VOTING POWER100.00%
DOWNVOTE POWER100.00%
RESOURCE CREDITS100.00%
REPUTATION PROGRESS0.00%
Net Worth
0.017USD
STEEM
0.000STEEM
SBD
0.021SBD
Effective Power
5.007SP
├── Own SP
0.125SP
└── Incoming DelegationsDeleg
+4.882SP
Detailed Balance
| STEEM | ||
| balance | 0.000STEEM | STEEM |
| market_balance | 0.000STEEM | STEEM |
| savings_balance | 0.000STEEM | STEEM |
| reward_steem_balance | 0.000STEEM | STEEM |
| STEEM POWER | ||
| Own SP | 0.125SP | SP |
| Delegated Out | 0.000SP | SP |
| Delegation In | 4.882SP | SP |
| Effective Power | 5.007SP | SP |
| Reward SP (pending) | 0.007SP | SP |
| SBD | ||
| sbd_balance | 0.000SBD | SBD |
| sbd_conversions | 0.000SBD | SBD |
| sbd_market_balance | 0.000SBD | SBD |
| savings_sbd_balance | 0.000SBD | SBD |
| reward_sbd_balance | 0.021SBD | SBD |
{
  "balance": "0.000 STEEM",
  "savings_balance": "0.000 STEEM",
  "reward_steem_balance": "0.000 STEEM",
  "vesting_shares": "203.557988 VESTS",
  "delegated_vesting_shares": "0.000000 VESTS",
  "received_vesting_shares": "7940.101818 VESTS",
  "sbd_balance": "0.000 SBD",
  "savings_sbd_balance": "0.000 SBD",
  "reward_sbd_balance": "0.021 SBD",
  "conversions": []
}
Account Info
| name | treyg |
| id | 973302 |
| rank | 239,024 |
| reputation | 194534243 |
| created | 2018-05-09T20:19:12 |
| recovery_account | steem |
| proxy | None |
| post_count | 4 |
| comment_count | 0 |
| lifetime_vote_count | 0 |
| witnesses_voted_for | 0 |
| last_post | 2018-07-11T15:20:57 |
| last_root_post | 2018-07-11T15:20:57 |
| last_vote_time | 2018-07-11T15:26:36 |
| proxied_vsf_votes | 0, 0, 0, 0 |
| can_vote | 1 |
| voting_power | 0 |
| delayed_votes | 0 |
| balance | 0.000 STEEM |
| savings_balance | 0.000 STEEM |
| sbd_balance | 0.000 SBD |
| savings_sbd_balance | 0.000 SBD |
| vesting_shares | 203.557988 VESTS |
| delegated_vesting_shares | 0.000000 VESTS |
| received_vesting_shares | 7940.101818 VESTS |
| reward_vesting_balance | 14.243974 VESTS |
| vesting_balance | 0.000 STEEM |
| vesting_withdraw_rate | 0.000000 VESTS |
| next_vesting_withdrawal | 1969-12-31T23:59:59 |
| withdrawn | 0 |
| to_withdraw | 0 |
| withdraw_routes | 0 |
| savings_withdraw_requests | 0 |
| last_account_recovery | 1970-01-01T00:00:00 |
| reset_account | null |
| last_owner_update | 1970-01-01T00:00:00 |
| last_account_update | 2018-05-09T20:34:21 |
| mined | No |
| sbd_seconds | 0 |
| sbd_last_interest_payment | 1970-01-01T00:00:00 |
| savings_sbd_last_interest_payment | 1970-01-01T00:00:00 |
{
  "active": {
    "account_auths": [],
    "key_auths": [
      [
        "STM6HxabYzLb6nk5z6wm6c41QG19UqScRpoeU3XhDppNQdPoDzrPX",
        1
      ]
    ],
    "weight_threshold": 1
  },
  "balance": "0.000 STEEM",
  "can_vote": true,
  "comment_count": 0,
  "created": "2018-05-09T20:19:12",
  "curation_rewards": 0,
  "delegated_vesting_shares": "0.000000 VESTS",
  "downvote_manabar": {
    "current_mana": 2035914951,
    "last_update_time": 1779089958
  },
  "guest_bloggers": [],
  "id": 973302,
  "json_metadata": "{\"profile\":{\"profile_image\":\"https://steemitimages.com/DQmQxtgBVHktoHHLUY2vP5BNF5Kz3Wmam1HwvCU683WfE2v/admin-ajax%20(1).jpeg\",\"website\":\"https://ezhangdoor.com\",\"name\":\"Trey\"}}",
  "last_account_recovery": "1970-01-01T00:00:00",
  "last_account_update": "2018-05-09T20:34:21",
  "last_owner_update": "1970-01-01T00:00:00",
  "last_post": "2018-07-11T15:20:57",
  "last_root_post": "2018-07-11T15:20:57",
  "last_vote_time": "2018-07-11T15:26:36",
  "lifetime_vote_count": 0,
  "market_history": [],
  "memo_key": "STM5RsLkt3Tvh6dehCUKcw8NBFdtNka9LS2Wp3X1PxHaqqRAF6mS3",
  "mined": false,
  "name": "treyg",
  "next_vesting_withdrawal": "1969-12-31T23:59:59",
  "other_history": [],
  "owner": {
    "account_auths": [],
    "key_auths": [
      [
        "STM5x2nUpNSCyKA3tuvp53bfoicmPUb8L77rVPrdeHCWG8idqZi4E",
        1
      ]
    ],
    "weight_threshold": 1
  },
  "pending_claimed_accounts": 0,
  "post_bandwidth": 0,
  "post_count": 4,
  "post_history": [],
  "posting": {
    "account_auths": [],
    "key_auths": [
      [
        "STM62Unh3cC8PUrzZyiBDbHMWzd5QRXT2XG5VzQnnuAXcd5af236P",
        1
      ]
    ],
    "weight_threshold": 1
  },
  "posting_json_metadata": "{\"profile\":{\"profile_image\":\"https://steemitimages.com/DQmQxtgBVHktoHHLUY2vP5BNF5Kz3Wmam1HwvCU683WfE2v/admin-ajax%20(1).jpeg\",\"website\":\"https://ezhangdoor.com\",\"name\":\"Trey\"}}",
  "posting_rewards": 14,
  "proxied_vsf_votes": [
    0,
    0,
    0,
    0
  ],
  "proxy": "",
  "received_vesting_shares": "7940.101818 VESTS",
  "recovery_account": "steem",
  "reputation": 194534243,
  "reset_account": "null",
  "reward_sbd_balance": "0.021 SBD",
  "reward_steem_balance": "0.000 STEEM",
  "reward_vesting_balance": "14.243974 VESTS",
  "reward_vesting_steem": "0.007 STEEM",
  "savings_balance": "0.000 STEEM",
  "savings_sbd_balance": "0.000 SBD",
  "savings_sbd_last_interest_payment": "1970-01-01T00:00:00",
  "savings_sbd_seconds": "0",
  "savings_sbd_seconds_last_update": "1970-01-01T00:00:00",
  "savings_withdraw_requests": 0,
  "sbd_balance": "0.000 SBD",
  "sbd_last_interest_payment": "1970-01-01T00:00:00",
  "sbd_seconds": "0",
  "sbd_seconds_last_update": "1970-01-01T00:00:00",
  "tags_usage": [],
  "to_withdraw": 0,
  "transfer_history": [],
  "vesting_balance": "0.000 STEEM",
  "vesting_shares": "203.557988 VESTS",
  "vesting_withdraw_rate": "0.000000 VESTS",
  "vote_history": [],
  "voting_manabar": {
    "current_mana": "8143659806",
    "last_update_time": 1779089958
  },
  "voting_power": 0,
  "withdraw_routes": 0,
  "withdrawn": 0,
  "witness_votes": [],
  "witnesses_voted_for": 0,
  "rank": 239024
}
Withdraw Routes
| Incoming | Outgoing |
|---|---|
Empty | Empty |
{
  "incoming": [],
  "outgoing": []
}From Date
To Date
2026/05/18 07:39:18
2026/05/18 07:39:18
| delegatee | treyg |
| delegator | steem |
| vesting shares | 7940.101818 VESTS |
| Transaction Info | Block #106152293/Trx c803f415f66e5c99643c9c3775fbd7678ef1aebe |
View Raw JSON Data
{
  "block": 106152293,
  "op": [
    "delegate_vesting_shares",
    {
      "delegatee": "treyg",
      "delegator": "steem",
      "vesting_shares": "7940.101818 VESTS"
    }
  ],
  "op_in_trx": 0,
  "timestamp": "2026-05-18T07:39:18",
  "trx_id": "c803f415f66e5c99643c9c3775fbd7678ef1aebe",
  "trx_in_block": 0,
  "virtual_op": 0
}2026/05/13 09:51:06
2026/05/13 09:51:06
| delegatee | treyg |
| delegator | steem |
| vesting shares | 5227.891413 VESTS |
| Transaction Info | Block #106011639/Trx 01b5fe1e0f0d6345b2997050451577534e947f68 |
View Raw JSON Data
{
  "block": 106011639,
  "op": [
    "delegate_vesting_shares",
    {
      "delegatee": "treyg",
      "delegator": "steem",
      "vesting_shares": "5227.891413 VESTS"
    }
  ],
  "op_in_trx": 0,
  "timestamp": "2026-05-13T09:51:06",
  "trx_id": "01b5fe1e0f0d6345b2997050451577534e947f68",
  "trx_in_block": 5,
  "virtual_op": 0
}2026/04/26 06:49:18
2026/04/26 06:49:18
| delegatee | treyg |
| delegator | steem |
| vesting shares | 7952.617574 VESTS |
| Transaction Info | Block #105519743/Trx 1a110b9842ddc1a1979610d4fd3b3ce3fb3fb10f |
View Raw JSON Data
{
  "block": 105519743,
  "op": [
    "delegate_vesting_shares",
    {
      "delegatee": "treyg",
      "delegator": "steem",
      "vesting_shares": "7952.617574 VESTS"
    }
  ],
  "op_in_trx": 0,
  "timestamp": "2026-04-26T06:49:18",
  "trx_id": "1a110b9842ddc1a1979610d4fd3b3ce3fb3fb10f",
  "trx_in_block": 1,
  "virtual_op": 0
}2026/01/24 03:40:57
2026/01/24 03:40:57
| delegatee | treyg |
| delegator | steem |
| vesting shares | 5269.438232 VESTS |
| Transaction Info | Block #102875620/Trx 1fdeddacac1ef67aa42dbe996e7edc8136b698e9 |
View Raw JSON Data
{
  "block": 102875620,
  "op": [
    "delegate_vesting_shares",
    {
      "delegatee": "treyg",
      "delegator": "steem",
      "vesting_shares": "5269.438232 VESTS"
    }
  ],
  "op_in_trx": 0,
  "timestamp": "2026-01-24T03:40:57",
  "trx_id": "1fdeddacac1ef67aa42dbe996e7edc8136b698e9",
  "trx_in_block": 1,
  "virtual_op": 0
}2024/12/17 22:49:39
2024/12/17 22:49:39
| delegatee | treyg |
| delegator | steem |
| vesting shares | 5433.657429 VESTS |
| Transaction Info | Block #91321813/Trx b30f3a2abaed816c857180313c80ca2bbccfa400 |
View Raw JSON Data
{
  "block": 91321813,
  "op": [
    "delegate_vesting_shares",
    {
      "delegatee": "treyg",
      "delegator": "steem",
      "vesting_shares": "5433.657429 VESTS"
    }
  ],
  "op_in_trx": 0,
  "timestamp": "2024-12-17T22:49:39",
  "trx_id": "b30f3a2abaed816c857180313c80ca2bbccfa400",
  "trx_in_block": 2,
  "virtual_op": 0
}2023/11/14 14:28:00
2023/11/14 14:28:00
| delegatee | treyg |
| delegator | steem |
| vesting shares | 5602.790961 VESTS |
| Transaction Info | Block #79875895/Trx a867b424836d27cf745ccb84122cd8fe535c4b7b |
View Raw JSON Data
{
  "block": 79875895,
  "op": [
    "delegate_vesting_shares",
    {
      "delegatee": "treyg",
      "delegator": "steem",
      "vesting_shares": "5602.790961 VESTS"
    }
  ],
  "op_in_trx": 0,
  "timestamp": "2023-11-14T14:28:00",
  "trx_id": "a867b424836d27cf745ccb84122cd8fe535c4b7b",
  "trx_in_block": 3,
  "virtual_op": 0
}2023/09/22 11:59:30
2023/09/22 11:59:30
| delegatee | treyg |
| delegator | steem |
| vesting shares | 8539.699747 VESTS |
| Transaction Info | Block #78364778/Trx 139071545892b9abb8dcfe5b330a319313d07fc4 |
View Raw JSON Data
{
  "block": 78364778,
  "op": [
    "delegate_vesting_shares",
    {
      "delegatee": "treyg",
      "delegator": "steem",
      "vesting_shares": "8539.699747 VESTS"
    }
  ],
  "op_in_trx": 0,
  "timestamp": "2023-09-22T11:59:30",
  "trx_id": "139071545892b9abb8dcfe5b330a319313d07fc4",
  "trx_in_block": 4,
  "virtual_op": 0
}2022/11/03 19:16:30
2022/11/03 19:16:30
| delegatee | treyg |
| delegator | steem |
| vesting shares | 8761.751185 VESTS |
| Transaction Info | Block #69122304/Trx 81e5722a1b55b8d6350125bc80e2c1c46ef46410 |
View Raw JSON Data
{
  "block": 69122304,
  "op": [
    "delegate_vesting_shares",
    {
      "delegatee": "treyg",
      "delegator": "steem",
      "vesting_shares": "8761.751185 VESTS"
    }
  ],
  "op_in_trx": 0,
  "timestamp": "2022-11-03T19:16:30",
  "trx_id": "81e5722a1b55b8d6350125bc80e2c1c46ef46410",
  "trx_in_block": 6,
  "virtual_op": 0
}2022/01/18 00:20:27
2022/01/18 00:20:27
| delegatee | treyg |
| delegator | steem |
| vesting shares | 8981.858786 VESTS |
| Transaction Info | Block #60825396/Trx 64e36443fcf5ed69ef95fb9523566185ae90348d |
View Raw JSON Data
{
  "block": 60825396,
  "op": [
    "delegate_vesting_shares",
    {
      "delegatee": "treyg",
      "delegator": "steem",
      "vesting_shares": "8981.858786 VESTS"
    }
  ],
  "op_in_trx": 0,
  "timestamp": "2022-01-18T00:20:27",
  "trx_id": "64e36443fcf5ed69ef95fb9523566185ae90348d",
  "trx_in_block": 24,
  "virtual_op": 0
}2021/06/14 07:27:57
2021/06/14 07:27:57
| delegatee | treyg |
| delegator | steem |
| vesting shares | 9166.053074 VESTS |
| Transaction Info | Block #54615647/Trx 454993a5d5227602f9c41f5da842411f49ebe692 |
View Raw JSON Data
{
  "block": 54615647,
  "op": [
    "delegate_vesting_shares",
    {
      "delegatee": "treyg",
      "delegator": "steem",
      "vesting_shares": "9166.053074 VESTS"
    }
  ],
  "op_in_trx": 0,
  "timestamp": "2021-06-14T07:27:57",
  "trx_id": "454993a5d5227602f9c41f5da842411f49ebe692",
  "trx_in_block": 4,
  "virtual_op": 0
}2020/12/11 17:39:03
2020/12/11 17:39:03
| delegatee | treyg |
| delegator | steem |
| vesting shares | 9353.475048 VESTS |
| Transaction Info | Block #49362868/Trx 054ee0de397e42b6e9c3abcc77394f42dc14840f |
View Raw JSON Data
{
  "block": 49362868,
  "op": [
    "delegate_vesting_shares",
    {
      "delegatee": "treyg",
      "delegator": "steem",
      "vesting_shares": "9353.475048 VESTS"
    }
  ],
  "op_in_trx": 0,
  "timestamp": "2020-12-11T17:39:03",
  "trx_id": "054ee0de397e42b6e9c3abcc77394f42dc14840f",
  "trx_in_block": 5,
  "virtual_op": 0
}2020/12/06 11:14:21
2020/12/06 11:14:21
| delegatee | treyg |
| delegator | steem |
| vesting shares | 1912.543513 VESTS |
| Transaction Info | Block #49214384/Trx 150a25372147b75eb44c8c438f20f49ff55e612a |
View Raw JSON Data
{
  "block": 49214384,
  "op": [
    "delegate_vesting_shares",
    {
      "delegatee": "treyg",
      "delegator": "steem",
      "vesting_shares": "1912.543513 VESTS"
    }
  ],
  "op_in_trx": 0,
  "timestamp": "2020-12-06T11:14:21",
  "trx_id": "150a25372147b75eb44c8c438f20f49ff55e612a",
  "trx_in_block": 8,
  "virtual_op": 0
}2020/12/05 21:16:54
2020/12/05 21:16:54
| delegatee | treyg |
| delegator | steem |
| vesting shares | 9359.682902 VESTS |
| Transaction Info | Block #49197951/Trx adf6ba8c4f0bbfde0f2e520e8e4c303f26a23649 |
View Raw JSON Data
{
  "block": 49197951,
  "op": [
    "delegate_vesting_shares",
    {
      "delegatee": "treyg",
      "delegator": "steem",
      "vesting_shares": "9359.682902 VESTS"
    }
  ],
  "op_in_trx": 0,
  "timestamp": "2020-12-05T21:16:54",
  "trx_id": "adf6ba8c4f0bbfde0f2e520e8e4c303f26a23649",
  "trx_in_block": 6,
  "virtual_op": 0
}2020/11/03 05:09:36
2020/11/03 05:09:36
| delegatee | treyg |
| delegator | steem |
| vesting shares | 1920.017158 VESTS |
| Transaction Info | Block #48273720/Trx 2a4057540c45a65084aa20e8fda0f0cde098bd9f |
View Raw JSON Data
{
  "block": 48273720,
  "op": [
    "delegate_vesting_shares",
    {
      "delegatee": "treyg",
      "delegator": "steem",
      "vesting_shares": "1920.017158 VESTS"
    }
  ],
  "op_in_trx": 0,
  "timestamp": "2020-11-03T05:09:36",
  "trx_id": "2a4057540c45a65084aa20e8fda0f0cde098bd9f",
  "trx_in_block": 3,
  "virtual_op": 0
}2020/05/09 12:18:36
2020/05/09 12:18:36
| delegatee | treyg |
| delegator | steem |
| vesting shares | 9562.488261 VESTS |
| Transaction Info | Block #43224732/Trx fe419bbb53006f44869e003644c6c98658fca96c |
View Raw JSON Data
{
  "block": 43224732,
  "op": [
    "delegate_vesting_shares",
    {
      "delegatee": "treyg",
      "delegator": "steem",
      "vesting_shares": "9562.488261 VESTS"
    }
  ],
  "op_in_trx": 0,
  "timestamp": "2020-05-09T12:18:36",
  "trx_id": "fe419bbb53006f44869e003644c6c98658fca96c",
  "trx_in_block": 6,
  "virtual_op": 0
}2020/05/08 16:53:39
2020/05/08 16:53:39
| delegatee | treyg |
| delegator | steem |
| vesting shares | 1953.311140 VESTS |
| Transaction Info | Block #43201985/Trx ba08f0afb6b00811a1d810f67098a0acd2685549 |
View Raw JSON Data
{
  "block": 43201985,
  "op": [
    "delegate_vesting_shares",
    {
      "delegatee": "treyg",
      "delegator": "steem",
      "vesting_shares": "1953.311140 VESTS"
    }
  ],
  "op_in_trx": 0,
  "timestamp": "2020-05-08T16:53:39",
  "trx_id": "ba08f0afb6b00811a1d810f67098a0acd2685549",
  "trx_in_block": 21,
  "virtual_op": 0
}2019/09/20 00:07:24
2019/09/20 00:07:24
| delegatee | treyg |
| delegator | steem |
| vesting shares | 9694.009307 VESTS |
| Transaction Info | Block #36571816/Trx 4b47a2190abeb709dcfae903f9dc3e350b5bec5b |
View Raw JSON Data
{
  "block": 36571816,
  "op": [
    "delegate_vesting_shares",
    {
      "delegatee": "treyg",
      "delegator": "steem",
      "vesting_shares": "9694.009307 VESTS"
    }
  ],
  "op_in_trx": 0,
  "timestamp": "2019-09-20T00:07:24",
  "trx_id": "4b47a2190abeb709dcfae903f9dc3e350b5bec5b",
  "trx_in_block": 28,
  "virtual_op": 0
}2019/05/09 22:25:48
2019/05/09 22:25:48
| author | steemitboard |
| body | Congratulations @treyg! You received a personal award! <table><tr><td>https://steemitimages.com/70x70/http://steemitboard.com/@treyg/birthday1.png</td><td>Happy Birthday! - You are on the Steem blockchain for 1 year!</td></tr></table> <sub>_You can view [your badges on your Steem Board](https://steemitboard.com/@treyg) and compare to others on the [Steem Ranking](http://steemitboard.com/ranking/index.php?name=treyg)_</sub> **Do not miss the last post from @steemitboard:** <table><tr><td><a href="https://steemit.com/steemitboard/@steemitboard/steemitboard-witness-update-2019-05"><img src="https://steemitimages.com/64x128/http://i.cubeupload.com/7CiQEO.png"></a></td><td><a href="https://steemit.com/steemitboard/@steemitboard/steemitboard-witness-update-2019-05">SteemitBoard - Witness Update</a></td></tr></table> ###### [Vote for @Steemitboard as a witness](https://v2.steemconnect.com/sign/account-witness-vote?witness=steemitboard&approve=1) to get one more award and increased upvotes! |
| json metadata | {"image":["https://steemitboard.com/img/notify.png"]} |
| parent author | treyg |
| parent permlink | how-to-frame-and-build-walls-rough-openings-and-headers |
| permlink | steemitboard-notify-treyg-20190509t222547000z |
| title | |
| Transaction Info | Block #32768145/Trx efa7a04cc9c98a3bbd34c73dc8c991a001f7c06a |
View Raw JSON Data
{
  "block": 32768145,
  "op": [
    "comment",
    {
      "author": "steemitboard",
      "body": "Congratulations @treyg! You received a personal award!\n\n<table><tr><td>https://steemitimages.com/70x70/http://steemitboard.com/@treyg/birthday1.png</td><td>Happy Birthday! - You are on the Steem blockchain for 1 year!</td></tr></table>\n\n<sub>_You can view [your badges on your Steem Board](https://steemitboard.com/@treyg) and compare to others on the [Steem Ranking](http://steemitboard.com/ranking/index.php?name=treyg)_</sub>\n\n\n**Do not miss the last post from @steemitboard:**\n<table><tr><td><a href=\"https://steemit.com/steemitboard/@steemitboard/steemitboard-witness-update-2019-05\"><img src=\"https://steemitimages.com/64x128/http://i.cubeupload.com/7CiQEO.png\"></a></td><td><a href=\"https://steemit.com/steemitboard/@steemitboard/steemitboard-witness-update-2019-05\">SteemitBoard - Witness Update</a></td></tr></table>\n\n###### [Vote for @Steemitboard as a witness](https://v2.steemconnect.com/sign/account-witness-vote?witness=steemitboard&approve=1) to get one more award and increased upvotes!",
      "json_metadata": "{\"image\":[\"https://steemitboard.com/img/notify.png\"]}",
      "parent_author": "treyg",
      "parent_permlink": "how-to-frame-and-build-walls-rough-openings-and-headers",
      "permlink": "steemitboard-notify-treyg-20190509t222547000z",
      "title": ""
    }
  ],
  "op_in_trx": 0,
  "timestamp": "2019-05-09T22:25:48",
  "trx_id": "efa7a04cc9c98a3bbd34c73dc8c991a001f7c06a",
  "trx_in_block": 8,
  "virtual_op": 0
}2018/10/10 17:30:45
2018/10/10 17:30:45
| delegatee | treyg |
| delegator | steem |
| vesting shares | 9892.001876 VESTS |
| Transaction Info | Block #26691313/Trx 654c704357badbe06dac2e267240290289b03f95 |
View Raw JSON Data
{
  "block": 26691313,
  "op": [
    "delegate_vesting_shares",
    {
      "delegatee": "treyg",
      "delegator": "steem",
      "vesting_shares": "9892.001876 VESTS"
    }
  ],
  "op_in_trx": 0,
  "timestamp": "2018-10-10T17:30:45",
  "trx_id": "654c704357badbe06dac2e267240290289b03f95",
  "trx_in_block": 17,
  "virtual_op": 0
}2018/09/12 20:12:18
2018/09/12 20:12:18
| delegatee | treyg |
| delegator | steem |
| vesting shares | 30127.737366 VESTS |
| Transaction Info | Block #25904386/Trx 51ea40c1fa3b9833016ffb231449682748be8efd |
View Raw JSON Data
{
  "block": 25904386,
  "op": [
    "delegate_vesting_shares",
    {
      "delegatee": "treyg",
      "delegator": "steem",
      "vesting_shares": "30127.737366 VESTS"
    }
  ],
  "op_in_trx": 0,
  "timestamp": "2018-09-12T20:12:18",
  "trx_id": "51ea40c1fa3b9833016ffb231449682748be8efd",
  "trx_in_block": 13,
  "virtual_op": 0
}treygupvoted (100.00%) @vladivostok / if-the-fruits-not-ripe-don-t-pick-it2018/07/11 15:26:36
treygupvoted (100.00%) @vladivostok / if-the-fruits-not-ripe-don-t-pick-it
2018/07/11 15:26:36
| author | vladivostok |
| permlink | if-the-fruits-not-ripe-don-t-pick-it |
| voter | treyg |
| weight | 10000 (100.00%) |
| Transaction Info | Block #24085596/Trx b238379e7eadb0bd160d804064560448130b50aa |
View Raw JSON Data
{
  "block": 24085596,
  "op": [
    "vote",
    {
      "author": "vladivostok",
      "permlink": "if-the-fruits-not-ripe-don-t-pick-it",
      "voter": "treyg",
      "weight": 10000
    }
  ],
  "op_in_trx": 0,
  "timestamp": "2018-07-11T15:26:36",
  "trx_id": "b238379e7eadb0bd160d804064560448130b50aa",
  "trx_in_block": 34,
  "virtual_op": 0
}treygupvoted (100.00%) @ionutciobanu / anewprojectinpersonallife-oul66t2klf2018/07/11 15:25:24
treygupvoted (100.00%) @ionutciobanu / anewprojectinpersonallife-oul66t2klf
2018/07/11 15:25:24
| author | ionutciobanu |
| permlink | anewprojectinpersonallife-oul66t2klf |
| voter | treyg |
| weight | 10000 (100.00%) |
| Transaction Info | Block #24085572/Trx 5297cbd37fff6ae9420f664203ec5ddb53e8dce5 |
View Raw JSON Data
{
  "block": 24085572,
  "op": [
    "vote",
    {
      "author": "ionutciobanu",
      "permlink": "anewprojectinpersonallife-oul66t2klf",
      "voter": "treyg",
      "weight": 10000
    }
  ],
  "op_in_trx": 0,
  "timestamp": "2018-07-11T15:25:24",
  "trx_id": "5297cbd37fff6ae9420f664203ec5ddb53e8dce5",
  "trx_in_block": 21,
  "virtual_op": 0
}treygfollowed @fahmidamti2018/07/11 15:25:12
treygfollowed @fahmidamti
2018/07/11 15:25:12
| id | follow |
| json | ["follow",{"follower":"treyg","following":"fahmidamti","what":["blog"]}] |
| required auths | [] |
| required posting auths | ["treyg"] |
| Transaction Info | Block #24085568/Trx 0819638d843538c71c4c4909c7040d48f9aa1d50 |
View Raw JSON Data
{
  "block": 24085568,
  "op": [
    "custom_json",
    {
      "id": "follow",
      "json": "[\"follow\",{\"follower\":\"treyg\",\"following\":\"fahmidamti\",\"what\":[\"blog\"]}]",
      "required_auths": [],
      "required_posting_auths": [
        "treyg"
      ]
    }
  ],
  "op_in_trx": 0,
  "timestamp": "2018-07-11T15:25:12",
  "trx_id": "0819638d843538c71c4c4909c7040d48f9aa1d50",
  "trx_in_block": 17,
  "virtual_op": 0
}treygfollowed @diy-projects2018/07/11 15:24:36
treygfollowed @diy-projects
2018/07/11 15:24:36
| id | follow |
| json | ["follow",{"follower":"treyg","following":"diy-projects","what":["blog"]}] |
| required auths | [] |
| required posting auths | ["treyg"] |
| Transaction Info | Block #24085556/Trx a640b3ffd9f747e43b8a07843dfb11f1af191ac8 |
View Raw JSON Data
{
  "block": 24085556,
  "op": [
    "custom_json",
    {
      "id": "follow",
      "json": "[\"follow\",{\"follower\":\"treyg\",\"following\":\"diy-projects\",\"what\":[\"blog\"]}]",
      "required_auths": [],
      "required_posting_auths": [
        "treyg"
      ]
    }
  ],
  "op_in_trx": 0,
  "timestamp": "2018-07-11T15:24:36",
  "trx_id": "a640b3ffd9f747e43b8a07843dfb11f1af191ac8",
  "trx_in_block": 20,
  "virtual_op": 0
}2018/07/11 15:21:30
2018/07/11 15:21:30
| author | cheetah |
| body | Hi! I am a robot. I just upvoted you! I found similar content that readers might be interested in: https://ezhangdoor.com/framing-and-building-walls-rough-openings-and-headers/ |
| json metadata | |
| parent author | treyg |
| parent permlink | how-to-frame-and-build-walls-rough-openings-and-headers |
| permlink | cheetah-re-treyghow-to-frame-and-build-walls-rough-openings-and-headers |
| title | |
| Transaction Info | Block #24085494/Trx ee9c740862268db9dd545e0562ccc69ec9d6236b |
View Raw JSON Data
{
  "block": 24085494,
  "op": [
    "comment",
    {
      "author": "cheetah",
      "body": "Hi! I am a robot. I just upvoted you! I found similar content that readers might be interested in:\nhttps://ezhangdoor.com/framing-and-building-walls-rough-openings-and-headers/",
      "json_metadata": "",
      "parent_author": "treyg",
      "parent_permlink": "how-to-frame-and-build-walls-rough-openings-and-headers",
      "permlink": "cheetah-re-treyghow-to-frame-and-build-walls-rough-openings-and-headers",
      "title": ""
    }
  ],
  "op_in_trx": 0,
  "timestamp": "2018-07-11T15:21:30",
  "trx_id": "ee9c740862268db9dd545e0562ccc69ec9d6236b",
  "trx_in_block": 1,
  "virtual_op": 0
}fastresteemupvoted (1.00%) @treyg / how-to-frame-and-build-walls-rough-openings-and-headers2018/07/11 15:21:09
fastresteemupvoted (1.00%) @treyg / how-to-frame-and-build-walls-rough-openings-and-headers
2018/07/11 15:21:09
| author | treyg |
| permlink | how-to-frame-and-build-walls-rough-openings-and-headers |
| voter | fastresteem |
| weight | 100 (1.00%) |
| Transaction Info | Block #24085487/Trx 3137cd5369fc4acbcf99b5cec82b74cd5ed52923 |
View Raw JSON Data
{
  "block": 24085487,
  "op": [
    "vote",
    {
      "author": "treyg",
      "permlink": "how-to-frame-and-build-walls-rough-openings-and-headers",
      "voter": "fastresteem",
      "weight": 100
    }
  ],
  "op_in_trx": 0,
  "timestamp": "2018-07-11T15:21:09",
  "trx_id": "3137cd5369fc4acbcf99b5cec82b74cd5ed52923",
  "trx_in_block": 13,
  "virtual_op": 0
}treygpublished a new post: how-to-frame-and-build-walls-rough-openings-and-headers2018/07/11 15:20:57
treygpublished a new post: how-to-frame-and-build-walls-rough-openings-and-headers
2018/07/11 15:20:57
| author | treyg |
| body | 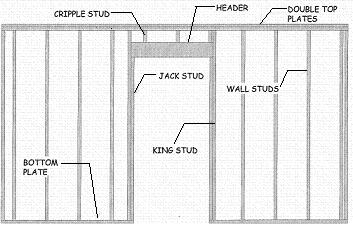 # **Properly Framing and Building Walls** The first thing to know when framing and building walls, is that you will need a bottom plate and two top plates to attach the wall studs to. The double top plate is needed to comply with building code. Code requires a double top plate for load-bearing walls. Layout the bottom plate and one of the top plates at 16″ on center. That means you will place wall studs every 16 inches. This is a typical spacing for most residential construction. Place your door openings where you want them and layout the correct rough opening size. When building new construction or remodeling, it is best to stack your wall studs directly over the floor joist. Guess what? Fortunately, most floor joist are also placed on 16″ centers. There are many reasons to do this, let’s start with the obvious: * The strength of the building is increased as every stud bears directly over the floor joist, which in turn is bearing directly on the foundation. * Mechanicals such as heating and plumbing are much easier to run from floor to floor Studs stack over each other in stairwells. * Future renovations or afterthought wiring will be less difficult. * Wall sheathing and drywall panels install with less cutting. You will need to pick a corner of the house to start all layouts from. Including floor and wall systems. The best spot to start from is where the two longest walls of the house or addition meet, or come together in a corner. Using this one reference point to complete all layouts from will produce the best result. While this will take a little extra time, and some thought to complete, the benefits will far outweigh the minimal time investment. 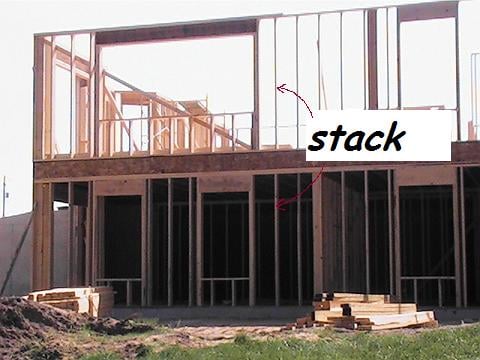 ## **Framing Your Door Rough Opening Correctly Will Make Installing Doors Go Smoothly** First, you must determine the size of your door. Measure the door if you already have it. If you don’t, take the actual door size you will be installing and add 2 inches to the width and two and one-half inches to the height. This will give you the correct rough openings. The reason for the extra space is to allow room for the door frame and for space to adjust the door. Once you have all this information, it’s just a matter of where you want your door. Decide the location by taking into consideration the traffic flow and the size of items you will furnishing the room with. In bedrooms, it’s best if you can swing the door against a wall. Frame the opening close to the corner if possible, just be sure to leave enough room for the size of trim you will be using. Always use two studs on each side of the opening. The first will be continuous from the top plate to the bottom plate. This is called a king stud. The next jack stud will be cut to the height of your door plus 2-1/2″ and minus the thickness of the bottom plate 1-1/2″ as it will rest on top of this. So your jack stud should be cut at 81″ for a 6-8″ tall door. Your header size is determined by the load it carries. If you are building a new bearing wall or cutting in a new doorway be sure to check your local building code span charts or consult an engineer to properly size the header. Once you know the depth of the header, it’s width is cut to fit from king stud to king stud, with the jack studs fitting under it to help disperse the loads. A typical header width with single jack studs is cut 3″ larger than the rough opening. An example: A 36″ door has a rough opening width of 38″ so your header is cut at 41″. Also, be aware double or triple jack studs may be required based on the opening width and the load the header carries. Be sure to check code requirements prior to framing. ## **Building Basement Walls** Building a new wall while finishing your basement is a relatively simple task that even a homeowner can tackle with a few pointers. The first step is to verify with your local building department to see if you will need a building permit. Most all codes require a means of egress from the basement when there is habitable space. If you are building a new home, most codes require means of egress from a basement, regardless of having any habitable space. This can be accomplished with an egress window, that has minimum size and height requirements. The key here is to ask your local jurisdiction first. Once you have the green light to start construction, start by determining the materials you will need to complete the wall framing. Layout the walls on the floor by measuring and snapping chalk lines where the bottom plate of the walls will rest. Be sure to check the chalk lines for square. It is easier to re-snap a chalk line then to move a wall. Measure all the areas where the walls will rest on the floor to determine the linear footage of plate your project requires. Don’t forget to add in the top plates of the wall. It will take the same amount of linear footage for the top as the bottom unless the walls are load bearing. * If the bottom plate rest on concrete, it must be treated or a certain species in order to be in contact with the concrete. * If your walls are non-load bearing a single top plate is all that is required. If they are load bearing a double top plate is required. When framing in 16″ centers, a good rule of thumb when figuring material, is one wall stud per foot of bottom plate. This will usually give you the extra studs needs for corners and door openings. If you want to get closer, here is a site with a wall construction calculator. Measure and cut the plates accordingly based on the chalk lines snapped. Layout all the wall studs on the top and bottom plates prior to nailing them in place. If you have enough room, build your wall laying down on the floor, this will allow you to face nail all the wall studs in place. Don’t forget, you will need space to stand the wall up also. If you don’t have room, nail the bottom and top plates in place first, then toenail the wall studs into place. Read more at: https://ezhangdoor.com/framing-and-building-walls-rough-openings-and-headers/ |
| json metadata | {"tags":["construction","diy","building","walls"],"image":["https://cdn.steemitimages.com/DQmbyCp1dyFHhkxdh7j4YZfjvdmhkL4qeF7Lghus4LncuUq/door_framing_pic.jpg","https://cdn.steemitimages.com/DQmSz7jhejh5RHfHRjS77xJgZz4kFV4DX3aV9su5AfU2eet/wall_framing_stacked.jpg"],"links":["https://ezhangdoor.com/framing-and-building-walls-rough-openings-and-headers/"],"app":"steemit/0.1","format":"markdown"} |
| parent author | |
| parent permlink | construction |
| permlink | how-to-frame-and-build-walls-rough-openings-and-headers |
| title | How to Frame and Build Walls, Rough Openings, and Headers |
| Transaction Info | Block #24085483/Trx 89931356d9862ffaf0311a041dc8de333fabf609 |
View Raw JSON Data
{
"block": 24085483,
"op": [
"comment",
{
"author": "treyg",
"body": "\n\n# **Properly Framing and Building Walls**\n\n\n\nThe first thing to know when framing and building walls, is that you will need a bottom plate and two top plates to attach the wall studs to. The double top plate is needed to comply with building code. Code requires a double top plate for load-bearing walls.\n\nLayout the bottom plate and one of the top plates at 16″ on center. That means you will place wall studs every 16 inches. This is a typical spacing for most residential construction. Place your door openings where you want them and layout the correct rough opening size. When building new construction or remodeling, it is best to stack your wall studs directly over the floor joist. \n\nGuess what? Fortunately, most floor joist are also placed on 16″ centers. There are many reasons to do this, let’s start with the obvious:\n\n* The strength of the building is increased as every stud bears directly over the floor joist, which in turn is bearing directly on the foundation.\n\n* Mechanicals such as heating and plumbing are much easier to run from floor to floor Studs stack over each other in stairwells.\n\n* Future renovations or afterthought wiring will be less difficult.\n\n* Wall sheathing and drywall panels install with less cutting.\n\nYou will need to pick a corner of the house to start all layouts from. Including floor and wall systems. The best spot to start from is where the two longest walls of the house or addition meet, or come together in a corner. \n\nUsing this one reference point to complete all layouts from will produce the best result. While this will take a little extra time, and some thought to complete, the benefits will far outweigh the minimal time investment.\n\n\n\n## **Framing Your Door Rough Opening Correctly Will Make Installing Doors Go Smoothly** \n\n\n\nFirst, you must determine the size of your door. Measure the door if you already have it. If you don’t, take the actual door size you will be installing and add 2 inches to the width and two and one-half inches to the height.\n\nThis will give you the correct rough openings. The reason for the extra space is to allow room for the door frame and for space to adjust the door. Once you have all this information, it’s just a matter of where you want your door.\n\nDecide the location by taking into consideration the traffic flow and the size of items you will furnishing the room with. In bedrooms, it’s best if you can swing the door against a wall. Frame the opening close to the corner if possible, just be sure to leave enough room for the size of trim you will be using. Always use two studs on each side of the opening. The first will be continuous from the top plate to the bottom plate. This is called a king stud. \n\nThe next jack stud will be cut to the height of your door plus 2-1/2″ and minus the thickness of the bottom plate 1-1/2″ as it will rest on top of this. So your jack stud should be cut at 81″ for a 6-8″ tall door. Your header size is determined by the load it carries. If you are building a new bearing wall or cutting in a new doorway be sure to check your local building code span charts or consult an engineer to properly size the header. \n\nOnce you know the depth of the header, it’s width is cut to fit from king stud to king stud, with the jack studs fitting under it to help disperse the loads. A typical header width with single jack studs is cut 3″ larger than the rough opening.\n\nAn example: A 36″ door has a rough opening width of 38″ so your header is cut at 41″. Also, be aware double or triple jack studs may be required based on the opening width and the load the header carries. Be sure to check code requirements prior to framing.\n\n## **Building Basement Walls**\n\nBuilding a new wall while finishing your basement is a relatively simple task that even a homeowner can tackle with a few pointers. The first step is to verify with your local building department to see if you will need a building permit. Most all codes require a means of egress from the basement when there is habitable space.\n\nIf you are building a new home, most codes require means of egress from a basement, regardless of having any habitable space. This can be accomplished with an egress window, that has minimum size and height requirements. The key here is to ask your local jurisdiction first.\n\nOnce you have the green light to start construction, start by determining the materials you will need to complete the wall framing. Layout the walls on the floor by measuring and snapping chalk lines where the bottom plate of the walls will rest. Be sure to check the chalk lines for square. It is easier to re-snap a chalk line then to move a wall.\n\nMeasure all the areas where the walls will rest on the floor to determine the linear footage of plate your project requires. Don’t forget to add in the top plates of the wall. It will take the same amount of linear footage for the top as the bottom unless the walls are load bearing.\n\n* If the bottom plate rest on concrete, it must be treated or a certain species in order to be in contact with the concrete.\n\n* If your walls are non-load bearing a single top plate is all that is required. If they are load bearing a double top plate is required.\n\nWhen framing in 16″ centers, a good rule of thumb when figuring material, is one wall stud per foot of bottom plate. This will usually give you the extra studs needs for corners and door openings. If you want to get closer, here is a site with a wall construction calculator.\n\nMeasure and cut the plates accordingly based on the chalk lines snapped. Layout all the wall studs on the top and bottom plates prior to nailing them in place. If you have enough room, build your wall laying down on the floor, this will allow you to face nail all the wall studs in place.\n\nDon’t forget, you will need space to stand the wall up also. If you don’t have room, nail the bottom and top plates in place first, then toenail the wall studs into place. \n\nRead more at: https://ezhangdoor.com/framing-and-building-walls-rough-openings-and-headers/",
"json_metadata": "{\"tags\":[\"construction\",\"diy\",\"building\",\"walls\"],\"image\":[\"https://cdn.steemitimages.com/DQmbyCp1dyFHhkxdh7j4YZfjvdmhkL4qeF7Lghus4LncuUq/door_framing_pic.jpg\",\"https://cdn.steemitimages.com/DQmSz7jhejh5RHfHRjS77xJgZz4kFV4DX3aV9su5AfU2eet/wall_framing_stacked.jpg\"],\"links\":[\"https://ezhangdoor.com/framing-and-building-walls-rough-openings-and-headers/\"],\"app\":\"steemit/0.1\",\"format\":\"markdown\"}",
"parent_author": "",
"parent_permlink": "construction",
"permlink": "how-to-frame-and-build-walls-rough-openings-and-headers",
"title": "How to Frame and Build Walls, Rough Openings, and Headers"
}
],
"op_in_trx": 0,
"timestamp": "2018-07-11T15:20:57",
"trx_id": "89931356d9862ffaf0311a041dc8de333fabf609",
"trx_in_block": 23,
"virtual_op": 0
}sensationupvoted (100.00%) @treyg / how-to-build-a-raised-garden-bed-4-simple-steps2018/05/28 16:57:33
sensationupvoted (100.00%) @treyg / how-to-build-a-raised-garden-bed-4-simple-steps
2018/05/28 16:57:33
| author | treyg |
| permlink | how-to-build-a-raised-garden-bed-4-simple-steps |
| voter | sensation |
| weight | 10000 (100.00%) |
| Transaction Info | Block #22831022/Trx 6157348911f94ff0862371273b4f1b57f600c4d4 |
View Raw JSON Data
{
  "block": 22831022,
  "op": [
    "vote",
    {
      "author": "treyg",
      "permlink": "how-to-build-a-raised-garden-bed-4-simple-steps",
      "voter": "sensation",
      "weight": 10000
    }
  ],
  "op_in_trx": 0,
  "timestamp": "2018-05-28T16:57:33",
  "trx_id": "6157348911f94ff0862371273b4f1b57f600c4d4",
  "trx_in_block": 29,
  "virtual_op": 0
}treygfollowed @upcoin.com2018/05/28 15:46:42
treygfollowed @upcoin.com
2018/05/28 15:46:42
| id | follow |
| json | ["follow",{"follower":"treyg","following":"upcoin.com","what":["blog"]}] |
| required auths | [] |
| required posting auths | ["treyg"] |
| Transaction Info | Block #22829605/Trx 088459402e2d6a2255accbcf79470994b1f39142 |
View Raw JSON Data
{
  "block": 22829605,
  "op": [
    "custom_json",
    {
      "id": "follow",
      "json": "[\"follow\",{\"follower\":\"treyg\",\"following\":\"upcoin.com\",\"what\":[\"blog\"]}]",
      "required_auths": [],
      "required_posting_auths": [
        "treyg"
      ]
    }
  ],
  "op_in_trx": 0,
  "timestamp": "2018-05-28T15:46:42",
  "trx_id": "088459402e2d6a2255accbcf79470994b1f39142",
  "trx_in_block": 27,
  "virtual_op": 0
}2018/05/28 15:46:24
2018/05/28 15:46:24
| id | follow |
| json | ["follow",{"follower":"treyg","following":"webgrrrl","what":["blog"]}] |
| required auths | [] |
| required posting auths | ["treyg"] |
| Transaction Info | Block #22829599/Trx 5cc5db37dbd37db1da52f16d23a601710f8f77cc |
View Raw JSON Data
{
  "block": 22829599,
  "op": [
    "custom_json",
    {
      "id": "follow",
      "json": "[\"follow\",{\"follower\":\"treyg\",\"following\":\"webgrrrl\",\"what\":[\"blog\"]}]",
      "required_auths": [],
      "required_posting_auths": [
        "treyg"
      ]
    }
  ],
  "op_in_trx": 0,
  "timestamp": "2018-05-28T15:46:24",
  "trx_id": "5cc5db37dbd37db1da52f16d23a601710f8f77cc",
  "trx_in_block": 39,
  "virtual_op": 0
}treygfollowed @socialmediaseo2018/05/28 15:46:12
treygfollowed @socialmediaseo
2018/05/28 15:46:12
| id | follow |
| json | ["follow",{"follower":"treyg","following":"socialmediaseo","what":["blog"]}] |
| required auths | [] |
| required posting auths | ["treyg"] |
| Transaction Info | Block #22829595/Trx 83e9b87d29c56fcacdc90dd6bcff949de8abe7d5 |
View Raw JSON Data
{
  "block": 22829595,
  "op": [
    "custom_json",
    {
      "id": "follow",
      "json": "[\"follow\",{\"follower\":\"treyg\",\"following\":\"socialmediaseo\",\"what\":[\"blog\"]}]",
      "required_auths": [],
      "required_posting_auths": [
        "treyg"
      ]
    }
  ],
  "op_in_trx": 0,
  "timestamp": "2018-05-28T15:46:12",
  "trx_id": "83e9b87d29c56fcacdc90dd6bcff949de8abe7d5",
  "trx_in_block": 18,
  "virtual_op": 0
}treygpublished a new post: how-to-build-a-raised-garden-bed-4-simple-steps2018/05/28 15:42:57
treygpublished a new post: how-to-build-a-raised-garden-bed-4-simple-steps
2018/05/28 15:42:57
| author | treyg |
| body |  Despite the initial cost and time, learning how to build a raised garden bed can save you time and labor in the long run. A raised garden bed allows you to plan for optimal sun exposure, and to use the most conducive soil type for whatever it is that you plan to grow. Raising the soil off from ground level also enables maximum sun exposure and minimal weed growth. It also means less bending and twisting for you while planting and tending to your garden. Raised garden beds can help optimize plant growth in a condensed area, or allow vegetable growth in places that would otherwise be too desolate or formidable. If you live in a rural area, raising your vegetable garden can also deter rabbits and other critters from munching on your food. Where we live there are tons of deer, so in this case it might be a good idea to build a garden cover with with some PVC pipe and screen or netting. Materials Needed to Build a Raised Garden Bed There are many ways to go about building a raised garden bed, but using wood seems to be the most common and the most aesthetically pleasing. Pre-made kits tend to degrade and warp over time, and can also be finished with harmful chemicals that could be damaging to your soil, and in turn, food. Other, less common options include cinder blocks, concrete, and rocks, but these all require more initial work and maintenance. In my opinion, they aren’t as visually appealing either. Building your garden out of rocks can add a nice rustic touch to your garden, but it will then also be much more prone to weed and insect infestations. Concrete and cinder blocks can cause your garden to overheat in the summer, and make it harder to move or take down if you want to change locations. Choosing Your Lumber It’s best to stay away from lumber that is treated or preserved with chemicals that can be toxic, especially if you plan to use your garden to grow edible food. The safety of using treated wood is inconclusive, but the general consensus is that toxins do leach out of the wood and into the soil, and are then taken up by the plants (OSU). For this guide, we’re going to be using cedar 2x12’s for our garden bed. Cedar is a naturally rot-resistant hardwood, and is also generally immune to insect infestations, making it the ideal lumber for a raised garden bed. Cedar made beds will last anywhere from 10-20 years in most cases. Other viable options are redwood or locust, and douglas fir. Redwood and locust will be high quality and last a long time, but are generally more expensive than the cheaper alternatives. Douglas fir tends to be the cheapest option, but will generally only last about 5-7 years. If you aren’t sure how long you’ll want to keep your raised garden bed, or how long you’ll be living in the same place, it might be a good idea to go with douglas fir. This could save you up to 50% of the cost. I chose 2x12’s because plants generally need about 6-12 inches of soil to adequately grow. A good size dimension for a raised garden be is 8ft x 4ft. This gives you plenty of length to grow a wide range of plants or vegetables, but also ensures that your bed isn’t so wide that you can’t reach the middle from either side. Other Materials Needed 3 – 2x12x8’ Lumber of your choice Circular Saw Galvanized Deck Screws Rake Level Drill Topsoil/Compost Optional: Corner Posts Garden Bed Liner If you’re building a smaller garden bed, it might be a good idea to add the optional corner posts, and stick them in the ground to prevent movement, but for our case, 8’x4’ will give our bed plenty of weight, rendering the posts unnecessary. Landscape fabric or garden liner is unnecessary if you’re living in an area where the ground soil is high quality and nutrient rich. If this is the case, you can use it to your advantage, and build your garden right on top of the ground soil, with no barrier. However, liners will help prevents weeds from growing up into your garden. There are many commercially available options for garden liners. Just search around to find the best price and size for your project. I’ve even seen people use old carpet or rugs to line their garden beds. Step 1: Location Start by selecting the location for the garden bed. The ideal location will have the most direct sunlight, and not be blocked by shade from the surround trees or buildings. You’ll want to choose a somewhat level spot, and make sure there’s plenty of room to walk around all sides of the garden. Step 2: Preparing the Ground Now you’ll want to prepare the ground where you’re going to set your garden bed. Start by marking the general area where you plan to have it sit. You can do this simply by drawing a line in the ground with your rake. Next you should pull any weeds from the area. Or you could try using some organic weed killer. Then you’ll wake to rake and loosen up the ground. If the soil is extremely dense or weed covered it might be a good idea to use a rototiller for the best results. If you have your garden liner pre-cut, you can now lay it down where the garden bed will. If not, it might be easier to cut after assembling the bed. Step 3: Constructing the Raised Garden Bed You’re now ready to begin building the actually garden bed. Start by cutting one of the 3 pieces of lumber in half. The resulting two pieces will make up the shorter ends of the garden bed. Next, screw the shorter end piece to the longer side piece using your galvanized deck screws and drill. You’ll want to put the shorter piece on the inside at the end of the 8 ft. 2x12, so as not to lose any square footage in your finished garden bed. Fasten two screws in through the outside of the 8 ft. side board, and into the 4 ft. end piece. Make sure the pieces are plumb and level when fastening. Screws should be fastened about 1 ½” from the top and bottom of the outside piece. Repeat these steps for the remaining three corners. Step 4: Adding the Soil After your garden bed is assembled and placed in the correct spot on the ground, it’s time to ensure your line is in place, and add the soil. The soil type and composition can vary depending on what you intend to grow, but is ultimately the most important step in building your garden. Using the wrong soil, or nutrient deficient soil is the biggest factor in whether your plants or vegetables will adequately grow or not. Generally a mix of topsoil, compost, and other organic materials such as peat moss will be best for a vegetable garden. It’s best to do some research after deciding what you’ll be growing in order to make the optimal combination for nutrient dense soil. Remember, raised garden beds may need extra watering in the beginning stages to ensure thorough saturation and plant growth. Read more at: https://ezhangdoor.com/how-to-build-a-raised-garden-bed/ |
| json metadata | {"tags":["gardening","raisedgarden","homeimprovement"],"image":["https://cdn.steemitimages.com/DQmTMkMJ5dHm3XzCq857fPmgDwmvMerPVquiha2DFZnuzqg/radish-3415773_640.jpg"],"links":["https://ezhangdoor.com/how-to-build-a-raised-garden-bed/"],"app":"steemit/0.1","format":"markdown"} |
| parent author | |
| parent permlink | gardening |
| permlink | how-to-build-a-raised-garden-bed-4-simple-steps |
| title | How to Build a Raised Garden Bed: 4 Simple Steps |
| Transaction Info | Block #22829530/Trx 9dbcc300b344ccd683ae23a2e73bb464c1917eb7 |
View Raw JSON Data
{
"block": 22829530,
"op": [
"comment",
{
"author": "treyg",
"body": "\n\nDespite the initial cost and time, learning how to build a raised garden bed can save you time and labor in the long run. A raised garden bed allows you to plan for optimal sun exposure, and to use the most conducive soil type for whatever it is that you plan to grow.\n\nRaising the soil off from ground level also enables maximum sun exposure and minimal weed growth. It also means less bending and twisting for you while planting and tending to your garden. Raised garden beds can help optimize plant growth in a condensed area, or allow vegetable growth in places that would otherwise be too desolate or formidable.\n\nIf you live in a rural area, raising your vegetable garden can also deter rabbits and other critters from munching on your food. Where we live there are tons of deer, so in this case it might be a good idea to build a garden cover with with some PVC pipe and screen or netting.\n\nMaterials Needed to Build a Raised Garden Bed\nThere are many ways to go about building a raised garden bed, but using wood seems to be the most common and the most aesthetically pleasing. Pre-made kits tend to degrade and warp over time, and can also be finished with harmful chemicals that could be damaging to your soil, and in turn, food.\n\nOther, less common options include cinder blocks, concrete, and rocks, but these all require more initial work and maintenance. In my opinion, they aren’t as visually appealing either.\n\nBuilding your garden out of rocks can add a nice rustic touch to your garden, but it will then also be much more prone to weed and insect infestations.\n\nConcrete and cinder blocks can cause your garden to overheat in the summer, and make it harder to move or take down if you want to change locations.\n\nChoosing Your Lumber\nIt’s best to stay away from lumber that is treated or preserved with chemicals that can be toxic, especially if you plan to use your garden to grow edible food. The safety of using treated wood is inconclusive, but the general consensus is that toxins do leach out of the wood and into the soil, and are then taken up by the plants (OSU).\n\nFor this guide, we’re going to be using cedar 2x12’s for our garden bed. Cedar is a naturally rot-resistant hardwood, and is also generally immune to insect infestations, making it the ideal lumber for a raised garden bed. Cedar made beds will last anywhere from 10-20 years in most cases.\n\nOther viable options are redwood or locust, and douglas fir. Redwood and locust will be high quality and last a long time, but are generally more expensive than the cheaper alternatives. Douglas fir tends to be the cheapest option, but will generally only last about 5-7 years.\n\nIf you aren’t sure how long you’ll want to keep your raised garden bed, or how long you’ll be living in the same place, it might be a good idea to go with douglas fir. This could save you up to 50% of the cost.\n\nI chose 2x12’s because plants generally need about 6-12 inches of soil to adequately grow.\n\nA good size dimension for a raised garden be is 8ft x 4ft. This gives you plenty of length to grow a wide range of plants or vegetables, but also ensures that your bed isn’t so wide that you can’t reach the middle from either side.\n\nOther Materials Needed\n3 – 2x12x8’ Lumber of your choice\nCircular Saw\nGalvanized Deck Screws\nRake\nLevel\nDrill\nTopsoil/Compost\nOptional:\n\nCorner Posts\nGarden Bed Liner\nIf you’re building a smaller garden bed, it might be a good idea to add the optional corner posts, and stick them in the ground to prevent movement, but for our case, 8’x4’ will give our bed plenty of weight, rendering the posts unnecessary.\n\nLandscape fabric or garden liner is unnecessary if you’re living in an area where the ground soil is high quality and nutrient rich. If this is the case, you can use it to your advantage, and build your garden right on top of the ground soil, with no barrier. However, liners will help prevents weeds from growing up into your garden.\n\nThere are many commercially available options for garden liners. Just search around to find the best price and size for your project. I’ve even seen people use old carpet or rugs to line their garden beds.\n\nStep 1: Location\nStart by selecting the location for the garden bed. The ideal location will have the most direct sunlight, and not be blocked by shade from the surround trees or buildings. You’ll want to choose a somewhat level spot, and make sure there’s plenty of room to walk around all sides of the garden.\n\nStep 2: Preparing the Ground\nNow you’ll want to prepare the ground where you’re going to set your garden bed. Start by marking the general area where you plan to have it sit. You can do this simply by drawing a line in the ground with your rake.\n\nNext you should pull any weeds from the area. Or you could try using some organic weed killer.\n\nThen you’ll wake to rake and loosen up the ground. If the soil is extremely dense or weed covered it might be a good idea to use a rototiller for the best results.\n\nIf you have your garden liner pre-cut, you can now lay it down where the garden bed will. If not, it might be easier to cut after assembling the bed.\n\nStep 3: Constructing the Raised Garden Bed\nYou’re now ready to begin building the actually garden bed.\nStart by cutting one of the 3 pieces of lumber in half. The resulting two pieces will make up the shorter ends of the garden bed.\n\nNext, screw the shorter end piece to the longer side piece using your galvanized deck screws and drill.\n\nYou’ll want to put the shorter piece on the inside at the end of the 8 ft. 2x12, so as not to lose any square footage in your finished garden bed.\n\nFasten two screws in through the outside of the 8 ft. side board, and into the 4 ft. end piece. Make sure the pieces are plumb and level when fastening.\nScrews should be fastened about 1 ½” from the top and bottom of the outside piece.\nRepeat these steps for the remaining three corners.\n\nStep 4: Adding the Soil\nAfter your garden bed is assembled and placed in the correct spot on the ground, it’s time to ensure your line is in place, and add the soil.\n\nThe soil type and composition can vary depending on what you intend to grow, but is ultimately the most important step in building your garden. Using the wrong soil, or nutrient deficient soil is the biggest factor in whether your plants or vegetables will adequately grow or not.\n\nGenerally a mix of topsoil, compost, and other organic materials such as peat moss will be best for a vegetable garden. It’s best to do some research after deciding what you’ll be growing in order to make the optimal combination for nutrient dense soil.\n\nRemember, raised garden beds may need extra watering in the beginning stages to ensure thorough saturation and plant growth.\n\n\nRead more at: https://ezhangdoor.com/how-to-build-a-raised-garden-bed/",
"json_metadata": "{\"tags\":[\"gardening\",\"raisedgarden\",\"homeimprovement\"],\"image\":[\"https://cdn.steemitimages.com/DQmTMkMJ5dHm3XzCq857fPmgDwmvMerPVquiha2DFZnuzqg/radish-3415773_640.jpg\"],\"links\":[\"https://ezhangdoor.com/how-to-build-a-raised-garden-bed/\"],\"app\":\"steemit/0.1\",\"format\":\"markdown\"}",
"parent_author": "",
"parent_permlink": "gardening",
"permlink": "how-to-build-a-raised-garden-bed-4-simple-steps",
"title": "How to Build a Raised Garden Bed: 4 Simple Steps"
}
],
"op_in_trx": 0,
"timestamp": "2018-05-28T15:42:57",
"trx_id": "9dbcc300b344ccd683ae23a2e73bb464c1917eb7",
"trx_in_block": 48,
"virtual_op": 0
}treygreceived 0.021 SBD, 0.009 SP author reward for @treyg / the-ultimate-guide-to-common-door-installation-problems2018/05/16 20:25:30
treygreceived 0.021 SBD, 0.009 SP author reward for @treyg / the-ultimate-guide-to-common-door-installation-problems
2018/05/16 20:25:30
| author | treyg |
| permlink | the-ultimate-guide-to-common-door-installation-problems |
| sbd payout | 0.021 SBD |
| steem payout | 0.000 STEEM |
| vesting payout | 14.243974 VESTS |
| Transaction Info | Block #22490010/Virtual Operation #6 |
View Raw JSON Data
{
  "block": 22490010,
  "op": [
    "author_reward",
    {
      "author": "treyg",
      "permlink": "the-ultimate-guide-to-common-door-installation-problems",
      "sbd_payout": "0.021 SBD",
      "steem_payout": "0.000 STEEM",
      "vesting_payout": "14.243974 VESTS"
    }
  ],
  "op_in_trx": 0,
  "timestamp": "2018-05-16T20:25:30",
  "trx_id": "0000000000000000000000000000000000000000",
  "trx_in_block": 4294967295,
  "virtual_op": 6
}2018/05/10 05:55:24
2018/05/10 05:55:24
| author | steemitboard |
| body | Congratulations @treyg! You have completed some achievement on Steemit and have been rewarded with new badge(s) : [](http://steemitboard.com/@treyg) You published your First Post [](http://steemitboard.com/@treyg) You got a First Vote [](http://steemitboard.com/@treyg) You made your First Vote Click on any badge to view your own Board of Honor on SteemitBoard. For more information about SteemitBoard, click [here](https://steemit.com/@steemitboard) If you no longer want to receive notifications, reply to this comment with the word `STOP` > Upvote this notification to help all Steemit users. Learn why [here](https://steemit.com/steemitboard/@steemitboard/http-i-cubeupload-com-7ciqeo-png)! |
| json metadata | {"image":["https://steemitboard.com/img/notifications.png"]} |
| parent author | treyg |
| parent permlink | choosing-a-contractor-and-5-reasons-not-to-hire-one |
| permlink | steemitboard-notify-treyg-20180510t055524000z |
| title | |
| Transaction Info | Block #22299833/Trx aa1eab5b6cfc9f308173aee3d7aca9f18474ecd9 |
View Raw JSON Data
{
"block": 22299833,
"op": [
"comment",
{
"author": "steemitboard",
"body": "Congratulations @treyg! You have completed some achievement on Steemit and have been rewarded with new badge(s) :\n\n[](http://steemitboard.com/@treyg) You published your First Post\n[](http://steemitboard.com/@treyg) You got a First Vote\n[](http://steemitboard.com/@treyg) You made your First Vote\n\nClick on any badge to view your own Board of Honor on SteemitBoard.\nFor more information about SteemitBoard, click [here](https://steemit.com/@steemitboard)\n\nIf you no longer want to receive notifications, reply to this comment with the word `STOP`\n\n> Upvote this notification to help all Steemit users. Learn why [here](https://steemit.com/steemitboard/@steemitboard/http-i-cubeupload-com-7ciqeo-png)!",
"json_metadata": "{\"image\":[\"https://steemitboard.com/img/notifications.png\"]}",
"parent_author": "treyg",
"parent_permlink": "choosing-a-contractor-and-5-reasons-not-to-hire-one",
"permlink": "steemitboard-notify-treyg-20180510t055524000z",
"title": ""
}
],
"op_in_trx": 0,
"timestamp": "2018-05-10T05:55:24",
"trx_id": "aa1eab5b6cfc9f308173aee3d7aca9f18474ecd9",
"trx_in_block": 14,
"virtual_op": 0
}priscilliaupvoted (100.00%) @treyg / choosing-a-contractor-and-5-reasons-not-to-hire-one2018/05/10 00:29:57
priscilliaupvoted (100.00%) @treyg / choosing-a-contractor-and-5-reasons-not-to-hire-one
2018/05/10 00:29:57
| author | treyg |
| permlink | choosing-a-contractor-and-5-reasons-not-to-hire-one |
| voter | priscillia |
| weight | 10000 (100.00%) |
| Transaction Info | Block #22293325/Trx 697e800664e4baf17d88180e7cdea6a225a4bd9c |
View Raw JSON Data
{
  "block": 22293325,
  "op": [
    "vote",
    {
      "author": "treyg",
      "permlink": "choosing-a-contractor-and-5-reasons-not-to-hire-one",
      "voter": "priscillia",
      "weight": 10000
    }
  ],
  "op_in_trx": 0,
  "timestamp": "2018-05-10T00:29:57",
  "trx_id": "697e800664e4baf17d88180e7cdea6a225a4bd9c",
  "trx_in_block": 37,
  "virtual_op": 0
}2018/05/10 00:29:36
2018/05/10 00:29:36
| author | cheetah |
| body | Hi! I am a robot. I just upvoted you! I found similar content that readers might be interested in: https://www.nahb.org/en/consumers/homeownership/homeownership-articles/checklist-for-finding-and-hiring-a-builder-or-remodeler.aspx |
| json metadata | |
| parent author | treyg |
| parent permlink | choosing-a-contractor-and-5-reasons-not-to-hire-one |
| permlink | cheetah-re-treygchoosing-a-contractor-and-5-reasons-not-to-hire-one |
| title | |
| Transaction Info | Block #22293318/Trx e5bab95415d865713f502540c2ef267ed80d5be1 |
View Raw JSON Data
{
  "block": 22293318,
  "op": [
    "comment",
    {
      "author": "cheetah",
      "body": "Hi! I am a robot. I just upvoted you! I found similar content that readers might be interested in:\nhttps://www.nahb.org/en/consumers/homeownership/homeownership-articles/checklist-for-finding-and-hiring-a-builder-or-remodeler.aspx",
      "json_metadata": "",
      "parent_author": "treyg",
      "parent_permlink": "choosing-a-contractor-and-5-reasons-not-to-hire-one",
      "permlink": "cheetah-re-treygchoosing-a-contractor-and-5-reasons-not-to-hire-one",
      "title": ""
    }
  ],
  "op_in_trx": 0,
  "timestamp": "2018-05-10T00:29:36",
  "trx_id": "e5bab95415d865713f502540c2ef267ed80d5be1",
  "trx_in_block": 39,
  "virtual_op": 0
}cheetahupvoted (0.08%) @treyg / choosing-a-contractor-and-5-reasons-not-to-hire-one2018/05/10 00:29:27
cheetahupvoted (0.08%) @treyg / choosing-a-contractor-and-5-reasons-not-to-hire-one
2018/05/10 00:29:27
| author | treyg |
| permlink | choosing-a-contractor-and-5-reasons-not-to-hire-one |
| voter | cheetah |
| weight | 8 (0.08%) |
| Transaction Info | Block #22293315/Trx 0ccb73c295a620c785a8cfc1404817aacbfaebe5 |
View Raw JSON Data
{
  "block": 22293315,
  "op": [
    "vote",
    {
      "author": "treyg",
      "permlink": "choosing-a-contractor-and-5-reasons-not-to-hire-one",
      "voter": "cheetah",
      "weight": 8
    }
  ],
  "op_in_trx": 0,
  "timestamp": "2018-05-10T00:29:27",
  "trx_id": "0ccb73c295a620c785a8cfc1404817aacbfaebe5",
  "trx_in_block": 0,
  "virtual_op": 0
}treygpublished a new post: choosing-a-contractor-and-5-reasons-not-to-hire-one2018/05/10 00:29:03
treygpublished a new post: choosing-a-contractor-and-5-reasons-not-to-hire-one
2018/05/10 00:29:03
| author | treyg |
| body | Homeowners select contractors, and to some extent contractors are interviewing homeowners at the same time to see if they would like to work for them. Finding a good fit and choosing a contractor that is qualified and reliable is essential for a smooth project. In the screening or interview process, sometimes what a contractor doesn’t say is just as important as what they do. We’ve included five clear warning signs NOT to hire a contractor. **Tips For Choosing a Contractor** First, check out this list from NAHB. It can be used to help you select a home builder or remodeler for your upcoming project: *Contact your local home builders’ association for the names of member builders and remodelers: NAHB/find. You can also ask family, friends or coworkers for recommendations. *Make sure the builder or home remodeler has a permanent business location and a good reputation with local banks and suppliers. *Find out how long they have been in the building business. It usually takes three to five years to establish a financially sound business. You want to make sure they will be around after the construction is complete to service any warranties. *Check out the company’s rating and if there have been any complaints filed with your local Better Business Bureau: bbb.org *Make sure the builder/remodeler has sufficient workers compensation and general liability insurance. If not, you may be liable for any construction-related accidents on your premises. *Ask the builder/remodeler to provide you with names of previous customers. If they won’t, beware. If they do, ask the customers if they would hire the builder/remodeler again. *Ask if you can see the builder/remodelers work, both completed and in progress. Check for quality of workmanship and materials. *Do you feel you can easily communicate with the builder/remodeler? Remember, you will be in close contact with them throughout the construction process and afterward as you live in your new home. *Make sure the builder/remodeler provides you with a complete and clearly written contract. The contract will benefit both of you. If you are having a new home built, get and review a copy of the home warranty and homeowner manual as well. *Be cautious of unusually low-priced bids. If the builder/remodeler is unable to pay for the materials and labor as the project proceeds, this may indicate a potential problem. Keep in mind that less expensive does not necessarily mean better!  **5 Reasons Not to Hire a Contractor** So you have saved money, scrimped on the family vacations for years, or just eliminated them all together to save up for that dream house or addition. Even if you are just hiring someone to put on a new roof or fix some of those nagging problems around the house, here are few things you shouldn’t hear when hiring a contractor. “I need all or 1/2 of the money upfront” If a builder needs all the money upfront, chances are they are not someone you should be dealing with. Depending on the size of the job, 1/3 down is an amount that gives the contractor some assurance you are invested in the project and gives him some money to pay for materials. “I only use good subs” Make sure you know who will be working on your house. If the contractor himself doesn’t physically do the work, ask around about his employees or sub contractor. A bad sub can turn the project into a nightmare even when everything else goes smoothly. Make sure you check references not only on the contractor but sub contractors also. “I’ll throw that in if I get the job” Contractors rarely throw something in. Make sure any additions to your contract state the work to done. Memories become forgetful as time passes. If it’s not in writing they don’t have to complete it. Just exercise diligence when asking for add on’s. Changes are most cost effective for you when you do them before the project starts or better yet before you hire someone. Always have change orders done in writing prior to the work being completed. “I’m licensed and I build to code” Just because an individual has a license doesn’t mean you will get quality workmanship. Good quality comes from experience and commitment to learning the trade; not purchasing or securing a license. Don’t forget code is the minimum standard that all builders must abide by. Would you want a doctor performing an operation on you that knows the minimum way to complete the procedure? I wouldn’t, neither should you hire a contractor that is only willing to do the minimum. Don’t get me wrong, I have seen over-kill that is just wasting a homeowners money. Again, this is why you need to check out the previous work of your potential contractor. “You don’t need a special person or license for that, we can do it cheaper” Beware of a builder wanting to remove things like asbestos or lead from your home unless he is qualified. EPA requires special training and certification for removal of materials considered harmful. If you are renovating, be sure your builder is RRP certified. You could be held liable yourself if you let someone work on your property and they don’t comply with requirements. In summary, make sure you always check references, check for a valid license, and make sure the contractor is insured. Selecting the right contractor to work on your home or project is perhaps the most important step in the process. One important thing to ask yourself is if you really need to hire someone to complete your project. For smaller home improvement tasks, you may be able to save time and money by learning the process yourself. However, if you’re unsure, or changing anything structural, it’s best to consult with a professional. Full Post: https://ezhangdoor.com/choosing-a-contractor-and-5-reasons-not-to-hire-one/ |
| json metadata | {"tags":["choosingacontractor","homeimprovement","construction"],"image":["https://steemitimages.com/DQmSP26EMTQJQ44STevNHQXjSkGuGPBSovrQ3kmyT3orDPd/hiriingcontractor.jpg"],"links":["https://ezhangdoor.com/choosing-a-contractor-and-5-reasons-not-to-hire-one/"],"app":"steemit/0.1","format":"markdown"} |
| parent author | |
| parent permlink | choosingacontractor |
| permlink | choosing-a-contractor-and-5-reasons-not-to-hire-one |
| title | Choosing a Contractor, and 5 Reasons NOT to Hire One |
| Transaction Info | Block #22293307/Trx 61b0502bc383d7eddb7d1ad05c6e1285b093bac9 |
View Raw JSON Data
{
"block": 22293307,
"op": [
"comment",
{
"author": "treyg",
"body": "Homeowners select contractors, and to some extent contractors are interviewing homeowners at the same time to see if they would like to work for them. Finding a good fit and choosing a contractor that is qualified and reliable is essential for a smooth project. In the screening or interview process, sometimes what a contractor doesn’t say is just as important as what they do. We’ve included five clear warning signs NOT to hire a contractor.\n\n**Tips For Choosing a Contractor**\nFirst, check out this list from NAHB. It can be used to help you select a home builder or remodeler for your upcoming project:\n\n \n\n*Contact your local home builders’ association for the names of member builders and remodelers: NAHB/find. You can also ask family, friends or coworkers for recommendations.\n \n\n*Make sure the builder or home remodeler has a permanent business location and a good reputation with local banks and suppliers.\n \n\n*Find out how long they have been in the building business. It usually takes three to five years to establish a financially sound business. You want to make sure they will be around after the construction is complete to service any warranties.\n \n\n*Check out the company’s rating and if there have been any complaints filed with your local Better Business Bureau: bbb.org\n \n\n*Make sure the builder/remodeler has sufficient workers compensation and general liability insurance. If not, you may be liable for any construction-related accidents on your premises.\n \n\n*Ask the builder/remodeler to provide you with names of previous customers. If they won’t, beware. If they do, ask the customers if they would hire the builder/remodeler again.\n \n\n*Ask if you can see the builder/remodelers work, both completed and in progress. Check for quality of workmanship and materials.\n \n\n*Do you feel you can easily communicate with the builder/remodeler? Remember, you will be in close contact with them throughout the construction process and afterward as you live in your new home.\n \n\n*Make sure the builder/remodeler provides you with a complete and clearly written contract. The contract will benefit both of you. If you are having a new home built, get and review a copy of the home warranty and homeowner manual as well.\n \n\n*Be cautious of unusually low-priced bids. If the builder/remodeler is unable to pay for the materials and labor as the project proceeds, this may indicate a potential problem. Keep in mind that less expensive does not necessarily mean better!\n\n\n\n**5 Reasons Not to Hire a Contractor**\nSo you have saved money, scrimped on the family vacations for years, or just eliminated them all together to save up for that dream house or addition. Even if you are just hiring someone to put on a new roof or fix some of those nagging problems around the house, here are few things you shouldn’t hear when hiring a contractor.\n\n\n“I need all or 1/2 of the money upfront”\n\nIf a builder needs all the money upfront, chances are they are not someone you should be dealing with. Depending on the size of the job, 1/3 down is an amount that gives the contractor some assurance you are invested in the project and gives him some money to pay for materials.\n\n\n“I only use good subs”\n\nMake sure you know who will be working on your house. If the contractor himself doesn’t physically do the work, ask around about his employees or sub contractor. A bad sub can turn the project into a nightmare even when everything else goes smoothly. Make sure you check references not only on the contractor but sub contractors also.\n\n\n“I’ll throw that in if I get the job”\n\nContractors rarely throw something in. Make sure any additions to your contract state the work to done. Memories become forgetful as time passes. If it’s not in writing they don’t have to complete it. Just exercise diligence when asking for add on’s. Changes are most cost effective for you when you do them before the project starts or better yet before you hire someone. Always have change orders done in writing prior to the work being completed.\n\n\n“I’m licensed and I build to code”\n\nJust because an individual has a license doesn’t mean you will get quality workmanship. Good quality comes from experience and commitment to learning the trade; not purchasing or securing a license. Don’t forget code is the minimum standard that all builders must abide by. Would you want a doctor performing an operation on you that knows the minimum way to complete the procedure? I wouldn’t, neither should you hire a contractor that is only willing to do the minimum. Don’t get me wrong, I have seen over-kill that is just wasting a homeowners money. Again, this is why you need to check out the previous work of your potential contractor.\n\n\n“You don’t need a special person or license for that, we can do it cheaper”\n\nBeware of a builder wanting to remove things like asbestos or lead from your home unless he is qualified. EPA requires special training and certification for removal of materials considered harmful. If you are renovating, be sure your builder is RRP certified. You could be held liable yourself if you let someone work on your property and they don’t comply with requirements.\n\n \n\nIn summary, make sure you always check references, check for a valid license, and make sure the contractor is insured. Selecting the right contractor to work on your home or project is perhaps the most important step in the process. One important thing to ask yourself is if you really need to hire someone to complete your project. For smaller home improvement tasks, you may be able to save time and money by learning the process yourself. However, if you’re unsure, or changing anything structural, it’s best to consult with a professional. \n\n\nFull Post: https://ezhangdoor.com/choosing-a-contractor-and-5-reasons-not-to-hire-one/",
"json_metadata": "{\"tags\":[\"choosingacontractor\",\"homeimprovement\",\"construction\"],\"image\":[\"https://steemitimages.com/DQmSP26EMTQJQ44STevNHQXjSkGuGPBSovrQ3kmyT3orDPd/hiriingcontractor.jpg\"],\"links\":[\"https://ezhangdoor.com/choosing-a-contractor-and-5-reasons-not-to-hire-one/\"],\"app\":\"steemit/0.1\",\"format\":\"markdown\"}",
"parent_author": "",
"parent_permlink": "choosingacontractor",
"permlink": "choosing-a-contractor-and-5-reasons-not-to-hire-one",
"title": "Choosing a Contractor, and 5 Reasons NOT to Hire One"
}
],
"op_in_trx": 0,
"timestamp": "2018-05-10T00:29:03",
"trx_id": "61b0502bc383d7eddb7d1ad05c6e1285b093bac9",
"trx_in_block": 21,
"virtual_op": 0
}treygpublished a new post: the-ultimate-guide-to-common-door-installation-problems2018/05/10 00:12:57
treygpublished a new post: the-ultimate-guide-to-common-door-installation-problems
2018/05/10 00:12:57
| author | treyg |
| body | Encountering door installation problems can leave you feeling helpless if you don’t know where the solution begins. Luckily, most door installation problems are quite a common occurrence, and can be fixed fairly quickly if you know what to do. We’ve compiled a list of those common problems and their resolutions. By following this guide, any installation issues you run into can be resolved easily and painlessly. Many unforeseen problems can occur when installing doors. Many of them are caused by improper framing, misaligned bottom plates, un-level floors or a wall that is simply not plumb. Obviously, tearing down walls with these problems and re-building is not a cost effective or easy method to corrections. So, how do you make your door installation look great, work properly without going through the costly and labor intensive procedures to fix them? Most door installation problems can be solved if you know a few simple tricks. Door problems can vary widely, including: Misaligned Bottom Wall Plates Door Uneven at the Top Trim Doesn't Fit Tight Checking for a Warped Door Rough Opening too Big Fixing a Loose or Stripped Screwhole Door Closes on It's Own Fixing a Squeaky Hinge Fixing a Rubbing Door Door Opens on It's Own Spacing Exterior Door off the Floor This guide will give you simple instrcutions on how to fix each of these problems, quickly and efficiently. Read more at: https://ezhangdoor.com/common-door-installation-problems-and-fixes/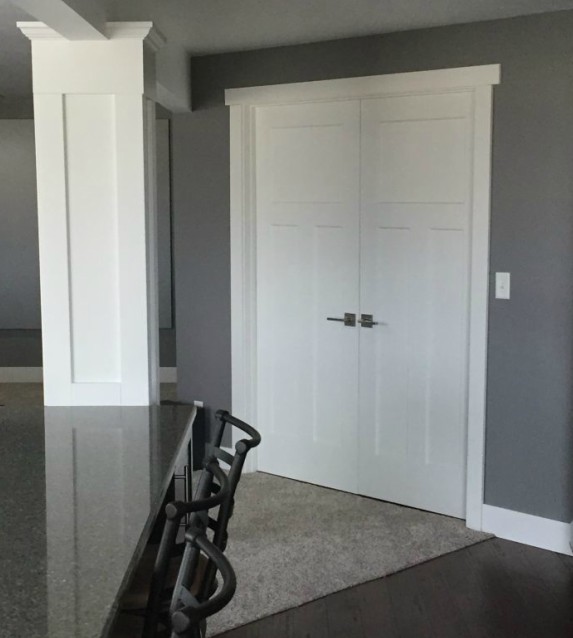 |
| json metadata | {"tags":["doorinstallation","diy","homeimprovement","door"],"image":["https://steemitimages.com/DQmNkMwQBYjGE32QUL3Aybt2kFgd9F9dtrQdAgymF7t6RbF/basement%20door.jpg"],"links":["https://ezhangdoor.com/common-door-installation-problems-and-fixes/"],"app":"steemit/0.1","format":"markdown"} |
| parent author | |
| parent permlink | door |
| permlink | the-ultimate-guide-to-common-door-installation-problems |
| title | The Ultimate Guide to Common Door Installation Problems |
| Transaction Info | Block #22292985/Trx 7bd60e36a84958cba05acd69d5c59216ab11bc3b |
View Raw JSON Data
{
"block": 22292985,
"op": [
"comment",
{
"author": "treyg",
"body": "Encountering door installation problems can leave you feeling helpless if you don’t know where the solution begins. Luckily, most door installation problems are quite a common occurrence, and can be fixed fairly quickly if you know what to do. We’ve compiled a list of those common problems and their resolutions. By following this guide, any installation issues you run into can be resolved easily and painlessly.\n\nMany unforeseen problems can occur when installing doors. Many of them are caused by improper framing, misaligned bottom plates, un-level floors or a wall that is simply not plumb. Obviously, tearing down walls with these problems and re-building is not a cost effective or easy method to corrections. So, how do you make your door installation look great, work properly without going through the costly and labor intensive procedures to fix them? Most door installation problems can be solved if you know a few simple tricks. \n\nDoor problems can vary widely, including:\n\nMisaligned Bottom Wall Plates\nDoor Uneven at the Top\nTrim Doesn't Fit Tight\nChecking for a Warped Door\nRough Opening too Big\nFixing a Loose or Stripped Screwhole\nDoor Closes on It's Own\nFixing a Squeaky Hinge\nFixing a Rubbing Door\nDoor Opens on It's Own\nSpacing Exterior Door off the Floor\n\nThis guide will give you simple instrcutions on how to fix each of these problems, quickly and efficiently. \n\nRead more at: https://ezhangdoor.com/common-door-installation-problems-and-fixes/",
"json_metadata": "{\"tags\":[\"doorinstallation\",\"diy\",\"homeimprovement\",\"door\"],\"image\":[\"https://steemitimages.com/DQmNkMwQBYjGE32QUL3Aybt2kFgd9F9dtrQdAgymF7t6RbF/basement%20door.jpg\"],\"links\":[\"https://ezhangdoor.com/common-door-installation-problems-and-fixes/\"],\"app\":\"steemit/0.1\",\"format\":\"markdown\"}",
"parent_author": "",
"parent_permlink": "door",
"permlink": "the-ultimate-guide-to-common-door-installation-problems",
"title": "The Ultimate Guide to Common Door Installation Problems"
}
],
"op_in_trx": 0,
"timestamp": "2018-05-10T00:12:57",
"trx_id": "7bd60e36a84958cba05acd69d5c59216ab11bc3b",
"trx_in_block": 34,
"virtual_op": 0
}treygpublished a new post: the-ultimate-guide-to-common-door-installation-problems2018/05/10 00:03:45
treygpublished a new post: the-ultimate-guide-to-common-door-installation-problems
2018/05/10 00:03:45
| author | treyg |
| body | Encountering door installation problems can leave you feeling helpless if you don’t know where the solution begins. Luckily, most door installation problems are quite a common occurrence, and can be fixed fairly quickly if you know what to do. We’ve compiled a list of those common problems and their resolutions. By following this guide, any installation issues you run into can be resolved easily and painlessly. Many unforeseen problems can occur when installing doors. Many of them are caused by improper framing, misaligned bottom plates, un-level floors or a wall that is simply not plumb. Obviously, tearing down walls with these problems and re-building is not a cost effective or easy method to corrections. So, how do you make your door installation look great, work properly without going through the costly and labor intensive procedures to fix them? Most door installation problems can be solved if you know a few simple tricks. Door problems can vary widely, including: Misaligned Bottom Wall Plates Door Uneven at the Top Trim Doesn't Fit Tight Checking for a Warped Door Rough Opening too Big Fixing a Loose or Stripped Screwhole Door Closes on It's Own Fixing a Squeaky Hinge Fixing a Rubbing Door Door Opens on It's Own Spacing Exterior Door off the Floor This guide will give you simple instrcutions on how to fix each of these problems, quickly and efficiently. Read more at: https://ezhangdoor.com/common-door-installation-problems-and-fixes/ |
| json metadata | {"tags":["diy","door","installation","home","improvement"],"image":["https://steemitimages.com/DQmNkMwQBYjGE32QUL3Aybt2kFgd9F9dtrQdAgymF7t6RbF/basement%20door.jpg"],"links":["https://ezhangdoor.com/common-door-installation-problems-and-fixes/"],"app":"steemit/0.1","format":"markdown"} |
| parent author | |
| parent permlink | door |
| permlink | the-ultimate-guide-to-common-door-installation-problems |
| title | The Ultimate Guide to Common Door Installation Problems |
| Transaction Info | Block #22292801/Trx b72d93f4abc39100faada85615eddec7d08aecd0 |
View Raw JSON Data
{
"block": 22292801,
"op": [
"comment",
{
"author": "treyg",
"body": "Encountering door installation problems can leave you feeling helpless if you don’t know where the solution begins. Luckily, most door installation problems are quite a common occurrence, and can be fixed fairly quickly if you know what to do. We’ve compiled a list of those common problems and their resolutions. By following this guide, any installation issues you run into can be resolved easily and painlessly.\n\nMany unforeseen problems can occur when installing doors. Many of them are caused by improper framing, misaligned bottom plates, un-level floors or a wall that is simply not plumb. Obviously, tearing down walls with these problems and re-building is not a cost effective or easy method to corrections. So, how do you make your door installation look great, work properly without going through the costly and labor intensive procedures to fix them? Most door installation problems can be solved if you know a few simple tricks. \n\nDoor problems can vary widely, including:\n\nMisaligned Bottom Wall Plates\nDoor Uneven at the Top\nTrim Doesn't Fit Tight\nChecking for a Warped Door\nRough Opening too Big\nFixing a Loose or Stripped Screwhole\nDoor Closes on It's Own\nFixing a Squeaky Hinge\nFixing a Rubbing Door\nDoor Opens on It's Own\nSpacing Exterior Door off the Floor\n\nThis guide will give you simple instrcutions on how to fix each of these problems, quickly and efficiently. \n\nRead more at: https://ezhangdoor.com/common-door-installation-problems-and-fixes/",
"json_metadata": "{\"tags\":[\"diy\",\"door\",\"installation\",\"home\",\"improvement\"],\"image\":[\"https://steemitimages.com/DQmNkMwQBYjGE32QUL3Aybt2kFgd9F9dtrQdAgymF7t6RbF/basement%20door.jpg\"],\"links\":[\"https://ezhangdoor.com/common-door-installation-problems-and-fixes/\"],\"app\":\"steemit/0.1\",\"format\":\"markdown\"}",
"parent_author": "",
"parent_permlink": "door",
"permlink": "the-ultimate-guide-to-common-door-installation-problems",
"title": "The Ultimate Guide to Common Door Installation Problems"
}
],
"op_in_trx": 0,
"timestamp": "2018-05-10T00:03:45",
"trx_id": "b72d93f4abc39100faada85615eddec7d08aecd0",
"trx_in_block": 14,
"virtual_op": 0
}treygpublished a new post: the-ultimate-guide-to-common-door-installation-problems2018/05/10 00:03:21
treygpublished a new post: the-ultimate-guide-to-common-door-installation-problems
2018/05/10 00:03:21
| author | treyg |
| body | Encountering door installation problems can leave you feeling helpless if you don’t know where the solution begins. Luckily, most door installation problems are quite a common occurrence, and can be fixed fairly quickly if you know what to do. We’ve compiled a list of those common problems and their resolutions. By following this guide, any installation issues you run into can be resolved easily and painlessly. Many unforeseen problems can occur when installing doors. Many of them are caused by improper framing, misaligned bottom plates, un-level floors or a wall that is simply not plumb. Obviously, tearing down walls with these problems and re-building is not a cost effective or easy method to corrections. So, how do you make your door installation look great, work properly without going through the costly and labor intensive procedures to fix them? Most door installation problems can be solved if you know a few simple tricks. Door problems can vary widely, including: Misaligned Bottom Wall Plates Door Uneven at the Top Trim Doesn't Fit Tight Checking for a Warped Door Rough Opening too Big Fixing a Loose or Stripped Screwhole Door Closes on It's Own Fixing a Squeaky Hinge Fixing a Rubbing Door Door Opens on It's Own Spacing Exterior Door off the Floor This guide will give you simple instrcutions on how to fix each of these problems, quickly and efficiently. Read more at: https://ezhangdoor.com/common-door-installation-problems-and-fixes/ |
| json metadata | {"tags":["diy","door","installation","home","improvement"],"image":["https://steemitimages.com/DQmNkMwQBYjGE32QUL3Aybt2kFgd9F9dtrQdAgymF7t6RbF/basement%20door.jpg"],"links":["https://ezhangdoor.com/common-door-installation-problems-and-fixes/"],"app":"steemit/0.1","format":"markdown"} |
| parent author | |
| parent permlink | door |
| permlink | the-ultimate-guide-to-common-door-installation-problems |
| title | The Ultimate Guide to Common Door Installation Problems |
| Transaction Info | Block #22292793/Trx e4b5bcc366fa0a2287c53db27e8893213073f5ae |
View Raw JSON Data
{
"block": 22292793,
"op": [
"comment",
{
"author": "treyg",
"body": "Encountering door installation problems can leave you feeling helpless if you don’t know where the solution begins. Luckily, most door installation problems are quite a common occurrence, and can be fixed fairly quickly if you know what to do. We’ve compiled a list of those common problems and their resolutions. By following this guide, any installation issues you run into can be resolved easily and painlessly.\n\nMany unforeseen problems can occur when installing doors. Many of them are caused by improper framing, misaligned bottom plates, un-level floors or a wall that is simply not plumb. Obviously, tearing down walls with these problems and re-building is not a cost effective or easy method to corrections. So, how do you make your door installation look great, work properly without going through the costly and labor intensive procedures to fix them? Most door installation problems can be solved if you know a few simple tricks. \n\nDoor problems can vary widely, including:\n\nMisaligned Bottom Wall Plates\nDoor Uneven at the Top\nTrim Doesn't Fit Tight\nChecking for a Warped Door\nRough Opening too Big\nFixing a Loose or Stripped Screwhole\nDoor Closes on It's Own\nFixing a Squeaky Hinge\nFixing a Rubbing Door\nDoor Opens on It's Own\nSpacing Exterior Door off the Floor\n\nThis guide will give you simple instrcutions on how to fix each of these problems, quickly and efficiently. \n\nRead more at: https://ezhangdoor.com/common-door-installation-problems-and-fixes/",
"json_metadata": "{\"tags\":[\"diy\",\"door\",\"installation\",\"home\",\"improvement\"],\"image\":[\"https://steemitimages.com/DQmNkMwQBYjGE32QUL3Aybt2kFgd9F9dtrQdAgymF7t6RbF/basement%20door.jpg\"],\"links\":[\"https://ezhangdoor.com/common-door-installation-problems-and-fixes/\"],\"app\":\"steemit/0.1\",\"format\":\"markdown\"}",
"parent_author": "",
"parent_permlink": "door",
"permlink": "the-ultimate-guide-to-common-door-installation-problems",
"title": "The Ultimate Guide to Common Door Installation Problems"
}
],
"op_in_trx": 0,
"timestamp": "2018-05-10T00:03:21",
"trx_id": "e4b5bcc366fa0a2287c53db27e8893213073f5ae",
"trx_in_block": 3,
"virtual_op": 0
}treygpublished a new post: the-ultimate-guide-to-common-door-installation-problems2018/05/10 00:01:30
treygpublished a new post: the-ultimate-guide-to-common-door-installation-problems
2018/05/10 00:01:30
| author | treyg |
| body | Encountering door installation problems can leave you feeling helpless if you don’t know where the solution begins. Luckily, most door installation problems are quite a common occurrence, and can be fixed fairly quickly if you know what to do. We’ve compiled a list of those common problems and their resolutions. By following this guide, any installation issues you run into can be resolved easily and painlessly. Many unforeseen problems can occur when installing doors. Many of them are caused by improper framing, misaligned bottom plates, un-level floors or a wall that is simply not plumb. Obviously, tearing down walls with these problems and re-building is not a cost effective or easy method to corrections. So, how do you make your door installation look great, work properly without going through the costly and labor intensive procedures to fix them? Most door installation problems can be solved if you know a few simple tricks. Door problems can vary widely, including: Misaligned Bottom Wall Plates Door Uneven at the Top Trim Doesn't Fit Tight Checking for a Warped Door Rough Opening too Big Fixing a Loose or Stripped Screwhole Door Closes on It's Own Fixing a Squeaky Hinge Fixing a Rubbing Door Door Opens on It's Own Spacing Exterior Door off the Floor This guide will give you simple instrcutions on how to fix each of these problems, quickly and efficiently. Read more at: https://ezhangdoor.com/common-door-installation-problems-and-fixes/ |
| json metadata | {"tags":["door","installation","door-installation","home","improvement"],"image":["https://steemitimages.com/DQmNkMwQBYjGE32QUL3Aybt2kFgd9F9dtrQdAgymF7t6RbF/basement%20door.jpg"],"links":["https://ezhangdoor.com/common-door-installation-problems-and-fixes/"],"app":"steemit/0.1","format":"markdown"} |
| parent author | |
| parent permlink | door |
| permlink | the-ultimate-guide-to-common-door-installation-problems |
| title | The Ultimate Guide to Common Door Installation Problems |
| Transaction Info | Block #22292756/Trx 7183596ae80242b821fd93bc97768b137ebd8e01 |
View Raw JSON Data
{
"block": 22292756,
"op": [
"comment",
{
"author": "treyg",
"body": "Encountering door installation problems can leave you feeling helpless if you don’t know where the solution begins. Luckily, most door installation problems are quite a common occurrence, and can be fixed fairly quickly if you know what to do. We’ve compiled a list of those common problems and their resolutions. By following this guide, any installation issues you run into can be resolved easily and painlessly.\n\nMany unforeseen problems can occur when installing doors. Many of them are caused by improper framing, misaligned bottom plates, un-level floors or a wall that is simply not plumb. Obviously, tearing down walls with these problems and re-building is not a cost effective or easy method to corrections. So, how do you make your door installation look great, work properly without going through the costly and labor intensive procedures to fix them? Most door installation problems can be solved if you know a few simple tricks. \n\nDoor problems can vary widely, including:\n\nMisaligned Bottom Wall Plates\nDoor Uneven at the Top\nTrim Doesn't Fit Tight\nChecking for a Warped Door\nRough Opening too Big\nFixing a Loose or Stripped Screwhole\nDoor Closes on It's Own\nFixing a Squeaky Hinge\nFixing a Rubbing Door\nDoor Opens on It's Own\nSpacing Exterior Door off the Floor\n\nThis guide will give you simple instrcutions on how to fix each of these problems, quickly and efficiently. \n\nRead more at: https://ezhangdoor.com/common-door-installation-problems-and-fixes/",
"json_metadata": "{\"tags\":[\"door\",\"installation\",\"door-installation\",\"home\",\"improvement\"],\"image\":[\"https://steemitimages.com/DQmNkMwQBYjGE32QUL3Aybt2kFgd9F9dtrQdAgymF7t6RbF/basement%20door.jpg\"],\"links\":[\"https://ezhangdoor.com/common-door-installation-problems-and-fixes/\"],\"app\":\"steemit/0.1\",\"format\":\"markdown\"}",
"parent_author": "",
"parent_permlink": "door",
"permlink": "the-ultimate-guide-to-common-door-installation-problems",
"title": "The Ultimate Guide to Common Door Installation Problems"
}
],
"op_in_trx": 0,
"timestamp": "2018-05-10T00:01:30",
"trx_id": "7183596ae80242b821fd93bc97768b137ebd8e01",
"trx_in_block": 49,
"virtual_op": 0
}treygpublished a new post: the-ultimate-guide-to-common-door-installation-problems2018/05/10 00:00:36
treygpublished a new post: the-ultimate-guide-to-common-door-installation-problems
2018/05/10 00:00:36
| author | treyg |
| body | Encountering door installation problems can leave you feeling helpless if you don’t know where the solution begins. Luckily, most door installation problems are quite a common occurrence, and can be fixed fairly quickly if you know what to do. We’ve compiled a list of those common problems and their resolutions. By following this guide, any installation issues you run into can be resolved easily and painlessly. Many unforeseen problems can occur when installing doors. Many of them are caused by improper framing, misaligned bottom plates, un-level floors or a wall that is simply not plumb. Obviously, tearing down walls with these problems and re-building is not a cost effective or easy method to corrections. So, how do you make your door installation look great, work properly without going through the costly and labor intensive procedures to fix them? Most door installation problems can be solved if you know a few simple tricks. Door problems can vary widely, including: Misaligned Bottom Wall Plates Door Uneven at the Top Trim Doesn't Fit Tight Checking for a Warped Door Rough Opening too Big Fixing a Loose or Stripped Screwhole Door Closes on It's Own Fixing a Squeaky Hinge Fixing a Rubbing Door Door Opens on It's Own Spacing Exterior Door off the Floor This guide will give you simple instrcutions on how to fix each of these problems, quickly and efficiently. Read more at: https://ezhangdoor.com/common-door-installation-problems-and-fixes/ |
| json metadata | {"tags":["door-installation","home","improvement","door"],"image":["https://steemitimages.com/DQmNkMwQBYjGE32QUL3Aybt2kFgd9F9dtrQdAgymF7t6RbF/basement%20door.jpg"],"links":["https://ezhangdoor.com/common-door-installation-problems-and-fixes/"],"app":"steemit/0.1","format":"markdown"} |
| parent author | |
| parent permlink | door |
| permlink | the-ultimate-guide-to-common-door-installation-problems |
| title | The Ultimate Guide to Common Door Installation Problems |
| Transaction Info | Block #22292738/Trx 185933b4852ee55b6a7b9e2f62586df4f8187682 |
View Raw JSON Data
{
"block": 22292738,
"op": [
"comment",
{
"author": "treyg",
"body": "Encountering door installation problems can leave you feeling helpless if you don’t know where the solution begins. Luckily, most door installation problems are quite a common occurrence, and can be fixed fairly quickly if you know what to do. We’ve compiled a list of those common problems and their resolutions. By following this guide, any installation issues you run into can be resolved easily and painlessly.\n\nMany unforeseen problems can occur when installing doors. Many of them are caused by improper framing, misaligned bottom plates, un-level floors or a wall that is simply not plumb. Obviously, tearing down walls with these problems and re-building is not a cost effective or easy method to corrections. So, how do you make your door installation look great, work properly without going through the costly and labor intensive procedures to fix them? Most door installation problems can be solved if you know a few simple tricks. \n\nDoor problems can vary widely, including:\n\nMisaligned Bottom Wall Plates\nDoor Uneven at the Top\nTrim Doesn't Fit Tight\nChecking for a Warped Door\nRough Opening too Big\nFixing a Loose or Stripped Screwhole\nDoor Closes on It's Own\nFixing a Squeaky Hinge\nFixing a Rubbing Door\nDoor Opens on It's Own\nSpacing Exterior Door off the Floor\n\nThis guide will give you simple instrcutions on how to fix each of these problems, quickly and efficiently. \n\nRead more at: https://ezhangdoor.com/common-door-installation-problems-and-fixes/",
"json_metadata": "{\"tags\":[\"door-installation\",\"home\",\"improvement\",\"door\"],\"image\":[\"https://steemitimages.com/DQmNkMwQBYjGE32QUL3Aybt2kFgd9F9dtrQdAgymF7t6RbF/basement%20door.jpg\"],\"links\":[\"https://ezhangdoor.com/common-door-installation-problems-and-fixes/\"],\"app\":\"steemit/0.1\",\"format\":\"markdown\"}",
"parent_author": "",
"parent_permlink": "door",
"permlink": "the-ultimate-guide-to-common-door-installation-problems",
"title": "The Ultimate Guide to Common Door Installation Problems"
}
],
"op_in_trx": 0,
"timestamp": "2018-05-10T00:00:36",
"trx_id": "185933b4852ee55b6a7b9e2f62586df4f8187682",
"trx_in_block": 29,
"virtual_op": 0
}2018/05/09 23:57:36
2018/05/09 23:57:36
| author | sogdinero |
| permlink | re-pleasestop-introducing-pleasestop-here-to-reduce-comment-spam-20180501t212603019z |
| voter | treyg |
| weight | 10000 (100.00%) |
| Transaction Info | Block #22292678/Trx d9738785889fc7b39ca6407e02a449356e4dfbd4 |
View Raw JSON Data
{
  "block": 22292678,
  "op": [
    "vote",
    {
      "author": "sogdinero",
      "permlink": "re-pleasestop-introducing-pleasestop-here-to-reduce-comment-spam-20180501t212603019z",
      "voter": "treyg",
      "weight": 10000
    }
  ],
  "op_in_trx": 0,
  "timestamp": "2018-05-09T23:57:36",
  "trx_id": "d9738785889fc7b39ca6407e02a449356e4dfbd4",
  "trx_in_block": 3,
  "virtual_op": 0
}treygupvoted (100.00%) @slowwalker / songgwangsa-temple-in-suncheon2018/05/09 23:55:42
treygupvoted (100.00%) @slowwalker / songgwangsa-temple-in-suncheon
2018/05/09 23:55:42
| author | slowwalker |
| permlink | songgwangsa-temple-in-suncheon |
| voter | treyg |
| weight | 10000 (100.00%) |
| Transaction Info | Block #22292640/Trx f571df30ef83bb87adcfbf06cc3bf2a5ca9d52e6 |
View Raw JSON Data
{
  "block": 22292640,
  "op": [
    "vote",
    {
      "author": "slowwalker",
      "permlink": "songgwangsa-temple-in-suncheon",
      "voter": "treyg",
      "weight": 10000
    }
  ],
  "op_in_trx": 0,
  "timestamp": "2018-05-09T23:55:42",
  "trx_id": "f571df30ef83bb87adcfbf06cc3bf2a5ca9d52e6",
  "trx_in_block": 4,
  "virtual_op": 0
}2018/05/09 21:33:09
2018/05/09 21:33:09
| delegatee | treyg |
| delegator | steem |
| vesting shares | 30330.077421 VESTS |
| Transaction Info | Block #22289790/Trx cabbc04cdb572f25e0f74589d14e1b4b0d18d0df |
View Raw JSON Data
{
  "block": 22289790,
  "op": [
    "delegate_vesting_shares",
    {
      "delegatee": "treyg",
      "delegator": "steem",
      "vesting_shares": "30330.077421 VESTS"
    }
  ],
  "op_in_trx": 0,
  "timestamp": "2018-05-09T21:33:09",
  "trx_id": "cabbc04cdb572f25e0f74589d14e1b4b0d18d0df",
  "trx_in_block": 41,
  "virtual_op": 0
}2018/05/09 20:41:12
2018/05/09 20:41:12
| author | introduce.bot |
| body | ✅ @treyg, congratulations on making your first post! **I gave you a $.05 vote!**<br>Please take a moment to read [this post](https://steemit.com/spam/@pleasestop/introducing-pleasestop-here-to-reduce-comment-spam) regarding commenting and spam. (tl;dr - if you spam, you will be flagged!) |
| json metadata | |
| parent author | treyg |
| parent permlink | the-ultimate-guide-to-common-door-installation-problems |
| permlink | introduce-bot-re-treygthe-ultimate-guide-to-common-door-installation-problems |
| title | |
| Transaction Info | Block #22288751/Trx adff77bc5a0ad75dc146883a81779f175a09ed6e |
View Raw JSON Data
{
  "block": 22288751,
  "op": [
    "comment",
    {
      "author": "introduce.bot",
      "body": "✅  @treyg, congratulations on making your first post! **I gave you a $.05 vote!**<br>Please take a moment to read [this post](https://steemit.com/spam/@pleasestop/introducing-pleasestop-here-to-reduce-comment-spam) regarding commenting and spam. (tl;dr - if you spam, you will be flagged!)",
      "json_metadata": "",
      "parent_author": "treyg",
      "parent_permlink": "the-ultimate-guide-to-common-door-installation-problems",
      "permlink": "introduce-bot-re-treygthe-ultimate-guide-to-common-door-installation-problems",
      "title": ""
    }
  ],
  "op_in_trx": 0,
  "timestamp": "2018-05-09T20:41:12",
  "trx_id": "adff77bc5a0ad75dc146883a81779f175a09ed6e",
  "trx_in_block": 7,
  "virtual_op": 0
}introduce.botupvoted (3.26%) @treyg / the-ultimate-guide-to-common-door-installation-problems2018/05/09 20:41:09
introduce.botupvoted (3.26%) @treyg / the-ultimate-guide-to-common-door-installation-problems
2018/05/09 20:41:09
| author | treyg |
| permlink | the-ultimate-guide-to-common-door-installation-problems |
| voter | introduce.bot |
| weight | 326 (3.26%) |
| Transaction Info | Block #22288750/Trx 5e42cbc2077f0c52039fed165ab5536d6c49e1c7 |
View Raw JSON Data
{
  "block": 22288750,
  "op": [
    "vote",
    {
      "author": "treyg",
      "permlink": "the-ultimate-guide-to-common-door-installation-problems",
      "voter": "introduce.bot",
      "weight": 326
    }
  ],
  "op_in_trx": 0,
  "timestamp": "2018-05-09T20:41:09",
  "trx_id": "5e42cbc2077f0c52039fed165ab5536d6c49e1c7",
  "trx_in_block": 44,
  "virtual_op": 0
}treygupdated their account properties2018/05/09 20:34:21
treygupdated their account properties
2018/05/09 20:34:21
| account | treyg |
| json metadata | {"profile":{"profile_image":"https://steemitimages.com/DQmQxtgBVHktoHHLUY2vP5BNF5Kz3Wmam1HwvCU683WfE2v/admin-ajax%20(1).jpeg","website":"https://ezhangdoor.com","name":"Trey"}} |
| memo key | STM5RsLkt3Tvh6dehCUKcw8NBFdtNka9LS2Wp3X1PxHaqqRAF6mS3 |
| Transaction Info | Block #22288614/Trx 485b3d9f95a25041ad7bb7e7b8b429b4bfd7ad14 |
View Raw JSON Data
{
  "block": 22288614,
  "op": [
    "account_update",
    {
      "account": "treyg",
      "json_metadata": "{\"profile\":{\"profile_image\":\"https://steemitimages.com/DQmQxtgBVHktoHHLUY2vP5BNF5Kz3Wmam1HwvCU683WfE2v/admin-ajax%20(1).jpeg\",\"website\":\"https://ezhangdoor.com\",\"name\":\"Trey\"}}",
      "memo_key": "STM5RsLkt3Tvh6dehCUKcw8NBFdtNka9LS2Wp3X1PxHaqqRAF6mS3"
    }
  ],
  "op_in_trx": 0,
  "timestamp": "2018-05-09T20:34:21",
  "trx_id": "485b3d9f95a25041ad7bb7e7b8b429b4bfd7ad14",
  "trx_in_block": 20,
  "virtual_op": 0
}treygupdated their account properties2018/05/09 20:30:24
treygupdated their account properties
2018/05/09 20:30:24
| account | treyg |
| json metadata | {"profile":{"profile_image":"https://steemitimages.com/DQmQxtgBVHktoHHLUY2vP5BNF5Kz3Wmam1HwvCU683WfE2v/admin-ajax%20(1).jpeg","website":"https://ezhangdoor.com"}} |
| memo key | STM5RsLkt3Tvh6dehCUKcw8NBFdtNka9LS2Wp3X1PxHaqqRAF6mS3 |
| Transaction Info | Block #22288535/Trx 646132f4c6813551c00e54fece05fa84e6ef870c |
View Raw JSON Data
{
  "block": 22288535,
  "op": [
    "account_update",
    {
      "account": "treyg",
      "json_metadata": "{\"profile\":{\"profile_image\":\"https://steemitimages.com/DQmQxtgBVHktoHHLUY2vP5BNF5Kz3Wmam1HwvCU683WfE2v/admin-ajax%20(1).jpeg\",\"website\":\"https://ezhangdoor.com\"}}",
      "memo_key": "STM5RsLkt3Tvh6dehCUKcw8NBFdtNka9LS2Wp3X1PxHaqqRAF6mS3"
    }
  ],
  "op_in_trx": 0,
  "timestamp": "2018-05-09T20:30:24",
  "trx_id": "646132f4c6813551c00e54fece05fa84e6ef870c",
  "trx_in_block": 60,
  "virtual_op": 0
}ax3upvoted (1.00%) @treyg / the-ultimate-guide-to-common-door-installation-problems2018/05/09 20:25:39
ax3upvoted (1.00%) @treyg / the-ultimate-guide-to-common-door-installation-problems
2018/05/09 20:25:39
| author | treyg |
| permlink | the-ultimate-guide-to-common-door-installation-problems |
| voter | ax3 |
| weight | 100 (1.00%) |
| Transaction Info | Block #22288440/Trx e9ea4773618a75ffe0bf963f3d52b029b681928b |
View Raw JSON Data
{
  "block": 22288440,
  "op": [
    "vote",
    {
      "author": "treyg",
      "permlink": "the-ultimate-guide-to-common-door-installation-problems",
      "voter": "ax3",
      "weight": 100
    }
  ],
  "op_in_trx": 0,
  "timestamp": "2018-05-09T20:25:39",
  "trx_id": "e9ea4773618a75ffe0bf963f3d52b029b681928b",
  "trx_in_block": 54,
  "virtual_op": 0
}treygpublished a new post: the-ultimate-guide-to-common-door-installation-problems2018/05/09 20:25:30
treygpublished a new post: the-ultimate-guide-to-common-door-installation-problems
2018/05/09 20:25:30
| author | treyg |
| body | Encountering door installation problems can leave you feeling helpless if you don’t know where the solution begins. Luckily, most door installation problems are quite a common occurrence, and can be fixed fairly quickly if you know what to do. We’ve compiled a list of those common problems and their resolutions. By following this guide, any installation issues you run into can be resolved easily and painlessly. Many unforeseen problems can occur when installing doors. Many of them are caused by improper framing, misaligned bottom plates, un-level floors or a wall that is simply not plumb. Obviously, tearing down walls with these problems and re-building is not a cost effective or easy method to corrections. So, how do you make your door installation look great, work properly without going through the costly and labor intensive procedures to fix them? Most door installation problems can be solved if you know a few simple tricks. Door problems can vary widely, including: Misaligned Bottom Wall Plates Door Uneven at the Top Trim Doesn't Fit Tight Checking for a Warped Door Rough Opening too Big Fixing a Loose or Stripped Screwhole Door Closes on It's Own Fixing a Squeaky Hinge Fixing a Rubbing Door Door Opens on It's Own Spacing Exterior Door off the Floor This guide will give you simple instrcutions on how to fix each of these problems, quickly and efficiently. Read more at: https://ezhangdoor.com/common-door-installation-problems-and-fixes/ |
| json metadata | {"tags":["door","installation","home","improvement"],"image":["https://steemitimages.com/DQmNkMwQBYjGE32QUL3Aybt2kFgd9F9dtrQdAgymF7t6RbF/basement%20door.jpg"],"links":["https://ezhangdoor.com/common-door-installation-problems-and-fixes/"],"app":"steemit/0.1","format":"markdown"} |
| parent author | |
| parent permlink | door |
| permlink | the-ultimate-guide-to-common-door-installation-problems |
| title | The Ultimate Guide to Common Door Installation Problems |
| Transaction Info | Block #22288437/Trx 172de3ab50247fe58864fa82e598b1f85b78ebe2 |
View Raw JSON Data
{
"block": 22288437,
"op": [
"comment",
{
"author": "treyg",
"body": "Encountering door installation problems can leave you feeling helpless if you don’t know where the solution begins. Luckily, most door installation problems are quite a common occurrence, and can be fixed fairly quickly if you know what to do. We’ve compiled a list of those common problems and their resolutions. By following this guide, any installation issues you run into can be resolved easily and painlessly.\n\nMany unforeseen problems can occur when installing doors. Many of them are caused by improper framing, misaligned bottom plates, un-level floors or a wall that is simply not plumb. Obviously, tearing down walls with these problems and re-building is not a cost effective or easy method to corrections. So, how do you make your door installation look great, work properly without going through the costly and labor intensive procedures to fix them? Most door installation problems can be solved if you know a few simple tricks. \n\nDoor problems can vary widely, including:\n\nMisaligned Bottom Wall Plates\nDoor Uneven at the Top\nTrim Doesn't Fit Tight\nChecking for a Warped Door\nRough Opening too Big\nFixing a Loose or Stripped Screwhole\nDoor Closes on It's Own\nFixing a Squeaky Hinge\nFixing a Rubbing Door\nDoor Opens on It's Own\nSpacing Exterior Door off the Floor\n\nThis guide will give you simple instrcutions on how to fix each of these problems, quickly and efficiently. \n\nRead more at: https://ezhangdoor.com/common-door-installation-problems-and-fixes/",
"json_metadata": "{\"tags\":[\"door\",\"installation\",\"home\",\"improvement\"],\"image\":[\"https://steemitimages.com/DQmNkMwQBYjGE32QUL3Aybt2kFgd9F9dtrQdAgymF7t6RbF/basement%20door.jpg\"],\"links\":[\"https://ezhangdoor.com/common-door-installation-problems-and-fixes/\"],\"app\":\"steemit/0.1\",\"format\":\"markdown\"}",
"parent_author": "",
"parent_permlink": "door",
"permlink": "the-ultimate-guide-to-common-door-installation-problems",
"title": "The Ultimate Guide to Common Door Installation Problems"
}
],
"op_in_trx": 0,
"timestamp": "2018-05-09T20:25:30",
"trx_id": "172de3ab50247fe58864fa82e598b1f85b78ebe2",
"trx_in_block": 78,
"virtual_op": 0
}2018/05/09 20:19:12
2018/05/09 20:19:12
| active | {"account_auths":[],"key_auths":[["STM6HxabYzLb6nk5z6wm6c41QG19UqScRpoeU3XhDppNQdPoDzrPX",1]],"weight_threshold":1} |
| creator | steem |
| delegation | 30690.000000 VESTS |
| extensions | [] |
| fee | 0.100 STEEM |
| json metadata | {} |
| memo key | STM5RsLkt3Tvh6dehCUKcw8NBFdtNka9LS2Wp3X1PxHaqqRAF6mS3 |
| new account name | treyg |
| owner | {"account_auths":[],"key_auths":[["STM5x2nUpNSCyKA3tuvp53bfoicmPUb8L77rVPrdeHCWG8idqZi4E",1]],"weight_threshold":1} |
| posting | {"account_auths":[],"key_auths":[["STM62Unh3cC8PUrzZyiBDbHMWzd5QRXT2XG5VzQnnuAXcd5af236P",1]],"weight_threshold":1} |
| Transaction Info | Block #22288311/Trx 04ac090c66cd9a5bbfdc3168b2625980f96fcad4 |
View Raw JSON Data
{
  "block": 22288311,
  "op": [
    "account_create_with_delegation",
    {
      "active": {
        "account_auths": [],
        "key_auths": [
          [
            "STM6HxabYzLb6nk5z6wm6c41QG19UqScRpoeU3XhDppNQdPoDzrPX",
            1
          ]
        ],
        "weight_threshold": 1
      },
      "creator": "steem",
      "delegation": "30690.000000 VESTS",
      "extensions": [],
      "fee": "0.100 STEEM",
      "json_metadata": "{}",
      "memo_key": "STM5RsLkt3Tvh6dehCUKcw8NBFdtNka9LS2Wp3X1PxHaqqRAF6mS3",
      "new_account_name": "treyg",
      "owner": {
        "account_auths": [],
        "key_auths": [
          [
            "STM5x2nUpNSCyKA3tuvp53bfoicmPUb8L77rVPrdeHCWG8idqZi4E",
            1
          ]
        ],
        "weight_threshold": 1
      },
      "posting": {
        "account_auths": [],
        "key_auths": [
          [
            "STM62Unh3cC8PUrzZyiBDbHMWzd5QRXT2XG5VzQnnuAXcd5af236P",
            1
          ]
        ],
        "weight_threshold": 1
      }
    }
  ],
  "op_in_trx": 0,
  "timestamp": "2018-05-09T20:19:12",
  "trx_id": "04ac090c66cd9a5bbfdc3168b2625980f96fcad4",
  "trx_in_block": 61,
  "virtual_op": 0
}Manabar
Voting Power100.00%
Downvote Power100.00%
Resource Credits100.00%
Reputation Progress0.00%
{
  "voting_manabar": {
    "current_mana": "8143659806",
    "last_update_time": 1779089958
  },
  "downvote_manabar": {
    "current_mana": 2035914951,
    "last_update_time": 1779089958
  },
  "rc_account": {
    "account": "treyg",
    "max_rc": "10164408779",
    "max_rc_creation_adjustment": {
      "amount": "2020748973",
      "nai": "@@000000037",
      "precision": 6
    },
    "rc_manabar": {
      "current_mana": "10164408779",
      "last_update_time": 1779089958
    }
  }
}
Account Metadata
| POSTING JSON METADATA | |
| profile | {"profile_image":"https://steemitimages.com/DQmQxtgBVHktoHHLUY2vP5BNF5Kz3Wmam1HwvCU683WfE2v/admin-ajax%20(1).jpeg","website":"https://ezhangdoor.com","name":"Trey"} |
| JSON METADATA | |
| profile | {"profile_image":"https://steemitimages.com/DQmQxtgBVHktoHHLUY2vP5BNF5Kz3Wmam1HwvCU683WfE2v/admin-ajax%20(1).jpeg","website":"https://ezhangdoor.com","name":"Trey"} |
{
  "posting_json_metadata": {
    "profile": {
      "profile_image": "https://steemitimages.com/DQmQxtgBVHktoHHLUY2vP5BNF5Kz3Wmam1HwvCU683WfE2v/admin-ajax%20(1).jpeg",
      "website": "https://ezhangdoor.com",
      "name": "Trey"
    }
  },
  "json_metadata": {
    "profile": {
      "profile_image": "https://steemitimages.com/DQmQxtgBVHktoHHLUY2vP5BNF5Kz3Wmam1HwvCU683WfE2v/admin-ajax%20(1).jpeg",
      "website": "https://ezhangdoor.com",
      "name": "Trey"
    }
  }
}
Auth Keys
Owner
Single Signature
Public Keys
STM5x2nUpNSCyKA3tuvp53bfoicmPUb8L77rVPrdeHCWG8idqZi4E1/1
Active
Single Signature
Public Keys
STM6HxabYzLb6nk5z6wm6c41QG19UqScRpoeU3XhDppNQdPoDzrPX1/1
Posting
Single Signature
Public Keys
STM62Unh3cC8PUrzZyiBDbHMWzd5QRXT2XG5VzQnnuAXcd5af236P1/1
Memo
STM5RsLkt3Tvh6dehCUKcw8NBFdtNka9LS2Wp3X1PxHaqqRAF6mS3
{
  "owner": {
    "account_auths": [],
    "key_auths": [
      [
        "STM5x2nUpNSCyKA3tuvp53bfoicmPUb8L77rVPrdeHCWG8idqZi4E",
        1
      ]
    ],
    "weight_threshold": 1
  },
  "active": {
    "account_auths": [],
    "key_auths": [
      [
        "STM6HxabYzLb6nk5z6wm6c41QG19UqScRpoeU3XhDppNQdPoDzrPX",
        1
      ]
    ],
    "weight_threshold": 1
  },
  "posting": {
    "account_auths": [],
    "key_auths": [
      [
        "STM62Unh3cC8PUrzZyiBDbHMWzd5QRXT2XG5VzQnnuAXcd5af236P",
        1
      ]
    ],
    "weight_threshold": 1
  },
  "memo": "STM5RsLkt3Tvh6dehCUKcw8NBFdtNka9LS2Wp3X1PxHaqqRAF6mS3"
}
Witness Votes
0 / 30
No active witness votes.
[]