VOTING POWER100.00%
DOWNVOTE POWER100.00%
RESOURCE CREDITS100.00%
REPUTATION PROGRESS0.00%
Net Worth
0.007USD
STEEM
0.001STEEM
SBD
0.000SBD
Effective Power
5.001SP
├── Own SP
0.125SP
└── Incoming DelegationsDeleg
+4.876SP
Detailed Balance
| STEEM | ||
| balance | 0.001STEEM | STEEM |
| market_balance | 0.000STEEM | STEEM |
| savings_balance | 0.000STEEM | STEEM |
| reward_steem_balance | 0.000STEEM | STEEM |
| STEEM POWER | ||
| Own SP | 0.125SP | SP |
| Delegated Out | 0.000SP | SP |
| Delegation In | 4.876SP | SP |
| Effective Power | 5.001SP | SP |
| Reward SP (pending) | 0.002SP | SP |
| SBD | ||
| sbd_balance | 0.000SBD | SBD |
| sbd_conversions | 0.000SBD | SBD |
| sbd_market_balance | 0.000SBD | SBD |
| savings_sbd_balance | 0.000SBD | SBD |
| reward_sbd_balance | 0.000SBD | SBD |
{
  "balance": "0.001 STEEM",
  "savings_balance": "0.000 STEEM",
  "reward_steem_balance": "0.000 STEEM",
  "vesting_shares": "203.758589 VESTS",
  "delegated_vesting_shares": "0.000000 VESTS",
  "received_vesting_shares": "7939.901217 VESTS",
  "sbd_balance": "0.000 SBD",
  "savings_sbd_balance": "0.000 SBD",
  "reward_sbd_balance": "0.000 SBD",
  "conversions": []
}
Account Info
| name | mragic |
| id | 949800 |
| rank | 1,315,332 |
| reputation | 721476963 |
| created | 2018-04-20T20:09:48 |
| recovery_account | steem |
| proxy | None |
| post_count | 11 |
| comment_count | 0 |
| lifetime_vote_count | 0 |
| witnesses_voted_for | 1 |
| last_post | 2019-01-02T18:57:51 |
| last_root_post | 2019-01-02T18:57:51 |
| last_vote_time | 2018-12-27T09:34:33 |
| proxied_vsf_votes | 0, 0, 0, 0 |
| can_vote | 1 |
| voting_power | 0 |
| delayed_votes | 0 |
| balance | 0.001 STEEM |
| savings_balance | 0.000 STEEM |
| sbd_balance | 0.000 SBD |
| savings_sbd_balance | 0.000 SBD |
| vesting_shares | 203.758589 VESTS |
| delegated_vesting_shares | 0.000000 VESTS |
| received_vesting_shares | 7939.901217 VESTS |
| reward_vesting_balance | 4.019599 VESTS |
| vesting_balance | 0.000 STEEM |
| vesting_withdraw_rate | 0.000000 VESTS |
| next_vesting_withdrawal | 1969-12-31T23:59:59 |
| withdrawn | 0 |
| to_withdraw | 0 |
| withdraw_routes | 0 |
| savings_withdraw_requests | 0 |
| last_account_recovery | 1970-01-01T00:00:00 |
| reset_account | null |
| last_owner_update | 1970-01-01T00:00:00 |
| last_account_update | 2018-04-22T08:04:21 |
| mined | No |
| sbd_seconds | 0 |
| sbd_last_interest_payment | 1970-01-01T00:00:00 |
| savings_sbd_last_interest_payment | 1970-01-01T00:00:00 |
{
  "id": 949800,
  "name": "mragic",
  "owner": {
    "weight_threshold": 1,
    "account_auths": [],
    "key_auths": [
      [
        "STM5zooK2vYNwNsSFcVK8ycXafGsTAYcohkBVb7M3XBDwjGzCsQxr",
        1
      ]
    ]
  },
  "active": {
    "weight_threshold": 1,
    "account_auths": [],
    "key_auths": [
      [
        "STM5q81mPcAQEMYxsny2oxcv73RXBYYaotF3WxLtSiXUZwR2YGo4j",
        1
      ]
    ]
  },
  "posting": {
    "weight_threshold": 1,
    "account_auths": [],
    "key_auths": [
      [
        "STM8aGXLNdVVJJNEZWz8ApwJCWFk2WtRdyhTyhtHQz7Gz8AX1CXYd",
        1
      ]
    ]
  },
  "memo_key": "STM5QfZyeF8z6FvVhh8UrmarZQt8ybaz2WXs3NTdmYWdimUaNGnFV",
  "json_metadata": "{\"profile\":{\"profile_image\":\"https://image.jimcdn.com/app/cms/image/transf/dimension=213x10000:format=png/path/s700f796b66d213d0/image/iccc85832e5486e59/version/1492460352/image.png\",\"cover_image\":\"https://image.jimcdn.com/app/cms/image/transf/dimension=2048x2048:format=jpg/path/s700f796b66d213d0/image/i6eff826a399050b3/version/1490726736/image.jpg\",\"name\":\"mragic\",\"website\":\"https://www.raspberryjam.ch\"}}",
  "posting_json_metadata": "{\"profile\":{\"profile_image\":\"https://image.jimcdn.com/app/cms/image/transf/dimension=213x10000:format=png/path/s700f796b66d213d0/image/iccc85832e5486e59/version/1492460352/image.png\",\"cover_image\":\"https://image.jimcdn.com/app/cms/image/transf/dimension=2048x2048:format=jpg/path/s700f796b66d213d0/image/i6eff826a399050b3/version/1490726736/image.jpg\",\"name\":\"mragic\",\"website\":\"https://www.raspberryjam.ch\"}}",
  "proxy": "",
  "last_owner_update": "1970-01-01T00:00:00",
  "last_account_update": "2018-04-22T08:04:21",
  "created": "2018-04-20T20:09:48",
  "mined": false,
  "recovery_account": "steem",
  "last_account_recovery": "1970-01-01T00:00:00",
  "reset_account": "null",
  "comment_count": 0,
  "lifetime_vote_count": 0,
  "post_count": 11,
  "can_vote": true,
  "voting_manabar": {
    "current_mana": "8143659806",
    "last_update_time": 1779077028
  },
  "downvote_manabar": {
    "current_mana": 2035914951,
    "last_update_time": 1779077028
  },
  "voting_power": 0,
  "balance": "0.001 STEEM",
  "savings_balance": "0.000 STEEM",
  "sbd_balance": "0.000 SBD",
  "sbd_seconds": "0",
  "sbd_seconds_last_update": "1970-01-01T00:00:00",
  "sbd_last_interest_payment": "1970-01-01T00:00:00",
  "savings_sbd_balance": "0.000 SBD",
  "savings_sbd_seconds": "0",
  "savings_sbd_seconds_last_update": "1970-01-01T00:00:00",
  "savings_sbd_last_interest_payment": "1970-01-01T00:00:00",
  "savings_withdraw_requests": 0,
  "reward_sbd_balance": "0.000 SBD",
  "reward_steem_balance": "0.000 STEEM",
  "reward_vesting_balance": "4.019599 VESTS",
  "reward_vesting_steem": "0.002 STEEM",
  "vesting_shares": "203.758589 VESTS",
  "delegated_vesting_shares": "0.000000 VESTS",
  "received_vesting_shares": "7939.901217 VESTS",
  "vesting_withdraw_rate": "0.000000 VESTS",
  "next_vesting_withdrawal": "1969-12-31T23:59:59",
  "withdrawn": 0,
  "to_withdraw": 0,
  "withdraw_routes": 0,
  "curation_rewards": 2,
  "posting_rewards": 0,
  "proxied_vsf_votes": [
    0,
    0,
    0,
    0
  ],
  "witnesses_voted_for": 1,
  "last_post": "2019-01-02T18:57:51",
  "last_root_post": "2019-01-02T18:57:51",
  "last_vote_time": "2018-12-27T09:34:33",
  "post_bandwidth": 0,
  "pending_claimed_accounts": 0,
  "vesting_balance": "0.000 STEEM",
  "reputation": 721476963,
  "transfer_history": [],
  "market_history": [],
  "post_history": [],
  "vote_history": [],
  "other_history": [],
  "witness_votes": [
    "steemitboard"
  ],
  "tags_usage": [],
  "guest_bloggers": [],
  "rank": 1315332
}
Withdraw Routes
| Incoming | Outgoing |
|---|---|
Empty | Empty |
{
  "incoming": [],
  "outgoing": []
}From Date
To Date
2026/05/18 04:03:48
2026/05/18 04:03:48
| delegator | steem |
| delegatee | mragic |
| vesting shares | 7939.901217 VESTS |
| Transaction Info | Block #106147998/Trx 3d799e94057ac171688328052309246f77289f01 |
View Raw JSON Data
{
  "trx_id": "3d799e94057ac171688328052309246f77289f01",
  "block": 106147998,
  "trx_in_block": 0,
  "op_in_trx": 0,
  "virtual_op": 0,
  "timestamp": "2026-05-18T04:03:48",
  "op": [
    "delegate_vesting_shares",
    {
      "delegator": "steem",
      "delegatee": "mragic",
      "vesting_shares": "7939.901217 VESTS"
    }
  ]
}2026/05/12 19:16:42
2026/05/12 19:16:42
| delegator | steem |
| delegatee | mragic |
| vesting shares | 5227.690812 VESTS |
| Transaction Info | Block #105994196/Trx 3497e716de376563fc82130ceeedc1fd2d839475 |
View Raw JSON Data
{
  "trx_id": "3497e716de376563fc82130ceeedc1fd2d839475",
  "block": 105994196,
  "trx_in_block": 1,
  "op_in_trx": 0,
  "virtual_op": 0,
  "timestamp": "2026-05-12T19:16:42",
  "op": [
    "delegate_vesting_shares",
    {
      "delegator": "steem",
      "delegatee": "mragic",
      "vesting_shares": "5227.690812 VESTS"
    }
  ]
}2026/04/26 03:18:39
2026/04/26 03:18:39
| delegator | steem |
| delegatee | mragic |
| vesting shares | 7952.416973 VESTS |
| Transaction Info | Block #105515541/Trx f7ff0193a5eb3b61c92c54cd2aa74e66ed4e4696 |
View Raw JSON Data
{
  "trx_id": "f7ff0193a5eb3b61c92c54cd2aa74e66ed4e4696",
  "block": 105515541,
  "trx_in_block": 2,
  "op_in_trx": 0,
  "virtual_op": 0,
  "timestamp": "2026-04-26T03:18:39",
  "op": [
    "delegate_vesting_shares",
    {
      "delegator": "steem",
      "delegatee": "mragic",
      "vesting_shares": "7952.416973 VESTS"
    }
  ]
}2026/01/23 18:01:33
2026/01/23 18:01:33
| delegator | steem |
| delegatee | mragic |
| vesting shares | 5269.237631 VESTS |
| Transaction Info | Block #102864062/Trx a309764c26aadf0c0d7b60fea978795ae41b56dd |
View Raw JSON Data
{
  "trx_id": "a309764c26aadf0c0d7b60fea978795ae41b56dd",
  "block": 102864062,
  "trx_in_block": 6,
  "op_in_trx": 0,
  "virtual_op": 0,
  "timestamp": "2026-01-23T18:01:33",
  "op": [
    "delegate_vesting_shares",
    {
      "delegator": "steem",
      "delegatee": "mragic",
      "vesting_shares": "5269.237631 VESTS"
    }
  ]
}2024/12/17 13:13:51
2024/12/17 13:13:51
| delegator | steem |
| delegatee | mragic |
| vesting shares | 5433.456828 VESTS |
| Transaction Info | Block #91310320/Trx 5ab503c358d0463eb39581a8f7d823d442a02bb7 |
View Raw JSON Data
{
  "trx_id": "5ab503c358d0463eb39581a8f7d823d442a02bb7",
  "block": 91310320,
  "trx_in_block": 8,
  "op_in_trx": 0,
  "virtual_op": 0,
  "timestamp": "2024-12-17T13:13:51",
  "op": [
    "delegate_vesting_shares",
    {
      "delegator": "steem",
      "delegatee": "mragic",
      "vesting_shares": "5433.456828 VESTS"
    }
  ]
}2023/11/14 04:55:39
2023/11/14 04:55:39
| delegator | steem |
| delegatee | mragic |
| vesting shares | 5602.590360 VESTS |
| Transaction Info | Block #79864492/Trx 3d2341a09bb76b8c1b5819987b33ee47db85219a |
View Raw JSON Data
{
  "trx_id": "3d2341a09bb76b8c1b5819987b33ee47db85219a",
  "block": 79864492,
  "trx_in_block": 1,
  "op_in_trx": 0,
  "virtual_op": 0,
  "timestamp": "2023-11-14T04:55:39",
  "op": [
    "delegate_vesting_shares",
    {
      "delegator": "steem",
      "delegatee": "mragic",
      "vesting_shares": "5602.590360 VESTS"
    }
  ]
}2023/09/22 07:45:00
2023/09/22 07:45:00
| delegator | steem |
| delegatee | mragic |
| vesting shares | 8539.499146 VESTS |
| Transaction Info | Block #78359706/Trx 6dd5f2fafc244d593888749250ef1f01cc49f3b9 |
View Raw JSON Data
{
  "trx_id": "6dd5f2fafc244d593888749250ef1f01cc49f3b9",
  "block": 78359706,
  "trx_in_block": 1,
  "op_in_trx": 0,
  "virtual_op": 0,
  "timestamp": "2023-09-22T07:45:00",
  "op": [
    "delegate_vesting_shares",
    {
      "delegator": "steem",
      "delegatee": "mragic",
      "vesting_shares": "8539.499146 VESTS"
    }
  ]
}2022/11/03 15:33:30
2022/11/03 15:33:30
| delegator | steem |
| delegatee | mragic |
| vesting shares | 8761.550584 VESTS |
| Transaction Info | Block #69117864/Trx fea505ca4621ae52fc7d71b1d6e923a595e4feb7 |
View Raw JSON Data
{
  "trx_id": "fea505ca4621ae52fc7d71b1d6e923a595e4feb7",
  "block": 69117864,
  "trx_in_block": 3,
  "op_in_trx": 0,
  "virtual_op": 0,
  "timestamp": "2022-11-03T15:33:30",
  "op": [
    "delegate_vesting_shares",
    {
      "delegator": "steem",
      "delegatee": "mragic",
      "vesting_shares": "8761.550584 VESTS"
    }
  ]
}mragicpublished a new post: how-to-send-sensor-data-from-python-to-iota-tangle-with-mam2022/05/14 08:47:27
mragicpublished a new post: how-to-send-sensor-data-from-python-to-iota-tangle-with-mam
2022/05/14 08:47:27
| parent author | |
| parent permlink | iota |
| author | mragic |
| permlink | how-to-send-sensor-data-from-python-to-iota-tangle-with-mam |
| title | How to send sensor data from python to IOTA tangle with MAM |
| body | @@ -7820,194 +7820,4 @@ %0A--- -%0A%0AIOTA: 9PDEUUFUTPLBNGORASBZGYXLWC9KLWWPGZFF9T9AHUKMLHHEVDWJJDUNXFJNADDHKT9ZKCNCVEY9MJRTZEWUHGASKY%0AETH: 0x6c54eA14109f3E97cdfC02b0C5AbE88e190BDf18%0ABitcoin: 35N7cEkjiKGrMyETDU61KBtWWc7wRBYAXv |
| json metadata | {"image":["https://cdn.steemitimages.com/DQmXhNHvkv1g4etTwovgQZ4aj2n2Lj8PgQpeyrYDNxVZfFH/image.png"],"links":["https://blog.iota.org/introducing-masked-authenticated-messaging-e55c1822d50e","https://github.com/iotaledger/mam.client.js/","http://www.steves-internet-guide.com/understanding-mqtt-topics/","https://steemit.com/iota/@mragic/how-to-send-ruuvitag-sensor-data-to-the-iota-tangle-with-mam-using-a-raspberry-pi-3"],"app":"steemit/0.2","format":"markdown","tags":["mam","raspberrypi","python"]} |
| Transaction Info | Block #64157137/Trx 1d899ac0754e5c1d457d9706e668fea2e20030be |
View Raw JSON Data
{
  "trx_id": "1d899ac0754e5c1d457d9706e668fea2e20030be",
  "block": 64157137,
  "trx_in_block": 7,
  "op_in_trx": 0,
  "virtual_op": 0,
  "timestamp": "2022-05-14T08:47:27",
  "op": [
    "comment",
    {
      "parent_author": "",
      "parent_permlink": "iota",
      "author": "mragic",
      "permlink": "how-to-send-sensor-data-from-python-to-iota-tangle-with-mam",
      "title": "How to send sensor data from python to IOTA tangle with MAM",
      "body": "@@ -7820,194 +7820,4 @@\n %0A---\n-%0A%0AIOTA: 9PDEUUFUTPLBNGORASBZGYXLWC9KLWWPGZFF9T9AHUKMLHHEVDWJJDUNXFJNADDHKT9ZKCNCVEY9MJRTZEWUHGASKY%0AETH: 0x6c54eA14109f3E97cdfC02b0C5AbE88e190BDf18%0ABitcoin: 35N7cEkjiKGrMyETDU61KBtWWc7wRBYAXv\n",
      "json_metadata": "{\"image\":[\"https://cdn.steemitimages.com/DQmXhNHvkv1g4etTwovgQZ4aj2n2Lj8PgQpeyrYDNxVZfFH/image.png\"],\"links\":[\"https://blog.iota.org/introducing-masked-authenticated-messaging-e55c1822d50e\",\"https://github.com/iotaledger/mam.client.js/\",\"http://www.steves-internet-guide.com/understanding-mqtt-topics/\",\"https://steemit.com/iota/@mragic/how-to-send-ruuvitag-sensor-data-to-the-iota-tangle-with-mam-using-a-raspberry-pi-3\"],\"app\":\"steemit/0.2\",\"format\":\"markdown\",\"tags\":[\"mam\",\"raspberrypi\",\"python\"]}"
    }
  ]
}2022/05/14 08:47:09
2022/05/14 08:47:09
| parent author | |
| parent permlink | raspberrypi |
| author | mragic |
| permlink | how-to-build-a-cat-detector-with-a-raspberry-pi-and-a-pi-noir-camera-using-deep-learning-part-iii |
| title | How to build a cat detector with a Raspberry Pi and a Pi Noir camera using Deep Learning - Part III |
| body | @@ -15687,290 +15687,4 @@ %0A--- -%0A***%0AETH: 0x6c54eA14109f3E97cdfC02b0C5AbE88e190BDf18%0A!%5B%5D(https://cdn.steemitimages.com/DQmPtrWD1WMJKvxg8uJ5NhyVfpmKHT6kTxXjdtYWUX6VLv3/image.png)%0ABitcoin: 35N7cEkjiKGrMyETDU61KBtWWc7wRBYAXv%0AIOTA: 9PDEUUFUTPLBNGORASBZGYXLWC9KLWWPGZFF9T9AHUKMLHHEVDWJJDUNXFJNADDHKT9ZKCNCVEY9MJRTZEWUHGASKY |
| json metadata | {"app":"steemit/0.2","tags":["cats","deeplearning","ai","keras"],"links":["https://steemit.com/raspberrypi/@mragic/how-to-build-a-cat-detector-with-a-raspberry-pi-and-a-pi-noir-camera-using-deep-learning-part-i","https://steemit.com/raspberrypi/@mragic/how-to-build-a-cat-detector-with-a-raspberry-pi-and-a-pi-noir-camera-using-deep-learning-part-ii","https://www.anaconda.com/download/","https://www.tensorflow.org/install/gpu","https://gist.github.com/yrevar/942d3a0ac09ec9e5eb3a","https://keras.io/applications/#inceptionv3","https://cloud.google.com/tpu/docs/inception-v3-advanced","https://keras.io/applications/","https://www.coursera.org/learn/neural-networks-deep-learning"],"format":"markdown","image":["https://cdn.steemitimages.com/DQmS1LEQXN3shy1eHCwv3Bo6SxwiWXPi8yYJ9QiMo1oG51C/07-20180422181348-03_cropped.jpg","https://cdn.steemitimages.com/DQmWZzzfHxf5MC3snPCGNn2GmWQRifRjwaR7C4mjjRsQNvN/03-20180422153419-03_cropped.jpg","https://cdn.steemitimages.com/DQmPZC2t6r8RQB4JMbBqaJJJfniuDyNtG4EFS1WsKLcAiXo/imageExample.png","https://cdn.steemitimages.com/DQmP34jSaScD5QGnyBMCyVEiAocenwdHbjL58L7y9tUoGLR/image.png"]} |
| Transaction Info | Block #64157131/Trx b9c3f2a53196e729a19033dddf89360db9dcaa86 |
View Raw JSON Data
{
  "trx_id": "b9c3f2a53196e729a19033dddf89360db9dcaa86",
  "block": 64157131,
  "trx_in_block": 2,
  "op_in_trx": 0,
  "virtual_op": 0,
  "timestamp": "2022-05-14T08:47:09",
  "op": [
    "comment",
    {
      "parent_author": "",
      "parent_permlink": "raspberrypi",
      "author": "mragic",
      "permlink": "how-to-build-a-cat-detector-with-a-raspberry-pi-and-a-pi-noir-camera-using-deep-learning-part-iii",
      "title": "How to build a cat detector with a Raspberry Pi and a Pi Noir camera using Deep Learning - Part III",
      "body": "@@ -15687,290 +15687,4 @@\n %0A---\n-%0A***%0AETH: 0x6c54eA14109f3E97cdfC02b0C5AbE88e190BDf18%0A!%5B%5D(https://cdn.steemitimages.com/DQmPtrWD1WMJKvxg8uJ5NhyVfpmKHT6kTxXjdtYWUX6VLv3/image.png)%0ABitcoin: 35N7cEkjiKGrMyETDU61KBtWWc7wRBYAXv%0AIOTA: 9PDEUUFUTPLBNGORASBZGYXLWC9KLWWPGZFF9T9AHUKMLHHEVDWJJDUNXFJNADDHKT9ZKCNCVEY9MJRTZEWUHGASKY\n",
      "json_metadata": "{\"app\":\"steemit/0.2\",\"tags\":[\"cats\",\"deeplearning\",\"ai\",\"keras\"],\"links\":[\"https://steemit.com/raspberrypi/@mragic/how-to-build-a-cat-detector-with-a-raspberry-pi-and-a-pi-noir-camera-using-deep-learning-part-i\",\"https://steemit.com/raspberrypi/@mragic/how-to-build-a-cat-detector-with-a-raspberry-pi-and-a-pi-noir-camera-using-deep-learning-part-ii\",\"https://www.anaconda.com/download/\",\"https://www.tensorflow.org/install/gpu\",\"https://gist.github.com/yrevar/942d3a0ac09ec9e5eb3a\",\"https://keras.io/applications/#inceptionv3\",\"https://cloud.google.com/tpu/docs/inception-v3-advanced\",\"https://keras.io/applications/\",\"https://www.coursera.org/learn/neural-networks-deep-learning\"],\"format\":\"markdown\",\"image\":[\"https://cdn.steemitimages.com/DQmS1LEQXN3shy1eHCwv3Bo6SxwiWXPi8yYJ9QiMo1oG51C/07-20180422181348-03_cropped.jpg\",\"https://cdn.steemitimages.com/DQmWZzzfHxf5MC3snPCGNn2GmWQRifRjwaR7C4mjjRsQNvN/03-20180422153419-03_cropped.jpg\",\"https://cdn.steemitimages.com/DQmPZC2t6r8RQB4JMbBqaJJJfniuDyNtG4EFS1WsKLcAiXo/imageExample.png\",\"https://cdn.steemitimages.com/DQmP34jSaScD5QGnyBMCyVEiAocenwdHbjL58L7y9tUoGLR/image.png\"]}"
    }
  ]
}executive-boardsent 0.001 STEEM to @mragic- "❗ Hello mragic, great that you are using the STEEM blockchain. The Executive Board is publishing insider infos at https://discord.gg/KyBbmhh on how you will be earning the most coins. It's easy, just ..."2022/05/14 08:46:06
executive-boardsent 0.001 STEEM to @mragic- "❗ Hello mragic, great that you are using the STEEM blockchain. The Executive Board is publishing insider infos at https://discord.gg/KyBbmhh on how you will be earning the most coins. It's easy, just ..."
2022/05/14 08:46:06
| from | executive-board |
| to | mragic |
| amount | 0.001 STEEM |
| memo | ❗ Hello mragic, great that you are using the STEEM blockchain. The Executive Board is publishing insider infos at https://discord.gg/KyBbmhh on how you will be earning the most coins. It's easy, just follow the instructions. THE 1000X BOOSTER KEY is already waiting for you over there too. 😉 Warm regards, The Executive Board. |
| Transaction Info | Block #64157110/Trx dc8eebd4eb5e994a0841d1110149c95dfe8bbb9b |
View Raw JSON Data
{
  "trx_id": "dc8eebd4eb5e994a0841d1110149c95dfe8bbb9b",
  "block": 64157110,
  "trx_in_block": 1,
  "op_in_trx": 0,
  "virtual_op": 0,
  "timestamp": "2022-05-14T08:46:06",
  "op": [
    "transfer",
    {
      "from": "executive-board",
      "to": "mragic",
      "amount": "0.001 STEEM",
      "memo": "❗ Hello mragic, great that you are using the STEEM blockchain. The Executive Board is publishing insider infos at https://discord.gg/KyBbmhh on how you will be earning the most coins. It's easy, just follow the instructions. THE 1000X BOOSTER KEY is already waiting for you over there too. 😉 Warm regards, The Executive Board."
    }
  ]
}2022/05/14 08:46:06
2022/05/14 08:46:06
| parent author | |
| parent permlink | raspberrypi |
| author | mragic |
| permlink | how-to-build-a-cat-detector-with-a-raspberry-pi-and-a-pi-noir-camera-using-deep-learning-part-iv |
| title | How to build a cat detector with a Raspberry Pi and a Pi Noir camera using Deep Learning - Part IV |
| body | @@ -5795,202 +5795,4 @@ fun! -%0A%0A***%0A***%0AETH: 0x6c54eA14109f3E97cdfC02b0C5AbE88e190BDf18%0ABitcoin: 35N7cEkjiKGrMyETDU61KBtWWc7wRBYAXv%0AIOTA: 9PDEUUFUTPLBNGORASBZGYXLWC9KLWWPGZFF9T9AHUKMLHHEVDWJJDUNXFJNADDHKT9ZKCNCVEY9MJRTZEWUHGASKY |
| json metadata | {"image":["https://cdn.steemitimages.com/DQmafefWEDinAMcoji3Dsc2cp1pDXkvnbSqxWnHV2AgU2PD/373-20180426190529-04_cropped.jpg","https://cdn.steemitimages.com/DQmaFg724MqmeLYdVVAgjaE1cLDnjbiWpZ8Kc5o2qdGzY2T/02-20180422124842-00_cropped.jpg"],"format":"markdown","links":["https://steemit.com/raspberrypi/@mragic/how-to-build-a-cat-detector-with-a-raspberry-pi-and-a-pi-noir-camera-using-deep-learning-part-i","https://steemit.com/raspberrypi/@mragic/how-to-build-a-cat-detector-with-a-raspberry-pi-and-a-pi-noir-camera-using-deep-learning-part-ii","https://steemit.com/raspberrypi/@mragic/how-to-build-a-cat-detector-with-a-raspberry-pi-and-a-pi-noir-camera-using-deep-learning-part-iii","http://www.zerorpc.io/"],"tags":["cats","deeplearning","ai","keras"],"app":"steemit/0.2"} |
| Transaction Info | Block #64157110/Trx 02b4da42cccca984cb5af3768da40ac46e90b74a |
View Raw JSON Data
{
  "trx_id": "02b4da42cccca984cb5af3768da40ac46e90b74a",
  "block": 64157110,
  "trx_in_block": 0,
  "op_in_trx": 0,
  "virtual_op": 0,
  "timestamp": "2022-05-14T08:46:06",
  "op": [
    "comment",
    {
      "parent_author": "",
      "parent_permlink": "raspberrypi",
      "author": "mragic",
      "permlink": "how-to-build-a-cat-detector-with-a-raspberry-pi-and-a-pi-noir-camera-using-deep-learning-part-iv",
      "title": "How to build a cat detector with a Raspberry Pi and a Pi Noir camera using Deep Learning - Part IV",
      "body": "@@ -5795,202 +5795,4 @@\n fun!\n-%0A%0A***%0A***%0AETH: 0x6c54eA14109f3E97cdfC02b0C5AbE88e190BDf18%0ABitcoin: 35N7cEkjiKGrMyETDU61KBtWWc7wRBYAXv%0AIOTA: 9PDEUUFUTPLBNGORASBZGYXLWC9KLWWPGZFF9T9AHUKMLHHEVDWJJDUNXFJNADDHKT9ZKCNCVEY9MJRTZEWUHGASKY\n",
      "json_metadata": "{\"image\":[\"https://cdn.steemitimages.com/DQmafefWEDinAMcoji3Dsc2cp1pDXkvnbSqxWnHV2AgU2PD/373-20180426190529-04_cropped.jpg\",\"https://cdn.steemitimages.com/DQmaFg724MqmeLYdVVAgjaE1cLDnjbiWpZ8Kc5o2qdGzY2T/02-20180422124842-00_cropped.jpg\"],\"format\":\"markdown\",\"links\":[\"https://steemit.com/raspberrypi/@mragic/how-to-build-a-cat-detector-with-a-raspberry-pi-and-a-pi-noir-camera-using-deep-learning-part-i\",\"https://steemit.com/raspberrypi/@mragic/how-to-build-a-cat-detector-with-a-raspberry-pi-and-a-pi-noir-camera-using-deep-learning-part-ii\",\"https://steemit.com/raspberrypi/@mragic/how-to-build-a-cat-detector-with-a-raspberry-pi-and-a-pi-noir-camera-using-deep-learning-part-iii\",\"http://www.zerorpc.io/\"],\"tags\":[\"cats\",\"deeplearning\",\"ai\",\"keras\"],\"app\":\"steemit/0.2\"}"
    }
  ]
}2022/05/14 08:44:57
2022/05/14 08:44:57
| parent author | |
| parent permlink | iota |
| author | mragic |
| permlink | how-to-send-ruuvitag-sensor-data-to-the-iota-tangle-with-mam-using-a-raspberry-pi-3 |
| title | How to send ruuvitag sensor data to the iota tangle with mam using a raspberry pi 3 |
| body | @@ -6491,194 +6491,4 @@ %0A--- -%0A%0AIOTA: 9PDEUUFUTPLBNGORASBZGYXLWC9KLWWPGZFF9T9AHUKMLHHEVDWJJDUNXFJNADDHKT9ZKCNCVEY9MJRTZEWUHGASKY%0AETH: 0x6c54eA14109f3E97cdfC02b0C5AbE88e190BDf18%0ABitcoin: 35N7cEkjiKGrMyETDU61KBtWWc7wRBYAXv |
| json metadata | {"links":["https://www.iota.org/","https://www.youtube.com/playlist?list=PLmL13yqb6OxdIf6CQMHf7hUcDZBbxHyza","https://iotasalad.org/nodes"],"format":"markdown","app":"steemit/0.2","tags":["ruuvitag","raspberrypi","mam","javascript"]} |
| Transaction Info | Block #64157087/Trx c3a17846e162181af055f17a9fd80095a7a2f9a2 |
View Raw JSON Data
{
  "trx_id": "c3a17846e162181af055f17a9fd80095a7a2f9a2",
  "block": 64157087,
  "trx_in_block": 1,
  "op_in_trx": 0,
  "virtual_op": 0,
  "timestamp": "2022-05-14T08:44:57",
  "op": [
    "comment",
    {
      "parent_author": "",
      "parent_permlink": "iota",
      "author": "mragic",
      "permlink": "how-to-send-ruuvitag-sensor-data-to-the-iota-tangle-with-mam-using-a-raspberry-pi-3",
      "title": "How to send ruuvitag sensor data to the iota tangle with mam using a raspberry pi 3",
      "body": "@@ -6491,194 +6491,4 @@\n %0A---\n-%0A%0AIOTA: 9PDEUUFUTPLBNGORASBZGYXLWC9KLWWPGZFF9T9AHUKMLHHEVDWJJDUNXFJNADDHKT9ZKCNCVEY9MJRTZEWUHGASKY%0AETH: 0x6c54eA14109f3E97cdfC02b0C5AbE88e190BDf18%0ABitcoin: 35N7cEkjiKGrMyETDU61KBtWWc7wRBYAXv\n",
      "json_metadata": "{\"links\":[\"https://www.iota.org/\",\"https://www.youtube.com/playlist?list=PLmL13yqb6OxdIf6CQMHf7hUcDZBbxHyza\",\"https://iotasalad.org/nodes\"],\"format\":\"markdown\",\"app\":\"steemit/0.2\",\"tags\":[\"ruuvitag\",\"raspberrypi\",\"mam\",\"javascript\"]}"
    }
  ]
}2022/01/17 20:58:06
2022/01/17 20:58:06
| delegator | steem |
| delegatee | mragic |
| vesting shares | 8981.658185 VESTS |
| Transaction Info | Block #60821367/Trx 31fd9d2f70b560c140e9975f197a283577b29d76 |
View Raw JSON Data
{
  "trx_id": "31fd9d2f70b560c140e9975f197a283577b29d76",
  "block": 60821367,
  "trx_in_block": 7,
  "op_in_trx": 0,
  "virtual_op": 0,
  "timestamp": "2022-01-17T20:58:06",
  "op": [
    "delegate_vesting_shares",
    {
      "delegator": "steem",
      "delegatee": "mragic",
      "vesting_shares": "8981.658185 VESTS"
    }
  ]
}2021/06/14 04:15:00
2021/06/14 04:15:00
| delegator | steem |
| delegatee | mragic |
| vesting shares | 9165.852473 VESTS |
| Transaction Info | Block #54611819/Trx 5d0d0f04cfaeca3d1c26e1e248b9ab833fc09581 |
View Raw JSON Data
{
  "trx_id": "5d0d0f04cfaeca3d1c26e1e248b9ab833fc09581",
  "block": 54611819,
  "trx_in_block": 3,
  "op_in_trx": 0,
  "virtual_op": 0,
  "timestamp": "2021-06-14T04:15:00",
  "op": [
    "delegate_vesting_shares",
    {
      "delegator": "steem",
      "delegatee": "mragic",
      "vesting_shares": "9165.852473 VESTS"
    }
  ]
}2020/12/11 14:29:30
2020/12/11 14:29:30
| delegator | steem |
| delegatee | mragic |
| vesting shares | 9353.274447 VESTS |
| Transaction Info | Block #49359147/Trx 5ae43c5203bd2d792bfc5b80efa32368fdf0324a |
View Raw JSON Data
{
  "trx_id": "5ae43c5203bd2d792bfc5b80efa32368fdf0324a",
  "block": 49359147,
  "trx_in_block": 2,
  "op_in_trx": 0,
  "virtual_op": 0,
  "timestamp": "2020-12-11T14:29:30",
  "op": [
    "delegate_vesting_shares",
    {
      "delegator": "steem",
      "delegatee": "mragic",
      "vesting_shares": "9353.274447 VESTS"
    }
  ]
}2020/12/06 08:05:48
2020/12/06 08:05:48
| delegator | steem |
| delegatee | mragic |
| vesting shares | 1912.543513 VESTS |
| Transaction Info | Block #49210687/Trx c5e253bb01d30ce61b91bc1ab33f71be9ddd7fb1 |
View Raw JSON Data
{
  "trx_id": "c5e253bb01d30ce61b91bc1ab33f71be9ddd7fb1",
  "block": 49210687,
  "trx_in_block": 3,
  "op_in_trx": 0,
  "virtual_op": 0,
  "timestamp": "2020-12-06T08:05:48",
  "op": [
    "delegate_vesting_shares",
    {
      "delegator": "steem",
      "delegatee": "mragic",
      "vesting_shares": "1912.543513 VESTS"
    }
  ]
}2020/12/05 18:07:12
2020/12/05 18:07:12
| delegator | steem |
| delegatee | mragic |
| vesting shares | 9359.482301 VESTS |
| Transaction Info | Block #49194232/Trx 800ee178999da21fdc08dd0f48f08de95b15012b |
View Raw JSON Data
{
  "trx_id": "800ee178999da21fdc08dd0f48f08de95b15012b",
  "block": 49194232,
  "trx_in_block": 2,
  "op_in_trx": 0,
  "virtual_op": 0,
  "timestamp": "2020-12-05T18:07:12",
  "op": [
    "delegate_vesting_shares",
    {
      "delegator": "steem",
      "delegatee": "mragic",
      "vesting_shares": "9359.482301 VESTS"
    }
  ]
}2020/11/02 22:36:00
2020/11/02 22:36:00
| delegator | steem |
| delegatee | mragic |
| vesting shares | 1920.017158 VESTS |
| Transaction Info | Block #48266002/Trx cfc7c3f431aef044feeaf53dc4cff1b3bfb40e50 |
View Raw JSON Data
{
  "trx_id": "cfc7c3f431aef044feeaf53dc4cff1b3bfb40e50",
  "block": 48266002,
  "trx_in_block": 1,
  "op_in_trx": 0,
  "virtual_op": 0,
  "timestamp": "2020-11-02T22:36:00",
  "op": [
    "delegate_vesting_shares",
    {
      "delegator": "steem",
      "delegatee": "mragic",
      "vesting_shares": "1920.017158 VESTS"
    }
  ]
}2020/05/09 09:06:33
2020/05/09 09:06:33
| delegator | steem |
| delegatee | mragic |
| vesting shares | 9562.287660 VESTS |
| Transaction Info | Block #43220981/Trx 3f16850127496fd34dce55bc48a1fe9950ed711d |
View Raw JSON Data
{
  "trx_id": "3f16850127496fd34dce55bc48a1fe9950ed711d",
  "block": 43220981,
  "trx_in_block": 22,
  "op_in_trx": 0,
  "virtual_op": 0,
  "timestamp": "2020-05-09T09:06:33",
  "op": [
    "delegate_vesting_shares",
    {
      "delegator": "steem",
      "delegatee": "mragic",
      "vesting_shares": "9562.287660 VESTS"
    }
  ]
}2020/05/08 13:13:30
2020/05/08 13:13:30
| delegator | steem |
| delegatee | mragic |
| vesting shares | 1953.311140 VESTS |
| Transaction Info | Block #43197686/Trx c86ca54f723e665334f20c622f662b78eb18178e |
View Raw JSON Data
{
  "trx_id": "c86ca54f723e665334f20c622f662b78eb18178e",
  "block": 43197686,
  "trx_in_block": 21,
  "op_in_trx": 0,
  "virtual_op": 0,
  "timestamp": "2020-05-08T13:13:30",
  "op": [
    "delegate_vesting_shares",
    {
      "delegator": "steem",
      "delegatee": "mragic",
      "vesting_shares": "1953.311140 VESTS"
    }
  ]
}2020/03/02 00:50:42
2020/03/02 00:50:42
| delegator | steem |
| delegatee | mragic |
| vesting shares | 9597.253471 VESTS |
| Transaction Info | Block #41286483/Trx 02572db6e5216302ee312d97a4a374dd23b0a057 |
View Raw JSON Data
{
  "trx_id": "02572db6e5216302ee312d97a4a374dd23b0a057",
  "block": 41286483,
  "trx_in_block": 35,
  "op_in_trx": 0,
  "virtual_op": 0,
  "timestamp": "2020-03-02T00:50:42",
  "op": [
    "delegate_vesting_shares",
    {
      "delegator": "steem",
      "delegatee": "mragic",
      "vesting_shares": "9597.253471 VESTS"
    }
  ]
}amirthavigneshkgupvoted (100.00%) @mragic / how-to-send-sensor-data-from-python-to-iota-tangle-with-mam2019/10/21 15:18:42
amirthavigneshkgupvoted (100.00%) @mragic / how-to-send-sensor-data-from-python-to-iota-tangle-with-mam
2019/10/21 15:18:42
| voter | amirthavigneshkg |
| author | mragic |
| permlink | how-to-send-sensor-data-from-python-to-iota-tangle-with-mam |
| weight | 10000 (100.00%) |
| Transaction Info | Block #37480957/Trx 56f4548555a9bda2c978bfa6aba99142ed53e90b |
View Raw JSON Data
{
  "trx_id": "56f4548555a9bda2c978bfa6aba99142ed53e90b",
  "block": 37480957,
  "trx_in_block": 51,
  "op_in_trx": 0,
  "virtual_op": 0,
  "timestamp": "2019-10-21T15:18:42",
  "op": [
    "vote",
    {
      "voter": "amirthavigneshkg",
      "author": "mragic",
      "permlink": "how-to-send-sensor-data-from-python-to-iota-tangle-with-mam",
      "weight": 10000
    }
  ]
}2019/04/20 21:22:24
2019/04/20 21:22:24
| parent author | mragic |
| parent permlink | radon-monitoring-and-the-internet-of-things |
| author | steemitboard |
| permlink | steemitboard-notify-mragic-20190420t212223000z |
| title | |
| body | Congratulations @mragic! You received a personal award! <table><tr><td>https://steemitimages.com/70x70/http://steemitboard.com/@mragic/birthday1.png</td><td>Happy Birthday! - You are on the Steem blockchain for 1 year!</td></tr></table> <sub>_You can view [your badges on your Steem Board](https://steemitboard.com/@mragic) and compare to others on the [Steem Ranking](http://steemitboard.com/ranking/index.php?name=mragic)_</sub> > You can upvote this notification to help all Steem users. Learn how [here](https://steemit.com/steemitboard/@steemitboard/http-i-cubeupload-com-7ciqeo-png)! |
| json metadata | {"image":["https://steemitboard.com/img/notify.png"]} |
| Transaction Info | Block #32219980/Trx 1af60840df98e9a175b85ade92b0c2dc9646be4d |
View Raw JSON Data
{
  "trx_id": "1af60840df98e9a175b85ade92b0c2dc9646be4d",
  "block": 32219980,
  "trx_in_block": 19,
  "op_in_trx": 0,
  "virtual_op": 0,
  "timestamp": "2019-04-20T21:22:24",
  "op": [
    "comment",
    {
      "parent_author": "mragic",
      "parent_permlink": "radon-monitoring-and-the-internet-of-things",
      "author": "steemitboard",
      "permlink": "steemitboard-notify-mragic-20190420t212223000z",
      "title": "",
      "body": "Congratulations @mragic! You received a personal award!\n\n<table><tr><td>https://steemitimages.com/70x70/http://steemitboard.com/@mragic/birthday1.png</td><td>Happy Birthday! - You are on the Steem blockchain for 1 year!</td></tr></table>\n\n<sub>_You can view [your badges on your Steem Board](https://steemitboard.com/@mragic) and compare to others on the [Steem Ranking](http://steemitboard.com/ranking/index.php?name=mragic)_</sub>\n\n\n> You can upvote this notification to help all Steem users. Learn how [here](https://steemit.com/steemitboard/@steemitboard/http-i-cubeupload-com-7ciqeo-png)!",
      "json_metadata": "{\"image\":[\"https://steemitboard.com/img/notify.png\"]}"
    }
  ]
}2019/04/03 21:09:09
2019/04/03 21:09:09
| delegator | steem |
| delegatee | mragic |
| vesting shares | 9793.325407 VESTS |
| Transaction Info | Block #31732003/Trx 69fd96727d5a0cd6efc2d34767910d0880c86098 |
View Raw JSON Data
{
  "trx_id": "69fd96727d5a0cd6efc2d34767910d0880c86098",
  "block": 31732003,
  "trx_in_block": 21,
  "op_in_trx": 0,
  "virtual_op": 0,
  "timestamp": "2019-04-03T21:09:09",
  "op": [
    "delegate_vesting_shares",
    {
      "delegator": "steem",
      "delegatee": "mragic",
      "vesting_shares": "9793.325407 VESTS"
    }
  ]
}2019/01/18 12:47:33
2019/01/18 12:47:33
| parent author | mragic |
| parent permlink | radon-monitoring-and-the-internet-of-things |
| author | partiko |
| permlink | partiko-re-mragic-radon-monitoring-and-the-internet-of-things-20190118t124733376z |
| title | |
| body | [](https://partiko-io.app.link/A27hLeUkgT) |
| json metadata | {"app":"partiko"} |
| Transaction Info | Block #29563647/Trx 66e02d98006bb33da4ad69fa399910169dcc8e51 |
View Raw JSON Data
{
"trx_id": "66e02d98006bb33da4ad69fa399910169dcc8e51",
"block": 29563647,
"trx_in_block": 10,
"op_in_trx": 0,
"virtual_op": 0,
"timestamp": "2019-01-18T12:47:33",
"op": [
"comment",
{
"parent_author": "mragic",
"parent_permlink": "radon-monitoring-and-the-internet-of-things",
"author": "partiko",
"permlink": "partiko-re-mragic-radon-monitoring-and-the-internet-of-things-20190118t124733376z",
"title": "",
"body": "[](https://partiko-io.app.link/A27hLeUkgT)",
"json_metadata": "{\"app\":\"partiko\"}"
}
]
}mragicreceived 0.002 SP curation reward for @mostafamd / re-mragic-how-to-send-ruuvitag-sensor-data-to-the-iota-tangle-with-mam-using-a-raspberry-pi-3-20181227t080010844z2019/01/03 08:00:18
mragicreceived 0.002 SP curation reward for @mostafamd / re-mragic-how-to-send-ruuvitag-sensor-data-to-the-iota-tangle-with-mam-using-a-raspberry-pi-3-20181227t080010844z
2019/01/03 08:00:18
| curator | mragic |
| reward | 4.019599 VESTS |
| comment author | mostafamd |
| comment permlink | re-mragic-how-to-send-ruuvitag-sensor-data-to-the-iota-tangle-with-mam-using-a-raspberry-pi-3-20181227t080010844z |
| Transaction Info | Block #29126311/Virtual Operation #6 |
View Raw JSON Data
{
  "trx_id": "0000000000000000000000000000000000000000",
  "block": 29126311,
  "trx_in_block": 4294967295,
  "op_in_trx": 0,
  "virtual_op": 6,
  "timestamp": "2019-01-03T08:00:18",
  "op": [
    "curation_reward",
    {
      "curator": "mragic",
      "reward": "4.019599 VESTS",
      "comment_author": "mostafamd",
      "comment_permlink": "re-mragic-how-to-send-ruuvitag-sensor-data-to-the-iota-tangle-with-mam-using-a-raspberry-pi-3-20181227t080010844z"
    }
  ]
}magpieloverupvoted (100.00%) @mragic / radon-monitoring-and-the-internet-of-things2019/01/02 19:31:27
magpieloverupvoted (100.00%) @mragic / radon-monitoring-and-the-internet-of-things
2019/01/02 19:31:27
| voter | magpielover |
| author | mragic |
| permlink | radon-monitoring-and-the-internet-of-things |
| weight | 10000 (100.00%) |
| Transaction Info | Block #29111354/Trx b5397415ed7a961c24bf051182b63a4b89ff5f25 |
View Raw JSON Data
{
  "trx_id": "b5397415ed7a961c24bf051182b63a4b89ff5f25",
  "block": 29111354,
  "trx_in_block": 7,
  "op_in_trx": 0,
  "virtual_op": 0,
  "timestamp": "2019-01-02T19:31:27",
  "op": [
    "vote",
    {
      "voter": "magpielover",
      "author": "mragic",
      "permlink": "radon-monitoring-and-the-internet-of-things",
      "weight": 10000
    }
  ]
}filipinoupvoted (10.00%) @mragic / radon-monitoring-and-the-internet-of-things2019/01/02 19:31:03
filipinoupvoted (10.00%) @mragic / radon-monitoring-and-the-internet-of-things
2019/01/02 19:31:03
| voter | filipino |
| author | mragic |
| permlink | radon-monitoring-and-the-internet-of-things |
| weight | 1000 (10.00%) |
| Transaction Info | Block #29111346/Trx cc375610d807d28457bd6e2056da562502a5007e |
View Raw JSON Data
{
  "trx_id": "cc375610d807d28457bd6e2056da562502a5007e",
  "block": 29111346,
  "trx_in_block": 27,
  "op_in_trx": 0,
  "virtual_op": 0,
  "timestamp": "2019-01-02T19:31:03",
  "op": [
    "vote",
    {
      "voter": "filipino",
      "author": "mragic",
      "permlink": "radon-monitoring-and-the-internet-of-things",
      "weight": 1000
    }
  ]
}mragicpublished a new post: radon-monitoring-and-the-internet-of-things2019/01/02 18:57:51
mragicpublished a new post: radon-monitoring-and-the-internet-of-things
2019/01/02 18:57:51
| parent author | |
| parent permlink | radon |
| author | mragic |
| permlink | radon-monitoring-and-the-internet-of-things |
| title | Radon Monitoring and the Internet Of Things |
| body | # Radon Radon (Rn) is a radioactive noble gas. It is created in the decay chains of Uranium and Thorium. All of its isotopes are radioactive, and has semistable decay products that emit alpha particles when decaying. Due to its high density, it likely accumulates in buildungs, preferably in basements. The natural concentration depends a lot on where one lives. It can be particularly be high in regions with granite bedrock, due to the fact that granite contains a high level of Uranium and Thorium. 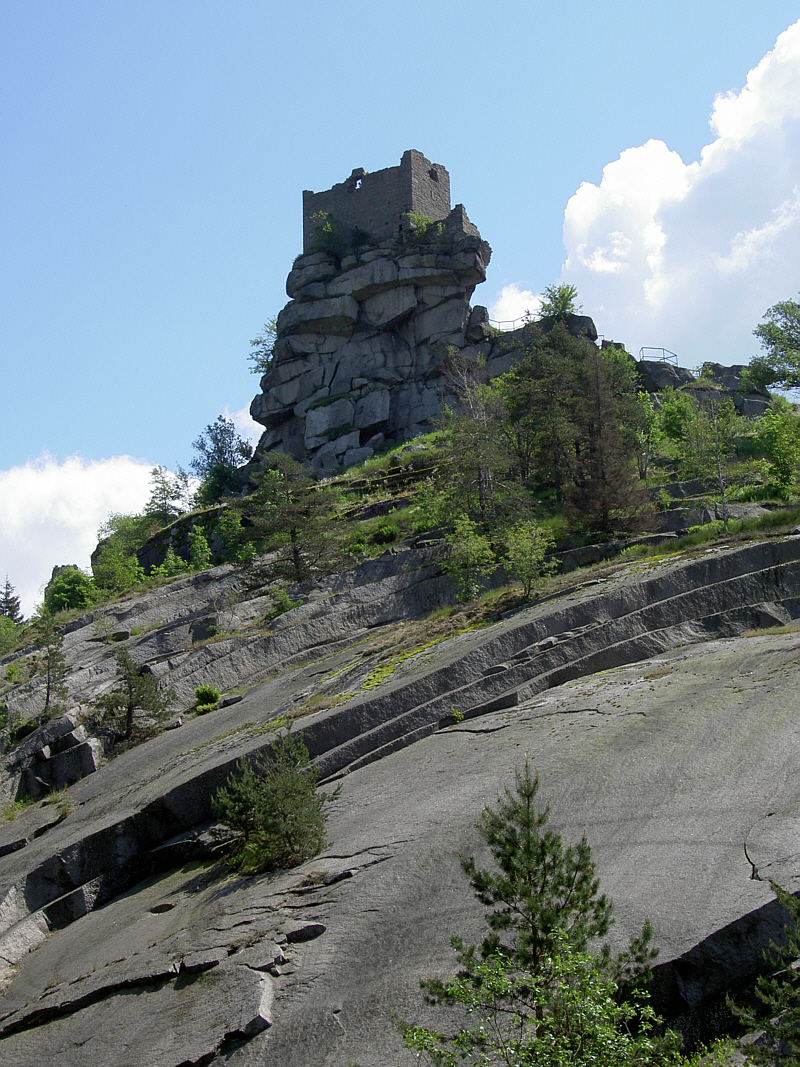 *Granite rock. Walter J. Pilsak, CC BY-SA 3.0, https://commons.wikimedia.org/w/index.php?curid=23196906* Switzerland has created a radon map with a resolution of 1km x 1km: 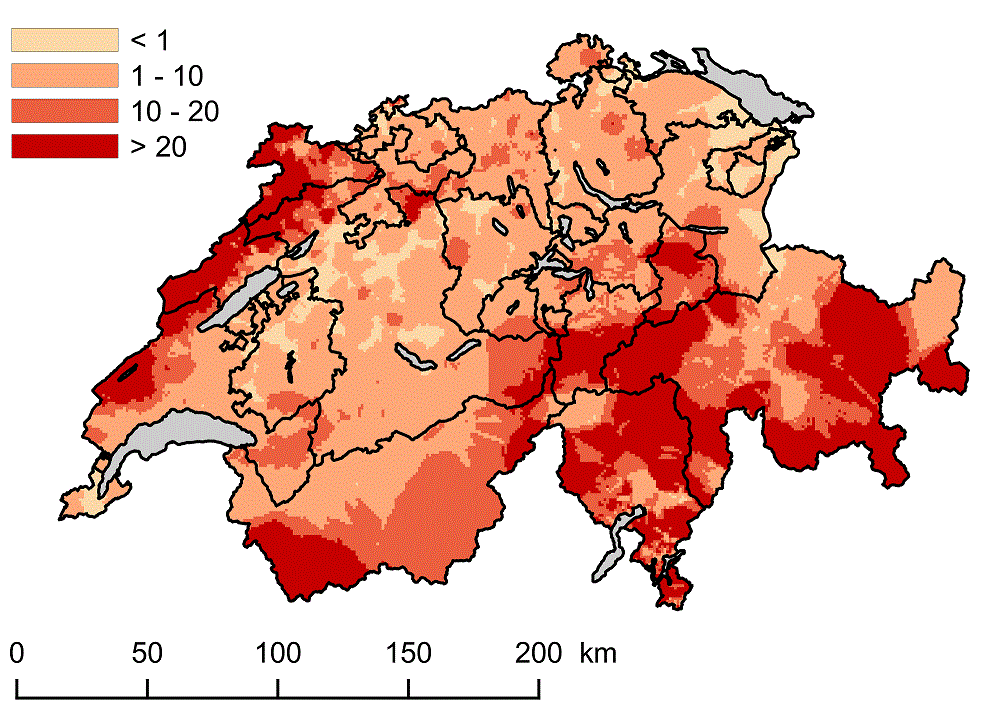 *Radon map of Switzerland. The colors denote the probability that the reference limit of 300Bq/m3 is exceeded. Source: Federal Office of Public Health, https://www.bag.admin.ch/bag/en/home/gesund-leben/umwelt-und-gesundheit/strahlung-radioaktivitaet-schall/radon/radongebiete-ch.html For an interactive version click here: https://map.geo.admin.ch/?layers=ch.bag.radonkarte&lang=de&topic=ech&bgLayer=ch.swisstopo.pixelkarte-farbe&layers_opacity=0.75* # Effects on Health The emitted alpha particles of the Radon decay products have a negative influence on human health. A study was performed in 2008 in Germany and Switzerland (*Menzler S. et al, 2008, Health Physics: August 2008 - Volume 95 - Issue 2 - p 179-189 doi: 10.1097/01.HP.0000309769.55126.03*). It was found that the average number of decays is 49Bq/m3 and 78Bq/3 for Germany and Switzerland, respectively. This leads to 5% and 8.3% of all cases of lung cancer for the two countries, respectively. Radon is thus the second highest cause for lung cancer after smoking and before asbestos. Radon cannot be smelled or tasted or felt, so people are not aware of increased radon levels in their homes. Switzerland requires thus to monitor the radon levels regularly such that the legal limit of 300 Bq/m3 of air is not exceeded. There are several laboratories that are certified to measure radon concentration in buildings. In case the averaged radon concentration exceeds the legal limit, the house owners are required to take measures against the high radon levels. # Radon Monitoring and the Internet of Things Now this is all very static. Counteracting high radon concentration in a living room is actually quite simple, just open two windows and let the wind blow out the gas. The problem is that radon cannot be smelled, so we need a real time detector to measure radon concentrations. Luckily, measuring Radon is not that difficult. For example, the company Airthings develops affordable radon meters running on battery that can be installed in your home: https://airthings.com/ . As it is 2019 and Airthings is a modern company, several of their devices (e.g. the Wave) come with bluetooth, and an app for iphone and android. Additionally, it has a nice feature, when waving the hand above the device, it turns green or red, depending if the radon level exceeds a certain amount. Now let's assume that a home owner installs one of these devices in a building. Let's assume that the device can publish its data once per day (or more often) to the internet of things (IOT). Now if the federal office of public health wants to check if the radon level in a building exceeds the legal limit, it subscribes to the data stream. Now not everybody wants to publish their data to the public, so the data must be masked (encrypted) with a key, that belongs to the house owner, and has to be requested from him or her by the interested data consumer. Furthermore, it should also be possible to sell this data, as it has a certain value. If there was such a solution, there would be no need for certified laboratories that measure Radon concentrations, but there would be a need for **certified sensors** and a way to publish, mask and sell sensor data. Furthermore, maybe there is more usage for the same data! There is some hints that Radon levels can be used as a predictor for earthquakes. However, the current evidence for a correlation between Radon and earthquakes is not significant. If, however, the Radon level can be accessed in a fine grid by scientists after an earthquake, they will have much more data to find correlations. # Radon Monitoring, Internet Of Things and IOTA Luckily, the foundations of such a IOT data exchange, where data can be published and sold by data producers, and subscribed to and bought by data consumers exists already. It is called IOTA, and is a decentralized ledger, at least in its final form. IOTA is designed to be a foundation for the machine to machine economy, and perfectly suited to publish IOT data. IOTA is still under heavy development. We will use the current version of the masked authenticated messaging (MAM), which allows one to published encrypted. Up to now, there is no data marketplace, so the data cannot be sold yet. However, this is planned in the near future. # Send Radon Levels from an Airthings Wave to the IOTA Tangle Now we come to the practical part. I will use the same infrastructure that I already described in an older blog: https://steemit.com/iota/@mragic/how-to-send-sensor-data-from-python-to-iota-tangle-with-mam Set up your Raspberry Pi the same way. You will need to install the bluetooth dependencies on your Raspberry Pi: ```bash source /home/pi/venv/mqtt-to-iota pip install bluepy ``` Then switch on bluetooth with: ```bash pi@raspberrypi:~$ sudo bluetoothctl [bluetooth]# power on [bluetooth]# show [bluetooth]# exit ``` Now you will need the MAC address of your Wave. You can find it with the python script from the airthings blog, and run find_wave.py as super user: ```bash wget airthings.com/tech/find_wave.py sudo find_wave.py ``` The repository (https://github.com/magictimelapse/mqtt-iota) contains a python script publish_radon_data.py. Open it and change the MAC address. Run in one terminal the script mqtt_to_mam_tangle.js ```bash node mqtt_to_mam_tangle.js ``` and in a different terminal the radon data publisher: ```bash python publish_radon_data.py ``` With a mam_receiver.js script (for example from here: https://steemit.com/iota/@mragic/how-to-send-ruuvitag-sensor-data-to-the-iota-tangle-with-mam-using-a-raspberry-pi-3), you can check if your radon sensor data goes through the IOTA tangle! |
| json metadata | {"tags":["radon","iota","raspberrypi","iot"],"image":["https://cdn.steemitimages.com/DQmXYWbybenENFEGEspVMHDRneaYRzsrqcqvL5LQyMJWge1/Ruine-Flossenbuerg-WJP.jpg","https://cdn.steemitimages.com/DQmWieSXqvrohYMH2XYCjJvzKR5bmw53JURiiWWPeNukXfW/image.png"],"links":["https://commons.wikimedia.org/w/index.php?curid=23196906","https://www.bag.admin.ch/bag/en/home/gesund-leben/umwelt-und-gesundheit/strahlung-radioaktivitaet-schall/radon/radongebiete-ch.html","https://map.geo.admin.ch/?layers=ch.bag.radonkarte&lang=de&topic=ech&bgLayer=ch.swisstopo.pixelkarte-farbe&layers_opacity=0.75","https://airthings.com/","https://steemit.com/iota/@mragic/how-to-send-sensor-data-from-python-to-iota-tangle-with-mam","https://github.com/magictimelapse/mqtt-iota","https://steemit.com/iota/@mragic/how-to-send-ruuvitag-sensor-data-to-the-iota-tangle-with-mam-using-a-raspberry-pi-3"],"app":"steemit/0.1","format":"markdown"} |
| Transaction Info | Block #29110684/Trx c05f05dd9b4913948c528561677c8afa644cfeb3 |
View Raw JSON Data
{
"trx_id": "c05f05dd9b4913948c528561677c8afa644cfeb3",
"block": 29110684,
"trx_in_block": 33,
"op_in_trx": 0,
"virtual_op": 0,
"timestamp": "2019-01-02T18:57:51",
"op": [
"comment",
{
"parent_author": "",
"parent_permlink": "radon",
"author": "mragic",
"permlink": "radon-monitoring-and-the-internet-of-things",
"title": "Radon Monitoring and the Internet Of Things",
"body": "# Radon\nRadon (Rn) is a radioactive noble gas. It is created in the decay chains of Uranium and Thorium. All of its isotopes are radioactive, and has semistable decay products that emit alpha particles when decaying. Due to its high density, it likely accumulates in buildungs, preferably in basements. The natural concentration depends a lot on where one lives. It can be particularly be high in regions with granite bedrock, due to the fact that granite contains a high level of Uranium and Thorium.\n\n*Granite rock. Walter J. Pilsak, CC BY-SA 3.0, https://commons.wikimedia.org/w/index.php?curid=23196906*\nSwitzerland has created a radon map with a resolution of 1km x 1km:\n\n*Radon map of Switzerland. The colors denote the probability that the reference limit of 300Bq/m3 is exceeded. \nSource: Federal Office of Public Health, https://www.bag.admin.ch/bag/en/home/gesund-leben/umwelt-und-gesundheit/strahlung-radioaktivitaet-schall/radon/radongebiete-ch.html\nFor an interactive version click here: https://map.geo.admin.ch/?layers=ch.bag.radonkarte&lang=de&topic=ech&bgLayer=ch.swisstopo.pixelkarte-farbe&layers_opacity=0.75*\n# Effects on Health\nThe emitted alpha particles of the Radon decay products have a negative influence on human health. A study was performed in 2008 in Germany and Switzerland (*Menzler S. et al, 2008, Health Physics: August 2008 - Volume 95 - Issue 2 - p 179-189 doi: 10.1097/01.HP.0000309769.55126.03*). It was found that the average number of decays is 49Bq/m3 and 78Bq/3 for Germany and Switzerland, respectively. This leads to 5% and 8.3% of all cases of lung cancer for the two countries, respectively. Radon is thus the second highest cause for lung cancer after smoking and before asbestos.\nRadon cannot be smelled or tasted or felt, so people are not aware of increased radon levels in their homes. Switzerland requires thus to monitor the radon levels regularly such that the legal limit of 300 Bq/m3 of air is not exceeded. There are several laboratories that are certified to measure radon concentration in buildings. In case the averaged radon concentration exceeds the legal limit, the house owners are required to take measures against the high radon levels.\n\n# Radon Monitoring and the Internet of Things\nNow this is all very static. Counteracting high radon concentration in a living room is actually quite simple, just open two windows and let the wind blow out the gas. The problem is that radon cannot be smelled, so we need a real time detector to measure radon concentrations. Luckily, measuring Radon is not that difficult. For example, the company Airthings develops affordable radon meters running on battery that can be installed in your home: https://airthings.com/ . As it is 2019 and Airthings is a modern company, several of their devices (e.g. the Wave) come with bluetooth, and an app for iphone and android. Additionally, it has a nice feature, when waving the hand above the device, it turns green or red, depending if the radon level exceeds a certain amount.\nNow let's assume that a home owner installs one of these devices in a building. Let's assume that the device can publish its data once per day (or more often) to the internet of things (IOT). Now if the federal office of public health wants to check if the radon level in a building exceeds the legal limit, it subscribes to the data stream. Now not everybody wants to publish their data to the public, so the data must be masked (encrypted) with a key, that belongs to the house owner, and has to be requested from him or her by the interested data consumer. Furthermore, it should also be possible to sell this data, as it has a certain value.\nIf there was such a solution, there would be no need for certified laboratories that measure Radon concentrations, but there would be a need for **certified sensors** and a way to publish, mask and sell sensor data.\nFurthermore, maybe there is more usage for the same data! There is some hints that Radon levels can be used as a predictor for earthquakes. However, the current evidence for a correlation between Radon and earthquakes is not significant. If, however, the Radon level can be accessed in a fine grid by scientists after an earthquake, they will have much more data to find correlations.\n\n# Radon Monitoring, Internet Of Things and IOTA\nLuckily, the foundations of such a IOT data exchange, where data can be published and sold by data producers, and subscribed to and bought by data consumers exists already. It is called IOTA, and is a decentralized ledger, at least in its final form. IOTA is designed to be a foundation for the machine to machine economy, and perfectly suited to publish IOT data. IOTA is still under heavy development. We will use the current version of the masked authenticated messaging (MAM), which allows one to published encrypted. Up to now, there is no data marketplace, so the data cannot be sold yet. However, this is planned in the near future.\n\n# Send Radon Levels from an Airthings Wave to the IOTA Tangle\nNow we come to the practical part. I will use the same infrastructure that I already described in an older blog: https://steemit.com/iota/@mragic/how-to-send-sensor-data-from-python-to-iota-tangle-with-mam\nSet up your Raspberry Pi the same way. You will need to install the bluetooth dependencies on your Raspberry Pi:\n```bash\nsource /home/pi/venv/mqtt-to-iota\npip install bluepy\n```\nThen switch on bluetooth with:\n```bash\npi@raspberrypi:~$ sudo bluetoothctl\n[bluetooth]# power on\n[bluetooth]# show\n[bluetooth]# exit\n```\nNow you will need the MAC address of your Wave. You can find it with the python script from the airthings blog, and run find_wave.py as super user:\n```bash\nwget airthings.com/tech/find_wave.py\nsudo find_wave.py\n```\nThe repository (https://github.com/magictimelapse/mqtt-iota) contains a python script publish_radon_data.py. Open it and change the MAC address. Run in one terminal the script mqtt_to_mam_tangle.js\n```bash\nnode mqtt_to_mam_tangle.js\n```\nand in a different terminal the radon data publisher:\n```bash\npython publish_radon_data.py\n```\nWith a mam_receiver.js script (for example from here: https://steemit.com/iota/@mragic/how-to-send-ruuvitag-sensor-data-to-the-iota-tangle-with-mam-using-a-raspberry-pi-3), you can check if your radon sensor data goes through the IOTA tangle!",
"json_metadata": "{\"tags\":[\"radon\",\"iota\",\"raspberrypi\",\"iot\"],\"image\":[\"https://cdn.steemitimages.com/DQmXYWbybenENFEGEspVMHDRneaYRzsrqcqvL5LQyMJWge1/Ruine-Flossenbuerg-WJP.jpg\",\"https://cdn.steemitimages.com/DQmWieSXqvrohYMH2XYCjJvzKR5bmw53JURiiWWPeNukXfW/image.png\"],\"links\":[\"https://commons.wikimedia.org/w/index.php?curid=23196906\",\"https://www.bag.admin.ch/bag/en/home/gesund-leben/umwelt-und-gesundheit/strahlung-radioaktivitaet-schall/radon/radongebiete-ch.html\",\"https://map.geo.admin.ch/?layers=ch.bag.radonkarte&lang=de&topic=ech&bgLayer=ch.swisstopo.pixelkarte-farbe&layers_opacity=0.75\",\"https://airthings.com/\",\"https://steemit.com/iota/@mragic/how-to-send-sensor-data-from-python-to-iota-tangle-with-mam\",\"https://github.com/magictimelapse/mqtt-iota\",\"https://steemit.com/iota/@mragic/how-to-send-ruuvitag-sensor-data-to-the-iota-tangle-with-mam-using-a-raspberry-pi-3\"],\"app\":\"steemit/0.1\",\"format\":\"markdown\"}"
}
]
}2019/01/02 11:11:15
2019/01/02 11:11:15
| voter | acknowledgement |
| author | mragic |
| permlink | how-to-send-sensor-data-from-python-to-iota-tangle-with-mam |
| weight | 1000 (10.00%) |
| Transaction Info | Block #29101365/Trx e0a38def59ea618f38c52d8e89f08705c77f1c28 |
View Raw JSON Data
{
  "trx_id": "e0a38def59ea618f38c52d8e89f08705c77f1c28",
  "block": 29101365,
  "trx_in_block": 1,
  "op_in_trx": 0,
  "virtual_op": 0,
  "timestamp": "2019-01-02T11:11:15",
  "op": [
    "vote",
    {
      "voter": "acknowledgement",
      "author": "mragic",
      "permlink": "how-to-send-sensor-data-from-python-to-iota-tangle-with-mam",
      "weight": 1000
    }
  ]
}bukilandupvoted (0.52%) @mragic / how-to-send-sensor-data-from-python-to-iota-tangle-with-mam2019/01/02 10:57:54
bukilandupvoted (0.52%) @mragic / how-to-send-sensor-data-from-python-to-iota-tangle-with-mam
2019/01/02 10:57:54
| voter | bukiland |
| author | mragic |
| permlink | how-to-send-sensor-data-from-python-to-iota-tangle-with-mam |
| weight | 52 (0.52%) |
| Transaction Info | Block #29101098/Trx b3e25119e0ddcd97d28e10edc4742fec22e47ddd |
View Raw JSON Data
{
  "trx_id": "b3e25119e0ddcd97d28e10edc4742fec22e47ddd",
  "block": 29101098,
  "trx_in_block": 17,
  "op_in_trx": 0,
  "virtual_op": 0,
  "timestamp": "2019-01-02T10:57:54",
  "op": [
    "vote",
    {
      "voter": "bukiland",
      "author": "mragic",
      "permlink": "how-to-send-sensor-data-from-python-to-iota-tangle-with-mam",
      "weight": 52
    }
  ]
}2019/01/02 10:52:54
2019/01/02 10:52:54
| voter | steem.create |
| author | mragic |
| permlink | how-to-send-sensor-data-from-python-to-iota-tangle-with-mam |
| weight | 200 (2.00%) |
| Transaction Info | Block #29100998/Trx ea6427cbeba04cb175e74be162f1e189cdad129a |
View Raw JSON Data
{
  "trx_id": "ea6427cbeba04cb175e74be162f1e189cdad129a",
  "block": 29100998,
  "trx_in_block": 17,
  "op_in_trx": 0,
  "virtual_op": 0,
  "timestamp": "2019-01-02T10:52:54",
  "op": [
    "vote",
    {
      "voter": "steem.create",
      "author": "mragic",
      "permlink": "how-to-send-sensor-data-from-python-to-iota-tangle-with-mam",
      "weight": 200
    }
  ]
}2019/01/02 10:51:36
2019/01/02 10:51:36
| voter | steeming-hot |
| author | mragic |
| permlink | how-to-send-sensor-data-from-python-to-iota-tangle-with-mam |
| weight | 25 (0.25%) |
| Transaction Info | Block #29100973/Trx 496194b9ed181514e7e54cab00e60ff7b5888ed7 |
View Raw JSON Data
{
  "trx_id": "496194b9ed181514e7e54cab00e60ff7b5888ed7",
  "block": 29100973,
  "trx_in_block": 16,
  "op_in_trx": 0,
  "virtual_op": 0,
  "timestamp": "2019-01-02T10:51:36",
  "op": [
    "vote",
    {
      "voter": "steeming-hot",
      "author": "mragic",
      "permlink": "how-to-send-sensor-data-from-python-to-iota-tangle-with-mam",
      "weight": 25
    }
  ]
}mragicpublished a new post: how-to-send-sensor-data-from-python-to-iota-tangle-with-mam2019/01/02 10:45:36
mragicpublished a new post: how-to-send-sensor-data-from-python-to-iota-tangle-with-mam
2019/01/02 10:45:36
| parent author | |
| parent permlink | iota |
| author | mragic |
| permlink | how-to-send-sensor-data-from-python-to-iota-tangle-with-mam |
| title | How to send sensor data from python to IOTA tangle with MAM |
| body | Currently, the client APIs for IOTA are still under heavy development. The most stable client for the masked authenticated messaging API (See e.g. https://blog.iota.org/introducing-masked-authenticated-messaging-e55c1822d50e) is in javascript here: https://github.com/iotaledger/mam.client.js/ There might be a major update in the near future, called mam+ or mam2.0. Let's say we have now already written a python module reading a sensor connected to a raspberry pi. How can we get this data now onto the IOTA tangle when we are missing a python IOTA MAM client? A possible solution is to serialize the data in json object and send this json object to a IOTA MAM client written in javascript. In the internet of things world, there is already infrastructure for sending around small amount of data from IOT devices, for example mosquitto with the mqtt protocol. Compared to IOTA, mqtt needs a central broker (a central server), where data publisher and data subscriber connect to. Publisher can publish data on a topic, subscriber can subscribe to a topic. This already sounds very similar to IOTA MAM, only that mosquitto is not decentralized. 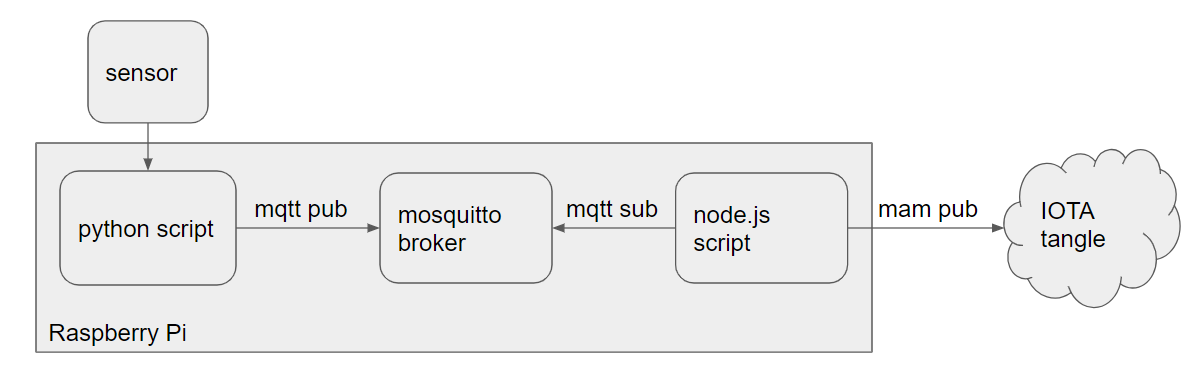 # Software Installation You find all the example node.js and python files in the git repository: ```bash git clone https://github.com/magictimelapse/mqtt-iota ``` Installing a mosquitto broker on a raspberry pi is very simple: ```bash sudo apt update sudo apt upgrade sudo apt install mosquitto mosquitto-clients ``` The mosquitto broker will conveniently start immediately as a service after installing the apt module: ```bash sudo service mosquitto status ● mosquitto.service - LSB: mosquitto MQTT v3.1 message broker Loaded: loaded (/etc/init.d/mosquitto; generated; vendor preset: enabled) Active: active (running) since Tue 2019-01-01 23:42:51 CET; 25min ago Docs: man:systemd-sysv-generator(8) CGroup: /system.slice/mosquitto.service └─20726 /usr/sbin/mosquitto -c /etc/mosquitto/mosquitto.conf ``` We can now subscribe to some topic on the local mosquitto broker: ```bash mosquitto_sub -d sensors/data ``` *sensors/data* is the topic we subscribe to. For further information, you can check here: http://www.steves-internet-guide.com/understanding-mqtt-topics/ In a separate terminal we write data to the same topic: ```bash mosquitto_pub -d -t sensors/data -m "{temperature: 23}" ``` In the subscriber terminal you see that the data arrived. We can send any data that serializes to strings, so a stringified json object is perfectly ok. # Python Sensor Part We will now send randomly generated data from python via mqtt to a iota mam client in javascript. Let's start with the python side. We will need a mqtt client in python, for example paho-mqtt. As is good practice in python, we will install the packages in virtual environment. Here we use python 2.7: ```bash cd /home/pi mkdir -p venv cd venv virtualenv mqtt-to-iota ``` Then we need to activate the virtual environment: ```bash source /home/pi/venv/mqtt-to-iota/bin/activate ``` And install paho-mqtt: ```bash pip install paho-mqtt ``` Alternatively, you can also install all dependencies by using pip with the requirements.txt file in the python directory of the mqtt-iota repository: ```bash pip install -r requirements.txt ``` Let's try it out with a simple script, called example_publish.py: ```python #!/usr/bin/env python import paho.mqtt.client as paho import json import random import time def create_data(): humidity = random.random()*100. temperature = random.random()*50-30. radon_activity = random.random()*200 data = {'humidity' : {'value': humidity, 'unit':'%RH'}, 'temperature': {'value': temperature, 'unit':'C'}, 'radon_activity': {'value':radon_activity, 'unit':'Bq'}} return data def create_location(): latitude = 2*(random.random()-0.5)*90. longitude = 2*(random.random()-0.5)*180. location = {'latitude' :{'value':latitude , 'unit':'deg'}, 'longitude':{'value':longitude, 'unit':'deg'}} return location def get_timestamp(): return time.time() # unix timestamp in utc if __name__ == "__main__": broker = 'localhost' port = 1883 client = paho.Client() client.connect(broker,port) location = create_location() sensor_id = 'radon sensor' while True: data = create_data() timestamp = get_timestamp() json_object = {'id': sensor_id, 'location': location, 'timestamp': timestamp, 'data': data} # stringify the json data: stringified_json_object = json.dumps(json_object, separators=(',',':')) ret = client.publish('sensors/data',stringified_json_object) time.sleep(30.) ``` Now we need to write the counterpart in the javascript world, which subscribes to our topic sensors/data and re-publishes the data to the IOTA tangle. # Software Installation: Node.js First change the directory to the js directory of the git repository, and install the node.js dependencies with: ```bash npm install ``` Additionally, we need a special (stable) version of the mam client. which you can get from rckey's github repository: ```bash cd node_modules git clone https://github.com/rckey/mam.node.js ``` Implementing the mqtt subscriber is pretty straightforward: ```javascript /// mqtt part /// MQTT = require('mqtt'); var mqtt_subscriber = MQTT.connect({ host: 'localhost', port: 1883}) mqtt_subscriber.on('connect', function() { mqtt_subscriber.subscribe('sensors/data', function(err) { if(!err) { console.log('connected and subscribed to mqtt sensors/data stream'); } }) }) mqtt_subscriber.on('message', function(topic, message) { obj = JSON.parse(message); const root = publish(obj); }) process.on('uncaughtException', function (exception) { console.log(exception); }); ``` We connect again to our local mosquitto broker. There are two callback function, which react to the events "connect" and "message". "connect" happens, when the mqtt_subscriber has connected to the broker. After connecting, it will subscribe to our data stream with topic 'sensors/data'. In case a message is received, the received stringified json object is deserialized with JSON.parse(message). Then we use the async function 'publish'(), which publishes the message on the tangle with MAM, similar as we already did directly with the ruuvitag data (https://steemit.com/iota/@mragic/how-to-send-ruuvitag-sensor-data-to-the-iota-tangle-with-mam-using-a-raspberry-pi-3): ```javascript const MAM = require('mam.node.js') const IOTA = require('iota.lib.js') const moment = require('moment') /// iota part /// //const iota_host = 'http://localhost:14265' const iota_host = 'https://durian.iotasalad.org:14265' const MODE = 'public' // set to public, restricted or private const SIDEKEY = '' const iota = new IOTA({provider: iota_host}) const SECURITYLEVEL = 2 // 1, 2 or 3 let mamState = MAM.init(iota, undefined, SECURITYLEVEL) if (MODE == 'restricted') { const key = iota.utils.toTrytes(SIDEKEY); mamState = MAM.changeMode(mamState, MODE, key); } else { mamState = MAM.changeMode(mamState, MODE); } const publish = async function(packet) { console.log('publishing message... ') console.log(packet) const trytes = iota.utils.toTrytes(JSON.stringify(packet)); const message = MAM.create(mamState, trytes); console.log("root: ", message.root) mamState = message.state; transaction = MAM.attach(message.payload, message.address); await transaction; return message.root; } ``` You find all the code in the repository as *mqtt_to_mam_tangle.js*. *** *** --- IOTA: 9PDEUUFUTPLBNGORASBZGYXLWC9KLWWPGZFF9T9AHUKMLHHEVDWJJDUNXFJNADDHKT9ZKCNCVEY9MJRTZEWUHGASKY ETH: 0x6c54eA14109f3E97cdfC02b0C5AbE88e190BDf18 Bitcoin: 35N7cEkjiKGrMyETDU61KBtWWc7wRBYAXv |
| json metadata | {"tags":["iota","mam","raspberrypi","python"],"image":["https://cdn.steemitimages.com/DQmXhNHvkv1g4etTwovgQZ4aj2n2Lj8PgQpeyrYDNxVZfFH/image.png"],"links":["https://blog.iota.org/introducing-masked-authenticated-messaging-e55c1822d50e","https://github.com/iotaledger/mam.client.js/","http://www.steves-internet-guide.com/understanding-mqtt-topics/","https://steemit.com/iota/@mragic/how-to-send-ruuvitag-sensor-data-to-the-iota-tangle-with-mam-using-a-raspberry-pi-3"],"app":"steemit/0.1","format":"markdown"} |
| Transaction Info | Block #29100854/Trx 0edca388ba69a4b47e91d44b808d8c73898ad56b |
View Raw JSON Data
{
"trx_id": "0edca388ba69a4b47e91d44b808d8c73898ad56b",
"block": 29100854,
"trx_in_block": 12,
"op_in_trx": 0,
"virtual_op": 0,
"timestamp": "2019-01-02T10:45:36",
"op": [
"comment",
{
"parent_author": "",
"parent_permlink": "iota",
"author": "mragic",
"permlink": "how-to-send-sensor-data-from-python-to-iota-tangle-with-mam",
"title": "How to send sensor data from python to IOTA tangle with MAM",
"body": "Currently, the client APIs for IOTA are still under heavy development. The most stable client for the masked authenticated messaging API (See e.g. https://blog.iota.org/introducing-masked-authenticated-messaging-e55c1822d50e) is in javascript here: https://github.com/iotaledger/mam.client.js/\nThere might be a major update in the near future, called mam+ or mam2.0. \nLet's say we have now already written a python module reading a sensor connected to a raspberry pi. How can we get this data now onto the IOTA tangle when we are missing a python IOTA MAM client? A possible solution is to serialize the data in json object and send this json object to a IOTA MAM client written in javascript. In the internet of things world, there is already infrastructure for sending around small amount of data from IOT devices, for example mosquitto with the mqtt protocol. Compared to IOTA, mqtt needs a central broker (a central server), where data publisher and data subscriber connect to. Publisher can publish data on a topic, subscriber can subscribe to a topic. This already sounds very similar to IOTA MAM, only that mosquitto is not decentralized.\n\n# Software Installation\nYou find all the example node.js and python files in the git repository:\n\n```bash\ngit clone https://github.com/magictimelapse/mqtt-iota\n```\n\nInstalling a mosquitto broker on a raspberry pi is very simple:\n```bash\nsudo apt update\nsudo apt upgrade\nsudo apt install mosquitto mosquitto-clients\n```\nThe mosquitto broker will conveniently start immediately as a service after installing the apt module:\n```bash\nsudo service mosquitto status\n\n● mosquitto.service - LSB: mosquitto MQTT v3.1 message broker\n Loaded: loaded (/etc/init.d/mosquitto; generated; vendor preset: enabled)\n Active: active (running) since Tue 2019-01-01 23:42:51 CET; 25min ago\n Docs: man:systemd-sysv-generator(8)\n CGroup: /system.slice/mosquitto.service\n └─20726 /usr/sbin/mosquitto -c /etc/mosquitto/mosquitto.conf\n```\n\nWe can now subscribe to some topic on the local mosquitto broker:\n```bash\nmosquitto_sub -d sensors/data\n```\n*sensors/data* is the topic we subscribe to. For further information, you can check here: http://www.steves-internet-guide.com/understanding-mqtt-topics/\nIn a separate terminal we write data to the same topic:\n```bash\nmosquitto_pub -d -t sensors/data -m \"{temperature: 23}\"\n```\nIn the subscriber terminal you see that the data arrived. We can send any data that serializes to strings, so a stringified json object is perfectly ok.\n\n# Python Sensor Part\nWe will now send randomly generated data from python via mqtt to a iota mam client in javascript. Let's start with the python side. We will need a mqtt client in python, for example paho-mqtt. As is good practice in python, we will install the packages in virtual environment. Here we use python 2.7:\n```bash\ncd /home/pi\nmkdir -p venv\ncd venv\nvirtualenv mqtt-to-iota\n```\nThen we need to activate the virtual environment:\n```bash\nsource /home/pi/venv/mqtt-to-iota/bin/activate\n```\nAnd install paho-mqtt:\n```bash\npip install paho-mqtt\n```\nAlternatively, you can also install all dependencies by using pip with the requirements.txt file in the python directory of the mqtt-iota repository:\n```bash\npip install -r requirements.txt\n```\n\nLet's try it out with a simple script, called example_publish.py:\n```python\n#!/usr/bin/env python\nimport paho.mqtt.client as paho\nimport json\nimport random\nimport time\ndef create_data():\n humidity = random.random()*100.\n temperature = random.random()*50-30.\n radon_activity = random.random()*200\n data = {'humidity' : {'value': humidity, 'unit':'%RH'},\n 'temperature': {'value': temperature, 'unit':'C'},\n 'radon_activity': {'value':radon_activity, 'unit':'Bq'}}\n return data\n\ndef create_location():\n latitude = 2*(random.random()-0.5)*90.\n longitude = 2*(random.random()-0.5)*180.\n location = {'latitude' :{'value':latitude , 'unit':'deg'},\n 'longitude':{'value':longitude, 'unit':'deg'}}\n return location\n\ndef get_timestamp():\n return time.time() # unix timestamp in utc\n\nif __name__ == \"__main__\":\n broker = 'localhost'\n port = 1883\n client = paho.Client()\n client.connect(broker,port)\n location = create_location()\n sensor_id = 'radon sensor'\n while True:\n data = create_data()\n timestamp = get_timestamp()\n json_object = {'id': sensor_id,\n 'location': location,\n 'timestamp': timestamp,\n 'data': data}\n # stringify the json data:\n stringified_json_object = json.dumps(json_object, separators=(',',':'))\n ret = client.publish('sensors/data',stringified_json_object)\n time.sleep(30.)\n```\n\nNow we need to write the counterpart in the javascript world, which subscribes to our topic sensors/data and re-publishes the data to the IOTA tangle.\n\n# Software Installation: Node.js\nFirst change the directory to the js directory of the git repository, and install the node.js dependencies with:\n```bash\nnpm install\n```\nAdditionally, we need a special (stable) version of the mam client. which you can get from rckey's github repository:\n```bash\ncd node_modules\ngit clone https://github.com/rckey/mam.node.js\n```\nImplementing the mqtt subscriber is pretty straightforward:\n```javascript\n/// mqtt part ///\nMQTT = require('mqtt');\nvar mqtt_subscriber = MQTT.connect({\n host: 'localhost',\n port: 1883})\n\nmqtt_subscriber.on('connect', function() {\n mqtt_subscriber.subscribe('sensors/data', function(err) {\n if(!err) {\n console.log('connected and subscribed to mqtt sensors/data stream');\n }\n })\n})\n\nmqtt_subscriber.on('message', function(topic, message) {\n obj = JSON.parse(message);\n const root = publish(obj);\n})\n\nprocess.on('uncaughtException', function (exception) {\n console.log(exception);\n});\n\n```\nWe connect again to our local mosquitto broker. There are two callback function, which react to the events \"connect\" and \"message\". \"connect\" happens, when the mqtt_subscriber has connected to the broker. After connecting, it will subscribe to our data stream with topic 'sensors/data'. In case a message is received, the received stringified json object is deserialized with JSON.parse(message). Then we use the async function 'publish'(), which publishes the message on the tangle with MAM, similar as we already did directly with the ruuvitag data (https://steemit.com/iota/@mragic/how-to-send-ruuvitag-sensor-data-to-the-iota-tangle-with-mam-using-a-raspberry-pi-3):\n```javascript\nconst MAM = require('mam.node.js')\nconst IOTA = require('iota.lib.js')\nconst moment = require('moment')\n\n/// iota part ///\n//const iota_host = 'http://localhost:14265'\nconst iota_host = 'https://durian.iotasalad.org:14265'\nconst MODE = 'public' // set to public, restricted or private\nconst SIDEKEY = ''\nconst iota = new IOTA({provider: iota_host})\nconst SECURITYLEVEL = 2 // 1, 2 or 3\n\nlet mamState = MAM.init(iota, undefined, SECURITYLEVEL)\n\nif (MODE == 'restricted') {\n const key = iota.utils.toTrytes(SIDEKEY);\n mamState = MAM.changeMode(mamState, MODE, key);\n} else {\n mamState = MAM.changeMode(mamState, MODE);\n}\n\n\nconst publish = async function(packet) {\n console.log('publishing message... ')\n console.log(packet)\n const trytes = iota.utils.toTrytes(JSON.stringify(packet));\n const message = MAM.create(mamState, trytes);\n console.log(\"root: \", message.root)\n mamState = message.state;\n transaction = MAM.attach(message.payload, message.address);\n await transaction;\n return message.root;\n}\n```\nYou find all the code in the repository as *mqtt_to_mam_tangle.js*.\n\n***\n***\n---\n\nIOTA: 9PDEUUFUTPLBNGORASBZGYXLWC9KLWWPGZFF9T9AHUKMLHHEVDWJJDUNXFJNADDHKT9ZKCNCVEY9MJRTZEWUHGASKY\nETH: 0x6c54eA14109f3E97cdfC02b0C5AbE88e190BDf18\nBitcoin: 35N7cEkjiKGrMyETDU61KBtWWc7wRBYAXv",
"json_metadata": "{\"tags\":[\"iota\",\"mam\",\"raspberrypi\",\"python\"],\"image\":[\"https://cdn.steemitimages.com/DQmXhNHvkv1g4etTwovgQZ4aj2n2Lj8PgQpeyrYDNxVZfFH/image.png\"],\"links\":[\"https://blog.iota.org/introducing-masked-authenticated-messaging-e55c1822d50e\",\"https://github.com/iotaledger/mam.client.js/\",\"http://www.steves-internet-guide.com/understanding-mqtt-topics/\",\"https://steemit.com/iota/@mragic/how-to-send-ruuvitag-sensor-data-to-the-iota-tangle-with-mam-using-a-raspberry-pi-3\"],\"app\":\"steemit/0.1\",\"format\":\"markdown\"}"
}
]
}2019/01/02 02:43:18
2019/01/02 02:43:18
| voter | steemitboard |
| author | mragic |
| permlink | how-to-build-a-cat-detector-with-a-raspberry-pi-and-a-pi-noir-camera-using-deep-learning-part-iv |
| weight | 100 (1.00%) |
| Transaction Info | Block #29091221/Trx 519aafbc3fd68a33b3efc1b9506e39f9316e9dd2 |
View Raw JSON Data
{
  "trx_id": "519aafbc3fd68a33b3efc1b9506e39f9316e9dd2",
  "block": 29091221,
  "trx_in_block": 4,
  "op_in_trx": 0,
  "virtual_op": 0,
  "timestamp": "2019-01-02T02:43:18",
  "op": [
    "vote",
    {
      "voter": "steemitboard",
      "author": "mragic",
      "permlink": "how-to-build-a-cat-detector-with-a-raspberry-pi-and-a-pi-noir-camera-using-deep-learning-part-iv",
      "weight": 100
    }
  ]
}2019/01/02 02:43:15
2019/01/02 02:43:15
| parent author | mragic |
| parent permlink | how-to-build-a-cat-detector-with-a-raspberry-pi-and-a-pi-noir-camera-using-deep-learning-part-iv |
| author | steemitboard |
| permlink | steemitboard-notify-mragic-20190102t024311000z |
| title | |
| body | @mragic, thank you for supporting @steemitboard as a witness. [](http://steemitboard.com/@mragic) Here is a small present to show our gratitude <sub>_Click on the badge to view your Board of Honor._</sub> Once again, thanks for your support! |
| json metadata | {"image":["https://steemitboard.com/img/notify.png"]} |
| Transaction Info | Block #29091220/Trx 4001c3317f71f4e400a8dab5fa97d44ac50392ab |
View Raw JSON Data
{
"trx_id": "4001c3317f71f4e400a8dab5fa97d44ac50392ab",
"block": 29091220,
"trx_in_block": 0,
"op_in_trx": 0,
"virtual_op": 0,
"timestamp": "2019-01-02T02:43:15",
"op": [
"comment",
{
"parent_author": "mragic",
"parent_permlink": "how-to-build-a-cat-detector-with-a-raspberry-pi-and-a-pi-noir-camera-using-deep-learning-part-iv",
"author": "steemitboard",
"permlink": "steemitboard-notify-mragic-20190102t024311000z",
"title": "",
"body": "@mragic, thank you for supporting @steemitboard as a witness.\n\n[](http://steemitboard.com/@mragic) Here is a small present to show our gratitude\n<sub>_Click on the badge to view your Board of Honor._</sub>\n\nOnce again, thanks for your support!",
"json_metadata": "{\"image\":[\"https://steemitboard.com/img/notify.png\"]}"
}
]
}2019/01/01 22:40:21
2019/01/01 22:40:21
| required auths | [] |
| required posting auths | ["mragic"] |
| id | follow |
| json | ["follow",{"follower":"mragic","following":"socky","what":["blog"]}] |
| Transaction Info | Block #29086367/Trx 5769b391f398090541bff6a85b5e82cf37f8cee6 |
View Raw JSON Data
{
  "trx_id": "5769b391f398090541bff6a85b5e82cf37f8cee6",
  "block": 29086367,
  "trx_in_block": 1,
  "op_in_trx": 0,
  "virtual_op": 0,
  "timestamp": "2019-01-01T22:40:21",
  "op": [
    "custom_json",
    {
      "required_auths": [],
      "required_posting_auths": [
        "mragic"
      ],
      "id": "follow",
      "json": "[\"follow\",{\"follower\":\"mragic\",\"following\":\"socky\",\"what\":[\"blog\"]}]"
    }
  ]
}2019/01/01 22:40:12
2019/01/01 22:40:12
| required auths | [] |
| required posting auths | ["mragic"] |
| id | follow |
| json | ["follow",{"follower":"mragic","following":"manian","what":["blog"]}] |
| Transaction Info | Block #29086364/Trx 1223a5aa5afd8e92e1551d6467ab5bbc96f02856 |
View Raw JSON Data
{
  "trx_id": "1223a5aa5afd8e92e1551d6467ab5bbc96f02856",
  "block": 29086364,
  "trx_in_block": 16,
  "op_in_trx": 0,
  "virtual_op": 0,
  "timestamp": "2019-01-01T22:40:12",
  "op": [
    "custom_json",
    {
      "required_auths": [],
      "required_posting_auths": [
        "mragic"
      ],
      "id": "follow",
      "json": "[\"follow\",{\"follower\":\"mragic\",\"following\":\"manian\",\"what\":[\"blog\"]}]"
    }
  ]
}2019/01/01 22:38:18
2019/01/01 22:38:18
| required auths | [] |
| required posting auths | ["mragic"] |
| id | follow |
| json | ["follow",{"follower":"mragic","following":"mahoor","what":["blog"]}] |
| Transaction Info | Block #29086326/Trx 00309612dfab649d386c0645391c6d9a93dd87cb |
View Raw JSON Data
{
  "trx_id": "00309612dfab649d386c0645391c6d9a93dd87cb",
  "block": 29086326,
  "trx_in_block": 0,
  "op_in_trx": 0,
  "virtual_op": 0,
  "timestamp": "2019-01-01T22:38:18",
  "op": [
    "custom_json",
    {
      "required_auths": [],
      "required_posting_auths": [
        "mragic"
      ],
      "id": "follow",
      "json": "[\"follow\",{\"follower\":\"mragic\",\"following\":\"mahoor\",\"what\":[\"blog\"]}]"
    }
  ]
}mragicfollowed @kaka.life2019/01/01 22:38:00
mragicfollowed @kaka.life
2019/01/01 22:38:00
| required auths | [] |
| required posting auths | ["mragic"] |
| id | follow |
| json | ["follow",{"follower":"mragic","following":"kaka.life","what":["blog"]}] |
| Transaction Info | Block #29086320/Trx 4c77022f8f906c5f340631545e917032ae113637 |
View Raw JSON Data
{
  "trx_id": "4c77022f8f906c5f340631545e917032ae113637",
  "block": 29086320,
  "trx_in_block": 11,
  "op_in_trx": 0,
  "virtual_op": 0,
  "timestamp": "2019-01-01T22:38:00",
  "op": [
    "custom_json",
    {
      "required_auths": [],
      "required_posting_auths": [
        "mragic"
      ],
      "id": "follow",
      "json": "[\"follow\",{\"follower\":\"mragic\",\"following\":\"kaka.life\",\"what\":[\"blog\"]}]"
    }
  ]
}2019/01/01 22:37:57
2019/01/01 22:37:57
| required auths | [] |
| required posting auths | ["mragic"] |
| id | follow |
| json | ["follow",{"follower":"mragic","following":"igora","what":["blog"]}] |
| Transaction Info | Block #29086319/Trx f9454559338aa94f9100c2246d4ee7843abb1bb8 |
View Raw JSON Data
{
  "trx_id": "f9454559338aa94f9100c2246d4ee7843abb1bb8",
  "block": 29086319,
  "trx_in_block": 2,
  "op_in_trx": 0,
  "virtual_op": 0,
  "timestamp": "2019-01-01T22:37:57",
  "op": [
    "custom_json",
    {
      "required_auths": [],
      "required_posting_auths": [
        "mragic"
      ],
      "id": "follow",
      "json": "[\"follow\",{\"follower\":\"mragic\",\"following\":\"igora\",\"what\":[\"blog\"]}]"
    }
  ]
}2019/01/01 22:37:15
2019/01/01 22:37:15
| required auths | [] |
| required posting auths | ["mragic"] |
| id | follow |
| json | ["follow",{"follower":"mragic","following":"aliram","what":["blog"]}] |
| Transaction Info | Block #29086305/Trx 6684378f586e01eb9f6beb54a163c1488b1b8edd |
View Raw JSON Data
{
  "trx_id": "6684378f586e01eb9f6beb54a163c1488b1b8edd",
  "block": 29086305,
  "trx_in_block": 10,
  "op_in_trx": 0,
  "virtual_op": 0,
  "timestamp": "2019-01-01T22:37:15",
  "op": [
    "custom_json",
    {
      "required_auths": [],
      "required_posting_auths": [
        "mragic"
      ],
      "id": "follow",
      "json": "[\"follow\",{\"follower\":\"mragic\",\"following\":\"aliram\",\"what\":[\"blog\"]}]"
    }
  ]
}2019/01/01 22:37:12
2019/01/01 22:37:12
| required auths | [] |
| required posting auths | ["mragic"] |
| id | follow |
| json | ["follow",{"follower":"mragic","following":"aliman","what":["blog"]}] |
| Transaction Info | Block #29086304/Trx 393284522fe3a888a8322173ded3fc6bcb4e60b9 |
View Raw JSON Data
{
  "trx_id": "393284522fe3a888a8322173ded3fc6bcb4e60b9",
  "block": 29086304,
  "trx_in_block": 1,
  "op_in_trx": 0,
  "virtual_op": 0,
  "timestamp": "2019-01-01T22:37:12",
  "op": [
    "custom_json",
    {
      "required_auths": [],
      "required_posting_auths": [
        "mragic"
      ],
      "id": "follow",
      "json": "[\"follow\",{\"follower\":\"mragic\",\"following\":\"aliman\",\"what\":[\"blog\"]}]"
    }
  ]
}2019/01/01 22:37:00
2019/01/01 22:37:00
| required auths | [] |
| required posting auths | ["mragic"] |
| id | follow |
| json | ["follow",{"follower":"mragic","following":"alax","what":["blog"]}] |
| Transaction Info | Block #29086300/Trx 5a460b44785b8c3b21422debe938ff9f31b92b62 |
View Raw JSON Data
{
  "trx_id": "5a460b44785b8c3b21422debe938ff9f31b92b62",
  "block": 29086300,
  "trx_in_block": 9,
  "op_in_trx": 0,
  "virtual_op": 0,
  "timestamp": "2019-01-01T22:37:00",
  "op": [
    "custom_json",
    {
      "required_auths": [],
      "required_posting_auths": [
        "mragic"
      ],
      "id": "follow",
      "json": "[\"follow\",{\"follower\":\"mragic\",\"following\":\"alax\",\"what\":[\"blog\"]}]"
    }
  ]
}2019/01/01 17:26:03
2019/01/01 17:26:03
| parent author | |
| parent permlink | raspberrypi |
| author | mragic |
| permlink | how-to-build-a-cat-detector-with-a-raspberry-pi-and-a-pi-noir-camera-using-deep-learning-part-iv |
| title | How to build a cat detector with a Raspberry Pi and a Pi Noir camera using Deep Learning - Part IV |
| body | Part I is here: https://steemit.com/raspberrypi/@mragic/how-to-build-a-cat-detector-with-a-raspberry-pi-and-a-pi-noir-camera-using-deep-learning-part-i Part II: https://steemit.com/raspberrypi/@mragic/how-to-build-a-cat-detector-with-a-raspberry-pi-and-a-pi-noir-camera-using-deep-learning-part-ii Part III: https://steemit.com/raspberrypi/@mragic/how-to-build-a-cat-detector-with-a-raspberry-pi-and-a-pi-noir-camera-using-deep-learning-part-iii # Introduction In this part I will describe how we can deploy the model we trained in part III on the raspberry pi. You can then choose what you want to do when a cat is recognised. In my case, I already have a raspberry pi controlled garden watering system in place. Now I use one of the rpi controlled valves to shoot some water in the direction of the cat when the cat detector finds a cat.  *a cat waiting to be classified as a cat* # Software Installation on the Raspberry Pi As our model is a tensorflow model using the keras framework, we need to install these dependencies. Here we will use pure pip: ```bash mkdir /home/pi/venv/ python3 -m venv ai source /home/pi/venv/ai/bin/activate ``` Install required python modules. Tensorflow and keras for the deep learning, pillow for image handling, ipython for the interactive python environement. ```bash pip install 'numpy' pip install 'tensorflow' pip install 'keras' pip install pillow pip install 'ipython' ``` # Apply Keras Deep Learning Model to Recognize Cats Let's try it to classify some real cat images! First you need to copy the hdf5 file with the trained weights to your raspberry pi. In my case, it is called inception_v3_1.h5, and has a size of 85MB. Let's open a file called apply_model.py and write this script: ```python from keras.models import load_model from keras.preprocessing import image from keras.applications.inception_v3 import preprocess_input import numpy as np img_width, img_height = 299, 299 print('loading model... This will take a while...') model = load_model('inceptionv3_1.h5') print (model.summary()) def predict(image_file): img = image.load_img(image_file, target_size=(img_width,img_height)) x = image.img_to_array(img) x = np.expand_dims(x,axis=0) x = preprocess_input(x) preds = model.predict(x) return preds ``` Run it in ipython shell: ```bash ipython -i apply_model.py ``` You will realised that it takes around 3-4 minutes (!) to load the model into the memory on a raspberry pi 3. Let's try it out with a real file: ```ipython filename = '/opt/motion/cropped/23-20180423001209-06_cropped.jpg' predict(filename) ``` You will see an output like: ```ipython predict(filename) Out[4]: array([[ 9.99523044e-01, 4.76956222e-04]], dtype=float32) ``` The array gives the probabilities for the two hypotheses: cat and noCat. It is nearly 1. for cat, so we can assume that this image is a cat:  You will also realize that it takes around 10seconds after the model is loaded to identify if a cat has crossed your garden or not. We now want to use motion to call our function above everytime it recognizes a motion a stores an image in the cropped folder, as described in https://steemit.com/raspberrypi/@mragic/how-to-build-a-cat-detector-with-a-raspberry-pi-and-a-pi-noir-camera-using-deep-learning-part-ii Obviously, we cannot call directly above module apply_model.py, because then it would take for every image a couple of minutes only to load the model into the python memory. We thus need to run some server, which preloads the model, and only runs the function predict(filename) in case a new motion is triggered by motion. Fortunately, there is already a very simple library which lets us execute remote procedures calls very naturally in python, called zerorpc. It uses zeromq as underlying socket protocoll and is very robust. You can find more information here: http://www.zerorpc.io/ We can install zerorpc with pip: ``` pip install zerorpc ``` We will now write a small zerorpc server, which loads our module apply_module.py and waits for a remote procedure call from the local client, which will be called from motion every time it triggers a motion. We call the server cat_rpc_server.py: ```python import apply_model import zerorpc import numpy as np class CatRecognition(object): def cat_recognition(self,jsonobject): filename = jsonobject['filename'] pred = apply_model.predict(filename) probabilities = {'cats': float(pred[0][0]),'noCat': float(pred[0][1])} return probabilities s = zerorpc.Server(CatRecognition()) s.bind('tcp://0.0.0.0:4242') s.run() ``` Let's run the server with python cat_rpc_server.py in one terminal. It will load first the model and then be ready to reply rpc requests from an rpc client. The client is then: recognize_cat.py, and you can find it in the repository in the raspberry_pi directory: ```bash git clone https://github.com/magictimelapse/CatRecognition.git ``` Now finally we need to hook it into motion. We do it the same way as we already were collecting and cropping the images in part II. For that we add to motion.conf the following configuration: ```bash on_event_start /home/pi/cat_recognition/recognize_cat.sh %v ``` This will run our script with argument run number. Our script recognize_cat.py will take the run number and analyze 10 images if a cat is present. If a cat is present, the script currently just writes that fact to the log file, but it is up to you to react to the presence of a cat in your garden! Have fun! *** *** ETH: 0x6c54eA14109f3E97cdfC02b0C5AbE88e190BDf18 Bitcoin: 35N7cEkjiKGrMyETDU61KBtWWc7wRBYAXv IOTA: 9PDEUUFUTPLBNGORASBZGYXLWC9KLWWPGZFF9T9AHUKMLHHEVDWJJDUNXFJNADDHKT9ZKCNCVEY9MJRTZEWUHGASKY |
| json metadata | {"tags":["raspberrypi","cats","deeplearning","ai","keras"],"image":["https://cdn.steemitimages.com/DQmafefWEDinAMcoji3Dsc2cp1pDXkvnbSqxWnHV2AgU2PD/373-20180426190529-04_cropped.jpg","https://cdn.steemitimages.com/DQmaFg724MqmeLYdVVAgjaE1cLDnjbiWpZ8Kc5o2qdGzY2T/02-20180422124842-00_cropped.jpg"],"links":["https://steemit.com/raspberrypi/@mragic/how-to-build-a-cat-detector-with-a-raspberry-pi-and-a-pi-noir-camera-using-deep-learning-part-i","https://steemit.com/raspberrypi/@mragic/how-to-build-a-cat-detector-with-a-raspberry-pi-and-a-pi-noir-camera-using-deep-learning-part-ii","https://steemit.com/raspberrypi/@mragic/how-to-build-a-cat-detector-with-a-raspberry-pi-and-a-pi-noir-camera-using-deep-learning-part-iii","http://www.zerorpc.io/"],"app":"steemit/0.1","format":"markdown"} |
| Transaction Info | Block #29080088/Trx 11faa4c47793edcabf756eae36c6a9aa85a5e0d7 |
View Raw JSON Data
{
"trx_id": "11faa4c47793edcabf756eae36c6a9aa85a5e0d7",
"block": 29080088,
"trx_in_block": 24,
"op_in_trx": 0,
"virtual_op": 0,
"timestamp": "2019-01-01T17:26:03",
"op": [
"comment",
{
"parent_author": "",
"parent_permlink": "raspberrypi",
"author": "mragic",
"permlink": "how-to-build-a-cat-detector-with-a-raspberry-pi-and-a-pi-noir-camera-using-deep-learning-part-iv",
"title": "How to build a cat detector with a Raspberry Pi and a Pi Noir camera using Deep Learning - Part IV",
"body": "Part I is here:\nhttps://steemit.com/raspberrypi/@mragic/how-to-build-a-cat-detector-with-a-raspberry-pi-and-a-pi-noir-camera-using-deep-learning-part-i\nPart II:\nhttps://steemit.com/raspberrypi/@mragic/how-to-build-a-cat-detector-with-a-raspberry-pi-and-a-pi-noir-camera-using-deep-learning-part-ii\nPart III:\nhttps://steemit.com/raspberrypi/@mragic/how-to-build-a-cat-detector-with-a-raspberry-pi-and-a-pi-noir-camera-using-deep-learning-part-iii\n\n# Introduction\nIn this part I will describe how we can deploy the model we trained in part III on the raspberry pi. You can then choose what you want to do when a cat is recognised. In my case, I already have a raspberry pi controlled garden watering system in place. Now I use one of the rpi controlled valves to shoot some water in the direction of the cat when the cat detector finds a cat. \n\n*a cat waiting to be classified as a cat*\n\n\n# Software Installation on the Raspberry Pi\nAs our model is a tensorflow model using the keras framework, we need to install these dependencies. Here we will use pure pip:\n```bash\nmkdir /home/pi/venv/\npython3 -m venv ai\nsource /home/pi/venv/ai/bin/activate\n```\n\nInstall required python modules. Tensorflow and keras for the deep learning, pillow for image handling, ipython for the interactive python environement.\n```bash\npip install 'numpy'\npip install 'tensorflow'\npip install 'keras'\npip install pillow\npip install 'ipython'\n```\n\n# Apply Keras Deep Learning Model to Recognize Cats\nLet's try it to classify some real cat images! First you need to copy the hdf5 file with the trained weights to your raspberry pi. In my case, it is called inception_v3_1.h5, and has a size of 85MB. Let's open a file called apply_model.py and write this script:\n```python\nfrom keras.models import load_model\nfrom keras.preprocessing import image\nfrom keras.applications.inception_v3 import preprocess_input\nimport numpy as np\nimg_width, img_height = 299, 299\nprint('loading model... This will take a while...')\nmodel = load_model('inceptionv3_1.h5')\nprint (model.summary())\ndef predict(image_file):\n img = image.load_img(image_file, target_size=(img_width,img_height))\n x = image.img_to_array(img)\n x = np.expand_dims(x,axis=0)\n x = preprocess_input(x)\n preds = model.predict(x)\n return preds\n\n```\n\nRun it in ipython shell:\n```bash\nipython -i apply_model.py\n```\nYou will realised that it takes around 3-4 minutes (!) to load the model into the memory on a raspberry pi 3. Let's try it out with a real file:\n```ipython\nfilename = '/opt/motion/cropped/23-20180423001209-06_cropped.jpg'\npredict(filename)\n```\nYou will see an output like:\n```ipython\npredict(filename)\nOut[4]: array([[ 9.99523044e-01, 4.76956222e-04]], dtype=float32)\n```\nThe array gives the probabilities for the two hypotheses: cat and noCat. It is nearly 1. for cat, so we can assume that this image is a cat:\n\n\nYou will also realize that it takes around 10seconds after the model is loaded to identify if a cat has crossed your garden or not. \nWe now want to use motion to call our function above everytime it recognizes a motion a stores an image in the cropped folder, as described in https://steemit.com/raspberrypi/@mragic/how-to-build-a-cat-detector-with-a-raspberry-pi-and-a-pi-noir-camera-using-deep-learning-part-ii\nObviously, we cannot call directly above module apply_model.py, because then it would take for every image a couple of minutes only to load the model into the python memory. We thus need to run some server, which preloads the model, and only runs the function predict(filename) in case a new motion is triggered by motion. Fortunately, there is already a very simple library which lets us execute remote procedures calls very naturally in python, called zerorpc. It uses zeromq as underlying socket protocoll and is very robust. You can find more information here: http://www.zerorpc.io/\nWe can install zerorpc with pip:\n```\npip install zerorpc\n```\n\nWe will now write a small zerorpc server, which loads our module apply_module.py and waits for a remote procedure call from the local client, which will be called from motion every time it triggers a motion. We call the server cat_rpc_server.py:\n```python\nimport apply_model\nimport zerorpc\nimport numpy as np\nclass CatRecognition(object):\n def cat_recognition(self,jsonobject):\n filename = jsonobject['filename']\n pred = apply_model.predict(filename)\n probabilities = {'cats': float(pred[0][0]),'noCat': float(pred[0][1])}\n return probabilities\n\ns = zerorpc.Server(CatRecognition())\ns.bind('tcp://0.0.0.0:4242')\ns.run()\n```\nLet's run the server with python cat_rpc_server.py in one terminal. It will load first the model and then be ready to reply rpc requests from an rpc client. The client is then: recognize_cat.py, and you can find it in the repository in the raspberry_pi directory:\n```bash\ngit clone https://github.com/magictimelapse/CatRecognition.git\n```\nNow finally we need to hook it into motion. We do it the same way as we already were collecting and cropping the images in part II. For that we add to motion.conf the following configuration:\n```bash\non_event_start /home/pi/cat_recognition/recognize_cat.sh %v\n```\nThis will run our script with argument run number. Our script recognize_cat.py will take the run number and analyze 10 images if a cat is present. If a cat is present, the script currently just writes that fact to the log file, but it is up to you to react to the presence of a cat in your garden!\nHave fun!\n\n***\n***\nETH: 0x6c54eA14109f3E97cdfC02b0C5AbE88e190BDf18\nBitcoin: 35N7cEkjiKGrMyETDU61KBtWWc7wRBYAXv\nIOTA: 9PDEUUFUTPLBNGORASBZGYXLWC9KLWWPGZFF9T9AHUKMLHHEVDWJJDUNXFJNADDHKT9ZKCNCVEY9MJRTZEWUHGASKY",
"json_metadata": "{\"tags\":[\"raspberrypi\",\"cats\",\"deeplearning\",\"ai\",\"keras\"],\"image\":[\"https://cdn.steemitimages.com/DQmafefWEDinAMcoji3Dsc2cp1pDXkvnbSqxWnHV2AgU2PD/373-20180426190529-04_cropped.jpg\",\"https://cdn.steemitimages.com/DQmaFg724MqmeLYdVVAgjaE1cLDnjbiWpZ8Kc5o2qdGzY2T/02-20180422124842-00_cropped.jpg\"],\"links\":[\"https://steemit.com/raspberrypi/@mragic/how-to-build-a-cat-detector-with-a-raspberry-pi-and-a-pi-noir-camera-using-deep-learning-part-i\",\"https://steemit.com/raspberrypi/@mragic/how-to-build-a-cat-detector-with-a-raspberry-pi-and-a-pi-noir-camera-using-deep-learning-part-ii\",\"https://steemit.com/raspberrypi/@mragic/how-to-build-a-cat-detector-with-a-raspberry-pi-and-a-pi-noir-camera-using-deep-learning-part-iii\",\"http://www.zerorpc.io/\"],\"app\":\"steemit/0.1\",\"format\":\"markdown\"}"
}
]
}mragicvoted for witness @steemitboard2019/01/01 16:18:03
mragicvoted for witness @steemitboard
2019/01/01 16:18:03
| account | mragic |
| witness | steemitboard |
| approve | true |
| Transaction Info | Block #29078730/Trx f5cb283f8812ee71c984a7ba61d282cd3eb40ec1 |
View Raw JSON Data
{
  "trx_id": "f5cb283f8812ee71c984a7ba61d282cd3eb40ec1",
  "block": 29078730,
  "trx_in_block": 0,
  "op_in_trx": 0,
  "virtual_op": 0,
  "timestamp": "2019-01-01T16:18:03",
  "op": [
    "account_witness_vote",
    {
      "account": "mragic",
      "witness": "steemitboard",
      "approve": true
    }
  ]
}2019/01/01 15:57:45
2019/01/01 15:57:45
| parent author | mragic |
| parent permlink | how-to-build-a-cat-detector-with-a-raspberry-pi-and-a-pi-noir-camera-using-deep-learning-part-iii |
| author | steemitboard |
| permlink | steemitboard-notify-mragic-20190101t155747000z |
| title | |
| body | Congratulations @mragic! You have completed the following achievement on the Steem blockchain and have been rewarded with new badge(s) : <table><tr><td>https://steemitimages.com/60x70/http://steemitboard.com/@mragic/voted.png?201901011508</td><td>You received more than 10 upvotes. Your next target is to reach 50 upvotes.</td></tr> </table> <sub>_[Click here to view your Board](https://steemitboard.com/@mragic)_</sub> <sub>_If you no longer want to receive notifications, reply to this comment with the word_ `STOP`</sub> > Support [SteemitBoard's project](https://steemit.com/@steemitboard)! **[Vote for its witness](https://v2.steemconnect.com/sign/account-witness-vote?witness=steemitboard&approve=1)** and **get one more award**! |
| json metadata | {"image":["https://steemitboard.com/img/notify.png"]} |
| Transaction Info | Block #29078324/Trx dc1f9377755bf7fc45481854dfc021a3d0c3f132 |
View Raw JSON Data
{
  "trx_id": "dc1f9377755bf7fc45481854dfc021a3d0c3f132",
  "block": 29078324,
  "trx_in_block": 31,
  "op_in_trx": 0,
  "virtual_op": 0,
  "timestamp": "2019-01-01T15:57:45",
  "op": [
    "comment",
    {
      "parent_author": "mragic",
      "parent_permlink": "how-to-build-a-cat-detector-with-a-raspberry-pi-and-a-pi-noir-camera-using-deep-learning-part-iii",
      "author": "steemitboard",
      "permlink": "steemitboard-notify-mragic-20190101t155747000z",
      "title": "",
      "body": "Congratulations @mragic! You have completed the following achievement on the Steem blockchain and have been rewarded with new badge(s) :\n\n<table><tr><td>https://steemitimages.com/60x70/http://steemitboard.com/@mragic/voted.png?201901011508</td><td>You received more than 10 upvotes. Your next target is to reach 50 upvotes.</td></tr>\n</table>\n\n<sub>_[Click here to view your Board](https://steemitboard.com/@mragic)_</sub>\n<sub>_If you no longer want to receive notifications, reply to this comment with the word_ `STOP`</sub>\n\n\n\n> Support [SteemitBoard's project](https://steemit.com/@steemitboard)! **[Vote for its witness](https://v2.steemconnect.com/sign/account-witness-vote?witness=steemitboard&approve=1)** and **get one more award**!",
      "json_metadata": "{\"image\":[\"https://steemitboard.com/img/notify.png\"]}"
    }
  ]
}2019/01/01 14:53:09
2019/01/01 14:53:09
| voter | sensation |
| author | mragic |
| permlink | how-to-build-a-cat-detector-with-a-raspberry-pi-and-a-pi-noir-camera-using-deep-learning-part-iii |
| weight | 10000 (100.00%) |
| Transaction Info | Block #29077033/Trx 664ce33d92f6493e368a897aa12d6384e32a12d0 |
View Raw JSON Data
{
  "trx_id": "664ce33d92f6493e368a897aa12d6384e32a12d0",
  "block": 29077033,
  "trx_in_block": 0,
  "op_in_trx": 0,
  "virtual_op": 0,
  "timestamp": "2019-01-01T14:53:09",
  "op": [
    "vote",
    {
      "voter": "sensation",
      "author": "mragic",
      "permlink": "how-to-build-a-cat-detector-with-a-raspberry-pi-and-a-pi-noir-camera-using-deep-learning-part-iii",
      "weight": 10000
    }
  ]
}2019/01/01 14:12:27
2019/01/01 14:12:27
| voter | council |
| author | mragic |
| permlink | how-to-build-a-cat-detector-with-a-raspberry-pi-and-a-pi-noir-camera-using-deep-learning-part-iii |
| weight | 1000 (10.00%) |
| Transaction Info | Block #29076221/Trx ccfff783b81925b2818f7e43db833f7ca0fa826f |
View Raw JSON Data
{
  "trx_id": "ccfff783b81925b2818f7e43db833f7ca0fa826f",
  "block": 29076221,
  "trx_in_block": 12,
  "op_in_trx": 0,
  "virtual_op": 0,
  "timestamp": "2019-01-01T14:12:27",
  "op": [
    "vote",
    {
      "voter": "council",
      "author": "mragic",
      "permlink": "how-to-build-a-cat-detector-with-a-raspberry-pi-and-a-pi-noir-camera-using-deep-learning-part-iii",
      "weight": 1000
    }
  ]
}2019/01/01 14:01:36
2019/01/01 14:01:36
| voter | davidfnck |
| author | mragic |
| permlink | how-to-build-a-cat-detector-with-a-raspberry-pi-and-a-pi-noir-camera-using-deep-learning-part-iii |
| weight | 3000 (30.00%) |
| Transaction Info | Block #29076004/Trx 3f41d154aea65f77cfabd205d0a0781feb4f5e61 |
View Raw JSON Data
{
  "trx_id": "3f41d154aea65f77cfabd205d0a0781feb4f5e61",
  "block": 29076004,
  "trx_in_block": 18,
  "op_in_trx": 0,
  "virtual_op": 0,
  "timestamp": "2019-01-01T14:01:36",
  "op": [
    "vote",
    {
      "voter": "davidfnck",
      "author": "mragic",
      "permlink": "how-to-build-a-cat-detector-with-a-raspberry-pi-and-a-pi-noir-camera-using-deep-learning-part-iii",
      "weight": 3000
    }
  ]
}2019/01/01 13:51:33
2019/01/01 13:51:33
| voter | filipino |
| author | mragic |
| permlink | how-to-build-a-cat-detector-with-a-raspberry-pi-and-a-pi-noir-camera-using-deep-learning-part-iii |
| weight | 1000 (10.00%) |
| Transaction Info | Block #29075804/Trx d2c62f083e573f26da6d6d7c4ee658bf535b0534 |
View Raw JSON Data
{
  "trx_id": "d2c62f083e573f26da6d6d7c4ee658bf535b0534",
  "block": 29075804,
  "trx_in_block": 45,
  "op_in_trx": 0,
  "virtual_op": 0,
  "timestamp": "2019-01-01T13:51:33",
  "op": [
    "vote",
    {
      "voter": "filipino",
      "author": "mragic",
      "permlink": "how-to-build-a-cat-detector-with-a-raspberry-pi-and-a-pi-noir-camera-using-deep-learning-part-iii",
      "weight": 1000
    }
  ]
}2019/01/01 13:48:39
2019/01/01 13:48:39
| voter | bukiland |
| author | mragic |
| permlink | how-to-build-a-cat-detector-with-a-raspberry-pi-and-a-pi-noir-camera-using-deep-learning-part-iii |
| weight | 63 (0.63%) |
| Transaction Info | Block #29075746/Trx 7308cc4f6b71c5520d787d2792862945872ecf03 |
View Raw JSON Data
{
  "trx_id": "7308cc4f6b71c5520d787d2792862945872ecf03",
  "block": 29075746,
  "trx_in_block": 6,
  "op_in_trx": 0,
  "virtual_op": 0,
  "timestamp": "2019-01-01T13:48:39",
  "op": [
    "vote",
    {
      "voter": "bukiland",
      "author": "mragic",
      "permlink": "how-to-build-a-cat-detector-with-a-raspberry-pi-and-a-pi-noir-camera-using-deep-learning-part-iii",
      "weight": 63
    }
  ]
}2019/01/01 13:47:54
2019/01/01 13:47:54
| voter | devsup |
| author | mragic |
| permlink | how-to-build-a-cat-detector-with-a-raspberry-pi-and-a-pi-noir-camera-using-deep-learning-part-iii |
| weight | 69 (0.69%) |
| Transaction Info | Block #29075731/Trx b9c128952cc0002d6f0d0b6ed691620381b8c79d |
View Raw JSON Data
{
  "trx_id": "b9c128952cc0002d6f0d0b6ed691620381b8c79d",
  "block": 29075731,
  "trx_in_block": 10,
  "op_in_trx": 0,
  "virtual_op": 0,
  "timestamp": "2019-01-01T13:47:54",
  "op": [
    "vote",
    {
      "voter": "devsup",
      "author": "mragic",
      "permlink": "how-to-build-a-cat-detector-with-a-raspberry-pi-and-a-pi-noir-camera-using-deep-learning-part-iii",
      "weight": 69
    }
  ]
}2019/01/01 13:32:54
2019/01/01 13:32:54
| parent author | |
| parent permlink | raspberrypi |
| author | mragic |
| permlink | how-to-build-a-cat-detector-with-a-raspberry-pi-and-a-pi-noir-camera-using-deep-learning-part-iii |
| title | How to build a cat detector with a Raspberry Pi and a Pi Noir camera using Deep Learning - Part III |
| body | Part I is here: https://steemit.com/raspberrypi/@mragic/how-to-build-a-cat-detector-with-a-raspberry-pi-and-a-pi-noir-camera-using-deep-learning-part-i Part II: https://steemit.com/raspberrypi/@mragic/how-to-build-a-cat-detector-with-a-raspberry-pi-and-a-pi-noir-camera-using-deep-learning-part-ii # Introduction In this part III I will describe how the the images taken in can be used to train a deep neural network to distinguish images with cats against images without cats. This will need a lot of computing power, and if available a GPU (graphics card) with CUDA, and cannot be done reasonably on a raspberry pi. I use my Windows 10 notebook with a NVIDIA Geforce 1070 graphics card. In total I collected 14000 images with cats, and around 40000 images without cats. With this amount of data I can reasonably distinguish cats pictures from non-cat pictures with a probability of around 95%. The training of the neural network took around 36 hours.  *Example of a cat image, used to train the deep neural network* 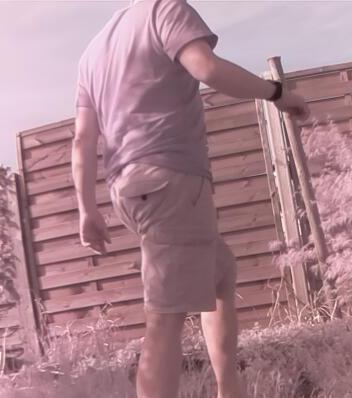 *Example of a non-cat image used to train the deep neural network* # Preparation of Software You can get all the code here: ```bash git clone https://github.com/magictimelapse/CatRecognition ``` First we will use anaconda as a python package manager to install all required python modules. You can download it from here: https://www.anaconda.com/download/ I use the python 3.6 version. Then open the anaconda shell from the start menu (called anaconda prompt). Create a anaconda environment with ```bash conda create -n ai python=3.6 ``` Press *y* to install all modules. Activate this environment with ```bash <condapath>/bin/activate ai ``` If you have GPU with CUDA feature (all modern NVIDIA GPUs have that), then install CUDA following this instruction: https://www.tensorflow.org/install/gpu for Windows or Linux, respectively. Then install tensorflow. If you have a GPU use the module tensorflow-gpu, otherwise tensorflow: ```bash conda install tensorflow-gpu ``` As deep learning framework, we will use the keras framework on top of tensorflow. Install it with: ```bash conda install keras ``` For plotting of some graphs, we will use plotly. For image manipulation, we need pillow. ```bash conda install plotly conda install pillow ``` # Preparation of the Data To train the deep neural network, we will need training data with label either *cat* or *noCat* assigned. We will thus split the cropped images in two folders, called cat and noCat. This can be done efficiently by copying all images to the windows computer to a folder called *images*. Create two folders *cat* and *noCat*, then copy from the *images* folder to either *cat* or *noCat* depending if there is a cat in the image or not. This can be done quite efficiently with all 3 folders open in the same desktop.  Yes, I did that for 14000 cats. I collected the images over around 2 months... Finally, we need from both cat and noCat label around 10% of the images to test the deep neural network, and 90% of the images to train the network. I create two folders *train* and *test*, with each two folder *cat* and *noCat*, and copy each 10% of the images to the test folder and 90% to the train folder. Now we are ready to train our deep neural network! # Training of the Deep Neural Network Recognizing and labeling of objects in images is a hot topic obviously, and huge advances where made in the last 5 years. There is yearly competition to compare labeling of thousands of categories, for example : 9: 'ostrich, Struthio camelus', 10: 'brambling, Fringilla montifringilla', 11: 'goldfinch, Carduelis carduelis', 12: 'house finch, linnet, Carpodacus mexicanus', 13: 'junco, snowbird', 14: 'indigo bunting, indigo finch, indigo bird, Passerina cyanea', 15: 'robin, American robin, Turdus migratorius' See here: https://gist.github.com/yrevar/942d3a0ac09ec9e5eb3a for all categories. It can also recognise different cats: 281: 'tabby, tabby cat', 282: 'tiger cat', 283: 'Persian cat', 284: 'Siamese cat, Siamese', 285: 'Egyptian cat', Google's implementation of deep neural network is obviously quite good in this challenge (e.g. GoogleNet (aka inception v1)). So in a first trial, I just loaded the inception v3 model with the weights already trained with the imagenet data, which is conveniently already available in keras (see https://keras.io/applications/#inceptionv3). I realized though that it performs very poorly. Mostly because the images I took with the Pi Noir Camera are usually out of focus and the colors are obviously wrong. I also only want to distinguish cat from noCat, and don't care what kind of cat uses my garden as a toilet. 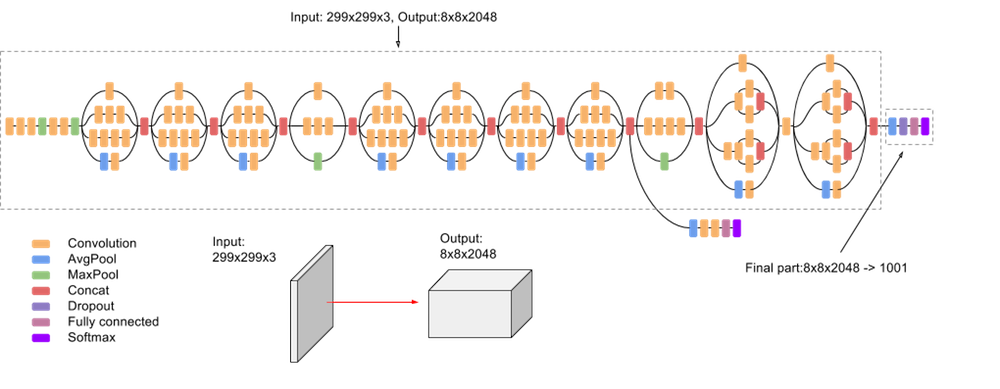 *The inception v3 deep neural network, from: https://cloud.google.com/tpu/docs/inception-v3-advanced* The pretrained network can still be used, especially the first layers, as they are pretty general for image recognition tasks. They mostly discover image features like edges, or same color areas etc. We will use the pretrained inception v3 model, and replace the very last layer with a fully connected dense layer with two output categories. When training, we will leave all weights of the bottom layers unchanged and will only train the replaced layer with the two output categories "cat" and "noCat". This is called *transfer learning* and is used efficiently in different scenarios. In above image, we thus will remove the final part 8x8x2048 -> 1001 categories and replace it with something that maps to 2 categories. There are also other pretrained models you can try out, see here: https://keras.io/applications/ I tried all of them and found the performance of inception v3 the best. It seems to be best suited for transfer learning of out of focus images with wrong colors. # Running the Transfer Learning Training You can download the transfer learning code from here: ```bash git clone https://github.com/magictimelapse/CatRecognition ``` Some explanation of the code: ```python img_width, img_height = 299, 299 train_data_dir = "<set your directory with the training data here>" validation_data_dir = "<set your diretory with the test data here>" batch_size = 6 initial_epoch = 0 endepochs = 10 ``` In train_data_dir and validation_data_dir set the training directory and the validation directory. batch_size is the number of images the neural network is optimised in one go. Set it larger to be faster, and smaller to be more precise. Initial_epoch and end_epoch is the number of epochs it will train (start to end). Set initial_epoch to 0, otherwise the program will load an existing pre trained neural network. One epoch is one iteration of the weight optimisation through all data. Run it first with a small number of epochs and check how long one epoch takes. ```python def add_last_layer(base_model, nb_classes = 2): x = base_model.output #x = Dropout(0.4)(x) x = Dense(16,activation="relu")(x) #x = Dropout(0.4)(x) predictions = Dense(nb_classes, activation='softmax')(x) model = Model(input=base_model.input, output=predictions) return model def exchange_last_layers(base_model, nb_classes=2): x = base_model.output x= GlobalAveragePooling2D()(x) x = Dropout(0.4)(x) x = Dense(4,activation="relu")(x) x = Dropout(0.4)(x) predictions = Dense(nb_classes, activation='softmax')(x) model = Model(input=base_model.input, output=predictions) return model ``` These two functions do all the magic with replacing the last layer, respectively adding an additional layer to extend the deep neural network. It takes any base model (e.g. inception v3) and exchanges the top layer (or adds an additional layer respectively) with a densely connected network. Important is than the last dense layer with nb_classes the number of categories we want to distinguish. We choose 2 (*cat* vs *noCat*). ```python if initial_epoch > 0: refit = True else: refit = False if not refit: if model_name == 'inception_v3_1' or model_name == 'inception_v3_2'or model_name == "InceptionResNet_V2_0": if (K.image_dim_ordering() == 'th'): input_tensor = Input(shape=(3, 299, 299)) else: input_tensor = Input(shape=(299, 299, 3)) if model_name == 'inception_v3_1': base_model = InceptionV3(input_tensor=input_tensor, weights='imagenet', include_top=False) mymodel = exchange_last_layers(base_model) if model_name == 'inception_v3_2': base_model = InceptionV3(input_tensor=input_tensor, weights='imagenet', include_top=True) mymodel = add_last_layer(base_model) elif model_name == "InceptionResNet_V2_0": base_model = InceptionResNetV2(input_tensor=input_tensor, weights='imagenet', include_top=False) mymodel = exchange_last_layers(base_model) for layer in base_model.layers: layer.trainable = False mymodel.compile(optimizer='rmsprop', loss='categorical_crossentropy', metrics=['accuracy']) ``` We will not refit if the initial epoch is zero. This means that we will construct a new model from e.g. inception v3 and construct a new top layer, as described above. After training the model, we will save it as a hdf5 file, so that we can later refit it, for example when we have collected more cat images. We can then restart the fitting at the epoch we stopped in the last training session, by setting the corresponding initial_epoch higher up in the code. The model 'inception_v3_1' will exchange the top layer with our custom dense layer. The model 'inception_v3_2' will add an additional layer. You can extend this block with your custom models, or with any model from here: https://keras.io/applications/ Finally we will set the layers of the base model to not trainable, and will only train our new layer. This model will still have 8206 trainable parameters, which is still a lot! However, compared to the already trained 21,802,784 parameters in the inception v3 model, this really reduces the number of parameters a lot. ```python train_datagen = ImageDataGenerator( rescale = 1./255, horizontal_flip = True, fill_mode = "nearest", zoom_range = 0.3, width_shift_range = 0.3, height_shift_range=0.3, rotation_range=30) train_generator = train_datagen.flow_from_directory( train_data_dir, target_size = (img_height, img_width), batch_size = batch_size, class_mode = "categorical") ``` Here we initialize the ImageDataGenerator. The idea is that we take the images, and create from them more training data by flipping the images, by zooming, shifhting and rotating the images a bit. This will make the training much more robust. We do the same with the validation data. ```python checkpoint = ModelCheckpoint(model_name+'.h5', monitor='val_acc', verbose=1, save_best_only=False, save_weights_only=False, mode='auto', period=1) ``` When fitting, we set a checkpoint after each iteration, where the model is saved in a hdf5 file. This helps to continue after a crash. ```python class_weights = {class_dictionary['cats']:0.85,class_dictionary['noCat']:0.15} print(class_dictionary) history= mymodel.fit_generator( train_generator, epochs = endepochs, initial_epoch = initial_epoch, validation_data = validation_generator, class_weight=class_weights, steps_per_epoch=len(train_generator) , validation_steps = len(validation_generator), callbacks=[checkpoint]) ``` Here, the heavy lifting will be done. First we tell keras, that it should weight the cat category with a weight of 0.85 and the noCat category with 0.15, due to the fact that I have much more noCat data than cat data. The we start the fitting with the transformed images from above. You will see an output like: ```bash __________________________________________________________________________________________________ activation_94 (Activation) (None, 8, 8, 192) 0 batch_normalization_94[0][0] __________________________________________________________________________________________________ mixed10 (Concatenate) (None, 8, 8, 2048) 0 activation_86[0][0] mixed9_1[0][0] concatenate_2[0][0] activation_94[0][0] __________________________________________________________________________________________________ global_average_pooling2d_1 (Glo (None, 2048) 0 mixed10[0][0] __________________________________________________________________________________________________ dropout_1 (Dropout) (None, 2048) 0 global_average_pooling2d_1[0][0] __________________________________________________________________________________________________ dense_1 (Dense) (None, 4) 8196 dropout_1[0][0] __________________________________________________________________________________________________ dropout_2 (Dropout) (None, 4) 0 dense_1[0][0] __________________________________________________________________________________________________ dense_2 (Dense) (None, 2) 10 dropout_2[0][0] ================================================================================================== Total params: 21,810,990 Trainable params: 8,206 Non-trainable params: 21,802,784 __________________________________________________________________________________________________ None Found 51165 images belonging to 2 classes. Found 1049 images belonging to 2 classes. {'cats': 0, 'noCat': 1} Epoch 1/10 2052/8528 [======>.......................] - ETA: 19:48 - loss: 0.2060 - acc: 0.4366 ``` The *loss* and *acc* values are important number. *loss* is the parameter that is optimized by the deep neural network in the fitting step. Here we use as loss function the categorical_crossentropy. The training will try to minimize this value by optimizing the weights in the neural network using back propagation. To learn more about backpropagation and deep neural networks, I can highly recommand Andrew Ng's courses on coursera: https://www.coursera.org/learn/neural-networks-deep-learning The value *acc* is a metrics the neural network calculates for each training step. It is defined as: accuracy = number of correct predictions / total number of predictions and is measure of how precise the neural network predicts the correct category. The script will produce two plots in html files: history.html and history_accuracy.html. It will show the development of the loss function and the accuracy as a function of training epoch for training and validation data. They should become smaller with training epochs, and should be about the same for a training epoch for training and validation data. If they are not similar, we probably overtrain the network. You can try to increase the dropout factor, or reduce the number of dense nodes in the exchange_last_layer() function. --- *** ETH: 0x6c54eA14109f3E97cdfC02b0C5AbE88e190BDf18  Bitcoin: 35N7cEkjiKGrMyETDU61KBtWWc7wRBYAXv IOTA: 9PDEUUFUTPLBNGORASBZGYXLWC9KLWWPGZFF9T9AHUKMLHHEVDWJJDUNXFJNADDHKT9ZKCNCVEY9MJRTZEWUHGASKY |
| json metadata | {"tags":["raspberrypi","cats","deeplearning","ai","keras"],"image":["https://cdn.steemitimages.com/DQmS1LEQXN3shy1eHCwv3Bo6SxwiWXPi8yYJ9QiMo1oG51C/07-20180422181348-03_cropped.jpg","https://cdn.steemitimages.com/DQmWZzzfHxf5MC3snPCGNn2GmWQRifRjwaR7C4mjjRsQNvN/03-20180422153419-03_cropped.jpg","https://cdn.steemitimages.com/DQmPZC2t6r8RQB4JMbBqaJJJfniuDyNtG4EFS1WsKLcAiXo/imageExample.png","https://cdn.steemitimages.com/DQmP34jSaScD5QGnyBMCyVEiAocenwdHbjL58L7y9tUoGLR/image.png","https://cdn.steemitimages.com/DQmPtrWD1WMJKvxg8uJ5NhyVfpmKHT6kTxXjdtYWUX6VLv3/image.png"],"links":["https://steemit.com/raspberrypi/@mragic/how-to-build-a-cat-detector-with-a-raspberry-pi-and-a-pi-noir-camera-using-deep-learning-part-i","https://steemit.com/raspberrypi/@mragic/how-to-build-a-cat-detector-with-a-raspberry-pi-and-a-pi-noir-camera-using-deep-learning-part-ii","https://www.anaconda.com/download/","https://www.tensorflow.org/install/gpu","https://gist.github.com/yrevar/942d3a0ac09ec9e5eb3a","https://keras.io/applications/#inceptionv3","https://cloud.google.com/tpu/docs/inception-v3-advanced","https://keras.io/applications/","https://www.coursera.org/learn/neural-networks-deep-learning"],"app":"steemit/0.1","format":"markdown"} |
| Transaction Info | Block #29075431/Trx b123ef86039cef7b4487e7cd1aa7f7060147a799 |
View Raw JSON Data
{
"trx_id": "b123ef86039cef7b4487e7cd1aa7f7060147a799",
"block": 29075431,
"trx_in_block": 6,
"op_in_trx": 0,
"virtual_op": 0,
"timestamp": "2019-01-01T13:32:54",
"op": [
"comment",
{
"parent_author": "",
"parent_permlink": "raspberrypi",
"author": "mragic",
"permlink": "how-to-build-a-cat-detector-with-a-raspberry-pi-and-a-pi-noir-camera-using-deep-learning-part-iii",
"title": "How to build a cat detector with a Raspberry Pi and a Pi Noir camera using Deep Learning - Part III",
"body": "Part I is here:\nhttps://steemit.com/raspberrypi/@mragic/how-to-build-a-cat-detector-with-a-raspberry-pi-and-a-pi-noir-camera-using-deep-learning-part-i\nPart II:\nhttps://steemit.com/raspberrypi/@mragic/how-to-build-a-cat-detector-with-a-raspberry-pi-and-a-pi-noir-camera-using-deep-learning-part-ii\n\n# Introduction\nIn this part III I will describe how the the images taken in can be used to train a deep neural network to distinguish images with cats against images without cats. This will need a lot of computing power, and if available a GPU (graphics card) with CUDA, and cannot be done reasonably on a raspberry pi. I use my Windows 10 notebook with a NVIDIA Geforce 1070 graphics card. In total I collected 14000 images with cats, and around 40000 images without cats. With this amount of data I can reasonably distinguish cats pictures from non-cat pictures with a probability of around 95%. The training of the neural network took around 36 hours.\n\n\n*Example of a cat image, used to train the deep neural network*\n\n\n*Example of a non-cat image used to train the deep neural network*\n\n\n# Preparation of Software\nYou can get all the code here:\n```bash\ngit clone https://github.com/magictimelapse/CatRecognition\n```\n\nFirst we will use anaconda as a python package manager to install all required python modules. You can download it from here:\nhttps://www.anaconda.com/download/\nI use the python 3.6 version.\nThen open the anaconda shell from the start menu (called anaconda prompt). Create a anaconda environment with \n```bash\nconda create -n ai python=3.6\n```\nPress *y* to install all modules. \nActivate this environment with\n```bash\n<condapath>/bin/activate ai\n```\nIf you have GPU with CUDA feature (all modern NVIDIA GPUs have that), then install CUDA following this instruction:\nhttps://www.tensorflow.org/install/gpu\nfor Windows or Linux, respectively.\nThen install tensorflow. If you have a GPU use the module tensorflow-gpu, otherwise tensorflow:\n```bash\nconda install tensorflow-gpu\n```\nAs deep learning framework, we will use the keras framework on top of tensorflow. Install it with:\n```bash\nconda install keras\n```\n\n\nFor plotting of some graphs, we will use plotly. For image manipulation, we need pillow.\n```bash\nconda install plotly\nconda install pillow\n```\n\n# Preparation of the Data\nTo train the deep neural network, we will need training data with label either *cat* or *noCat* assigned. We will thus split the cropped images in two folders, called cat and noCat. This can be done efficiently by copying all images to the windows computer to a folder called *images*. Create two folders *cat* and *noCat*, then copy from the *images* folder to either *cat* or *noCat* depending if there is a cat in the image or not. This can be done quite efficiently with all 3 folders open in the same desktop. \n\nYes, I did that for 14000 cats. I collected the images over around 2 months...\n\nFinally, we need from both cat and noCat label around 10% of the images to test the deep neural network, and 90% of the images to train the network. I create two folders *train* and *test*, with each two folder *cat* and *noCat*, and copy each 10% of the images to the test folder and 90% to the train folder. Now we are ready to train our deep neural network!\n\n# Training of the Deep Neural Network\nRecognizing and labeling of objects in images is a hot topic obviously, and huge advances where made in the last 5 years. There is yearly competition to compare labeling of thousands of categories, for example :\n9: 'ostrich, Struthio camelus',\n 10: 'brambling, Fringilla montifringilla',\n 11: 'goldfinch, Carduelis carduelis',\n 12: 'house finch, linnet, Carpodacus mexicanus',\n 13: 'junco, snowbird',\n 14: 'indigo bunting, indigo finch, indigo bird, Passerina cyanea',\n 15: 'robin, American robin, Turdus migratorius'\nSee here: https://gist.github.com/yrevar/942d3a0ac09ec9e5eb3a for all categories.\nIt can also recognise different cats:\n 281: 'tabby, tabby cat',\n 282: 'tiger cat',\n 283: 'Persian cat',\n 284: 'Siamese cat, Siamese',\n 285: 'Egyptian cat',\n\nGoogle's implementation of deep neural network is obviously quite good in this challenge (e.g. GoogleNet (aka inception v1)). So in a first trial, I just loaded the inception v3 model with the weights already trained with the imagenet data, which is conveniently already available in keras (see https://keras.io/applications/#inceptionv3). I realized though that it performs very poorly. Mostly because the images I took with the Pi Noir Camera are usually out of focus and the colors are obviously wrong. I also only want to distinguish cat from noCat, and don't care what kind of cat uses my garden as a toilet.\n\n*The inception v3 deep neural network, from: https://cloud.google.com/tpu/docs/inception-v3-advanced*\nThe pretrained network can still be used, especially the first layers, as they are pretty general for image recognition tasks. They mostly discover image features like edges, or same color areas etc. We will use the pretrained inception v3 model, and replace the very last layer with a fully connected dense layer with two output categories. When training, we will leave all weights of the bottom layers unchanged and will only train the replaced layer with the two output categories \"cat\" and \"noCat\". This is called *transfer learning* and is used efficiently in different scenarios.\nIn above image, we thus will remove the final part 8x8x2048 -> 1001 categories and replace it with something that maps to 2 categories.\nThere are also other pretrained models you can try out, see here: https://keras.io/applications/\nI tried all of them and found the performance of inception v3 the best. It seems to be best suited for transfer learning of out of focus images with wrong colors.\n\n# Running the Transfer Learning Training\nYou can download the transfer learning code from here:\n```bash\ngit clone https://github.com/magictimelapse/CatRecognition\n```\nSome explanation of the code:\n```python\nimg_width, img_height = 299, 299\ntrain_data_dir = \"<set your directory with the training data here>\"\nvalidation_data_dir = \"<set your diretory with the test data here>\"\n\nbatch_size = 6\ninitial_epoch = 0\nendepochs = 10\n\n```\nIn train_data_dir and validation_data_dir set the training directory and the validation directory. batch_size is the number of images the neural network is optimised in one go. Set it larger to be faster, and smaller to be more precise. Initial_epoch and end_epoch is the number of epochs it will train (start to end). Set initial_epoch to 0, otherwise the program will load an existing pre trained neural network. One epoch is one iteration of the weight optimisation through all data. Run it first with a small number of epochs and check how long one epoch takes.\n```python\ndef add_last_layer(base_model, nb_classes = 2):\n x = base_model.output\n #x = Dropout(0.4)(x)\n x = Dense(16,activation=\"relu\")(x)\n #x = Dropout(0.4)(x)\n predictions = Dense(nb_classes, activation='softmax')(x)\n model = Model(input=base_model.input, output=predictions)\n return model\ndef exchange_last_layers(base_model, nb_classes=2):\n x = base_model.output\n x= GlobalAveragePooling2D()(x)\n x = Dropout(0.4)(x)\n x = Dense(4,activation=\"relu\")(x)\n x = Dropout(0.4)(x)\n predictions = Dense(nb_classes, activation='softmax')(x)\n model = Model(input=base_model.input, output=predictions)\n return model\n```\nThese two functions do all the magic with replacing the last layer, respectively adding an additional layer to extend the deep neural network. It takes any base model (e.g. inception v3) and exchanges the top layer (or adds an additional layer respectively) with a densely connected network. Important is than the last dense layer with nb_classes the number of categories we want to distinguish. We choose 2 (*cat* vs *noCat*).\n```python\nif initial_epoch > 0:\n refit = True\nelse:\n refit = False\n\nif not refit:\n if model_name == 'inception_v3_1' or model_name == 'inception_v3_2'or model_name == \"InceptionResNet_V2_0\":\n if (K.image_dim_ordering() == 'th'):\n input_tensor = Input(shape=(3, 299, 299))\n else:\n input_tensor = Input(shape=(299, 299, 3))\n if model_name == 'inception_v3_1':\n base_model = InceptionV3(input_tensor=input_tensor, weights='imagenet',\n include_top=False)\n mymodel = exchange_last_layers(base_model)\n if model_name == 'inception_v3_2':\n base_model = InceptionV3(input_tensor=input_tensor, weights='imagenet',\n include_top=True)\n mymodel = add_last_layer(base_model)\n\n elif model_name == \"InceptionResNet_V2_0\":\n base_model = InceptionResNetV2(input_tensor=input_tensor, weights='imagenet',\n include_top=False)\n mymodel = exchange_last_layers(base_model)\n\n\n for layer in base_model.layers:\n layer.trainable = False\n mymodel.compile(optimizer='rmsprop',\n loss='categorical_crossentropy',\n metrics=['accuracy'])\n```\nWe will not refit if the initial epoch is zero. This means that we will construct a new model from e.g. inception v3 and construct a new top layer, as described above. After training the model, we will save it as a hdf5 file, so that we can later refit it, for example when we have collected more cat images. We can then restart the fitting at the epoch we stopped in the last training session, by setting the corresponding initial_epoch higher up in the code.\nThe model 'inception_v3_1' will exchange the top layer with our custom dense layer. The model 'inception_v3_2' will add an additional layer. You can extend this block with your custom models, or with any model from here: https://keras.io/applications/\nFinally we will set the layers of the base model to not trainable, and will only train our new layer. This model will still have 8206 trainable parameters, which is still a lot! However, compared to the already trained 21,802,784 parameters in the inception v3 model, this really reduces the number of parameters a lot.\n```python\ntrain_datagen = ImageDataGenerator(\nrescale = 1./255,\nhorizontal_flip = True,\nfill_mode = \"nearest\",\nzoom_range = 0.3,\nwidth_shift_range = 0.3,\nheight_shift_range=0.3,\nrotation_range=30)\ntrain_generator = train_datagen.flow_from_directory(\ntrain_data_dir,\ntarget_size = (img_height, img_width),\nbatch_size = batch_size,\nclass_mode = \"categorical\")\n\n```\nHere we initialize the ImageDataGenerator. The idea is that we take the images, and create from them more training data by flipping the images, by zooming, shifhting and rotating the images a bit. This will make the training much more robust. We do the same with the validation data.\n```python\ncheckpoint = ModelCheckpoint(model_name+'.h5', monitor='val_acc', verbose=1, save_best_only=False, save_weights_only=False, mode='auto', period=1)\n```\nWhen fitting, we set a checkpoint after each iteration, where the model is saved in a hdf5 file. This helps to continue after a crash.\n```python\nclass_weights = {class_dictionary['cats']:0.85,class_dictionary['noCat']:0.15}\nprint(class_dictionary)\nhistory= mymodel.fit_generator(\n train_generator,\n epochs = endepochs,\n initial_epoch = initial_epoch,\n validation_data = validation_generator,\n class_weight=class_weights,\n steps_per_epoch=len(train_generator) ,\n validation_steps = len(validation_generator),\n callbacks=[checkpoint])\n```\nHere, the heavy lifting will be done. First we tell keras, that it should weight the cat category with a weight of 0.85 and the noCat category with 0.15, due to the fact that I have much more noCat data than cat data. The we start the fitting with the transformed images from above. You will see an output like:\n```bash\n__________________________________________________________________________________________________\nactivation_94 (Activation) (None, 8, 8, 192) 0 batch_normalization_94[0][0]\n__________________________________________________________________________________________________\nmixed10 (Concatenate) (None, 8, 8, 2048) 0 activation_86[0][0]\n mixed9_1[0][0]\n concatenate_2[0][0]\n activation_94[0][0]\n__________________________________________________________________________________________________\nglobal_average_pooling2d_1 (Glo (None, 2048) 0 mixed10[0][0]\n__________________________________________________________________________________________________\ndropout_1 (Dropout) (None, 2048) 0 global_average_pooling2d_1[0][0]\n__________________________________________________________________________________________________\ndense_1 (Dense) (None, 4) 8196 dropout_1[0][0]\n__________________________________________________________________________________________________\ndropout_2 (Dropout) (None, 4) 0 dense_1[0][0]\n__________________________________________________________________________________________________\ndense_2 (Dense) (None, 2) 10 dropout_2[0][0]\n==================================================================================================\nTotal params: 21,810,990\nTrainable params: 8,206\nNon-trainable params: 21,802,784\n__________________________________________________________________________________________________\nNone\nFound 51165 images belonging to 2 classes.\nFound 1049 images belonging to 2 classes.\n{'cats': 0, 'noCat': 1}\nEpoch 1/10\n2052/8528 [======>.......................] - ETA: 19:48 - loss: 0.2060 - acc: 0.4366\n```\n\nThe *loss* and *acc* values are important number. *loss* is the parameter that is optimized by the deep neural network in the fitting step. Here we use as loss function the categorical_crossentropy. The training will try to minimize this value by optimizing the weights in the neural network using back propagation. To learn more about backpropagation and deep neural networks, I can highly recommand Andrew Ng's courses on coursera:\nhttps://www.coursera.org/learn/neural-networks-deep-learning\nThe value *acc* is a metrics the neural network calculates for each training step. It is defined as:\naccuracy = number of correct predictions / total number of predictions\nand is measure of how precise the neural network predicts the correct category.\n\nThe script will produce two plots in html files: history.html and history_accuracy.html. It will show the development of the loss function and the accuracy as a function of training epoch for training and validation data. They should become smaller with training epochs, and should be about the same for a training epoch for training and validation data. If they are not similar, we probably overtrain the network. You can try to increase the dropout factor, or reduce the number of dense nodes in the exchange_last_layer() function.\n\n---\n***\nETH: 0x6c54eA14109f3E97cdfC02b0C5AbE88e190BDf18\n\nBitcoin: 35N7cEkjiKGrMyETDU61KBtWWc7wRBYAXv\nIOTA: 9PDEUUFUTPLBNGORASBZGYXLWC9KLWWPGZFF9T9AHUKMLHHEVDWJJDUNXFJNADDHKT9ZKCNCVEY9MJRTZEWUHGASKY",
"json_metadata": "{\"tags\":[\"raspberrypi\",\"cats\",\"deeplearning\",\"ai\",\"keras\"],\"image\":[\"https://cdn.steemitimages.com/DQmS1LEQXN3shy1eHCwv3Bo6SxwiWXPi8yYJ9QiMo1oG51C/07-20180422181348-03_cropped.jpg\",\"https://cdn.steemitimages.com/DQmWZzzfHxf5MC3snPCGNn2GmWQRifRjwaR7C4mjjRsQNvN/03-20180422153419-03_cropped.jpg\",\"https://cdn.steemitimages.com/DQmPZC2t6r8RQB4JMbBqaJJJfniuDyNtG4EFS1WsKLcAiXo/imageExample.png\",\"https://cdn.steemitimages.com/DQmP34jSaScD5QGnyBMCyVEiAocenwdHbjL58L7y9tUoGLR/image.png\",\"https://cdn.steemitimages.com/DQmPtrWD1WMJKvxg8uJ5NhyVfpmKHT6kTxXjdtYWUX6VLv3/image.png\"],\"links\":[\"https://steemit.com/raspberrypi/@mragic/how-to-build-a-cat-detector-with-a-raspberry-pi-and-a-pi-noir-camera-using-deep-learning-part-i\",\"https://steemit.com/raspberrypi/@mragic/how-to-build-a-cat-detector-with-a-raspberry-pi-and-a-pi-noir-camera-using-deep-learning-part-ii\",\"https://www.anaconda.com/download/\",\"https://www.tensorflow.org/install/gpu\",\"https://gist.github.com/yrevar/942d3a0ac09ec9e5eb3a\",\"https://keras.io/applications/#inceptionv3\",\"https://cloud.google.com/tpu/docs/inception-v3-advanced\",\"https://keras.io/applications/\",\"https://www.coursera.org/learn/neural-networks-deep-learning\"],\"app\":\"steemit/0.1\",\"format\":\"markdown\"}"
}
]
}2018/12/27 09:57:36
2018/12/27 09:57:36
| voter | millibot |
| author | mragic |
| permlink | how-to-send-ruuvitag-sensor-data-to-the-iota-tangle-with-mam-using-a-raspberry-pi-3 |
| weight | 500 (5.00%) |
| Transaction Info | Block #28927214/Trx 209349aca40faf3ae34c8e68dde44859258a3aeb |
View Raw JSON Data
{
  "trx_id": "209349aca40faf3ae34c8e68dde44859258a3aeb",
  "block": 28927214,
  "trx_in_block": 0,
  "op_in_trx": 0,
  "virtual_op": 0,
  "timestamp": "2018-12-27T09:57:36",
  "op": [
    "vote",
    {
      "voter": "millibot",
      "author": "mragic",
      "permlink": "how-to-send-ruuvitag-sensor-data-to-the-iota-tangle-with-mam-using-a-raspberry-pi-3",
      "weight": 500
    }
  ]
}2018/12/27 09:56:30
2018/12/27 09:56:30
| parent author | |
| parent permlink | iota |
| author | mragic |
| permlink | how-to-send-ruuvitag-sensor-data-to-the-iota-tangle-with-mam-using-a-raspberry-pi-3 |
| title | How to send ruuvitag sensor data to the iota tangle with mam using a raspberry pi 3 |
| body | @@ -6482,8 +6482,203 @@ dencies. +%0A%0A---%0A%0AIOTA: 9PDEUUFUTPLBNGORASBZGYXLWC9KLWWPGZFF9T9AHUKMLHHEVDWJJDUNXFJNADDHKT9ZKCNCVEY9MJRTZEWUHGASKY%0AETH: 0x6c54eA14109f3E97cdfC02b0C5AbE88e190BDf18%0ABitcoin: 35N7cEkjiKGrMyETDU61KBtWWc7wRBYAXv |
| json metadata | {"tags":["iota","ruuvitag","raspberrypi","mam","javascript"],"links":["https://www.iota.org/","https://www.youtube.com/playlist?list=PLmL13yqb6OxdIf6CQMHf7hUcDZBbxHyza","https://iotasalad.org/nodes"],"app":"steemit/0.1","format":"markdown"} |
| Transaction Info | Block #28927192/Trx e7173646890f752fb0f030fc12a75e05f120b457 |
View Raw JSON Data
{
  "trx_id": "e7173646890f752fb0f030fc12a75e05f120b457",
  "block": 28927192,
  "trx_in_block": 18,
  "op_in_trx": 0,
  "virtual_op": 0,
  "timestamp": "2018-12-27T09:56:30",
  "op": [
    "comment",
    {
      "parent_author": "",
      "parent_permlink": "iota",
      "author": "mragic",
      "permlink": "how-to-send-ruuvitag-sensor-data-to-the-iota-tangle-with-mam-using-a-raspberry-pi-3",
      "title": "How to send ruuvitag sensor data to the iota tangle with mam using a raspberry pi 3",
      "body": "@@ -6482,8 +6482,203 @@\n dencies.\n+%0A%0A---%0A%0AIOTA: 9PDEUUFUTPLBNGORASBZGYXLWC9KLWWPGZFF9T9AHUKMLHHEVDWJJDUNXFJNADDHKT9ZKCNCVEY9MJRTZEWUHGASKY%0AETH: 0x6c54eA14109f3E97cdfC02b0C5AbE88e190BDf18%0ABitcoin: 35N7cEkjiKGrMyETDU61KBtWWc7wRBYAXv\n",
      "json_metadata": "{\"tags\":[\"iota\",\"ruuvitag\",\"raspberrypi\",\"mam\",\"javascript\"],\"links\":[\"https://www.iota.org/\",\"https://www.youtube.com/playlist?list=PLmL13yqb6OxdIf6CQMHf7hUcDZBbxHyza\",\"https://iotasalad.org/nodes\"],\"app\":\"steemit/0.1\",\"format\":\"markdown\"}"
    }
  ]
}2018/12/27 09:34:33
2018/12/27 09:34:33
| voter | mragic |
| author | mostafamd |
| permlink | re-mragic-how-to-send-ruuvitag-sensor-data-to-the-iota-tangle-with-mam-using-a-raspberry-pi-3-20181227t080010844z |
| weight | 10000 (100.00%) |
| Transaction Info | Block #28926753/Trx c71b99798e048d2efff4dcb4c0edd2ea0a31572b |
View Raw JSON Data
{
  "trx_id": "c71b99798e048d2efff4dcb4c0edd2ea0a31572b",
  "block": 28926753,
  "trx_in_block": 19,
  "op_in_trx": 0,
  "virtual_op": 0,
  "timestamp": "2018-12-27T09:34:33",
  "op": [
    "vote",
    {
      "voter": "mragic",
      "author": "mostafamd",
      "permlink": "re-mragic-how-to-send-ruuvitag-sensor-data-to-the-iota-tangle-with-mam-using-a-raspberry-pi-3-20181227t080010844z",
      "weight": 10000
    }
  ]
}2018/12/27 08:00:18
2018/12/27 08:00:18
| parent author | mragic |
| parent permlink | how-to-send-ruuvitag-sensor-data-to-the-iota-tangle-with-mam-using-a-raspberry-pi-3 |
| author | mostafamd |
| permlink | re-mragic-how-to-send-ruuvitag-sensor-data-to-the-iota-tangle-with-mam-using-a-raspberry-pi-3-20181227t080010844z |
| title | |
| body | Thanks for nice info |
| json metadata | {"tags":["iota"],"app":"steemit/0.1"} |
| Transaction Info | Block #28924868/Trx 0806e71eec29cfe670c8160bc2cce9f67ba73475 |
View Raw JSON Data
{
  "trx_id": "0806e71eec29cfe670c8160bc2cce9f67ba73475",
  "block": 28924868,
  "trx_in_block": 15,
  "op_in_trx": 0,
  "virtual_op": 0,
  "timestamp": "2018-12-27T08:00:18",
  "op": [
    "comment",
    {
      "parent_author": "mragic",
      "parent_permlink": "how-to-send-ruuvitag-sensor-data-to-the-iota-tangle-with-mam-using-a-raspberry-pi-3",
      "author": "mostafamd",
      "permlink": "re-mragic-how-to-send-ruuvitag-sensor-data-to-the-iota-tangle-with-mam-using-a-raspberry-pi-3-20181227t080010844z",
      "title": "",
      "body": "Thanks for nice info",
      "json_metadata": "{\"tags\":[\"iota\"],\"app\":\"steemit/0.1\"}"
    }
  ]
}2018/12/27 07:59:45
2018/12/27 07:59:45
| voter | mostafamd |
| author | mragic |
| permlink | how-to-send-ruuvitag-sensor-data-to-the-iota-tangle-with-mam-using-a-raspberry-pi-3 |
| weight | 10000 (100.00%) |
| Transaction Info | Block #28924857/Trx 7e9d45bfd6df0673540fc4428642f6e9031b9f77 |
View Raw JSON Data
{
  "trx_id": "7e9d45bfd6df0673540fc4428642f6e9031b9f77",
  "block": 28924857,
  "trx_in_block": 11,
  "op_in_trx": 0,
  "virtual_op": 0,
  "timestamp": "2018-12-27T07:59:45",
  "op": [
    "vote",
    {
      "voter": "mostafamd",
      "author": "mragic",
      "permlink": "how-to-send-ruuvitag-sensor-data-to-the-iota-tangle-with-mam-using-a-raspberry-pi-3",
      "weight": 10000
    }
  ]
}2018/12/25 14:23:27
2018/12/25 14:23:27
| voter | minibot |
| author | mragic |
| permlink | how-to-send-ruuvitag-sensor-data-to-the-iota-tangle-with-mam-using-a-raspberry-pi-3 |
| weight | 500 (5.00%) |
| Transaction Info | Block #28874951/Trx a0f4c49558e9d4a79aff6b612b847cdd4d211b00 |
View Raw JSON Data
{
  "trx_id": "a0f4c49558e9d4a79aff6b612b847cdd4d211b00",
  "block": 28874951,
  "trx_in_block": 9,
  "op_in_trx": 0,
  "virtual_op": 0,
  "timestamp": "2018-12-25T14:23:27",
  "op": [
    "vote",
    {
      "voter": "minibot",
      "author": "mragic",
      "permlink": "how-to-send-ruuvitag-sensor-data-to-the-iota-tangle-with-mam-using-a-raspberry-pi-3",
      "weight": 500
    }
  ]
}2018/12/25 14:21:30
2018/12/25 14:21:30
| parent author | |
| parent permlink | iota |
| author | mragic |
| permlink | how-to-send-ruuvitag-sensor-data-to-the-iota-tangle-with-mam-using-a-raspberry-pi-3 |
| title | How to send ruuvitag sensor data to the iota tangle with mam using a raspberry pi 3 |
| body | @@ -1613,16 +1613,53 @@ ibraries +, and you might also need libudev-dev :%0A%60%60%60bas @@ -1701,16 +1701,49 @@ hcidump%0A +sudo apt-get install libudev-dev%0A %60%60%60%0AThen |
| json metadata | {"tags":["iota","ruuvitag","raspberrypi","mam","javascript"],"links":["https://www.iota.org/","https://www.youtube.com/playlist?list=PLmL13yqb6OxdIf6CQMHf7hUcDZBbxHyza","https://iotasalad.org/nodes"],"app":"steemit/0.1","format":"markdown"} |
| Transaction Info | Block #28874913/Trx a6ff9ed614271fa2004536f2a35113d306d44b14 |
View Raw JSON Data
{
  "trx_id": "a6ff9ed614271fa2004536f2a35113d306d44b14",
  "block": 28874913,
  "trx_in_block": 12,
  "op_in_trx": 0,
  "virtual_op": 0,
  "timestamp": "2018-12-25T14:21:30",
  "op": [
    "comment",
    {
      "parent_author": "",
      "parent_permlink": "iota",
      "author": "mragic",
      "permlink": "how-to-send-ruuvitag-sensor-data-to-the-iota-tangle-with-mam-using-a-raspberry-pi-3",
      "title": "How to send ruuvitag sensor data to the iota tangle with mam using a raspberry pi 3",
      "body": "@@ -1613,16 +1613,53 @@\n ibraries\n+, and you might also need libudev-dev\n :%0A%60%60%60bas\n@@ -1701,16 +1701,49 @@\n hcidump%0A\n+sudo apt-get install libudev-dev%0A\n %60%60%60%0AThen\n",
      "json_metadata": "{\"tags\":[\"iota\",\"ruuvitag\",\"raspberrypi\",\"mam\",\"javascript\"],\"links\":[\"https://www.iota.org/\",\"https://www.youtube.com/playlist?list=PLmL13yqb6OxdIf6CQMHf7hUcDZBbxHyza\",\"https://iotasalad.org/nodes\"],\"app\":\"steemit/0.1\",\"format\":\"markdown\"}"
    }
  ]
}2018/12/25 11:17:42
2018/12/25 11:17:42
| delegator | steem |
| delegatee | mragic |
| vesting shares | 29957.653491 VESTS |
| Transaction Info | Block #28871238/Trx 00fab20651dc8c170ef4e164e45dd272dee77881 |
View Raw JSON Data
{
  "trx_id": "00fab20651dc8c170ef4e164e45dd272dee77881",
  "block": 28871238,
  "trx_in_block": 18,
  "op_in_trx": 0,
  "virtual_op": 0,
  "timestamp": "2018-12-25T11:17:42",
  "op": [
    "delegate_vesting_shares",
    {
      "delegator": "steem",
      "delegatee": "mragic",
      "vesting_shares": "29957.653491 VESTS"
    }
  ]
}2018/12/25 11:14:33
2018/12/25 11:14:33
| parent author | |
| parent permlink | iota |
| author | mragic |
| permlink | how-to-send-ruuvitag-sensor-data-to-the-iota-tangle-with-mam-using-a-raspberry-pi-3 |
| title | How to send ruuvitag sensor data to the iota tangle with mam using a raspberry pi 3 |
| body | The IOTA tangle (https://www.iota.org/) is a distributed ledger thought to be used for machine to machine economics. Compared to first and second generation distributed ledgers like bitcoin or ethereum, it does not use a blockchain, where blocks are written synchronously, but a so called tangle. In order to attach a transaction to the tangle,one needs to confirm two older transactions by doing a small proof of work. As each transaction confirms two earlier transaction, the scalability of the tangle is much better compared to classical blockchain based distributed ledgers. A further advantage is that there is no mining in IOTA and thus also no transaction fees. If you want to know more about the tangle and its structure, I highly recommand to watch the tutorials by mobilefish: https://www.youtube.com/playlist?list=PLmL13yqb6OxdIf6CQMHf7hUcDZBbxHyza Small amount of data can be written directly onto the tangle, by using for example MAM (masked authenticated messaging). This allows to write a stream of data to the tangle. Only people who are listening to the specific stream will then receive this data. As the data is masked (encrypted), nobody else can receive this data. In this example, I use a ruuvitag. This small device generates weather data (temperature, humidity, air pressure, ...). I write it every 30 seconds to the tangle using mam. First, however, we need to read data from the ruuvitag. In this example, we will use javascript, because the IOTA mam client library is already written in javascript (I would love to use python instead...). First we need to install the bluetooth libraries: ```bash sudo apt-get install bluez bluez-hcidump ``` Then let's see if we can get some data out of the ruuvitag with javascript. We need the node.js ruuvitag library. All example code you can get from my github account. You can clone it with: ```bash mkdir /home/pi/ git clone https://github.com/magictimelapse/ruuvitag-iota.git cd ruuvitag-iota ``` Then we install the ruuvitag module. This module depends on noble, so we also install it: ```bash npm install node-ruuvitag --production npm install noble ``` This will take a moment. Let's see that there is no error, then open your favorite editor (e.g. nano) and write the following file, or find it in the folder called 1: ```bash cd 1 ``` ```javascript const ruuvi = require('node-ruuvitag'); ruuvi.on('found', tag => { console.log('Found RuuviTag, id: ' + tag.id); tag.on('updated', data => { console.log('Got data from RuuviTag ' + tag.id + ':\n' + JSON.stringify(data, null, '\t')); }); }); ``` Save it as ruuvi-example.js. Run it with: ```bash node ruuvi-example.js ``` Every couple of seconds there should be something like: ```bash Got data from RuuviTag d6a08223138b: { "dataFormat": 3, "rssi": -74, "humidity": 72.5, "temperature": 9.21, "pressure": 98387, "accelerationX": 5, "accelerationY": -31, "accelerationZ": 1067, "battery": 3049 } ``` That's already the data from the ruuvitag in json format. Now we only need to write this data to the tangle. Luckily, there is already a javascript module for that, which you can find in mobilefish's repository. For convenience, I copied it into the git repository in lib. Furthermore, we need the official javascript iota client and the moment javascript module: ```bash cd /home/pi/ruuvitag-iota npm install iota.lib.js npm install moment ``` In the repository, you find in the 1 folder the two javascript file mam_receive.js and mam_publish.js. They are copied from mobilefish's repository, and adjusted such that they submit data to the IOTA main tangle. I selected a node from: https://iotasalad.org/nodes You can choose one yourself and change it. You can have different nodes for the data receiver and the data publisher! The script mam_publish.js generates random data and sends it via MAM to the tangle. Thus we can test if our connection to the tangle works before we marry it with the data read out from the ruuvitag. Run the publisher script with: ```bash node mam_publish.js ``` And wait for some output: ``` json= { data: 84, dateTime: '25/12/2018 10:30:32' }, e.g. Root: EKHZLDFNAMRZDICOMAQEGCHKI9GZXERCE99ZPKIXCJQCMEDQUOGTXECCSEUOJFFCVSOLFUCUY9ER9OXFE Address: BFUJIFBIPC9KGBWCWGJLFHGMTRMBJYNUCDISZOLBGQPUVEIJZYSYINYIIKLWVXUVPWDBMNMNGBUKHGRNU ``` Copy the Root hash. Open a second terminal on the raspberry pi and run the receiver with the argument the root hash. ```bash node mam_receive.js <ROOT HASH FROM ABOVE> ``` You will see after some time, that you receive the data you are submitting to the tangle: ``` received data 25/12/2018 10:55:00 70 ``` As a last step, we need to marry the ruuvitag sensor readout with the mam_publish.js and adjust the mam_receive.js such that the data is displayed correctly. I do this in a probably very un-javascript way, by writing the data onto a global variable data_ruuvi, which is a json dictionary, and then instead of sending the random data, I send this global variable to the tangle. Works great as a proof of concept! You can use the script mam_publish_ruuvi.js in the repository: ```bash node mam_publish_ruuvi.js ``` and get the output: ``` node mam_publish_ruuvi.js json= {} Root: XWYFDAEROSVOZZBOXNADSFOIAVZDVNIYKGRZOAVPBGUPDASQCRYKJZYWQMJK9TIFDUSQJIOSKEOIXFYKN Address: 9ESZYNJHD9BAVAZOSOCVQMVHBKDHJWEIEAZHEMEPVMOXQJGREAVGPRLRVCHYMPC9QCEWZUVVRNHOMWCIL Found RuuviTag, id: d6a08223138b published data undefined undefined XWYFDAEROSVOZZBOXNADSFOIAVZDVNIYKGRZOAVPBGUPDASQCRYKJZYWQMJK9TIFDUSQJIOSKEOIXFYKN json= { dataFormat: 3, rssi: -82, humidity: 84, temperature: 3.05, pressure: 98876, accelerationX: 2, accelerationY: -30, accelerationZ: 1071, battery: 3019 } Root: DEWOYDLUYJQPYZMOHELZBZHTJRFKZDNGSZSVXTLPNRDCUXAOIGFZEEAGL99YOVFLGEKRCUEZXWTKRCMSG Address: SUYT9COUUWOCHTEZPPRVAARBCZLJQHKMLWTSH9ZVSIOEQXWVIVSVIPYHOKYUIKCUDKOELDFBTLUUGIFPJ ``` You see that in the first iteration, the ruuvitag was not ready, so an empty dictionary was send. In the second round, it worked. You can receive this data with the same mam_receive.js script from above, just adjust to the new root: ``` node mam_receive.js <new root> ``` Remark: After checking out the repository, you can run ``` npm install ``` from the directory /home/pi/ruuvitag-iota This will read the package.json file and install all dependencies. |
| json metadata | {"tags":["iota","ruuvitag","raspberrypi","mam","javascript"],"links":["https://www.iota.org/","https://www.youtube.com/playlist?list=PLmL13yqb6OxdIf6CQMHf7hUcDZBbxHyza","https://iotasalad.org/nodes"],"app":"steemit/0.1","format":"markdown"} |
| Transaction Info | Block #28871175/Trx 673c640adb8d1cd68f2713656abbef2d66fbb2a7 |
View Raw JSON Data
{
  "trx_id": "673c640adb8d1cd68f2713656abbef2d66fbb2a7",
  "block": 28871175,
  "trx_in_block": 23,
  "op_in_trx": 0,
  "virtual_op": 0,
  "timestamp": "2018-12-25T11:14:33",
  "op": [
    "comment",
    {
      "parent_author": "",
      "parent_permlink": "iota",
      "author": "mragic",
      "permlink": "how-to-send-ruuvitag-sensor-data-to-the-iota-tangle-with-mam-using-a-raspberry-pi-3",
      "title": "How to send ruuvitag sensor data to the iota tangle with mam using a raspberry pi 3",
      "body": "The IOTA tangle (https://www.iota.org/) is a distributed ledger thought to be used for machine to machine economics.  Compared to first and second generation distributed ledgers like bitcoin or ethereum, it does not use a blockchain, where blocks are written synchronously, but a so called tangle. In order to attach a transaction to the tangle,one needs to confirm two older transactions by doing a small proof of work. As each transaction confirms two earlier transaction,  the scalability of the tangle is much better compared to classical blockchain based distributed ledgers. A further advantage is that there is no mining in IOTA and thus also no transaction fees. If you want to know more about the tangle and its structure, I highly recommand to watch the tutorials by mobilefish:\nhttps://www.youtube.com/playlist?list=PLmL13yqb6OxdIf6CQMHf7hUcDZBbxHyza\n\nSmall amount of data can be written directly onto the tangle, by using for example MAM (masked authenticated messaging). This allows to write a stream of data to the tangle. Only people who are listening to the specific stream will then receive this data. As the data is masked (encrypted), nobody else can receive this data.\nIn this example, I use a ruuvitag. This small device generates weather data (temperature, humidity, air pressure, ...). I write it every 30 seconds to the  tangle using mam. First, however, we need to read data from the ruuvitag. In this example, we will  use javascript, because the IOTA mam client library is already written in javascript (I would love to use python instead...).  First we need to install the bluetooth libraries:\n```bash\nsudo apt-get install bluez bluez-hcidump\n```\nThen let's see if we can get some data out of the ruuvitag with javascript. We need the node.js ruuvitag library. All example code you can get from my github account.  You can clone it with:\n```bash\nmkdir /home/pi/\ngit clone https://github.com/magictimelapse/ruuvitag-iota.git\ncd ruuvitag-iota\n```\nThen we install the ruuvitag module. This module depends on noble, so we also install it:\n```bash\nnpm install node-ruuvitag --production\nnpm install noble\n```\nThis will take a moment. Let's see that there is no error, then open your favorite editor (e.g. nano) and write the following file, or find it in the folder called 1:\n```bash\ncd 1\n```\n\n```javascript\nconst ruuvi = require('node-ruuvitag');\n\nruuvi.on('found', tag => {\n  console.log('Found RuuviTag, id: ' + tag.id);\n  tag.on('updated', data => {\n    console.log('Got data from RuuviTag ' + tag.id + ':\\n' +\n      JSON.stringify(data, null, '\\t'));\n  });\n});\n```\nSave it as ruuvi-example.js. Run it with:\n```bash\nnode ruuvi-example.js\n```\nEvery couple of seconds there should be something like:\n```bash\nGot data from RuuviTag d6a08223138b:\n{\n        \"dataFormat\": 3,\n        \"rssi\": -74,\n        \"humidity\": 72.5,\n        \"temperature\": 9.21,\n        \"pressure\": 98387,\n        \"accelerationX\": 5,\n        \"accelerationY\": -31,\n        \"accelerationZ\": 1067,\n        \"battery\": 3049\n}\n```\nThat's already the data from the ruuvitag in json format.\nNow we only need to write this data to the tangle. Luckily, there is already a javascript module for that,  which you can find in mobilefish's repository. For convenience, I copied it into the git repository in lib. Furthermore, we need the official javascript iota client and the moment javascript module:\n```bash\ncd /home/pi/ruuvitag-iota\nnpm install iota.lib.js\nnpm install moment\n```\nIn the repository, you find in the 1 folder the two javascript file mam_receive.js and mam_publish.js. They are copied from mobilefish's repository, and adjusted such that they submit data to the IOTA main tangle. I selected a node from:\nhttps://iotasalad.org/nodes\nYou can choose one yourself and change it. You can have different nodes for the data receiver and the data publisher! The script mam_publish.js generates random data and sends it via MAM to the tangle. Thus we can test if our connection to the tangle works before we marry it with the data read out from the ruuvitag. Run the publisher script with:\n```bash\nnode mam_publish.js\n```\nAnd wait for some output:\n```\njson= { data: 84, dateTime: '25/12/2018 10:30:32' }, e.g.\nRoot:  EKHZLDFNAMRZDICOMAQEGCHKI9GZXERCE99ZPKIXCJQCMEDQUOGTXECCSEUOJFFCVSOLFUCUY9ER9OXFE\nAddress:  BFUJIFBIPC9KGBWCWGJLFHGMTRMBJYNUCDISZOLBGQPUVEIJZYSYINYIIKLWVXUVPWDBMNMNGBUKHGRNU\n```\nCopy the Root hash. Open a second terminal on the raspberry pi and run the receiver with the argument the root hash.\n```bash\nnode mam_receive.js <ROOT HASH FROM ABOVE>\n```\nYou will see after some time, that you receive the data you are submitting to the tangle:\n```\nreceived data\n25/12/2018 10:55:00\n70\n```\n\nAs a last step, we need to marry the ruuvitag sensor readout with the mam_publish.js and adjust the mam_receive.js such that the data is displayed correctly.  I do this in a probably very un-javascript way, by writing the data onto a global variable data_ruuvi, which is a json dictionary, and then instead of sending the random data, I send this global variable to the tangle. Works great as a proof of concept! You can use the script mam_publish_ruuvi.js in the repository:\n```bash\nnode mam_publish_ruuvi.js\n```\nand get the output:\n```\nnode mam_publish_ruuvi.js\njson= {}\nRoot:  XWYFDAEROSVOZZBOXNADSFOIAVZDVNIYKGRZOAVPBGUPDASQCRYKJZYWQMJK9TIFDUSQJIOSKEOIXFYKN\nAddress:  9ESZYNJHD9BAVAZOSOCVQMVHBKDHJWEIEAZHEMEPVMOXQJGREAVGPRLRVCHYMPC9QCEWZUVVRNHOMWCIL\nFound RuuviTag, id: d6a08223138b\npublished data\nundefined\nundefined\nXWYFDAEROSVOZZBOXNADSFOIAVZDVNIYKGRZOAVPBGUPDASQCRYKJZYWQMJK9TIFDUSQJIOSKEOIXFYKN\njson= { dataFormat: 3,\n  rssi: -82,\n  humidity: 84,\n  temperature: 3.05,\n  pressure: 98876,\n  accelerationX: 2,\n  accelerationY: -30,\n  accelerationZ: 1071,\n  battery: 3019 }\nRoot:  DEWOYDLUYJQPYZMOHELZBZHTJRFKZDNGSZSVXTLPNRDCUXAOIGFZEEAGL99YOVFLGEKRCUEZXWTKRCMSG\nAddress:  SUYT9COUUWOCHTEZPPRVAARBCZLJQHKMLWTSH9ZVSIOEQXWVIVSVIPYHOKYUIKCUDKOELDFBTLUUGIFPJ\n```\n\nYou see that in the first iteration, the ruuvitag  was not ready, so an empty dictionary was send. In the second round, it worked.\n\nYou can receive this data with the same mam_receive.js script from above, just adjust to the new root:\n```\nnode mam_receive.js <new root>\n```\n\n\nRemark: After checking out the repository, you can run \n```\nnpm install \n```\nfrom the directory /home/pi/ruuvitag-iota\nThis will read the package.json file and install all dependencies.",
      "json_metadata": "{\"tags\":[\"iota\",\"ruuvitag\",\"raspberrypi\",\"mam\",\"javascript\"],\"links\":[\"https://www.iota.org/\",\"https://www.youtube.com/playlist?list=PLmL13yqb6OxdIf6CQMHf7hUcDZBbxHyza\",\"https://iotasalad.org/nodes\"],\"app\":\"steemit/0.1\",\"format\":\"markdown\"}"
    }
  ]
}2018/08/28 19:36:33
2018/08/28 19:36:33
| delegator | steem |
| delegatee | mragic |
| vesting shares | 9914.810451 VESTS |
| Transaction Info | Block #25471878/Trx c89e1485f448e18f5a39b4399466aa097b2ba687 |
View Raw JSON Data
{
  "trx_id": "c89e1485f448e18f5a39b4399466aa097b2ba687",
  "block": 25471878,
  "trx_in_block": 11,
  "op_in_trx": 0,
  "virtual_op": 0,
  "timestamp": "2018-08-28T19:36:33",
  "op": [
    "delegate_vesting_shares",
    {
      "delegator": "steem",
      "delegatee": "mragic",
      "vesting_shares": "9914.810451 VESTS"
    }
  ]
}2018/08/25 12:48:00
2018/08/25 12:48:00
| delegator | steem |
| delegatee | mragic |
| vesting shares | 30157.316891 VESTS |
| Transaction Info | Block #25377343/Trx f0d437413b997e9b195f362743c466a6ea8e6ed8 |
View Raw JSON Data
{
  "trx_id": "f0d437413b997e9b195f362743c466a6ea8e6ed8",
  "block": 25377343,
  "trx_in_block": 20,
  "op_in_trx": 0,
  "virtual_op": 0,
  "timestamp": "2018-08-25T12:48:00",
  "op": [
    "delegate_vesting_shares",
    {
      "delegator": "steem",
      "delegatee": "mragic",
      "vesting_shares": "30157.316891 VESTS"
    }
  ]
}2018/05/29 19:32:39
2018/05/29 19:32:39
| parent author | |
| parent permlink | raspberrypi |
| author | mragic |
| permlink | how-to-build-a-cat-detector-with-a-raspberry-pi-and-a-pi-noir-camera-using-deep-learning-part-i |
| title | How to build a cat detector with a Raspberry Pi and a Pi Noir camera using Deep Learning - Part I |
| body | @@ -2228,16 +2228,36 @@ camera +with a infrared LED (e.g. fr @@ -2281,51 +2281,67 @@ www. -raspberrypi.org/products/ +play-zone.ch/de/hdtv- pi-noir- +ir- camera- -v2/ +inkl-led-module.html ). I @@ -2370,106 +2370,8 @@ LED - (e.g. https://www.amazon.com/Infrared-High-power-Illuminator-Adjustable-Raspberry/dp/B01M3U8DIT), so |
| json metadata | {"tags":["raspberrypi","deeplearning","cats","gardening","computervision"],"image":["https://steemitimages.com/DQmNZGwMb45MZQqmcfGmowB8eQiHEYvHfgSmuZXhquqxxc8/07-20180422181348-03_cropped.jpg","https://steemitimages.com/DQmdEwGhXJGRNUSbr39aym9x6zknqZwG1gTchistMmiXT4R/494-20180428142032-03_cropped.jpg","https://steemitimages.com/DQmfE1mCCaP9W5pvc2FdfNCXR8sH8yQt6xf3erEDFjyXdtn/2018-05-23%2020_29_05-Window.png"],"links":["https://www.raspberrypi.org/downloads/raspbian/","https://www.raspberrypi.org/magpi/vnc-raspberry-pi/","https://www.play-zone.ch/de/hdtv-pi-noir-ir-camera-inkl-led-module.html","https://steemit.com/raspberrypi/@mragic/how-to-build-a-cat-detector-with-a-raspberry-pi-and-a-pi-noir-camera-using-deep-learning-part-ii"],"app":"steemit/0.1","format":"markdown"} |
| Transaction Info | Block #22862921/Trx bfa90e0f144e6d8c95d5e1a6f5c2a3366842ba43 |
View Raw JSON Data
{
  "trx_id": "bfa90e0f144e6d8c95d5e1a6f5c2a3366842ba43",
  "block": 22862921,
  "trx_in_block": 113,
  "op_in_trx": 0,
  "virtual_op": 0,
  "timestamp": "2018-05-29T19:32:39",
  "op": [
    "comment",
    {
      "parent_author": "",
      "parent_permlink": "raspberrypi",
      "author": "mragic",
      "permlink": "how-to-build-a-cat-detector-with-a-raspberry-pi-and-a-pi-noir-camera-using-deep-learning-part-i",
      "title": "How to build a cat detector with a Raspberry Pi and a Pi Noir camera using Deep Learning - Part I",
      "body": "@@ -2228,16 +2228,36 @@\n  camera \n+with a infrared LED \n (e.g. fr\n@@ -2281,51 +2281,67 @@\n www.\n-raspberrypi.org/products/\n+play-zone.ch/de/hdtv-\n pi-noir-\n+ir-\n camera-\n-v2/\n+inkl-led-module.html\n ). I\n@@ -2370,106 +2370,8 @@\n  LED\n- (e.g. https://www.amazon.com/Infrared-High-power-Illuminator-Adjustable-Raspberry/dp/B01M3U8DIT),\n  so \n",
      "json_metadata": "{\"tags\":[\"raspberrypi\",\"deeplearning\",\"cats\",\"gardening\",\"computervision\"],\"image\":[\"https://steemitimages.com/DQmNZGwMb45MZQqmcfGmowB8eQiHEYvHfgSmuZXhquqxxc8/07-20180422181348-03_cropped.jpg\",\"https://steemitimages.com/DQmdEwGhXJGRNUSbr39aym9x6zknqZwG1gTchistMmiXT4R/494-20180428142032-03_cropped.jpg\",\"https://steemitimages.com/DQmfE1mCCaP9W5pvc2FdfNCXR8sH8yQt6xf3erEDFjyXdtn/2018-05-23%2020_29_05-Window.png\"],\"links\":[\"https://www.raspberrypi.org/downloads/raspbian/\",\"https://www.raspberrypi.org/magpi/vnc-raspberry-pi/\",\"https://www.play-zone.ch/de/hdtv-pi-noir-ir-camera-inkl-led-module.html\",\"https://steemit.com/raspberrypi/@mragic/how-to-build-a-cat-detector-with-a-raspberry-pi-and-a-pi-noir-camera-using-deep-learning-part-ii\"],\"app\":\"steemit/0.1\",\"format\":\"markdown\"}"
    }
  ]
}2018/05/28 03:20:24
2018/05/28 03:20:24
| voter | mytechtrail |
| author | mragic |
| permlink | how-to-build-a-cat-detector-with-a-raspberry-pi-and-a-pi-noir-camera-using-deep-learning-part-ii |
| weight | 10000 (100.00%) |
| Transaction Info | Block #22814681/Trx 874b15f201ccecdf831a3c8e104def8ce8c0b1e9 |
View Raw JSON Data
{
  "trx_id": "874b15f201ccecdf831a3c8e104def8ce8c0b1e9",
  "block": 22814681,
  "trx_in_block": 8,
  "op_in_trx": 0,
  "virtual_op": 0,
  "timestamp": "2018-05-28T03:20:24",
  "op": [
    "vote",
    {
      "voter": "mytechtrail",
      "author": "mragic",
      "permlink": "how-to-build-a-cat-detector-with-a-raspberry-pi-and-a-pi-noir-camera-using-deep-learning-part-ii",
      "weight": 10000
    }
  ]
}2018/05/27 12:21:12
2018/05/27 12:21:12
| parent author | mragic |
| parent permlink | sheet-mulch-turn-lawn-into-vegetable-bed |
| author | mragic |
| permlink | re-mragic-sheet-mulch-turn-lawn-into-vegetable-bed-20180527t122114927z |
| title | |
| body | here: https://steemit.com/raspberrypi/@mragic/how-to-build-a-cat-detector-with-a-raspberry-pi-and-a-pi-noir-camera-using-deep-learning-part-i is the cat defense system for my garden! |
| json metadata | {"tags":["gardening"],"links":["https://steemit.com/raspberrypi/@mragic/how-to-build-a-cat-detector-with-a-raspberry-pi-and-a-pi-noir-camera-using-deep-learning-part-i"],"app":"steemit/0.1"} |
| Transaction Info | Block #22796698/Trx b41439d53319881d72a331983bacbcb04fd1a87d |
View Raw JSON Data
{
  "trx_id": "b41439d53319881d72a331983bacbcb04fd1a87d",
  "block": 22796698,
  "trx_in_block": 11,
  "op_in_trx": 0,
  "virtual_op": 0,
  "timestamp": "2018-05-27T12:21:12",
  "op": [
    "comment",
    {
      "parent_author": "mragic",
      "parent_permlink": "sheet-mulch-turn-lawn-into-vegetable-bed",
      "author": "mragic",
      "permlink": "re-mragic-sheet-mulch-turn-lawn-into-vegetable-bed-20180527t122114927z",
      "title": "",
      "body": "here:  https://steemit.com/raspberrypi/@mragic/how-to-build-a-cat-detector-with-a-raspberry-pi-and-a-pi-noir-camera-using-deep-learning-part-i is the cat defense system for my garden!",
      "json_metadata": "{\"tags\":[\"gardening\"],\"links\":[\"https://steemit.com/raspberrypi/@mragic/how-to-build-a-cat-detector-with-a-raspberry-pi-and-a-pi-noir-camera-using-deep-learning-part-i\"],\"app\":\"steemit/0.1\"}"
    }
  ]
}2018/05/27 12:18:18
2018/05/27 12:18:18
| parent author | |
| parent permlink | raspberrypi |
| author | mragic |
| permlink | how-to-build-a-cat-detector-with-a-raspberry-pi-and-a-pi-noir-camera-using-deep-learning-part-i |
| title | How to build a cat detector with a Raspberry Pi and a Pi Noir camera using Deep Learning - Part I |
| body | @@ -4432,8 +4432,163 @@ i helps? +%0A%0AHere is part II:%0Ahttps://steemit.com/raspberrypi/@mragic/how-to-build-a-cat-detector-with-a-raspberry-pi-and-a-pi-noir-camera-using-deep-learning-part-ii |
| json metadata | {"tags":["raspberrypi","deeplearning","cats","gardening","computervision"],"image":["https://steemitimages.com/DQmNZGwMb45MZQqmcfGmowB8eQiHEYvHfgSmuZXhquqxxc8/07-20180422181348-03_cropped.jpg","https://steemitimages.com/DQmdEwGhXJGRNUSbr39aym9x6zknqZwG1gTchistMmiXT4R/494-20180428142032-03_cropped.jpg","https://steemitimages.com/DQmfE1mCCaP9W5pvc2FdfNCXR8sH8yQt6xf3erEDFjyXdtn/2018-05-23%2020_29_05-Window.png"],"links":["https://www.raspberrypi.org/downloads/raspbian/","https://www.raspberrypi.org/magpi/vnc-raspberry-pi/","https://www.raspberrypi.org/products/pi-noir-camera-v2/","https://www.amazon.com/Infrared-High-power-Illuminator-Adjustable-Raspberry/dp/B01M3U8DIT","https://steemit.com/raspberrypi/@mragic/how-to-build-a-cat-detector-with-a-raspberry-pi-and-a-pi-noir-camera-using-deep-learning-part-ii"],"app":"steemit/0.1","format":"markdown"} |
| Transaction Info | Block #22796640/Trx 7e9a8449879759f5f6e0cebc1046299074b933f0 |
View Raw JSON Data
{
  "trx_id": "7e9a8449879759f5f6e0cebc1046299074b933f0",
  "block": 22796640,
  "trx_in_block": 41,
  "op_in_trx": 0,
  "virtual_op": 0,
  "timestamp": "2018-05-27T12:18:18",
  "op": [
    "comment",
    {
      "parent_author": "",
      "parent_permlink": "raspberrypi",
      "author": "mragic",
      "permlink": "how-to-build-a-cat-detector-with-a-raspberry-pi-and-a-pi-noir-camera-using-deep-learning-part-i",
      "title": "How to build a cat detector with a Raspberry Pi and a Pi Noir camera using Deep Learning - Part I",
      "body": "@@ -4432,8 +4432,163 @@\n i helps?\n+%0A%0AHere is part II:%0Ahttps://steemit.com/raspberrypi/@mragic/how-to-build-a-cat-detector-with-a-raspberry-pi-and-a-pi-noir-camera-using-deep-learning-part-ii\n",
      "json_metadata": "{\"tags\":[\"raspberrypi\",\"deeplearning\",\"cats\",\"gardening\",\"computervision\"],\"image\":[\"https://steemitimages.com/DQmNZGwMb45MZQqmcfGmowB8eQiHEYvHfgSmuZXhquqxxc8/07-20180422181348-03_cropped.jpg\",\"https://steemitimages.com/DQmdEwGhXJGRNUSbr39aym9x6zknqZwG1gTchistMmiXT4R/494-20180428142032-03_cropped.jpg\",\"https://steemitimages.com/DQmfE1mCCaP9W5pvc2FdfNCXR8sH8yQt6xf3erEDFjyXdtn/2018-05-23%2020_29_05-Window.png\"],\"links\":[\"https://www.raspberrypi.org/downloads/raspbian/\",\"https://www.raspberrypi.org/magpi/vnc-raspberry-pi/\",\"https://www.raspberrypi.org/products/pi-noir-camera-v2/\",\"https://www.amazon.com/Infrared-High-power-Illuminator-Adjustable-Raspberry/dp/B01M3U8DIT\",\"https://steemit.com/raspberrypi/@mragic/how-to-build-a-cat-detector-with-a-raspberry-pi-and-a-pi-noir-camera-using-deep-learning-part-ii\"],\"app\":\"steemit/0.1\",\"format\":\"markdown\"}"
    }
  ]
}2018/05/27 12:16:09
2018/05/27 12:16:09
| parent author | |
| parent permlink | raspberrypi |
| author | mragic |
| permlink | how-to-build-a-cat-detector-with-a-raspberry-pi-and-a-pi-noir-camera-using-deep-learning-part-i |
| title | How to build a cat detector with a Raspberry Pi and a Pi Noir camera using Deep Learning - Part I |
| body | Having a garden in a neighbourhood with tons of cats has the disadvantage that these cats will leave too much fertilizer between my vegetables. Being a garden and Raspberry Pi enthusiast, I have already built an automated irrigation system for my pumpkins, the spices, tomatoes and potatoes. Fortunately, I still had one valve unconnected, which I use now to deter cats. # Summary In short, the cats are recorded with a Raspberry Pi Pi Noir (night vision) camera, using the software motion. Motion will record every movement it detects in its field of view. In a first step, I sorted these images in two groups: - images containing cats 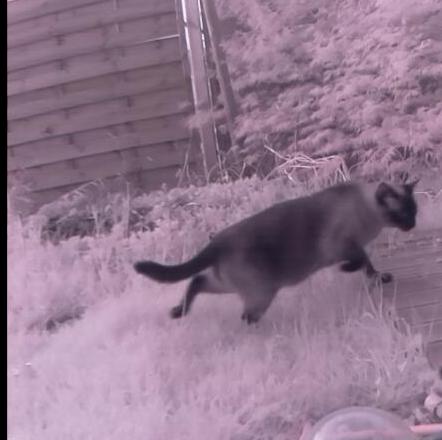 - images without cats 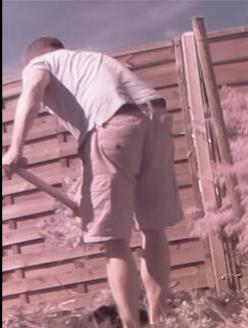 I then copy these images to a Windows computer with a decent graphics card, where I train a deep learning network to distinguish images of cats from images without cats. The neural network tree is copied to the raspberry pi. When then motion records a movement, it calls a python script that checks with the neural network tree if the image contains a cat or not. In case a cat is present, it opens the valve and the cat is wet. And will hopefully never again enter my garden... # Detailed guide, part I: Setting up the cat camera First you need a raspberry pi, best a raspberry pi 3. Install the latest raspbian stretch image: https://www.raspberrypi.org/downloads/raspbian/ Start up the raspberry pi and set up the wlan to be able to connect to your wireless lan. With: ```bash sudo raspi-config ``` open up the configuration, and enable the camera. I run the raspberry pi directly outside in my garden, so it is completely headless. So also enable ssh. If you prefer a graphical desktop, enable the vnc, see for example here: https://www.raspberrypi.org/magpi/vnc-raspberry-pi/ Check with: ```bash ifconfig wlan0 ``` what the IP of your raspberry pi is, and connect then from your laptop / windows machine with vnc or ssh to the raspberry pi. Then connect your pi noir camera (e.g. from here: https://www.raspberrypi.org/products/pi-noir-camera-v2/). I also added a infrared LED (e.g. https://www.amazon.com/Infrared-High-power-Illuminator-Adjustable-Raspberry/dp/B01M3U8DIT), so that it also finds cats during the night. Check with: ```bash raspistill -o image.jpg ``` if everything is connected correctly. If there is no error, it will write a file called image.jpg We will need to install some libraries, but first start with updating and upgrading the raspberry pi from a terminal: ```bash sudo apt update sudo apt upgrade sudo apt-get install libmariadbclient18 libpq5 libavcodec57 libavformat57 libavutil55 libswscale4 ``` Then download and install the motion software: ```bash wget https://github.com/Motion-Project/motion/releases/download/release-4.0.1/pi_stretch_motion_4.0.1-1_armhf.deb sudo dpkg -i pi_stretch_motion_4.0.1-1_armhf.deb ``` Then configure motion: ```bash sudo nano /etc/motion/motion.conf ``` Change: ``` daemon on ``` then: ``` stream_localhost off ``` Set the framerate, width and height of the image ``` stream_maxrate 20 framerate 20 width 640 height 480 ``` First we will do a quick sanity check if everything is setup correctly. In order to start motion, you will have to edit: ``` sudo nano /etc/default/motion ``` and change: ``` start_motion_daemon=yes ``` If you use the raspberry pi camera (pi noir), you will have to edit: ``` sudo nano /etc/modules ``` and add: ``` bcm2835-v4l2 ``` This will load a driver which is needed that the raspberry pi camera appears as a video device (under /dev/video0) Let's now do a sanity check, and start the motion service: ``` sudo service motion start ``` Connect with a webbrowser to ``` <rpi-ipAddress>:8081 ``` and check if you see the stream! In my case, this is: ``` http://192.168.178.48:8081/ ``` And I see a liveview of my garden:  If nothing appears, you can check the status of the motion service: ``` sudo service motion status ``` if it does not say active ( running) in green, then something went wrong. Maybe restarting the raspberry pi helps? |
| json metadata | {"tags":["raspberrypi","deeplearning","cats","gardening","computervision"],"image":["https://steemitimages.com/DQmNZGwMb45MZQqmcfGmowB8eQiHEYvHfgSmuZXhquqxxc8/07-20180422181348-03_cropped.jpg","https://steemitimages.com/DQmdEwGhXJGRNUSbr39aym9x6zknqZwG1gTchistMmiXT4R/494-20180428142032-03_cropped.jpg","https://steemitimages.com/DQmfE1mCCaP9W5pvc2FdfNCXR8sH8yQt6xf3erEDFjyXdtn/2018-05-23%2020_29_05-Window.png"],"links":["https://www.raspberrypi.org/downloads/raspbian/","https://www.raspberrypi.org/magpi/vnc-raspberry-pi/","https://www.raspberrypi.org/products/pi-noir-camera-v2/","https://www.amazon.com/Infrared-High-power-Illuminator-Adjustable-Raspberry/dp/B01M3U8DIT"],"app":"steemit/0.1","format":"markdown"} |
| Transaction Info | Block #22796597/Trx 6c024033678094d55ec8fc1e99113fdc4f5574d9 |
View Raw JSON Data
{
"trx_id": "6c024033678094d55ec8fc1e99113fdc4f5574d9",
"block": 22796597,
"trx_in_block": 16,
"op_in_trx": 0,
"virtual_op": 0,
"timestamp": "2018-05-27T12:16:09",
"op": [
"comment",
{
"parent_author": "",
"parent_permlink": "raspberrypi",
"author": "mragic",
"permlink": "how-to-build-a-cat-detector-with-a-raspberry-pi-and-a-pi-noir-camera-using-deep-learning-part-i",
"title": "How to build a cat detector with a Raspberry Pi and a Pi Noir camera using Deep Learning - Part I",
"body": "Having a garden in a neighbourhood with tons of cats has the disadvantage that these cats will leave too much fertilizer between my vegetables. Being a garden and Raspberry Pi enthusiast, I have already built an automated irrigation system for my pumpkins, the spices, tomatoes and potatoes. Fortunately, I still had one valve unconnected, which I use now to deter cats.\n# Summary \nIn short, the cats are recorded with a Raspberry Pi Pi Noir (night vision) camera, using the software motion. Motion will record every movement it detects in its field of view. In a first step, I sorted these images in two groups:\n- images containing cats\n\n- images without cats\n\n\n\nI then copy these images to a Windows computer with a decent graphics card, where I train a deep learning network to distinguish images of cats from images without cats.\nThe neural network tree is copied to the raspberry pi. When then motion records a movement, it calls a python script that checks with the neural network tree if the image contains a cat or not. In case a cat is present, it opens the valve and the cat is wet. And will hopefully never again enter my garden...\n\n# Detailed guide, part I: Setting up the cat camera\nFirst you need a raspberry pi, best a raspberry pi 3. Install the latest raspbian stretch image: https://www.raspberrypi.org/downloads/raspbian/\nStart up the raspberry pi and set up the wlan to be able to connect to your wireless lan. With:\n```bash\nsudo raspi-config\n```\nopen up the configuration, and enable the camera. I run the raspberry pi directly outside in my garden, so it is completely headless. So also enable ssh. If you prefer a graphical desktop, enable the vnc, see for example here:\nhttps://www.raspberrypi.org/magpi/vnc-raspberry-pi/\nCheck with:\n```bash\nifconfig wlan0\n```\nwhat the IP of your raspberry pi is, and connect then from your laptop / windows machine with vnc or ssh to the raspberry pi.\nThen connect your pi noir camera (e.g. from here: https://www.raspberrypi.org/products/pi-noir-camera-v2/). I also added a infrared LED (e.g. https://www.amazon.com/Infrared-High-power-Illuminator-Adjustable-Raspberry/dp/B01M3U8DIT), so that it also finds cats during the night.\nCheck with:\n```bash\nraspistill -o image.jpg\n```\nif everything is connected correctly. If there is no error, it will write a file called image.jpg\nWe will need to install some libraries, but first start with updating and upgrading the raspberry pi from a terminal:\n```bash\nsudo apt update\nsudo apt upgrade\nsudo apt-get install libmariadbclient18 libpq5 libavcodec57 libavformat57 libavutil55 libswscale4\n```\nThen download and install the motion software:\n```bash\nwget https://github.com/Motion-Project/motion/releases/download/release-4.0.1/pi_stretch_motion_4.0.1-1_armhf.deb\nsudo dpkg -i pi_stretch_motion_4.0.1-1_armhf.deb\n```\nThen configure motion:\n```bash\nsudo nano /etc/motion/motion.conf\n```\nChange:\n```\ndaemon on\n```\n\nthen:\n```\nstream_localhost off\n```\nSet the framerate, width and height of the image\n```\nstream_maxrate 20 \nframerate 20\nwidth 640\nheight 480\n```\n\nFirst we will do a quick sanity check if everything is setup correctly. In order to start motion, you will have to edit:\n```\nsudo nano /etc/default/motion\n```\nand change:\n```\nstart_motion_daemon=yes\n```\nIf you use the raspberry pi camera (pi noir), you will have to edit:\n```\nsudo nano /etc/modules\n```\nand add:\n```\nbcm2835-v4l2\n```\nThis will load a driver which is needed that the raspberry pi camera appears as a video device (under /dev/video0)\n\nLet's now do a sanity check, and start the motion service:\n```\nsudo service motion start\n```\nConnect with a webbrowser to \n```\n<rpi-ipAddress>:8081\n```\nand check if you see the stream!\nIn my case, this is:\n```\nhttp://192.168.178.48:8081/\n```\nAnd I see a liveview of my garden:\n\n\nIf nothing appears, you can check the status of the motion service:\n```\nsudo service motion status\n```\nif it does not say active ( running) in green, then something went wrong. Maybe restarting the raspberry pi helps?",
"json_metadata": "{\"tags\":[\"raspberrypi\",\"deeplearning\",\"cats\",\"gardening\",\"computervision\"],\"image\":[\"https://steemitimages.com/DQmNZGwMb45MZQqmcfGmowB8eQiHEYvHfgSmuZXhquqxxc8/07-20180422181348-03_cropped.jpg\",\"https://steemitimages.com/DQmdEwGhXJGRNUSbr39aym9x6zknqZwG1gTchistMmiXT4R/494-20180428142032-03_cropped.jpg\",\"https://steemitimages.com/DQmfE1mCCaP9W5pvc2FdfNCXR8sH8yQt6xf3erEDFjyXdtn/2018-05-23%2020_29_05-Window.png\"],\"links\":[\"https://www.raspberrypi.org/downloads/raspbian/\",\"https://www.raspberrypi.org/magpi/vnc-raspberry-pi/\",\"https://www.raspberrypi.org/products/pi-noir-camera-v2/\",\"https://www.amazon.com/Infrared-High-power-Illuminator-Adjustable-Raspberry/dp/B01M3U8DIT\"],\"app\":\"steemit/0.1\",\"format\":\"markdown\"}"
}
]
}2018/05/27 11:38:33
2018/05/27 11:38:33
| voter | youngogmarqs |
| author | mragic |
| permlink | how-to-build-a-cat-detector-with-a-raspberry-pi-and-a-pi-noir-camera-using-deep-learning-part-ii |
| weight | 2 (0.02%) |
| Transaction Info | Block #22795845/Trx 63d1e93a8f2b83762d1c08053b284e716bec6e66 |
View Raw JSON Data
{
  "trx_id": "63d1e93a8f2b83762d1c08053b284e716bec6e66",
  "block": 22795845,
  "trx_in_block": 24,
  "op_in_trx": 0,
  "virtual_op": 0,
  "timestamp": "2018-05-27T11:38:33",
  "op": [
    "vote",
    {
      "voter": "youngogmarqs",
      "author": "mragic",
      "permlink": "how-to-build-a-cat-detector-with-a-raspberry-pi-and-a-pi-noir-camera-using-deep-learning-part-ii",
      "weight": 2
    }
  ]
}2018/05/27 11:19:06
2018/05/27 11:19:06
| parent author | |
| parent permlink | raspberrypi |
| author | mragic |
| permlink | how-to-build-a-cat-detector-with-a-raspberry-pi-and-a-pi-noir-camera-using-deep-learning-part-ii |
| title | How to build a cat detector with a Raspberry Pi and a Pi Noir camera using Deep Learning - Part II |
| body | Part I of the story is here: https://steemit.com/raspberrypi/@mragic/how-to-build-a-cat-detector-with-a-raspberry-pi-and-a-pi-noir-camera-using-deep-learning-part-i In this second part, we will create the train and test dataset needed later to train and test the deep neural network which will be able to distinguish if a cat is in a image or not. First, we will setup motion such, that it records the images when something moved in the field of view of the camera. To do so, we open motion.conf again with: ```bash sudo nano /etc/motion/motion.conf ``` . We enable the recording of images and we set the target directory, where we want to store the images: ```bash output_pictures on target_dir /opt/motion ``` For every image, we call a python script with the arguments being the coordinates of the rectangle where the motion happened in the frame. Motion can hand over arguments with the %. ``` on_picture_save /home/pi/cat_recognition/on_picture_save.py %f %v %q %i %J %K %L %f is the filename of the created image %v the event %q frame number %i width of motion area %J height of motion area %K X coordinate of motion center %L Y coordinate of motion center ``` Then create the directories where the images will be stored: ``` sudo mkdir -p /opt/motion/cropped sudo chown -R motion:motion /opt/motion sudo chmod a+rw -R /opt/motion ``` The python script takes these arguments, and writes them in a json file. Furthermore, it cuts out the area of motion within the frame, and writes these as a new image to /opt/motion/cropped : ```python #!/home/pi/miniconda3/envs/ml/bin/python import os, sys import json import crop_images if __name__ == "__main__": out_dict = {} out_dict['filename'] = sys.argv[1] out_dict['event'] = int(sys.argv[2]) out_dict['frame_nr'] =int(sys.argv[3]) out_dict['width'] = int(sys.argv[4]) out_dict['height'] = int(sys.argv[5]) out_dict['center_x'] = int(sys.argv[6]) out_dict['center_y'] = int(sys.argv[7]) filename = out_dict['filename'] filename_txt = os.path.splitext(filename)[0]+'.json' with open(filename_txt,'w') as outfile: json.dump(out_dict,outfile) os.system('sync') crop_images.crop_image(filename_txt) ``` The crop_images python file is: ```python #!/home/pi/miniconda3/envs/ml/bin/python from PIL import Image import json import os import sys def crop_image(jfilename): try: data = json.load(open(jfilename)) except ValueError as e: print('problem decoding {0}'.format(jfilename)) return ifilename = data['filename'] img = Image.open(ifilename) left = int(data['center_x'] - data['width']/2) right = int(data['center_x'] + data['width']/2) top = int(data['center_y'] - data['height']/2) bottom = int(data['center_y'] + data['height']/2) cropped_img = img.crop((left,top,right,bottom)) path,filename = os.path.split(ifilename) path = os.path.join(path,'cropped') filename_cropped = os.path.join(path,os.path.splitext(filename)[0] + '_crop\ ped.jpg') print(filename_cropped) cropped_img.save(filename_cropped) return filename_cropped if __name__=="__main__": path = sys.argv[1] import glob jfilenames = glob.glob(os.path.join(path, '*.json')) length = len(jfilenames) for ii,j in enumerate(jfilenames): crop_image(j) if ii%500 == 0: print ('{0}/{1}'.format(ii,length)) ``` You can find all this code in my github repository under: https://github.com/magictimelapse/garden You can clone it from the pi home directory: ```bash git clone https://github.com/magictimelapse/garden ln -snf /home/pi/garden/cats/ cat_recognition ``` # Install miniconda and all required dependencies I use miniconda to install all required packages. You can install it with: ```bash wget http://repo.continuum.io/miniconda/Miniconda3-latest-Linux-armv7l.sh sudo md5sum Miniconda3-latest-Linux-armv7l.sh # (optional) check md5 sudo /bin/bash Miniconda3-latest-Linux-armv7l.sh # -> change default directory to /home/pi/miniconda3 sudo reboot -h now ``` Then create the environment from the requirements.yml file with: ``` /home/pi/miniconda3/bin/conda create -f requirements.yml source /home/pi/miniconda3/bin/activate ml ``` Later down the road we will need tensorflow and keras as the deep learning environment. Installing tensorflow on the raspberry pi is fortunately straight forward: ``` sudo apt-get install libatlas-base-dev libblas-dev wget https://github.com/samjabrahams/tensorflow-on-raspberry-pi/releases/download/v1.1.0/tensorflow-1.1.0-cp34-cp34m-linux_armv7l.whl source /home/pi/miniconda3/bin/activate ml pip install tensorflow-1.1.0-cp34-cp34m-linux_armv7l.whl ``` All the rest of the required packages can be automatically installed with pip from the requirements.txt file in the cat_recognition directory: ``` source /home/pi/miniconda3/bin/activate ml pip install -r requirements.txt ``` # Testing You might have to restart your pi now. When it has restarted, check the status of your motion service again: ``` sudo service motion status ``` The output must be active(running) in green. Move your hand in front of the camera and check if images are written in /opt/motion and in /opt/motion/cropped  |
| json metadata | {"tags":["raspberrypi","deeplearning","cats","gardening","computervision"],"image":["https://cdn.steemitimages.com/DQmQ3NZes7swWwV4DN456xuersBHYJL9t5qKm9gtGoHdc82/97-20180424110053-05_cropped.jpg"],"links":["https://steemit.com/raspberrypi/@mragic/how-to-build-a-cat-detector-with-a-raspberry-pi-and-a-pi-noir-camera-using-deep-learning-part-i","https://github.com/magictimelapse/garden"],"app":"steemit/0.1","format":"markdown"} |
| Transaction Info | Block #22795456/Trx 38bc752db16be273b0c4d6f5f51fad0825f1bd93 |
View Raw JSON Data
{
"trx_id": "38bc752db16be273b0c4d6f5f51fad0825f1bd93",
"block": 22795456,
"trx_in_block": 42,
"op_in_trx": 0,
"virtual_op": 0,
"timestamp": "2018-05-27T11:19:06",
"op": [
"comment",
{
"parent_author": "",
"parent_permlink": "raspberrypi",
"author": "mragic",
"permlink": "how-to-build-a-cat-detector-with-a-raspberry-pi-and-a-pi-noir-camera-using-deep-learning-part-ii",
"title": "How to build a cat detector with a Raspberry Pi and a Pi Noir camera using Deep Learning - Part II",
"body": "Part I of the story is here: \nhttps://steemit.com/raspberrypi/@mragic/how-to-build-a-cat-detector-with-a-raspberry-pi-and-a-pi-noir-camera-using-deep-learning-part-i\n\nIn this second part, we will create the train and test dataset needed later to train and test the deep neural network which will be able to distinguish if a cat is in a image or not.\nFirst, we will setup motion such, that it records the images when something moved in the field of view of the camera.\nTo do so, we open motion.conf again with:\n```bash\nsudo nano /etc/motion/motion.conf\n```\n. We enable the recording of images and we set the target directory, where we want to store the images:\n```bash\noutput_pictures on\ntarget_dir /opt/motion\n```\nFor every image, we call a python script with the arguments being the coordinates of the rectangle where the motion happened in the frame. Motion can hand over arguments with the %.\n```\non_picture_save /home/pi/cat_recognition/on_picture_save.py %f %v %q %i %J %K %L\n%f is the filename of the created image\n%v the event \n%q frame number\n%i width of motion area\n%J height of motion area\n%K X coordinate of motion center\n%L Y coordinate of motion center\n```\nThen create the directories where the images will be stored:\n```\nsudo mkdir -p /opt/motion/cropped\nsudo chown -R motion:motion /opt/motion\nsudo chmod a+rw -R /opt/motion\n```\nThe python script takes these arguments, and writes them in a json file. Furthermore, it cuts out the area of motion within the frame, and writes these as a new image to /opt/motion/cropped :\n```python\n#!/home/pi/miniconda3/envs/ml/bin/python\nimport os, sys\nimport json\nimport crop_images\nif __name__ == \"__main__\":\n out_dict = {}\n out_dict['filename'] = sys.argv[1]\n out_dict['event'] = int(sys.argv[2])\n out_dict['frame_nr'] =int(sys.argv[3])\n out_dict['width'] = int(sys.argv[4])\n out_dict['height'] = int(sys.argv[5])\n out_dict['center_x'] = int(sys.argv[6])\n out_dict['center_y'] = int(sys.argv[7])\n filename = out_dict['filename']\n filename_txt = os.path.splitext(filename)[0]+'.json'\n with open(filename_txt,'w') as outfile:\n json.dump(out_dict,outfile)\n os.system('sync')\n crop_images.crop_image(filename_txt)\n```\nThe crop_images python file is:\n```python\n#!/home/pi/miniconda3/envs/ml/bin/python\nfrom PIL import Image\nimport json\nimport os\nimport sys\ndef crop_image(jfilename):\n try:\n data = json.load(open(jfilename))\n except ValueError as e:\n print('problem decoding {0}'.format(jfilename))\n return\n ifilename = data['filename']\n img = Image.open(ifilename)\n left = int(data['center_x'] - data['width']/2)\n right = int(data['center_x'] + data['width']/2)\n top = int(data['center_y'] - data['height']/2)\n bottom = int(data['center_y'] + data['height']/2)\n cropped_img = img.crop((left,top,right,bottom))\n path,filename = os.path.split(ifilename)\n path = os.path.join(path,'cropped')\n\n filename_cropped = os.path.join(path,os.path.splitext(filename)[0] + '_crop\\\nped.jpg')\n print(filename_cropped)\n cropped_img.save(filename_cropped)\n return filename_cropped\n\nif __name__==\"__main__\":\n path = sys.argv[1]\n import glob\n jfilenames = glob.glob(os.path.join(path, '*.json'))\n length = len(jfilenames)\n for ii,j in enumerate(jfilenames):\n crop_image(j)\n if ii%500 == 0:\n print ('{0}/{1}'.format(ii,length))\n```\nYou can find all this code in my github repository under:\nhttps://github.com/magictimelapse/garden\n\nYou can clone it from the pi home directory:\n```bash\ngit clone https://github.com/magictimelapse/garden\nln -snf /home/pi/garden/cats/ cat_recognition\n```\n# Install miniconda and all required dependencies\nI use miniconda to install all required packages. You can install it with:\n```bash\nwget http://repo.continuum.io/miniconda/Miniconda3-latest-Linux-armv7l.sh\nsudo md5sum Miniconda3-latest-Linux-armv7l.sh # (optional) check md5\nsudo /bin/bash Miniconda3-latest-Linux-armv7l.sh # -> change default directory to /home/pi/miniconda3\nsudo reboot -h now\n```\nThen create the environment from the requirements.yml file with:\n```\n/home/pi/miniconda3/bin/conda create -f requirements.yml\nsource /home/pi/miniconda3/bin/activate ml\n```\n\nLater down the road we will need tensorflow and keras as the deep learning environment. Installing tensorflow on the raspberry pi is fortunately straight forward:\n```\nsudo apt-get install libatlas-base-dev libblas-dev\nwget https://github.com/samjabrahams/tensorflow-on-raspberry-pi/releases/download/v1.1.0/tensorflow-1.1.0-cp34-cp34m-linux_armv7l.whl\nsource /home/pi/miniconda3/bin/activate ml\npip install tensorflow-1.1.0-cp34-cp34m-linux_armv7l.whl\n```\nAll the rest of the required packages can be automatically installed with pip from the requirements.txt file in the cat_recognition directory:\n```\nsource /home/pi/miniconda3/bin/activate ml\npip install -r requirements.txt\n```\n# Testing\n\nYou might have to restart your pi now. When it has restarted, check the status of your motion service again:\n```\nsudo service motion status\n```\nThe output must be active(running) in green.\nMove your hand in front of the camera and check if images are written in /opt/motion and in /opt/motion/cropped\n",
"json_metadata": "{\"tags\":[\"raspberrypi\",\"deeplearning\",\"cats\",\"gardening\",\"computervision\"],\"image\":[\"https://cdn.steemitimages.com/DQmQ3NZes7swWwV4DN456xuersBHYJL9t5qKm9gtGoHdc82/97-20180424110053-05_cropped.jpg\"],\"links\":[\"https://steemit.com/raspberrypi/@mragic/how-to-build-a-cat-detector-with-a-raspberry-pi-and-a-pi-noir-camera-using-deep-learning-part-i\",\"https://github.com/magictimelapse/garden\"],\"app\":\"steemit/0.1\",\"format\":\"markdown\"}"
}
]
}mragicfollowed @mytechtrail2018/05/27 10:02:57
mragicfollowed @mytechtrail
2018/05/27 10:02:57
| required auths | [] |
| required posting auths | ["mragic"] |
| id | follow |
| json | ["follow",{"follower":"mragic","following":"mytechtrail","what":["blog"]}] |
| Transaction Info | Block #22793933/Trx e5d57fa9d41a6d340b43e4a671d4bc8c1ed407bb |
View Raw JSON Data
{
  "trx_id": "e5d57fa9d41a6d340b43e4a671d4bc8c1ed407bb",
  "block": 22793933,
  "trx_in_block": 38,
  "op_in_trx": 0,
  "virtual_op": 0,
  "timestamp": "2018-05-27T10:02:57",
  "op": [
    "custom_json",
    {
      "required_auths": [],
      "required_posting_auths": [
        "mragic"
      ],
      "id": "follow",
      "json": "[\"follow\",{\"follower\":\"mragic\",\"following\":\"mytechtrail\",\"what\":[\"blog\"]}]"
    }
  ]
}2018/05/27 10:02:48
2018/05/27 10:02:48
| parent author | mytechtrail |
| parent permlink | re-mragic-how-to-build-a-cat-detector-with-a-raspberry-pi-and-a-pi-noir-camera-using-deep-learning-part-i-20180524t003331590z |
| author | mragic |
| permlink | re-mytechtrail-re-mragic-how-to-build-a-cat-detector-with-a-raspberry-pi-and-a-pi-noir-camera-using-deep-learning-part-i-20180527t100251262z |
| title | |
| body | Thanks a lot, I changed it! |
| json metadata | {"tags":["raspberrypi"],"app":"steemit/0.1"} |
| Transaction Info | Block #22793930/Trx 7e5abc7a8ad4bfaa37e7e2cfb21d3176c86ae73a |
View Raw JSON Data
{
  "trx_id": "7e5abc7a8ad4bfaa37e7e2cfb21d3176c86ae73a",
  "block": 22793930,
  "trx_in_block": 10,
  "op_in_trx": 0,
  "virtual_op": 0,
  "timestamp": "2018-05-27T10:02:48",
  "op": [
    "comment",
    {
      "parent_author": "mytechtrail",
      "parent_permlink": "re-mragic-how-to-build-a-cat-detector-with-a-raspberry-pi-and-a-pi-noir-camera-using-deep-learning-part-i-20180524t003331590z",
      "author": "mragic",
      "permlink": "re-mytechtrail-re-mragic-how-to-build-a-cat-detector-with-a-raspberry-pi-and-a-pi-noir-camera-using-deep-learning-part-i-20180527t100251262z",
      "title": "",
      "body": "Thanks a lot, I changed it!",
      "json_metadata": "{\"tags\":[\"raspberrypi\"],\"app\":\"steemit/0.1\"}"
    }
  ]
}Manabar
Voting Power100.00%
Downvote Power100.00%
Resource Credits100.00%
Reputation Progress0.00%
{
  "voting_manabar": {
    "current_mana": "8143659806",
    "last_update_time": 1779077028
  },
  "downvote_manabar": {
    "current_mana": 2035914951,
    "last_update_time": 1779077028
  },
  "rc_account": {
    "account": "mragic",
    "rc_manabar": {
      "current_mana": "10164408779",
      "last_update_time": 1779077028
    },
    "max_rc_creation_adjustment": {
      "amount": "2020748973",
      "precision": 6,
      "nai": "@@000000037"
    },
    "max_rc": "10164408779"
  }
}
Account Metadata
| POSTING JSON METADATA | |
| profile | {"profile_image":"https://image.jimcdn.com/app/cms/image/transf/dimension=213x10000:format=png/path/s700f796b66d213d0/image/iccc85832e5486e59/version/1492460352/image.png","cover_image":"https://image.jimcdn.com/app/cms/image/transf/dimension=2048x2048:format=jpg/path/s700f796b66d213d0/image/i6eff826a399050b3/version/1490726736/image.jpg","name":"mragic","website":"https://www.raspberryjam.ch"} |
| JSON METADATA | |
| profile | {"profile_image":"https://image.jimcdn.com/app/cms/image/transf/dimension=213x10000:format=png/path/s700f796b66d213d0/image/iccc85832e5486e59/version/1492460352/image.png","cover_image":"https://image.jimcdn.com/app/cms/image/transf/dimension=2048x2048:format=jpg/path/s700f796b66d213d0/image/i6eff826a399050b3/version/1490726736/image.jpg","name":"mragic","website":"https://www.raspberryjam.ch"} |
{
  "posting_json_metadata": {
    "profile": {
      "profile_image": "https://image.jimcdn.com/app/cms/image/transf/dimension=213x10000:format=png/path/s700f796b66d213d0/image/iccc85832e5486e59/version/1492460352/image.png",
      "cover_image": "https://image.jimcdn.com/app/cms/image/transf/dimension=2048x2048:format=jpg/path/s700f796b66d213d0/image/i6eff826a399050b3/version/1490726736/image.jpg",
      "name": "mragic",
      "website": "https://www.raspberryjam.ch"
    }
  },
  "json_metadata": {
    "profile": {
      "profile_image": "https://image.jimcdn.com/app/cms/image/transf/dimension=213x10000:format=png/path/s700f796b66d213d0/image/iccc85832e5486e59/version/1492460352/image.png",
      "cover_image": "https://image.jimcdn.com/app/cms/image/transf/dimension=2048x2048:format=jpg/path/s700f796b66d213d0/image/i6eff826a399050b3/version/1490726736/image.jpg",
      "name": "mragic",
      "website": "https://www.raspberryjam.ch"
    }
  }
}
Auth Keys
Owner
Single Signature
Public Keys
STM5zooK2vYNwNsSFcVK8ycXafGsTAYcohkBVb7M3XBDwjGzCsQxr1/1
Active
Single Signature
Public Keys
STM5q81mPcAQEMYxsny2oxcv73RXBYYaotF3WxLtSiXUZwR2YGo4j1/1
Posting
Single Signature
Public Keys
STM8aGXLNdVVJJNEZWz8ApwJCWFk2WtRdyhTyhtHQz7Gz8AX1CXYd1/1
Memo
STM5QfZyeF8z6FvVhh8UrmarZQt8ybaz2WXs3NTdmYWdimUaNGnFV
{
  "owner": {
    "weight_threshold": 1,
    "account_auths": [],
    "key_auths": [
      [
        "STM5zooK2vYNwNsSFcVK8ycXafGsTAYcohkBVb7M3XBDwjGzCsQxr",
        1
      ]
    ]
  },
  "active": {
    "weight_threshold": 1,
    "account_auths": [],
    "key_auths": [
      [
        "STM5q81mPcAQEMYxsny2oxcv73RXBYYaotF3WxLtSiXUZwR2YGo4j",
        1
      ]
    ]
  },
  "posting": {
    "weight_threshold": 1,
    "account_auths": [],
    "key_auths": [
      [
        "STM8aGXLNdVVJJNEZWz8ApwJCWFk2WtRdyhTyhtHQz7Gz8AX1CXYd",
        1
      ]
    ]
  },
  "memo": "STM5QfZyeF8z6FvVhh8UrmarZQt8ybaz2WXs3NTdmYWdimUaNGnFV"
}
Witness Votes
1 / 30
01.steemitboard |
[
  "steemitboard"
]