VOTING POWER100.00%
DOWNVOTE POWER100.00%
RESOURCE CREDITS100.00%
REPUTATION PROGRESS36.74%
Net Worth
2.928USD
STEEM
0.000STEEM
SBD
5.280SBD
Effective Power
7.005SP
├── Own SP
5.972SP
└── Incoming DelegationsDeleg
+1.033SP
Detailed Balance
| STEEM | ||
| balance | 0.000STEEM | STEEM |
| market_balance | 0.000STEEM | STEEM |
| savings_balance | 0.000STEEM | STEEM |
| reward_steem_balance | 0.000STEEM | STEEM |
| STEEM POWER | ||
| Own SP | 5.972SP | SP |
| Delegated Out | 0.000SP | SP |
| Delegation In | 1.033SP | SP |
| Effective Power | 7.005SP | SP |
| Reward SP (pending) | 0.000SP | SP |
| SBD | ||
| sbd_balance | 5.280SBD | SBD |
| sbd_conversions | 0.000SBD | SBD |
| sbd_market_balance | 0.000SBD | SBD |
| savings_sbd_balance | 0.000SBD | SBD |
| reward_sbd_balance | 0.000SBD | SBD |
{
  "balance": "0.000 STEEM",
  "savings_balance": "0.000 STEEM",
  "reward_steem_balance": "0.000 STEEM",
  "vesting_shares": "9725.186228 VESTS",
  "delegated_vesting_shares": "0.000000 VESTS",
  "received_vesting_shares": "1681.664156 VESTS",
  "sbd_balance": "5.280 SBD",
  "savings_sbd_balance": "0.000 SBD",
  "reward_sbd_balance": "0.000 SBD",
  "conversions": []
}
Account Info
| name | mistahlee |
| id | 160916 |
| rank | 171,900 |
| reputation | 50990120396 |
| created | 2017-05-15T22:53:00 |
| recovery_account | steem |
| proxy | None |
| post_count | 9 |
| comment_count | 0 |
| lifetime_vote_count | 0 |
| witnesses_voted_for | 0 |
| last_post | 2017-07-23T10:36:39 |
| last_root_post | 2017-07-23T10:36:39 |
| last_vote_time | 2017-07-23T10:36:39 |
| proxied_vsf_votes | 0, 0, 0, 0 |
| can_vote | 1 |
| voting_power | 0 |
| delayed_votes | 0 |
| balance | 0.000 STEEM |
| savings_balance | 0.000 STEEM |
| sbd_balance | 5.280 SBD |
| savings_sbd_balance | 0.000 SBD |
| vesting_shares | 9725.186228 VESTS |
| delegated_vesting_shares | 0.000000 VESTS |
| received_vesting_shares | 1681.664156 VESTS |
| reward_vesting_balance | 0.000000 VESTS |
| vesting_balance | 0.000 STEEM |
| vesting_withdraw_rate | 0.000000 VESTS |
| next_vesting_withdrawal | 1969-12-31T23:59:59 |
| withdrawn | 0 |
| to_withdraw | 0 |
| withdraw_routes | 0 |
| savings_withdraw_requests | 0 |
| last_account_recovery | 1970-01-01T00:00:00 |
| reset_account | null |
| last_owner_update | 1970-01-01T00:00:00 |
| last_account_update | 2017-06-22T04:37:33 |
| mined | No |
| sbd_seconds | 0 |
| sbd_last_interest_payment | 2017-08-15T02:38:45 |
| savings_sbd_last_interest_payment | 1970-01-01T00:00:00 |
{
  "id": 160916,
  "name": "mistahlee",
  "owner": {
    "weight_threshold": 1,
    "account_auths": [],
    "key_auths": [
      [
        "STM8XCH3LnnwKgytk4LPQGaGFqMjJwJphAgm6VQt6MiT2Jqe4dPum",
        1
      ]
    ]
  },
  "active": {
    "weight_threshold": 1,
    "account_auths": [],
    "key_auths": [
      [
        "STM6yLE8mQLrAVxzrj53wtWxc6dZrqxtpPs1ftC2VtdWhxuit9hic",
        1
      ]
    ]
  },
  "posting": {
    "weight_threshold": 1,
    "account_auths": [],
    "key_auths": [
      [
        "STM7ceaCbZfWqbUkRwCkbrZie7jF6a4fVXQjRdFxGPTAViKGZV2Md",
        1
      ]
    ]
  },
  "memo_key": "STM5uHVDHdWpF3mPDn7oC9yagSxqSA6vmc3ooWaFMTCHQQJYg1u8U",
  "json_metadata": "{\"profile\":{\"name\":\"mistah lee\"}}",
  "posting_json_metadata": "{\"profile\":{\"name\":\"mistah lee\"}}",
  "proxy": "",
  "last_owner_update": "1970-01-01T00:00:00",
  "last_account_update": "2017-06-22T04:37:33",
  "created": "2017-05-15T22:53:00",
  "mined": false,
  "recovery_account": "steem",
  "last_account_recovery": "1970-01-01T00:00:00",
  "reset_account": "null",
  "comment_count": 0,
  "lifetime_vote_count": 0,
  "post_count": 9,
  "can_vote": true,
  "voting_manabar": {
    "current_mana": "11406850384",
    "last_update_time": 1741002351
  },
  "downvote_manabar": {
    "current_mana": 2851712596,
    "last_update_time": 1741002351
  },
  "voting_power": 0,
  "balance": "0.000 STEEM",
  "savings_balance": "0.000 STEEM",
  "sbd_balance": "5.280 SBD",
  "sbd_seconds": "0",
  "sbd_seconds_last_update": "2017-08-15T02:38:45",
  "sbd_last_interest_payment": "2017-08-15T02:38:45",
  "savings_sbd_balance": "0.000 SBD",
  "savings_sbd_seconds": "0",
  "savings_sbd_seconds_last_update": "1970-01-01T00:00:00",
  "savings_sbd_last_interest_payment": "1970-01-01T00:00:00",
  "savings_withdraw_requests": 0,
  "reward_sbd_balance": "0.000 SBD",
  "reward_steem_balance": "0.000 STEEM",
  "reward_vesting_balance": "0.000000 VESTS",
  "reward_vesting_steem": "0.000 STEEM",
  "vesting_shares": "9725.186228 VESTS",
  "delegated_vesting_shares": "0.000000 VESTS",
  "received_vesting_shares": "1681.664156 VESTS",
  "vesting_withdraw_rate": "0.000000 VESTS",
  "next_vesting_withdrawal": "1969-12-31T23:59:59",
  "withdrawn": 0,
  "to_withdraw": 0,
  "withdraw_routes": 0,
  "curation_rewards": 5,
  "posting_rewards": 7374,
  "proxied_vsf_votes": [
    0,
    0,
    0,
    0
  ],
  "witnesses_voted_for": 0,
  "last_post": "2017-07-23T10:36:39",
  "last_root_post": "2017-07-23T10:36:39",
  "last_vote_time": "2017-07-23T10:36:39",
  "post_bandwidth": 0,
  "pending_claimed_accounts": 0,
  "vesting_balance": "0.000 STEEM",
  "reputation": "50990120396",
  "transfer_history": [],
  "market_history": [],
  "post_history": [],
  "vote_history": [],
  "other_history": [],
  "witness_votes": [],
  "tags_usage": [],
  "guest_bloggers": [],
  "rank": 171900
}
Withdraw Routes
| Incoming | Outgoing |
|---|---|
Empty | Empty |
{
  "incoming": [],
  "outgoing": []
}From Date
To Date
steemdelegated 1.033 SP to @mistahlee2025/03/03 11:45:51
steemdelegated 1.033 SP to @mistahlee
2025/03/03 11:45:51
| delegator | steem |
| delegatee | mistahlee |
| vesting shares | 1681.664156 VESTS |
| Transaction Info | Block #93491746/Trx 4317d617a2aacb5d337b5213ad67c2d398c42331 |
View Raw JSON Data
{
  "trx_id": "4317d617a2aacb5d337b5213ad67c2d398c42331",
  "block": 93491746,
  "trx_in_block": 1,
  "op_in_trx": 0,
  "virtual_op": 0,
  "timestamp": "2025-03-03T11:45:51",
  "op": [
    "delegate_vesting_shares",
    {
      "delegator": "steem",
      "delegatee": "mistahlee",
      "vesting_shares": "1681.664156 VESTS"
    }
  ]
}steemdelegated 1.136 SP to @mistahlee2021/10/30 09:32:24
steemdelegated 1.136 SP to @mistahlee
2021/10/30 09:32:24
| delegator | steem |
| delegatee | mistahlee |
| vesting shares | 1849.842268 VESTS |
| Transaction Info | Block #58557117/Trx 714abdb4c85e332dada34675a8cb9258841a69e0 |
View Raw JSON Data
{
  "trx_id": "714abdb4c85e332dada34675a8cb9258841a69e0",
  "block": 58557117,
  "trx_in_block": 6,
  "op_in_trx": 0,
  "virtual_op": 0,
  "timestamp": "2021-10-30T09:32:24",
  "op": [
    "delegate_vesting_shares",
    {
      "delegator": "steem",
      "delegatee": "mistahlee",
      "vesting_shares": "1849.842268 VESTS"
    }
  ]
}2019/05/16 00:05:51
2019/05/16 00:05:51
| parent author | mistahlee |
| parent permlink | vintage-airstream-travel-trailer-renovation-post-7-interior-aluminum-skins |
| author | steemitboard |
| permlink | steemitboard-notify-mistahlee-20190516t000550000z |
| title | |
| body | Congratulations @mistahlee! You received a personal award! <table><tr><td>https://steemitimages.com/70x70/http://steemitboard.com/@mistahlee/birthday2.png</td><td>Happy Birthday! - You are on the Steem blockchain for 2 years!</td></tr></table> <sub>_You can view [your badges on your Steem Board](https://steemitboard.com/@mistahlee) and compare to others on the [Steem Ranking](http://steemitboard.com/ranking/index.php?name=mistahlee)_</sub> **Do not miss the last post from @steemitboard:** <table><tr><td><a href="https://steemit.com/japanese/@steemitboard/new-japanese-speaking-community-steem-meetup-badge"><img src="https://steemitimages.com/64x128/https://cdn.steemitimages.com/DQmRWbAjbeETEaqSPLcpwYX1JN5pZhdPffv4q6DaBs6xvZm/image.png"></a></td><td><a href="https://steemit.com/japanese/@steemitboard/new-japanese-speaking-community-steem-meetup-badge">New japanese speaking community Steem Meetup badge</a></td></tr></table> ###### [Vote for @Steemitboard as a witness](https://v2.steemconnect.com/sign/account-witness-vote?witness=steemitboard&approve=1) to get one more award and increased upvotes! |
| json metadata | {"image":["https://steemitboard.com/img/notify.png"]} |
| Transaction Info | Block #32942863/Trx 28f95810ce1643ebda11c2d06567306f5b791ccd |
View Raw JSON Data
{
  "trx_id": "28f95810ce1643ebda11c2d06567306f5b791ccd",
  "block": 32942863,
  "trx_in_block": 11,
  "op_in_trx": 0,
  "virtual_op": 0,
  "timestamp": "2019-05-16T00:05:51",
  "op": [
    "comment",
    {
      "parent_author": "mistahlee",
      "parent_permlink": "vintage-airstream-travel-trailer-renovation-post-7-interior-aluminum-skins",
      "author": "steemitboard",
      "permlink": "steemitboard-notify-mistahlee-20190516t000550000z",
      "title": "",
      "body": "Congratulations @mistahlee! You received a personal award!\n\n<table><tr><td>https://steemitimages.com/70x70/http://steemitboard.com/@mistahlee/birthday2.png</td><td>Happy Birthday! - You are on the Steem blockchain for 2 years!</td></tr></table>\n\n<sub>_You can view [your badges on your Steem Board](https://steemitboard.com/@mistahlee) and compare to others on the [Steem Ranking](http://steemitboard.com/ranking/index.php?name=mistahlee)_</sub>\n\n\n**Do not miss the last post from @steemitboard:**\n<table><tr><td><a href=\"https://steemit.com/japanese/@steemitboard/new-japanese-speaking-community-steem-meetup-badge\"><img src=\"https://steemitimages.com/64x128/https://cdn.steemitimages.com/DQmRWbAjbeETEaqSPLcpwYX1JN5pZhdPffv4q6DaBs6xvZm/image.png\"></a></td><td><a href=\"https://steemit.com/japanese/@steemitboard/new-japanese-speaking-community-steem-meetup-badge\">New  japanese speaking community Steem Meetup badge</a></td></tr></table>\n\n###### [Vote for @Steemitboard as a witness](https://v2.steemconnect.com/sign/account-witness-vote?witness=steemitboard&approve=1) to get one more award and increased upvotes!",
      "json_metadata": "{\"image\":[\"https://steemitboard.com/img/notify.png\"]}"
    }
  ]
}2018/06/22 20:58:24
2018/06/22 20:58:24
| voter | davecof |
| author | mistahlee |
| permlink | vintage-airstream-travel-trailer-renovation-post-1-before-and-after-pics |
| weight | 10000 (100.00%) |
| Transaction Info | Block #23555065/Trx 005ce7af2c83fa9eee3b683cf271ada747c1b975 |
View Raw JSON Data
{
  "trx_id": "005ce7af2c83fa9eee3b683cf271ada747c1b975",
  "block": 23555065,
  "trx_in_block": 5,
  "op_in_trx": 0,
  "virtual_op": 0,
  "timestamp": "2018-06-22T20:58:24",
  "op": [
    "vote",
    {
      "voter": "davecof",
      "author": "mistahlee",
      "permlink": "vintage-airstream-travel-trailer-renovation-post-1-before-and-after-pics",
      "weight": 10000
    }
  ]
}2018/06/22 20:58:21
2018/06/22 20:58:21
| voter | davecof |
| author | mistahlee |
| permlink | vintage-airstream-travel-trailer-renovation-post-2-preparing-a-vintage-trailer-for-transport-and-gutting-the-interior |
| weight | 10000 (100.00%) |
| Transaction Info | Block #23555064/Trx eef08d7274f36ce7ab41590b3eabf9b06c4447e8 |
View Raw JSON Data
{
  "trx_id": "eef08d7274f36ce7ab41590b3eabf9b06c4447e8",
  "block": 23555064,
  "trx_in_block": 35,
  "op_in_trx": 0,
  "virtual_op": 0,
  "timestamp": "2018-06-22T20:58:21",
  "op": [
    "vote",
    {
      "voter": "davecof",
      "author": "mistahlee",
      "permlink": "vintage-airstream-travel-trailer-renovation-post-2-preparing-a-vintage-trailer-for-transport-and-gutting-the-interior",
      "weight": 10000
    }
  ]
}davecofremoved vote from (0.00%) @mistahlee / vintage-airstream-travel-trailer-renovation-post-3-removing-the-shell-and-putting-it-back-together2018/06/22 20:58:18
davecofremoved vote from (0.00%) @mistahlee / vintage-airstream-travel-trailer-renovation-post-3-removing-the-shell-and-putting-it-back-together
2018/06/22 20:58:18
| voter | davecof |
| author | mistahlee |
| permlink | vintage-airstream-travel-trailer-renovation-post-3-removing-the-shell-and-putting-it-back-together |
| weight | 0 (0.00%) |
| Transaction Info | Block #23555063/Trx e4e5bb8b6eb0bc05fc3a0638a24fa672c0b68e3c |
View Raw JSON Data
{
  "trx_id": "e4e5bb8b6eb0bc05fc3a0638a24fa672c0b68e3c",
  "block": 23555063,
  "trx_in_block": 63,
  "op_in_trx": 0,
  "virtual_op": 0,
  "timestamp": "2018-06-22T20:58:18",
  "op": [
    "vote",
    {
      "voter": "davecof",
      "author": "mistahlee",
      "permlink": "vintage-airstream-travel-trailer-renovation-post-3-removing-the-shell-and-putting-it-back-together",
      "weight": 0
    }
  ]
}2018/06/22 20:58:12
2018/06/22 20:58:12
| voter | davecof |
| author | mistahlee |
| permlink | vintage-airstream-travel-trailer-renovation-post-4-polishing-a-vintage-trailer |
| weight | 10000 (100.00%) |
| Transaction Info | Block #23555061/Trx 18d10c20f9f18d077f9229d2387a293bc34bfcf8 |
View Raw JSON Data
{
  "trx_id": "18d10c20f9f18d077f9229d2387a293bc34bfcf8",
  "block": 23555061,
  "trx_in_block": 117,
  "op_in_trx": 0,
  "virtual_op": 0,
  "timestamp": "2018-06-22T20:58:12",
  "op": [
    "vote",
    {
      "voter": "davecof",
      "author": "mistahlee",
      "permlink": "vintage-airstream-travel-trailer-renovation-post-4-polishing-a-vintage-trailer",
      "weight": 10000
    }
  ]
}2018/06/22 20:58:12
2018/06/22 20:58:12
| voter | davecof |
| author | mistahlee |
| permlink | vintage-airstream-travel-trailer-renovation-post-4-stopping-leaks-your-sealant-options |
| weight | 10000 (100.00%) |
| Transaction Info | Block #23555061/Trx 873b66c492f9e99a42c460f416c8230a8c5dc143 |
View Raw JSON Data
{
  "trx_id": "873b66c492f9e99a42c460f416c8230a8c5dc143",
  "block": 23555061,
  "trx_in_block": 11,
  "op_in_trx": 0,
  "virtual_op": 0,
  "timestamp": "2018-06-22T20:58:12",
  "op": [
    "vote",
    {
      "voter": "davecof",
      "author": "mistahlee",
      "permlink": "vintage-airstream-travel-trailer-renovation-post-4-stopping-leaks-your-sealant-options",
      "weight": 10000
    }
  ]
}davecofupvoted (100.00%) @mistahlee / fully-rebuilt-1971-airstream-trailer-for-sale2018/06/22 20:58:09
davecofupvoted (100.00%) @mistahlee / fully-rebuilt-1971-airstream-trailer-for-sale
2018/06/22 20:58:09
| voter | davecof |
| author | mistahlee |
| permlink | fully-rebuilt-1971-airstream-trailer-for-sale |
| weight | 10000 (100.00%) |
| Transaction Info | Block #23555060/Trx cf44f69e8c46a58f8355c62a754216acd00b2261 |
View Raw JSON Data
{
  "trx_id": "cf44f69e8c46a58f8355c62a754216acd00b2261",
  "block": 23555060,
  "trx_in_block": 24,
  "op_in_trx": 0,
  "virtual_op": 0,
  "timestamp": "2018-06-22T20:58:09",
  "op": [
    "vote",
    {
      "voter": "davecof",
      "author": "mistahlee",
      "permlink": "fully-rebuilt-1971-airstream-trailer-for-sale",
      "weight": 10000
    }
  ]
}2018/06/22 20:58:09
2018/06/22 20:58:09
| voter | davecof |
| author | mistahlee |
| permlink | vintage-airstream-travel-trailer-renovation-post-6-spray-foam-insulation |
| weight | 10000 (100.00%) |
| Transaction Info | Block #23555060/Trx abfec4744b59a8d4a455556a8feda82a264833ce |
View Raw JSON Data
{
  "trx_id": "abfec4744b59a8d4a455556a8feda82a264833ce",
  "block": 23555060,
  "trx_in_block": 6,
  "op_in_trx": 0,
  "virtual_op": 0,
  "timestamp": "2018-06-22T20:58:09",
  "op": [
    "vote",
    {
      "voter": "davecof",
      "author": "mistahlee",
      "permlink": "vintage-airstream-travel-trailer-renovation-post-6-spray-foam-insulation",
      "weight": 10000
    }
  ]
}2018/06/22 20:58:06
2018/06/22 20:58:06
| voter | davecof |
| author | mistahlee |
| permlink | vintage-airstream-travel-trailer-renovation-post-7-interior-aluminum-skins |
| weight | 10000 (100.00%) |
| Transaction Info | Block #23555059/Trx 547f3fd82ff9031a2c5a3089dba99037119fcca8 |
View Raw JSON Data
{
  "trx_id": "547f3fd82ff9031a2c5a3089dba99037119fcca8",
  "block": 23555059,
  "trx_in_block": 23,
  "op_in_trx": 0,
  "virtual_op": 0,
  "timestamp": "2018-06-22T20:58:06",
  "op": [
    "vote",
    {
      "voter": "davecof",
      "author": "mistahlee",
      "permlink": "vintage-airstream-travel-trailer-renovation-post-7-interior-aluminum-skins",
      "weight": 10000
    }
  ]
}2018/06/22 20:45:12
2018/06/22 20:45:12
| voter | davecof |
| author | mistahlee |
| permlink | vintage-airstream-travel-trailer-renovation-post-3-removing-the-shell-and-putting-it-back-together |
| weight | 10000 (100.00%) |
| Transaction Info | Block #23554801/Trx 43cefe068173cf257f8a0006ac843cea38eb6e25 |
View Raw JSON Data
{
  "trx_id": "43cefe068173cf257f8a0006ac843cea38eb6e25",
  "block": 23554801,
  "trx_in_block": 42,
  "op_in_trx": 0,
  "virtual_op": 0,
  "timestamp": "2018-06-22T20:45:12",
  "op": [
    "vote",
    {
      "voter": "davecof",
      "author": "mistahlee",
      "permlink": "vintage-airstream-travel-trailer-renovation-post-3-removing-the-shell-and-putting-it-back-together",
      "weight": 10000
    }
  ]
}steemdelegated 1.250 SP to @mistahlee2018/05/16 23:02:18
steemdelegated 1.250 SP to @mistahlee
2018/05/16 23:02:18
| delegator | steem |
| delegatee | mistahlee |
| vesting shares | 2034.832276 VESTS |
| Transaction Info | Block #22493147/Trx 8b642f5a5e83869b53d5ba3ff9b96aa4708c1b08 |
View Raw JSON Data
{
  "trx_id": "8b642f5a5e83869b53d5ba3ff9b96aa4708c1b08",
  "block": 22493147,
  "trx_in_block": 44,
  "op_in_trx": 0,
  "virtual_op": 0,
  "timestamp": "2018-05-16T23:02:18",
  "op": [
    "delegate_vesting_shares",
    {
      "delegator": "steem",
      "delegatee": "mistahlee",
      "vesting_shares": "2034.832276 VESTS"
    }
  ]
}2018/05/16 01:15:45
2018/05/16 01:15:45
| parent author | mistahlee |
| parent permlink | vintage-airstream-travel-trailer-renovation-post-7-interior-aluminum-skins |
| author | steemitboard |
| permlink | steemitboard-notify-mistahlee-20180516t011547000z |
| title | |
| body | Congratulations @mistahlee! You have received a personal award! [](http://steemitboard.com/@mistahlee) 1 Year on Steemit Click on the badge to view your own Board of Honor on SteemitBoard. > Upvote this notificationto to help all Steemit users. Learn why [here](https://steemit.com/steemitboard/@steemitboard/http-i-cubeupload-com-7ciqeo-png)! |
| json metadata | {"image":["https://steemitboard.com/img/notifications.png"]} |
| Transaction Info | Block #22467021/Trx 241df8d9b6604351a19a8388109f88b3fefbefb1 |
View Raw JSON Data
{
"trx_id": "241df8d9b6604351a19a8388109f88b3fefbefb1",
"block": 22467021,
"trx_in_block": 37,
"op_in_trx": 0,
"virtual_op": 0,
"timestamp": "2018-05-16T01:15:45",
"op": [
"comment",
{
"parent_author": "mistahlee",
"parent_permlink": "vintage-airstream-travel-trailer-renovation-post-7-interior-aluminum-skins",
"author": "steemitboard",
"permlink": "steemitboard-notify-mistahlee-20180516t011547000z",
"title": "",
"body": "Congratulations @mistahlee! You have received a personal award!\n\n[](http://steemitboard.com/@mistahlee) 1 Year on Steemit\nClick on the badge to view your own Board of Honor on SteemitBoard.\n\n> Upvote this notificationto to help all Steemit users. Learn why [here](https://steemit.com/steemitboard/@steemitboard/http-i-cubeupload-com-7ciqeo-png)!",
"json_metadata": "{\"image\":[\"https://steemitboard.com/img/notifications.png\"]}"
}
]
}steemdelegated 12.896 SP to @mistahlee2018/01/09 06:42:48
steemdelegated 12.896 SP to @mistahlee
2018/01/09 06:42:48
| delegator | steem |
| delegatee | mistahlee |
| vesting shares | 21000.003064 VESTS |
| Transaction Info | Block #18819652/Trx cf61042051dfcf19bf6a59972d3850b699d2b287 |
View Raw JSON Data
{
  "trx_id": "cf61042051dfcf19bf6a59972d3850b699d2b287",
  "block": 18819652,
  "trx_in_block": 2,
  "op_in_trx": 0,
  "virtual_op": 0,
  "timestamp": "2018-01-09T06:42:48",
  "op": [
    "delegate_vesting_shares",
    {
      "delegator": "steem",
      "delegatee": "mistahlee",
      "vesting_shares": "21000.003064 VESTS"
    }
  ]
}2017/11/05 18:57:00
2017/11/05 18:57:00
| voter | jacquelinewalton |
| author | mistahlee |
| permlink | vintage-airstream-travel-trailer-renovation-post-3-removing-the-shell-and-putting-it-back-together |
| weight | 10000 (100.00%) |
| Transaction Info | Block #16963452/Trx 95423e3e2da48718172cbf66f53c874d6db229da |
View Raw JSON Data
{
  "trx_id": "95423e3e2da48718172cbf66f53c874d6db229da",
  "block": 16963452,
  "trx_in_block": 12,
  "op_in_trx": 0,
  "virtual_op": 0,
  "timestamp": "2017-11-05T18:57:00",
  "op": [
    "vote",
    {
      "voter": "jacquelinewalton",
      "author": "mistahlee",
      "permlink": "vintage-airstream-travel-trailer-renovation-post-3-removing-the-shell-and-putting-it-back-together",
      "weight": 10000
    }
  ]
}2017/09/14 15:46:09
2017/09/14 15:46:09
| parent author | mistahlee |
| parent permlink | vintage-airstream-travel-trailer-renovation-post-1-before-and-after-pics |
| author | davecof |
| permlink | re-mistahlee-vintage-airstream-travel-trailer-renovation-post-1-before-and-after-pics-20170914t154608937z |
| title | |
| body | This is awesome! We have started our own Airstream project. I just made my first post about it. Hopefully we will be able to finish ours next year. How long did it take you to complete this project? |
| json metadata | {"tags":["airstream"],"app":"steemit/0.1"} |
| Transaction Info | Block #15463138/Trx 7f913bb3c6bc01b7afc4be96629a9b6cc30bf411 |
View Raw JSON Data
{
  "trx_id": "7f913bb3c6bc01b7afc4be96629a9b6cc30bf411",
  "block": 15463138,
  "trx_in_block": 21,
  "op_in_trx": 0,
  "virtual_op": 0,
  "timestamp": "2017-09-14T15:46:09",
  "op": [
    "comment",
    {
      "parent_author": "mistahlee",
      "parent_permlink": "vintage-airstream-travel-trailer-renovation-post-1-before-and-after-pics",
      "author": "davecof",
      "permlink": "re-mistahlee-vintage-airstream-travel-trailer-renovation-post-1-before-and-after-pics-20170914t154608937z",
      "title": "",
      "body": "This is awesome! We have started our own Airstream project. I just made my first post about it. Hopefully we will be able to finish ours next year. How long did it take you to complete this project?",
      "json_metadata": "{\"tags\":[\"airstream\"],\"app\":\"steemit/0.1\"}"
    }
  ]
}2017/08/28 13:32:48
2017/08/28 13:32:48
| voter | iriomote |
| author | mistahlee |
| permlink | vintage-airstream-travel-trailer-renovation-post-1-before-and-after-pics |
| weight | 3500 (35.00%) |
| Transaction Info | Block #14971178/Trx 5758d99f0b0775a74f5dd5a2df433d18e7cc2a56 |
View Raw JSON Data
{
  "trx_id": "5758d99f0b0775a74f5dd5a2df433d18e7cc2a56",
  "block": 14971178,
  "trx_in_block": 12,
  "op_in_trx": 0,
  "virtual_op": 0,
  "timestamp": "2017-08-28T13:32:48",
  "op": [
    "vote",
    {
      "voter": "iriomote",
      "author": "mistahlee",
      "permlink": "vintage-airstream-travel-trailer-renovation-post-1-before-and-after-pics",
      "weight": 3500
    }
  ]
}2017/08/28 13:32:12
2017/08/28 13:32:12
| voter | iriomote |
| author | mistahlee |
| permlink | vintage-airstream-travel-trailer-renovation-post-4-stopping-leaks-your-sealant-options |
| weight | 3500 (35.00%) |
| Transaction Info | Block #14971166/Trx 42821cf8d96c955ee702d7625929e9d818aae959 |
View Raw JSON Data
{
  "trx_id": "42821cf8d96c955ee702d7625929e9d818aae959",
  "block": 14971166,
  "trx_in_block": 2,
  "op_in_trx": 0,
  "virtual_op": 0,
  "timestamp": "2017-08-28T13:32:12",
  "op": [
    "vote",
    {
      "voter": "iriomote",
      "author": "mistahlee",
      "permlink": "vintage-airstream-travel-trailer-renovation-post-4-stopping-leaks-your-sealant-options",
      "weight": 3500
    }
  ]
}mistahleeclaimed reward balance: 0.022 SBD, 0.025 SP2017/08/15 02:38:45
mistahleeclaimed reward balance: 0.022 SBD, 0.025 SP
2017/08/15 02:38:45
| account | mistahlee |
| reward steem | 0.000 STEEM |
| reward sbd | 0.022 SBD |
| reward vests | 41.312326 VESTS |
| Transaction Info | Block #14583922/Trx e03f5fb93d66c8d1ffd94131bd234e715e8c8ce2 |
View Raw JSON Data
{
  "trx_id": "e03f5fb93d66c8d1ffd94131bd234e715e8c8ce2",
  "block": 14583922,
  "trx_in_block": 19,
  "op_in_trx": 0,
  "virtual_op": 0,
  "timestamp": "2017-08-15T02:38:45",
  "op": [
    "claim_reward_balance",
    {
      "account": "mistahlee",
      "reward_steem": "0.000 STEEM",
      "reward_sbd": "0.022 SBD",
      "reward_vests": "41.312326 VESTS"
    }
  ]
}steemdelegated 13.076 SP to @mistahlee2017/08/04 05:21:30
steemdelegated 13.076 SP to @mistahlee
2017/08/04 05:21:30
| delegator | steem |
| delegatee | mistahlee |
| vesting shares | 21292.126098 VESTS |
| Transaction Info | Block #14271505/Trx 6224b8be957a9b88444948f415df8657e17de107 |
View Raw JSON Data
{
  "trx_id": "6224b8be957a9b88444948f415df8657e17de107",
  "block": 14271505,
  "trx_in_block": 15,
  "op_in_trx": 0,
  "virtual_op": 0,
  "timestamp": "2017-08-04T05:21:30",
  "op": [
    "delegate_vesting_shares",
    {
      "delegator": "steem",
      "delegatee": "mistahlee",
      "vesting_shares": "21292.126098 VESTS"
    }
  ]
}mistahleereceived 0.011 SBD, 0.013 SP author reward for @mistahlee / vintage-airstream-travel-trailer-renovation-post-7-interior-aluminum-skins2017/07/30 10:36:39
mistahleereceived 0.011 SBD, 0.013 SP author reward for @mistahlee / vintage-airstream-travel-trailer-renovation-post-7-interior-aluminum-skins
2017/07/30 10:36:39
| author | mistahlee |
| permlink | vintage-airstream-travel-trailer-renovation-post-7-interior-aluminum-skins |
| sbd payout | 0.011 SBD |
| steem payout | 0.000 STEEM |
| vesting payout | 20.656025 VESTS |
| Transaction Info | Block #14133926/Virtual Operation #3 |
View Raw JSON Data
{
  "trx_id": "0000000000000000000000000000000000000000",
  "block": 14133926,
  "trx_in_block": 4294967295,
  "op_in_trx": 0,
  "virtual_op": 3,
  "timestamp": "2017-07-30T10:36:39",
  "op": [
    "author_reward",
    {
      "author": "mistahlee",
      "permlink": "vintage-airstream-travel-trailer-renovation-post-7-interior-aluminum-skins",
      "sbd_payout": "0.011 SBD",
      "steem_payout": "0.000 STEEM",
      "vesting_payout": "20.656025 VESTS"
    }
  ]
}mistahleereceived 0.011 SBD, 0.013 SP author reward for @mistahlee / vintage-airstream-travel-trailer-renovation-post-6-spray-foam-insulation2017/07/30 04:33:03
mistahleereceived 0.011 SBD, 0.013 SP author reward for @mistahlee / vintage-airstream-travel-trailer-renovation-post-6-spray-foam-insulation
2017/07/30 04:33:03
| author | mistahlee |
| permlink | vintage-airstream-travel-trailer-renovation-post-6-spray-foam-insulation |
| sbd payout | 0.011 SBD |
| steem payout | 0.000 STEEM |
| vesting payout | 20.656301 VESTS |
| Transaction Info | Block #14126656/Virtual Operation #8 |
View Raw JSON Data
{
  "trx_id": "0000000000000000000000000000000000000000",
  "block": 14126656,
  "trx_in_block": 4294967295,
  "op_in_trx": 0,
  "virtual_op": 8,
  "timestamp": "2017-07-30T04:33:03",
  "op": [
    "author_reward",
    {
      "author": "mistahlee",
      "permlink": "vintage-airstream-travel-trailer-renovation-post-6-spray-foam-insulation",
      "sbd_payout": "0.011 SBD",
      "steem_payout": "0.000 STEEM",
      "vesting_payout": "20.656301 VESTS"
    }
  ]
}2017/07/23 10:42:45
2017/07/23 10:42:45
| parent author | mistahlee |
| parent permlink | vintage-airstream-travel-trailer-renovation-post-7-interior-aluminum-skins |
| author | leejin-33 |
| permlink | re-mistahlee-vintage-airstream-travel-trailer-renovation-post-7-interior-aluminum-skins-20170723t104245370z |
| title | |
| body | You have a very good skill. I can feel it made hard. |
| json metadata | {"tags":["airstream"],"app":"steemit/0.1"} |
| Transaction Info | Block #13932572/Trx 2546c798586a39cd2696c773810d3c4cbe9d1253 |
View Raw JSON Data
{
  "trx_id": "2546c798586a39cd2696c773810d3c4cbe9d1253",
  "block": 13932572,
  "trx_in_block": 26,
  "op_in_trx": 0,
  "virtual_op": 0,
  "timestamp": "2017-07-23T10:42:45",
  "op": [
    "comment",
    {
      "parent_author": "mistahlee",
      "parent_permlink": "vintage-airstream-travel-trailer-renovation-post-7-interior-aluminum-skins",
      "author": "leejin-33",
      "permlink": "re-mistahlee-vintage-airstream-travel-trailer-renovation-post-7-interior-aluminum-skins-20170723t104245370z",
      "title": "",
      "body": "You have a very good skill.\nI can feel it made hard.",
      "json_metadata": "{\"tags\":[\"airstream\"],\"app\":\"steemit/0.1\"}"
    }
  ]
}2017/07/23 10:36:39
2017/07/23 10:36:39
| voter | mistahlee |
| author | mistahlee |
| permlink | vintage-airstream-travel-trailer-renovation-post-7-interior-aluminum-skins |
| weight | 10000 (100.00%) |
| Transaction Info | Block #13932450/Trx 7d4ae64e39caca6f6050d999eb22f406c2700b1c |
View Raw JSON Data
{
  "trx_id": "7d4ae64e39caca6f6050d999eb22f406c2700b1c",
  "block": 13932450,
  "trx_in_block": 7,
  "op_in_trx": 0,
  "virtual_op": 0,
  "timestamp": "2017-07-23T10:36:39",
  "op": [
    "vote",
    {
      "voter": "mistahlee",
      "author": "mistahlee",
      "permlink": "vintage-airstream-travel-trailer-renovation-post-7-interior-aluminum-skins",
      "weight": 10000
    }
  ]
}mistahleepublished a new post: vintage-airstream-travel-trailer-renovation-post-7-interior-aluminum-skins2017/07/23 10:36:39
mistahleepublished a new post: vintage-airstream-travel-trailer-renovation-post-7-interior-aluminum-skins
2017/07/23 10:36:39
| parent author | |
| parent permlink | airstream |
| author | mistahlee |
| permlink | vintage-airstream-travel-trailer-renovation-post-7-interior-aluminum-skins |
| title | Vintage Airstream Travel Trailer Renovation: Post 7 - Interior Aluminum Skins |
| body | Putting on the interior walls has been challenging, particularly because I do not have the original walls to use as templates. Everything has to be measured precisely, cut and riveted securely. In this post I’ll explain the simplest method I’ve found. For the size of my Airstream, I needed 18 sheets of 4 x 8 .032 aluminum. Buying in that quantity should provide you with a much better per sheet price than individual sheets. I was able to get all my aluminum for under $1,000.00 CDN with delivery. You will need: – a grinder – several metal cut off disks – WD-40 – Tin Snips – All the usual airstream tools – riveter, drill, rivets, measuring tape, etc… Below: First panel installed.  Once you have made your measurements, place the full sheet of aluminum on something flat, clamp it down, and drawn the lines you intend to cut on the side that will not be exposed. Spray the lines with WD-40, but only do one window at a time as the spray will distort your lines. The WD-40 helps the cut off wheel slide along and prolongs its life. I would advise using the grinder to cut straight lines only. The curved edges of each window should be done by hand with the tin snips. The cut does not have to be perfect since your frames will cover the edges.  The metal fragments from the grinder can slide under and easily scratch your aluminum so be sure to brush them away often.  Installing the sheets inside the Airstream is really a two person job. Have one person hold the sheet in place, while the second drills and rivets. Apply quite a bit of pressure to the aluminum so that it follows the curve and does not create spaces between your next sheet of aluminum. Measure accurately, from one support gusset to the next as that is where the rivets should go. Here is the first wall panel on inside. As you can see, the top vista window frame is the incorrect size, fortunately you can still order them from Silver Trailer Supply.  Don’t forget to make holes for all your electrical.  Although aluminum is lightweight, any extra weight that can be excluded is beneficial. I have decided not to run the aluminum sheets from ceiling to floor where there will be cabinets that will cover the wall anyway. 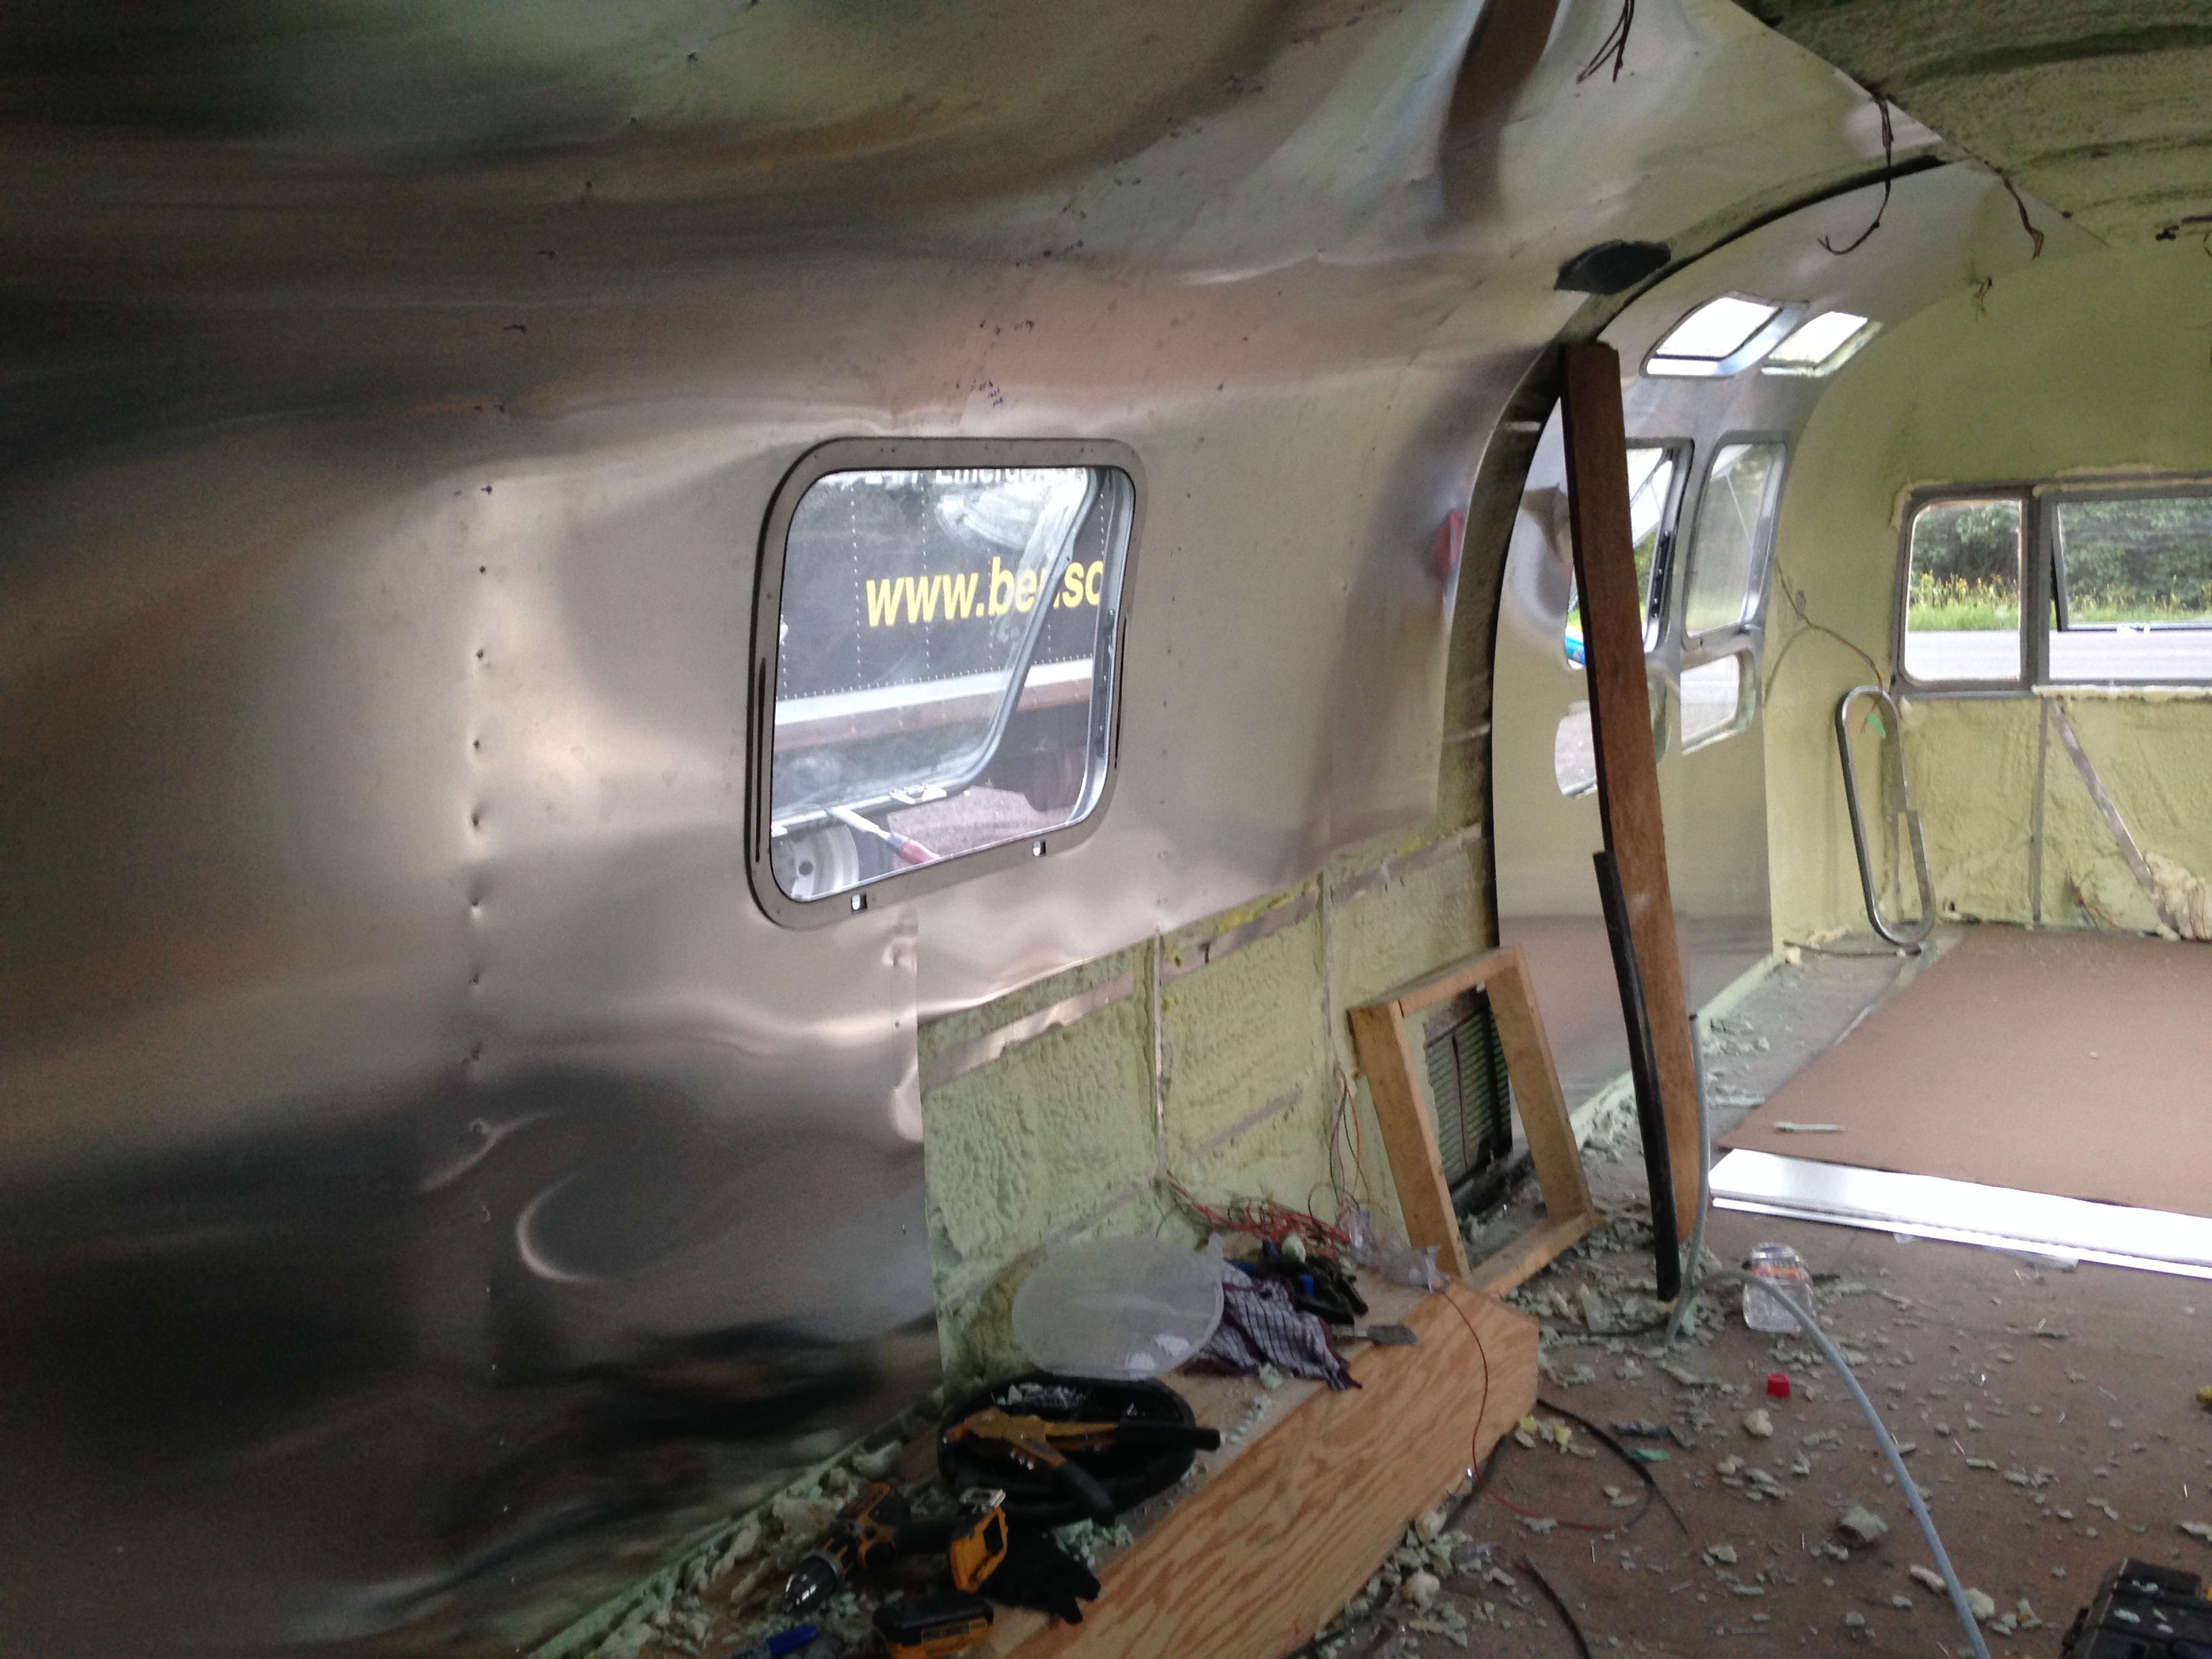 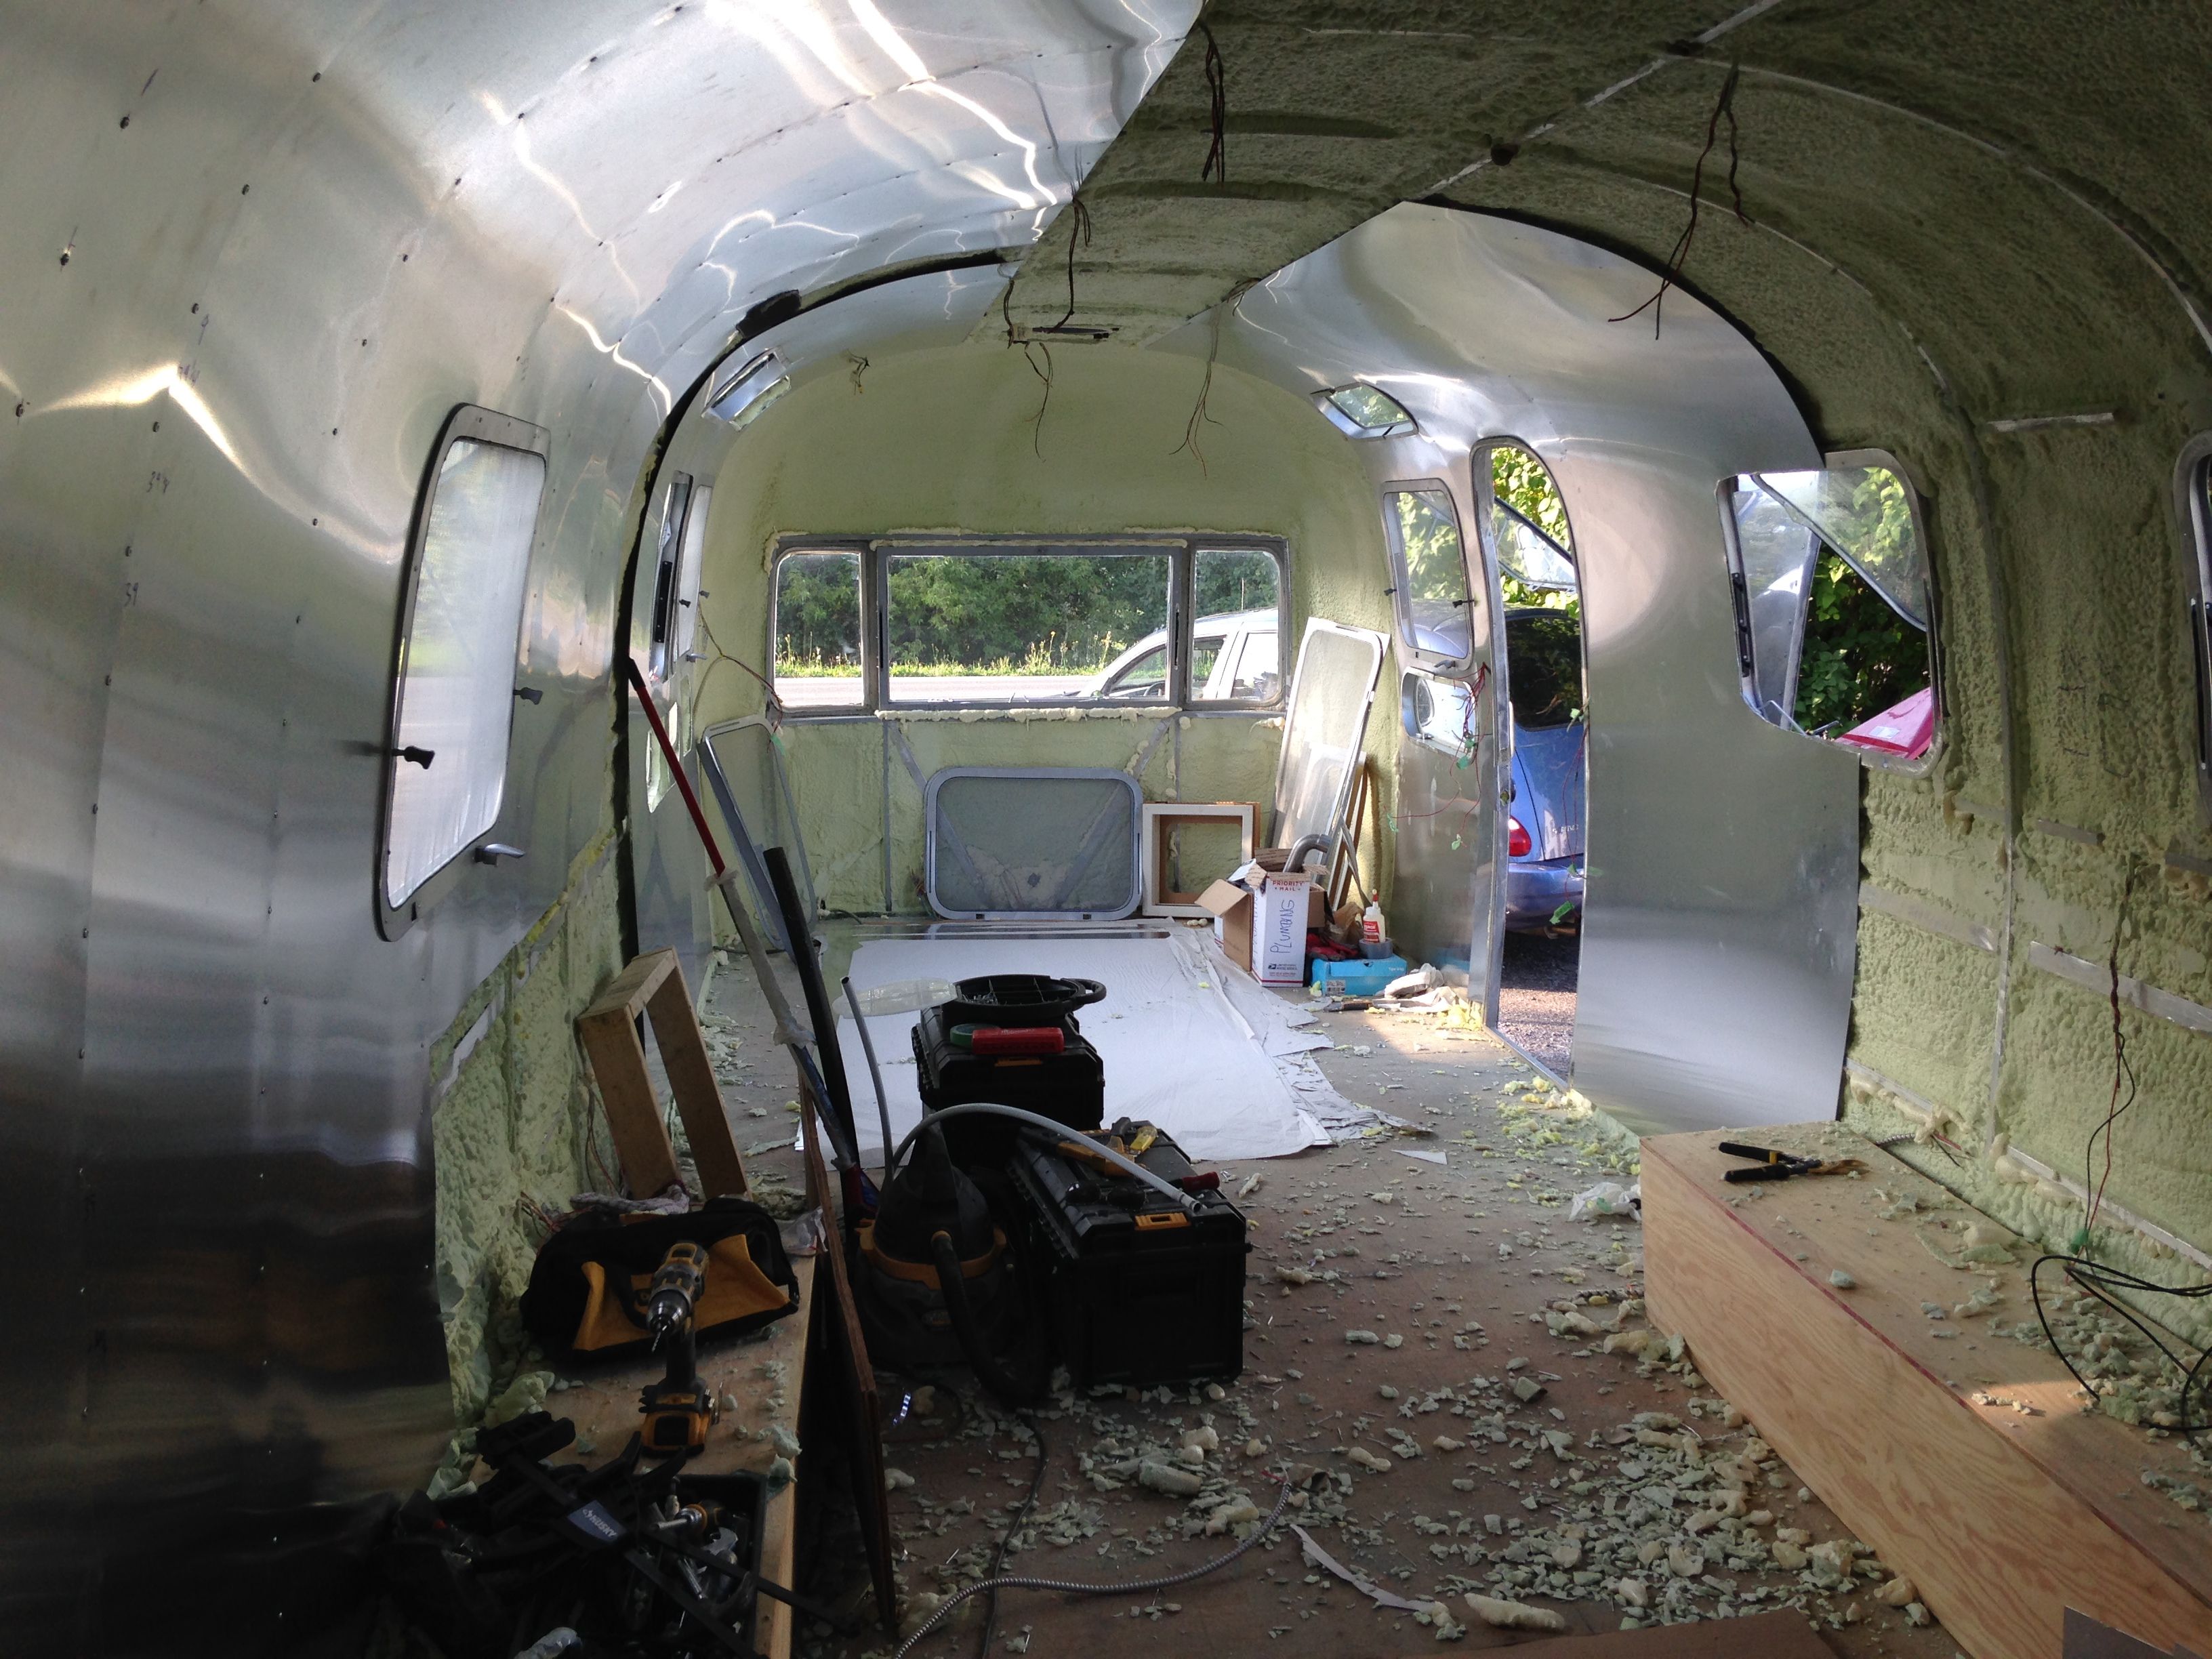 This is a useful tool for cutting hard to access areas. Its called a rotary tool and has dozens of uses, you can put different attachments on, use it as a cutting tool, grinder, polisher, engraver, etc… 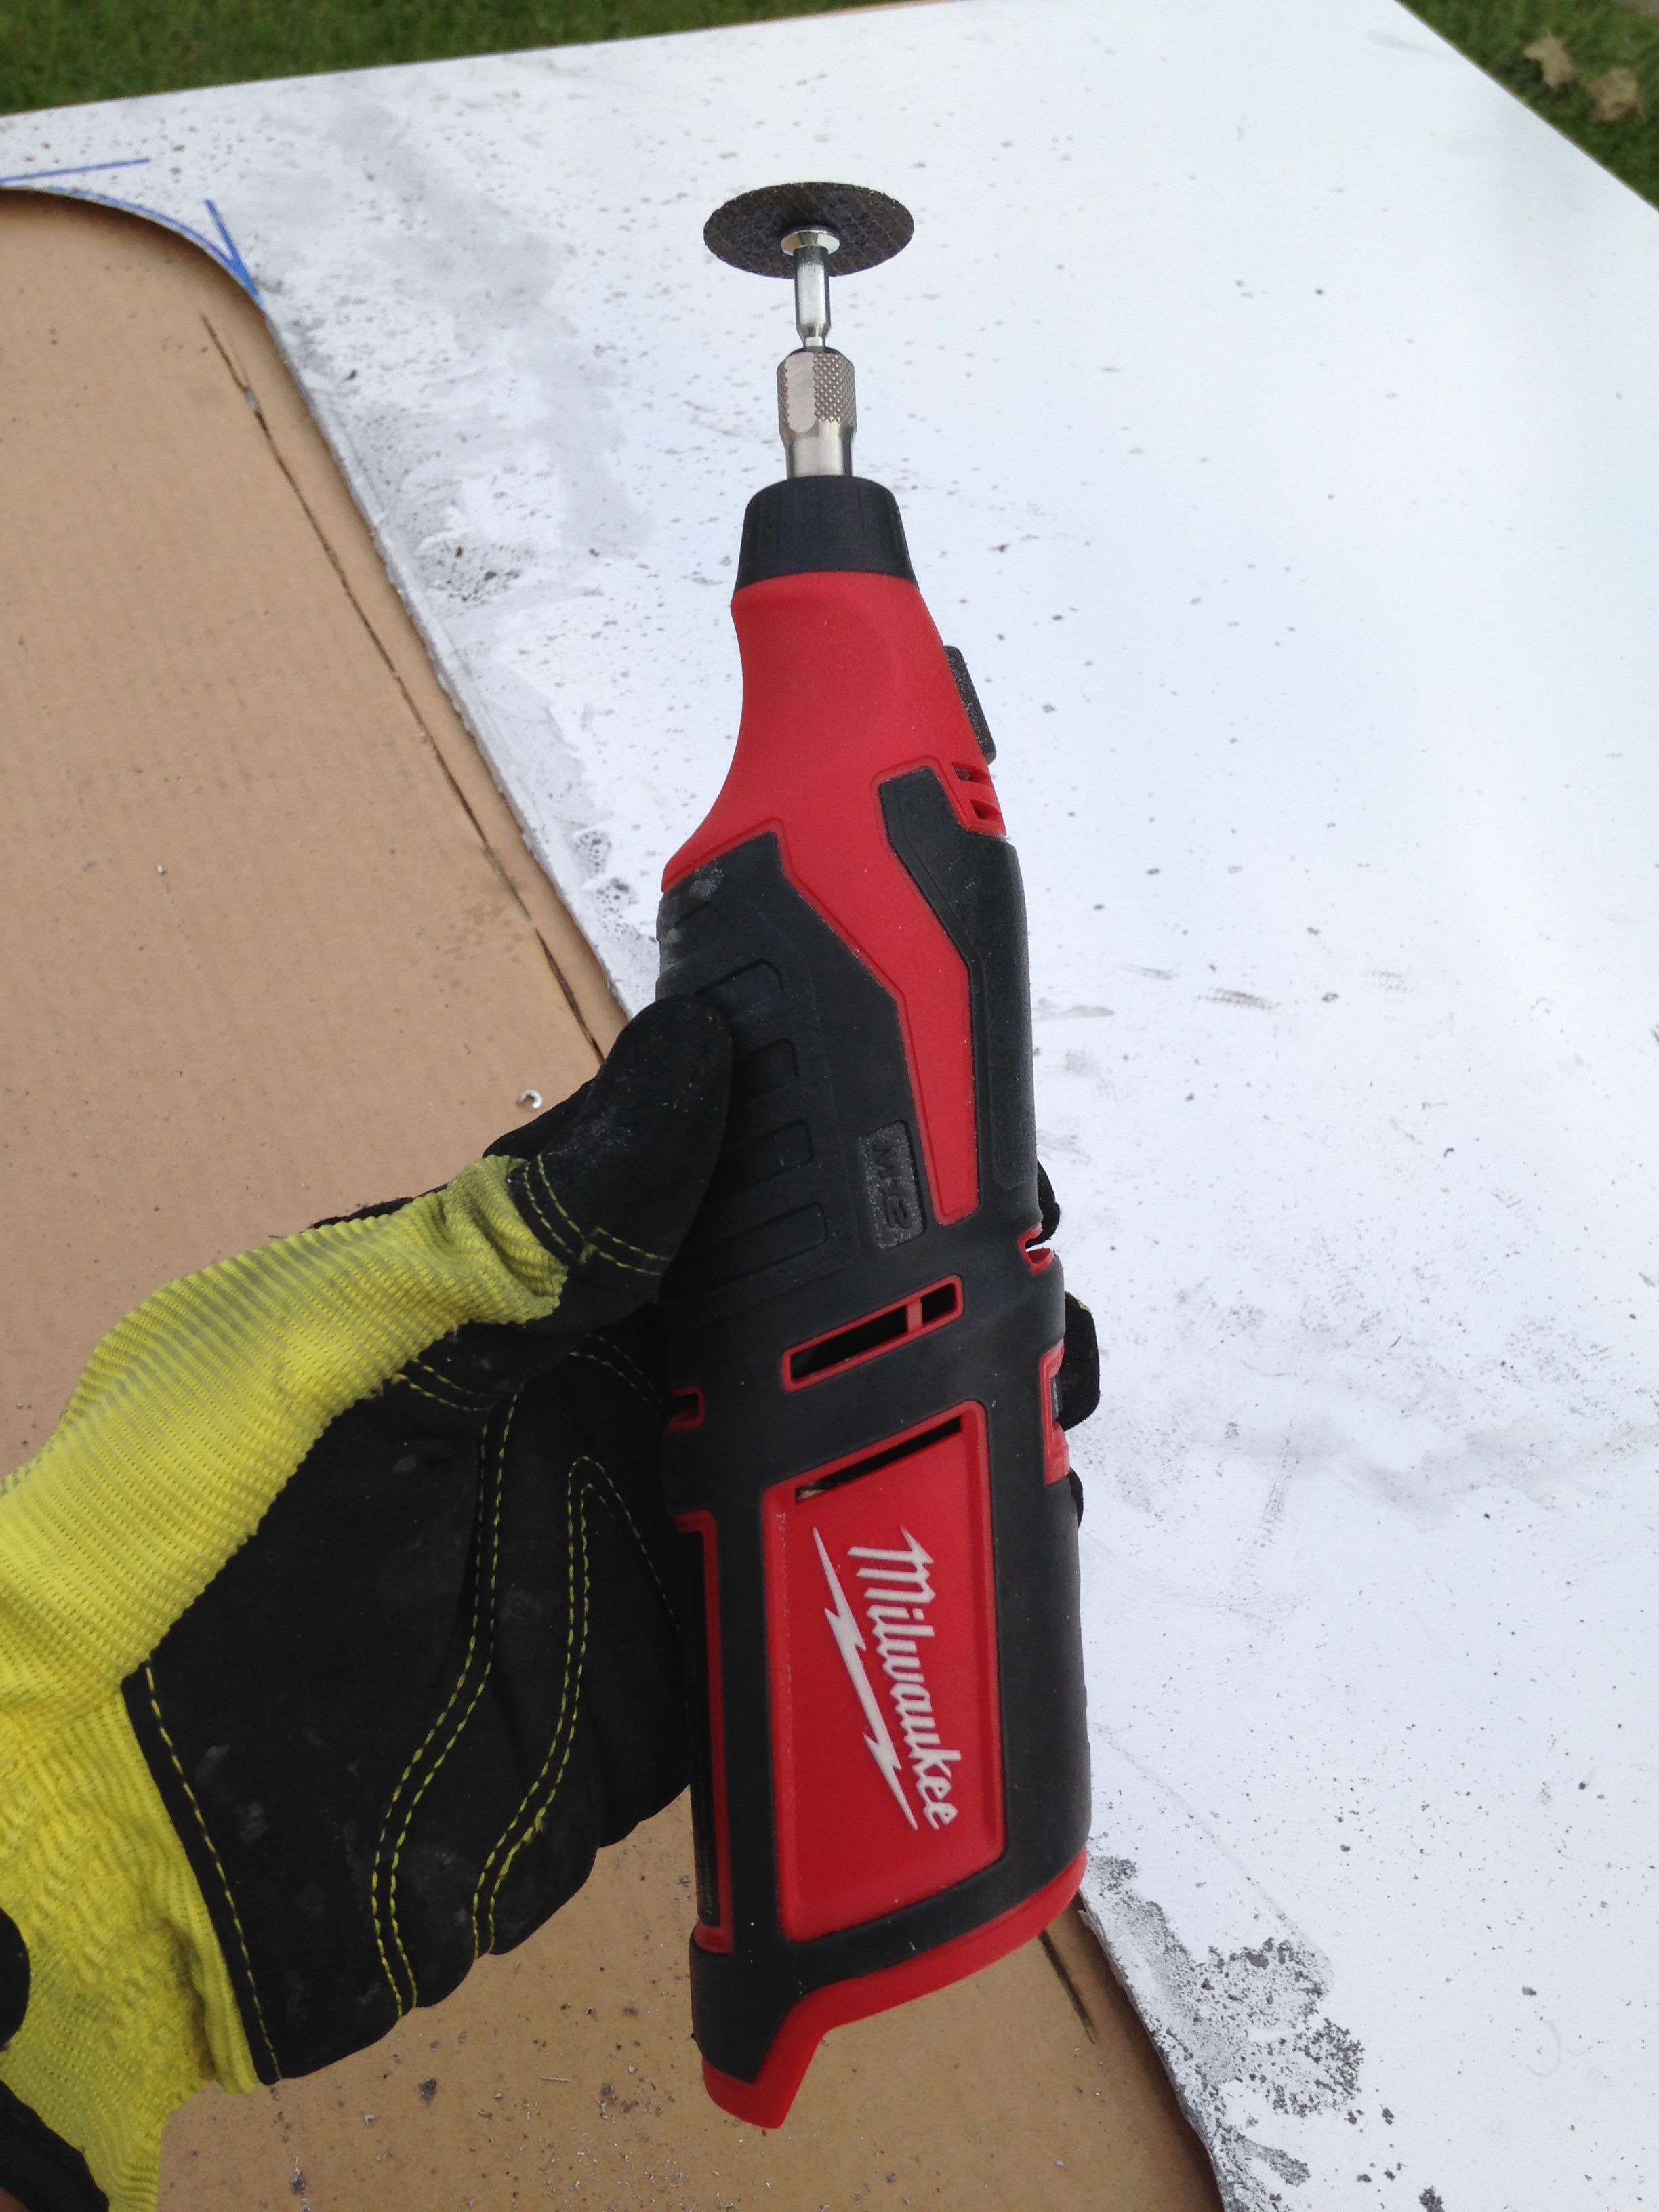 The curved front and back sections of the Airstream trailer was a job that I had been contemplating for several months. I anticipated that this would be very difficult, especially without templates, but it turns out that it was actually the easiest part of the interior so far. Here's my method: I first began by installing a large piece in the centre that is tapered at the bottom. It is 6 inches wider at the top, which leaves several inches on each side of the window frame below. You can go with whatever size you prefer as long as the aluminum will fit the contour, keeping in mind that the wall curves down as well as around. It does not matter if your cuts are perfect because each of the following sheets will slightly overlap the previous and you should keep the already cut sides exposed. Use full 4×8 sheets for the normal walls where the vista view windows are so that there is a perfect straight edge to overlap the ends of the cut pieces you will use for the curved end. You will need to hold those walls on with temporary rivets and put permanent ones in place as each curved wall sheet slides underneath. 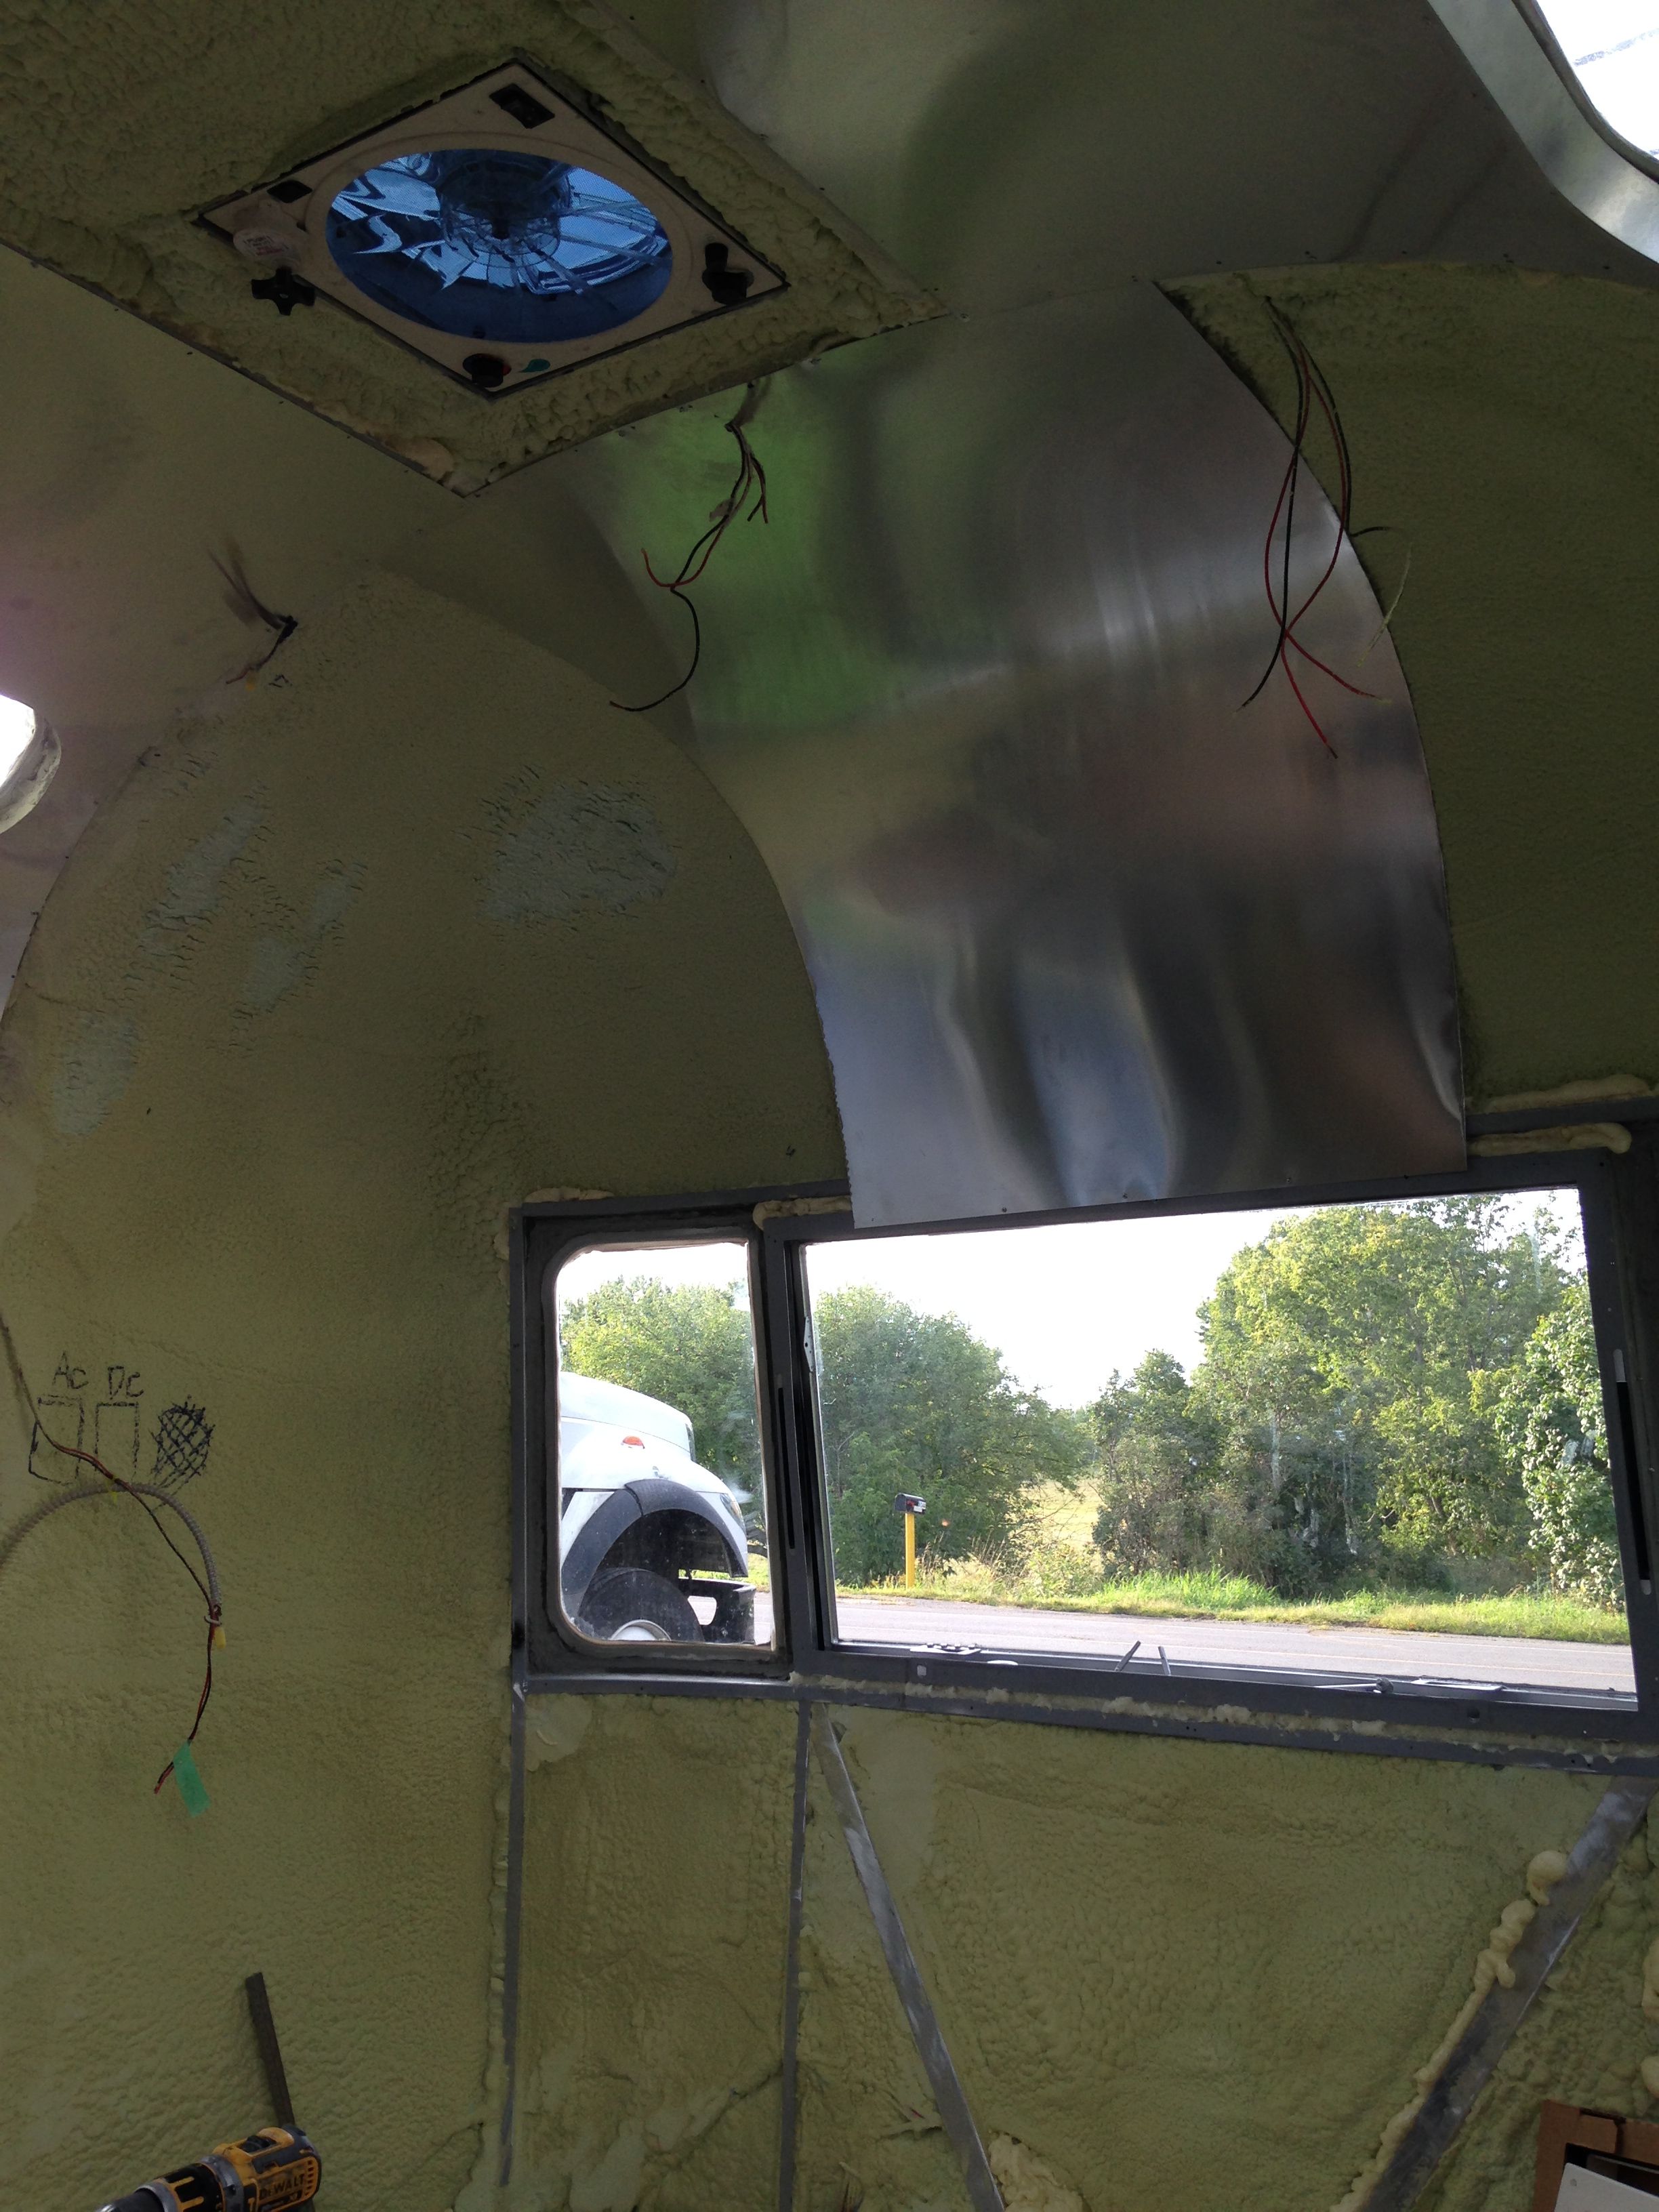 I wrote the details of the next part directly on the image as it is easier to understand that way. See below. 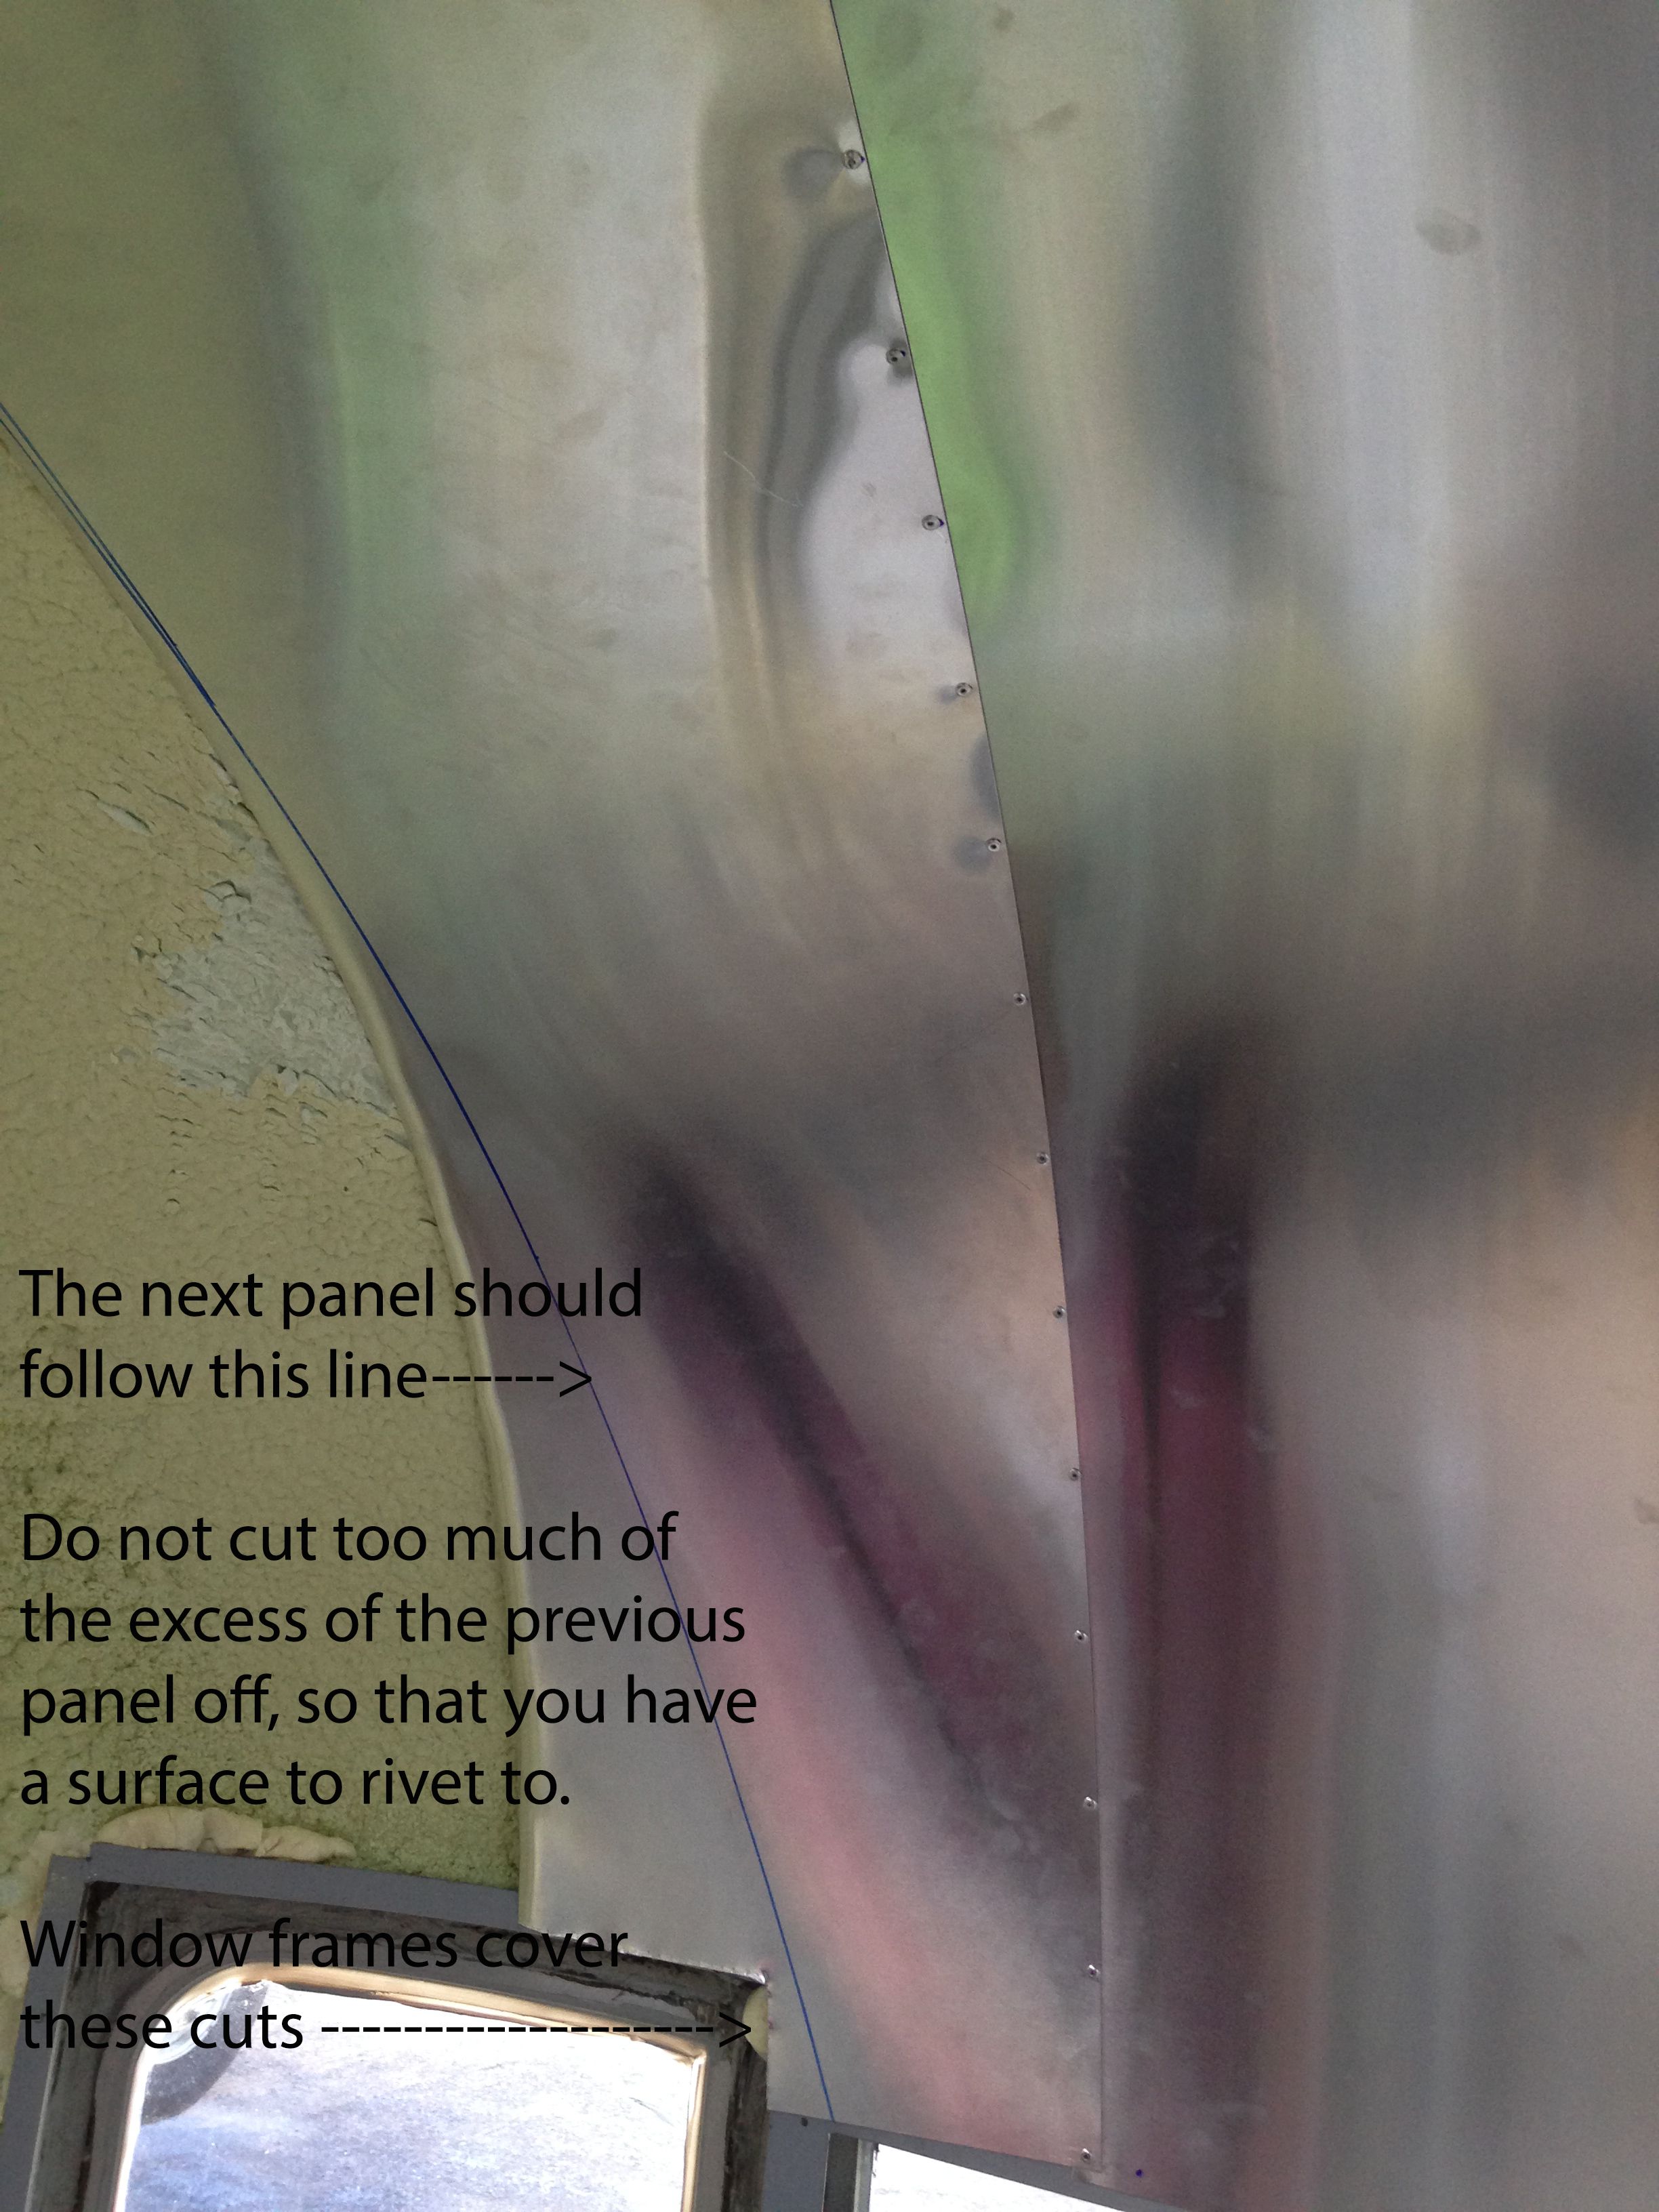 Follow a similar process for each subsequent sheet you put on. Use the temporary rivets in the regular wall sheets as a guide to let you know where your pieces should be placed. 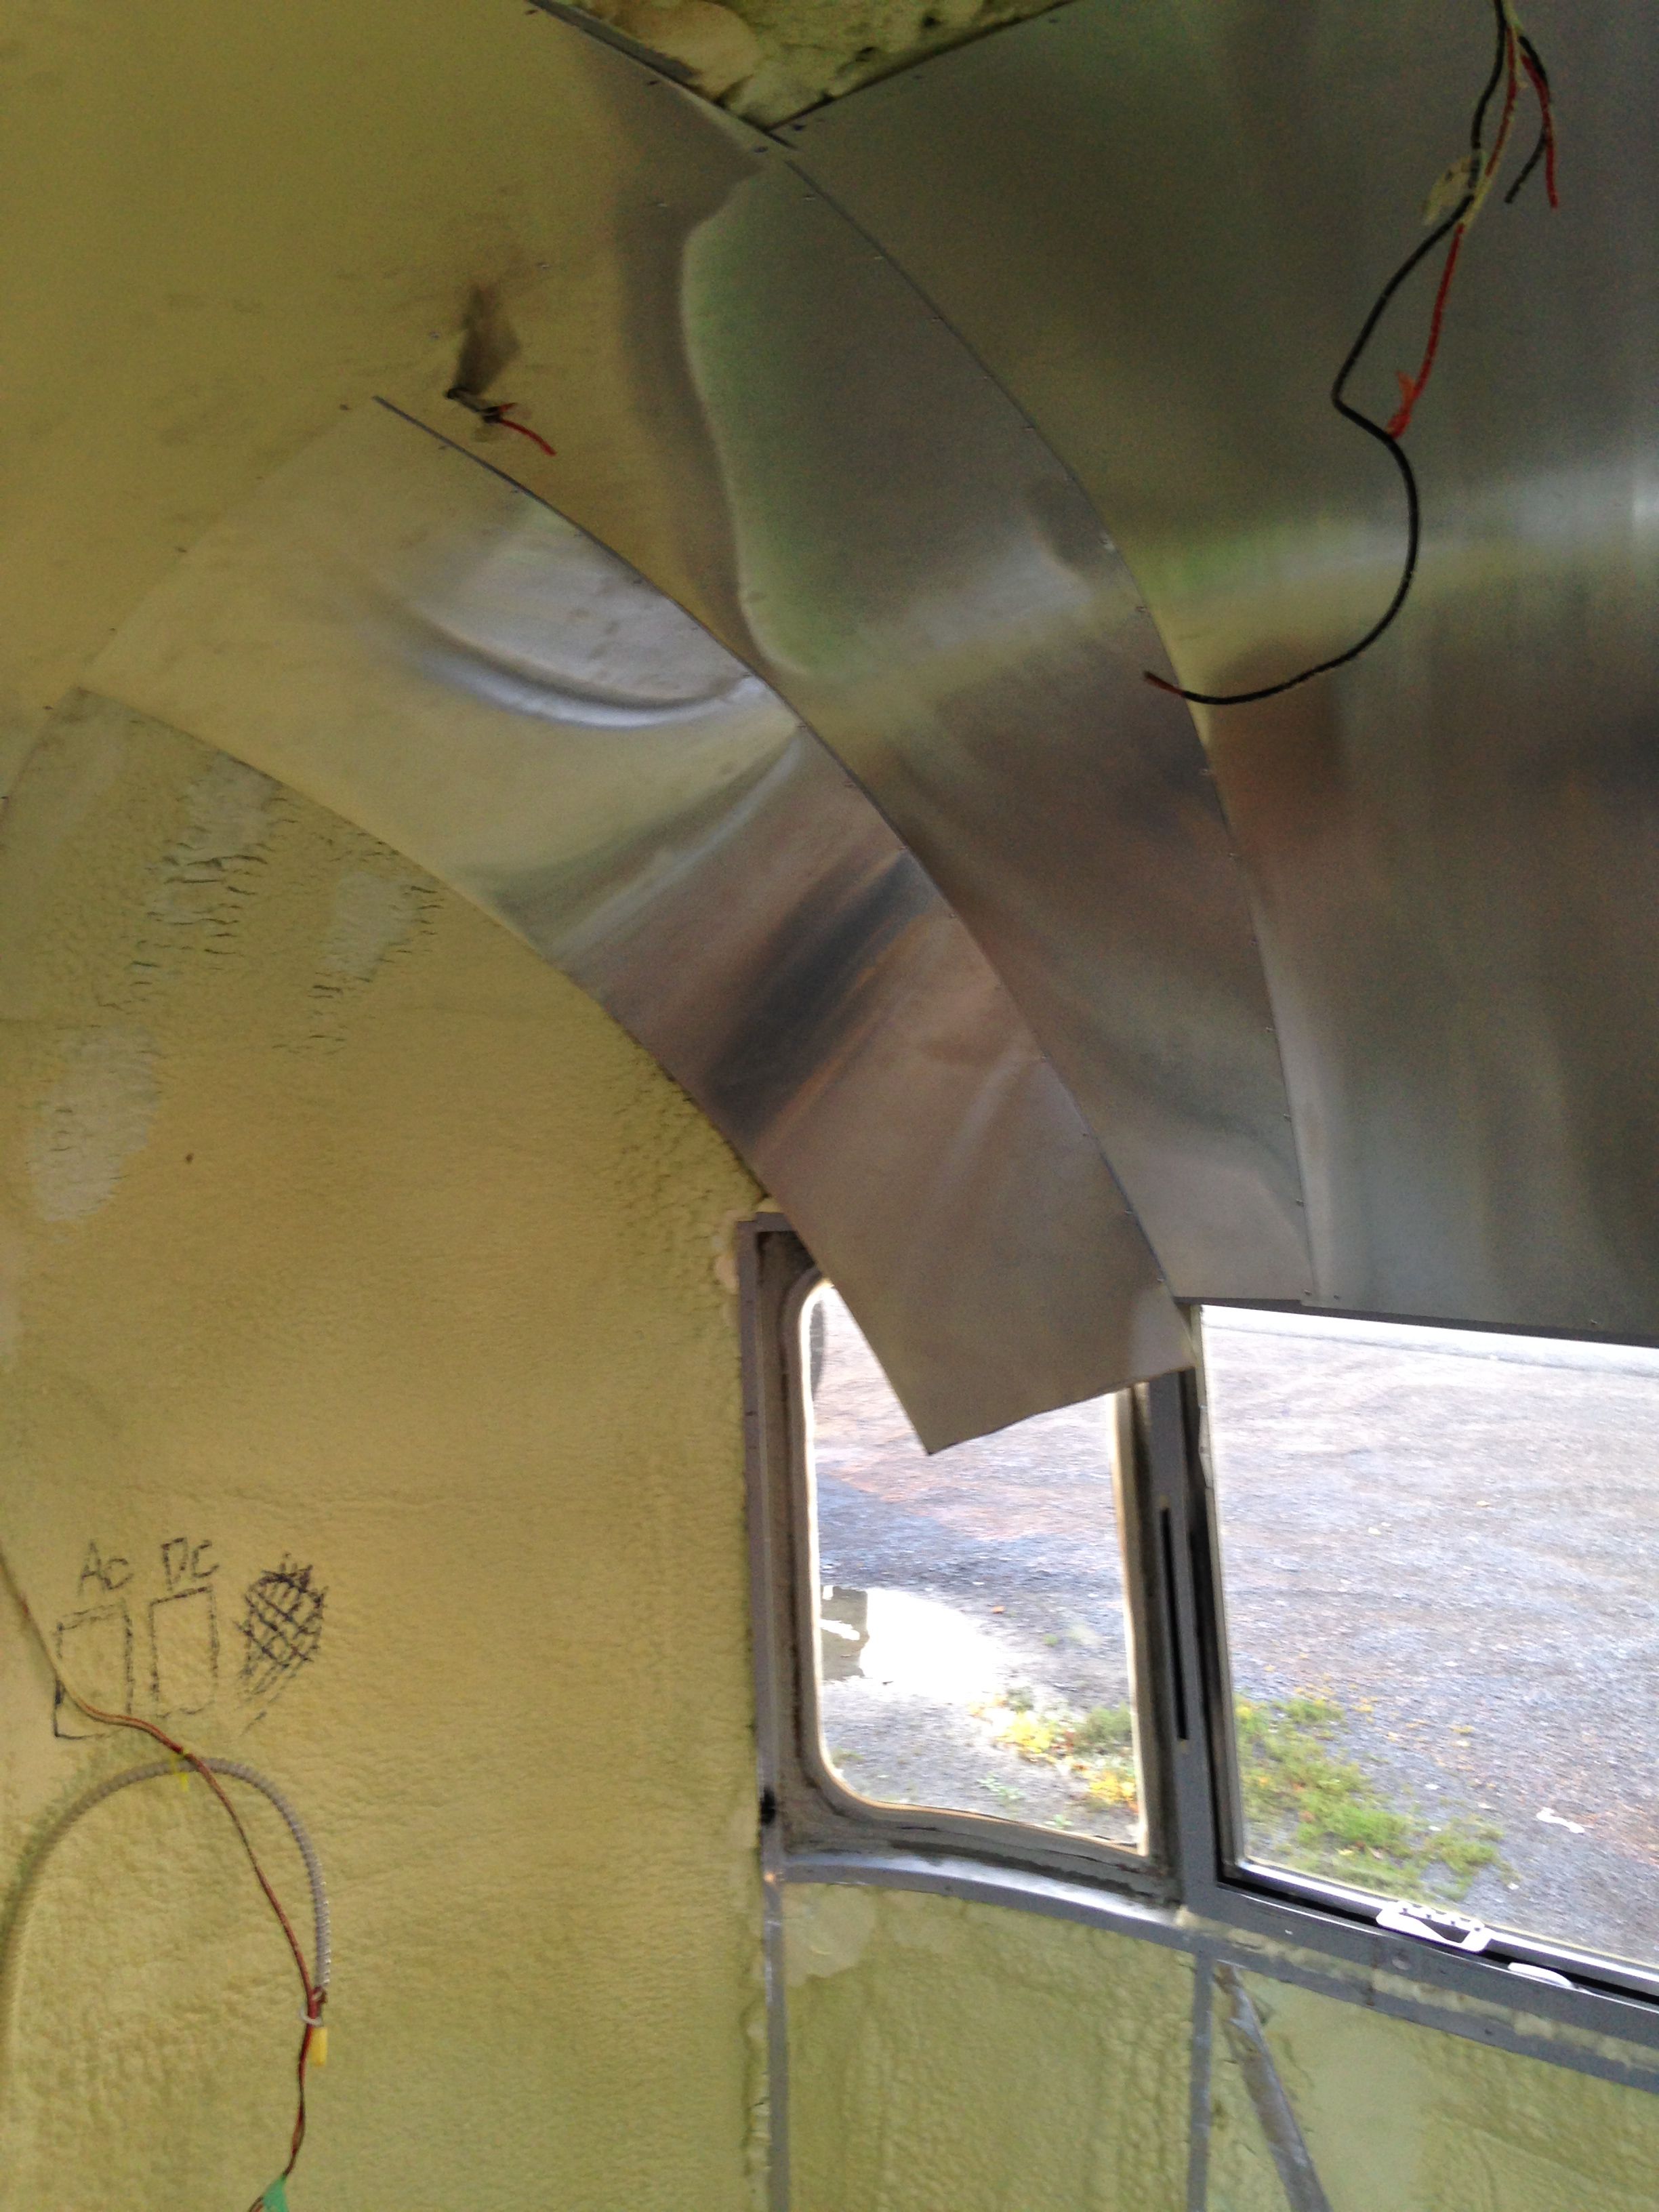 Repeat the process on the opposite side. Make sure measurements are exact before riveting! This entire area will be one of the most visible on the interior when finished and blemishes will be very noticeable. 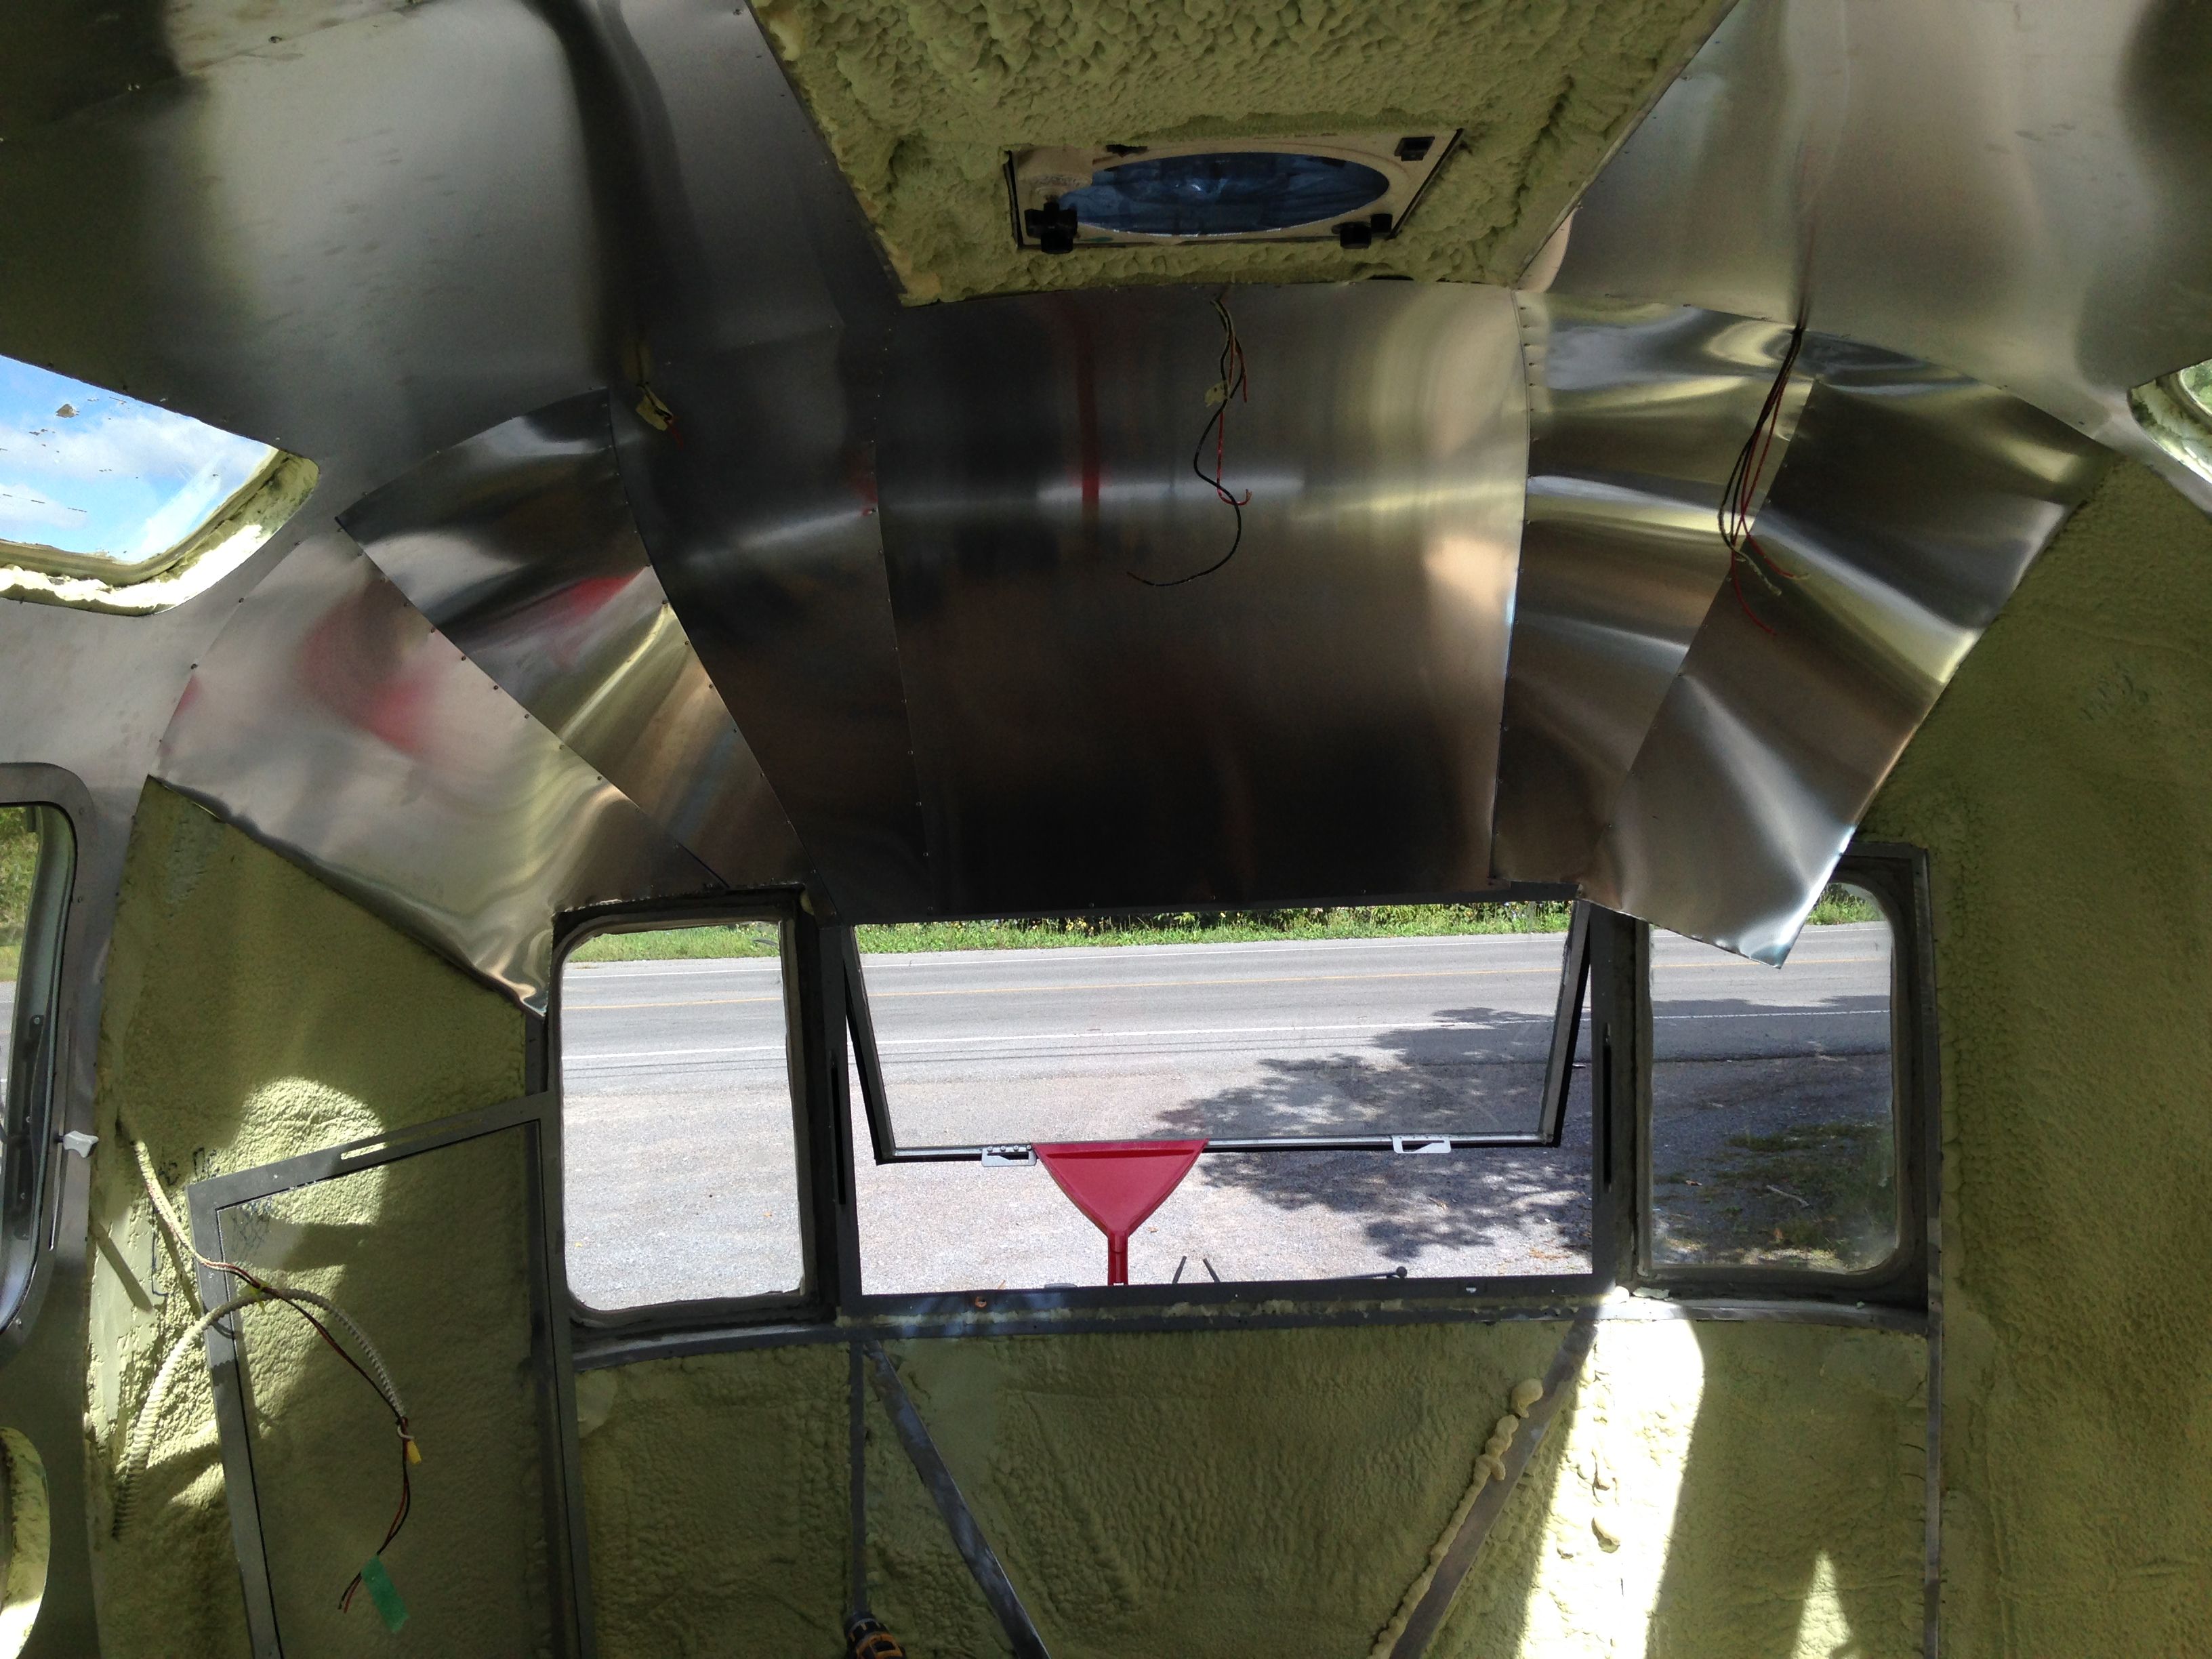 With each panel, the progress looks much better. 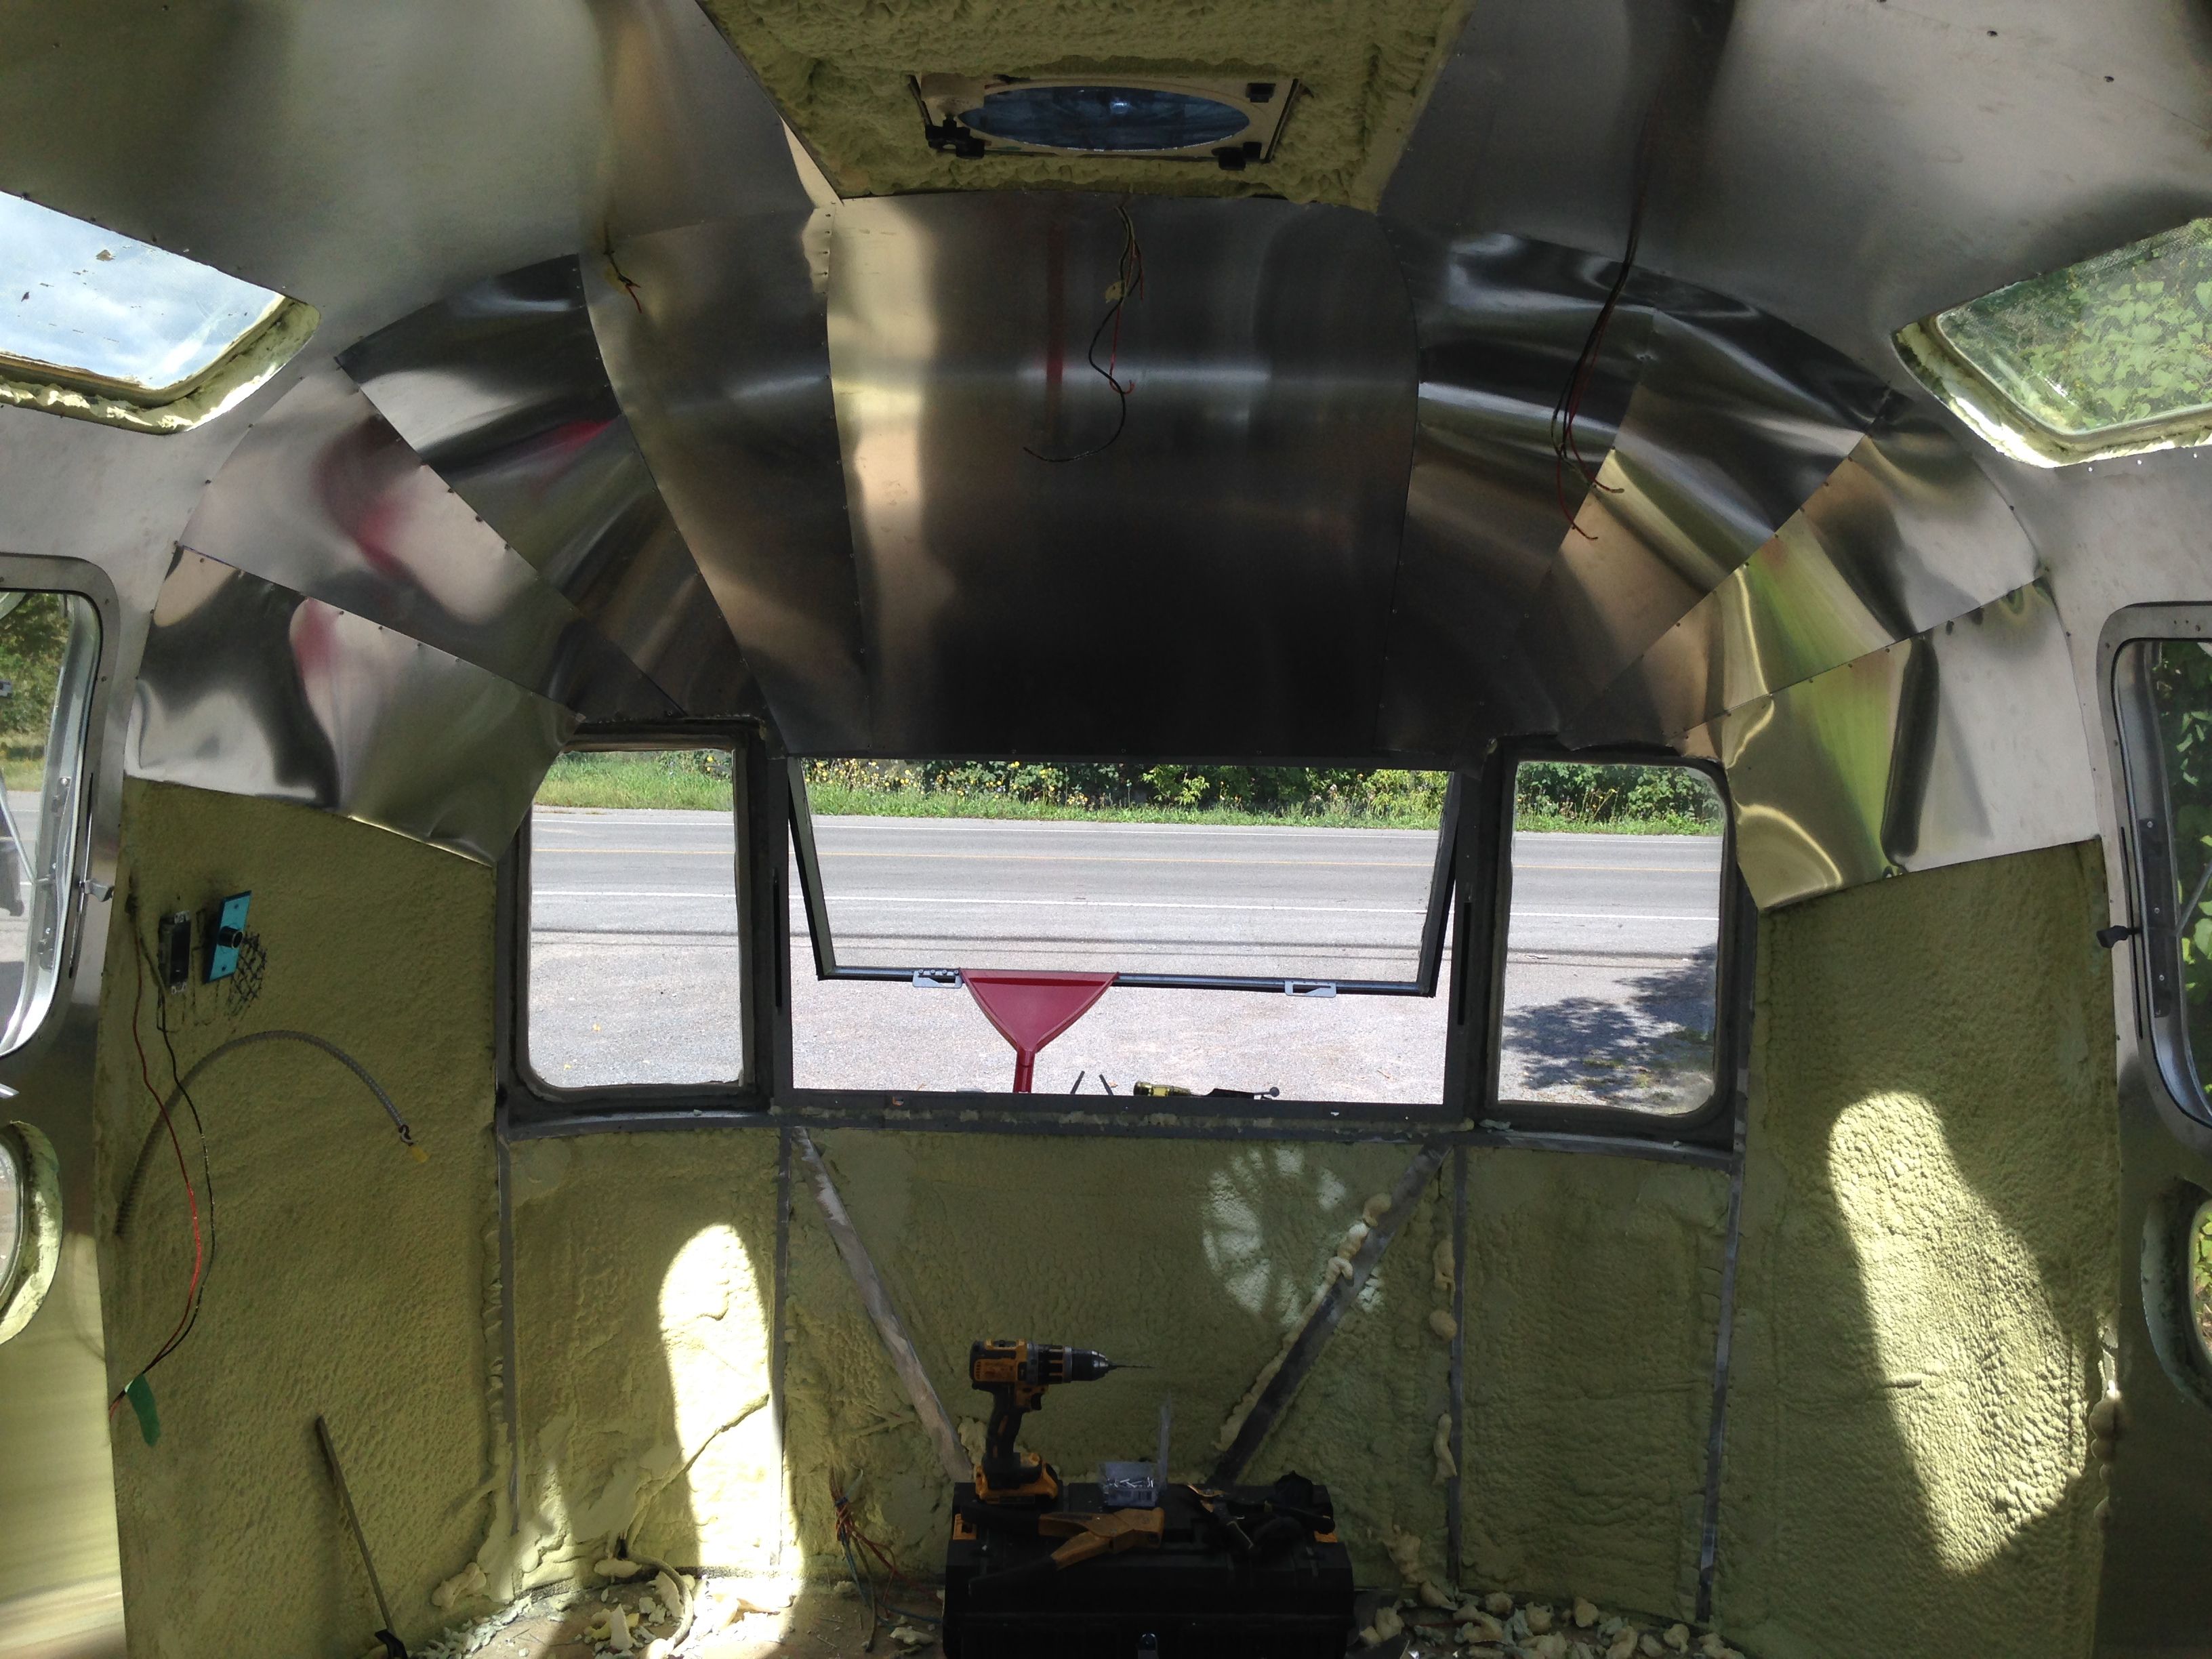 When you reach the end of one side, you will need a much larger sheet to reach the bottom of the curved front windows. If you are building a wrap around couch there, as I am, you do not need the aluminum to extend to the floor, but rather just a few inches below the windows. Make sure you cut any holes for electrical outlets, etc…before you rivet the sheet in place. 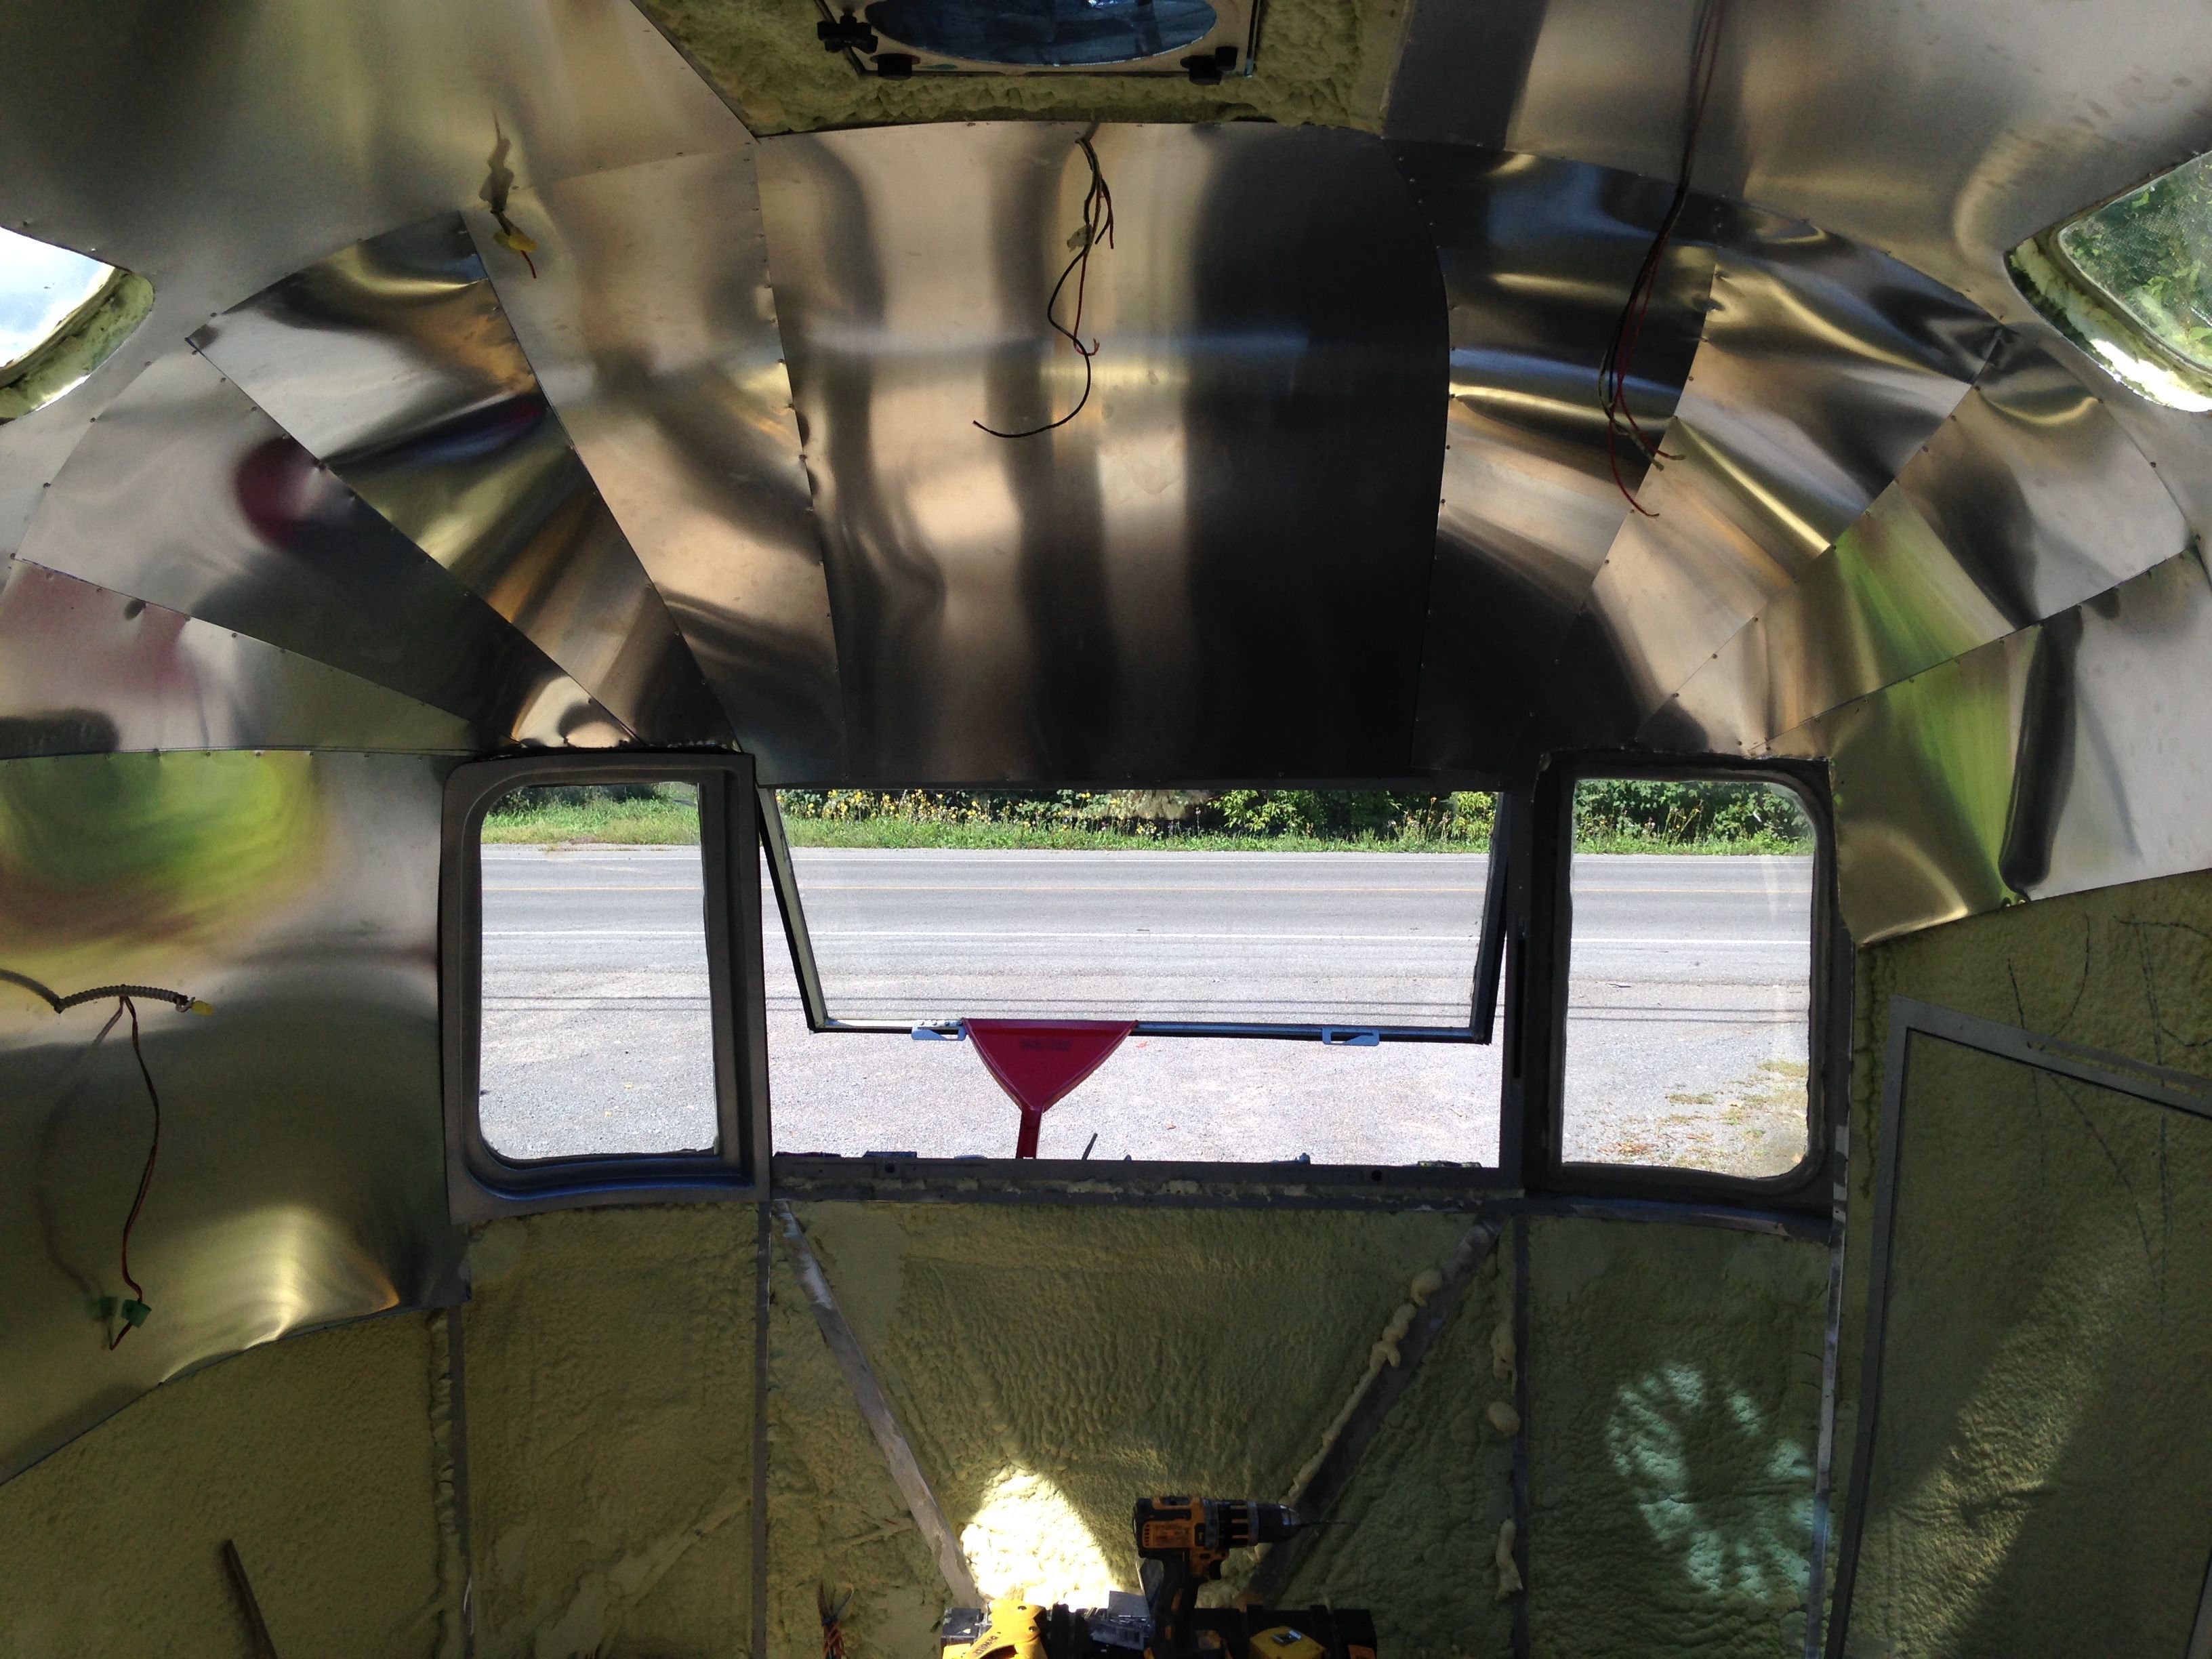 Use tin snips to cut any excess around the windows and then place your interior window frames and rivet over any jagged edges so that none are left visible. (In these photos I have not yet installed the window frames) 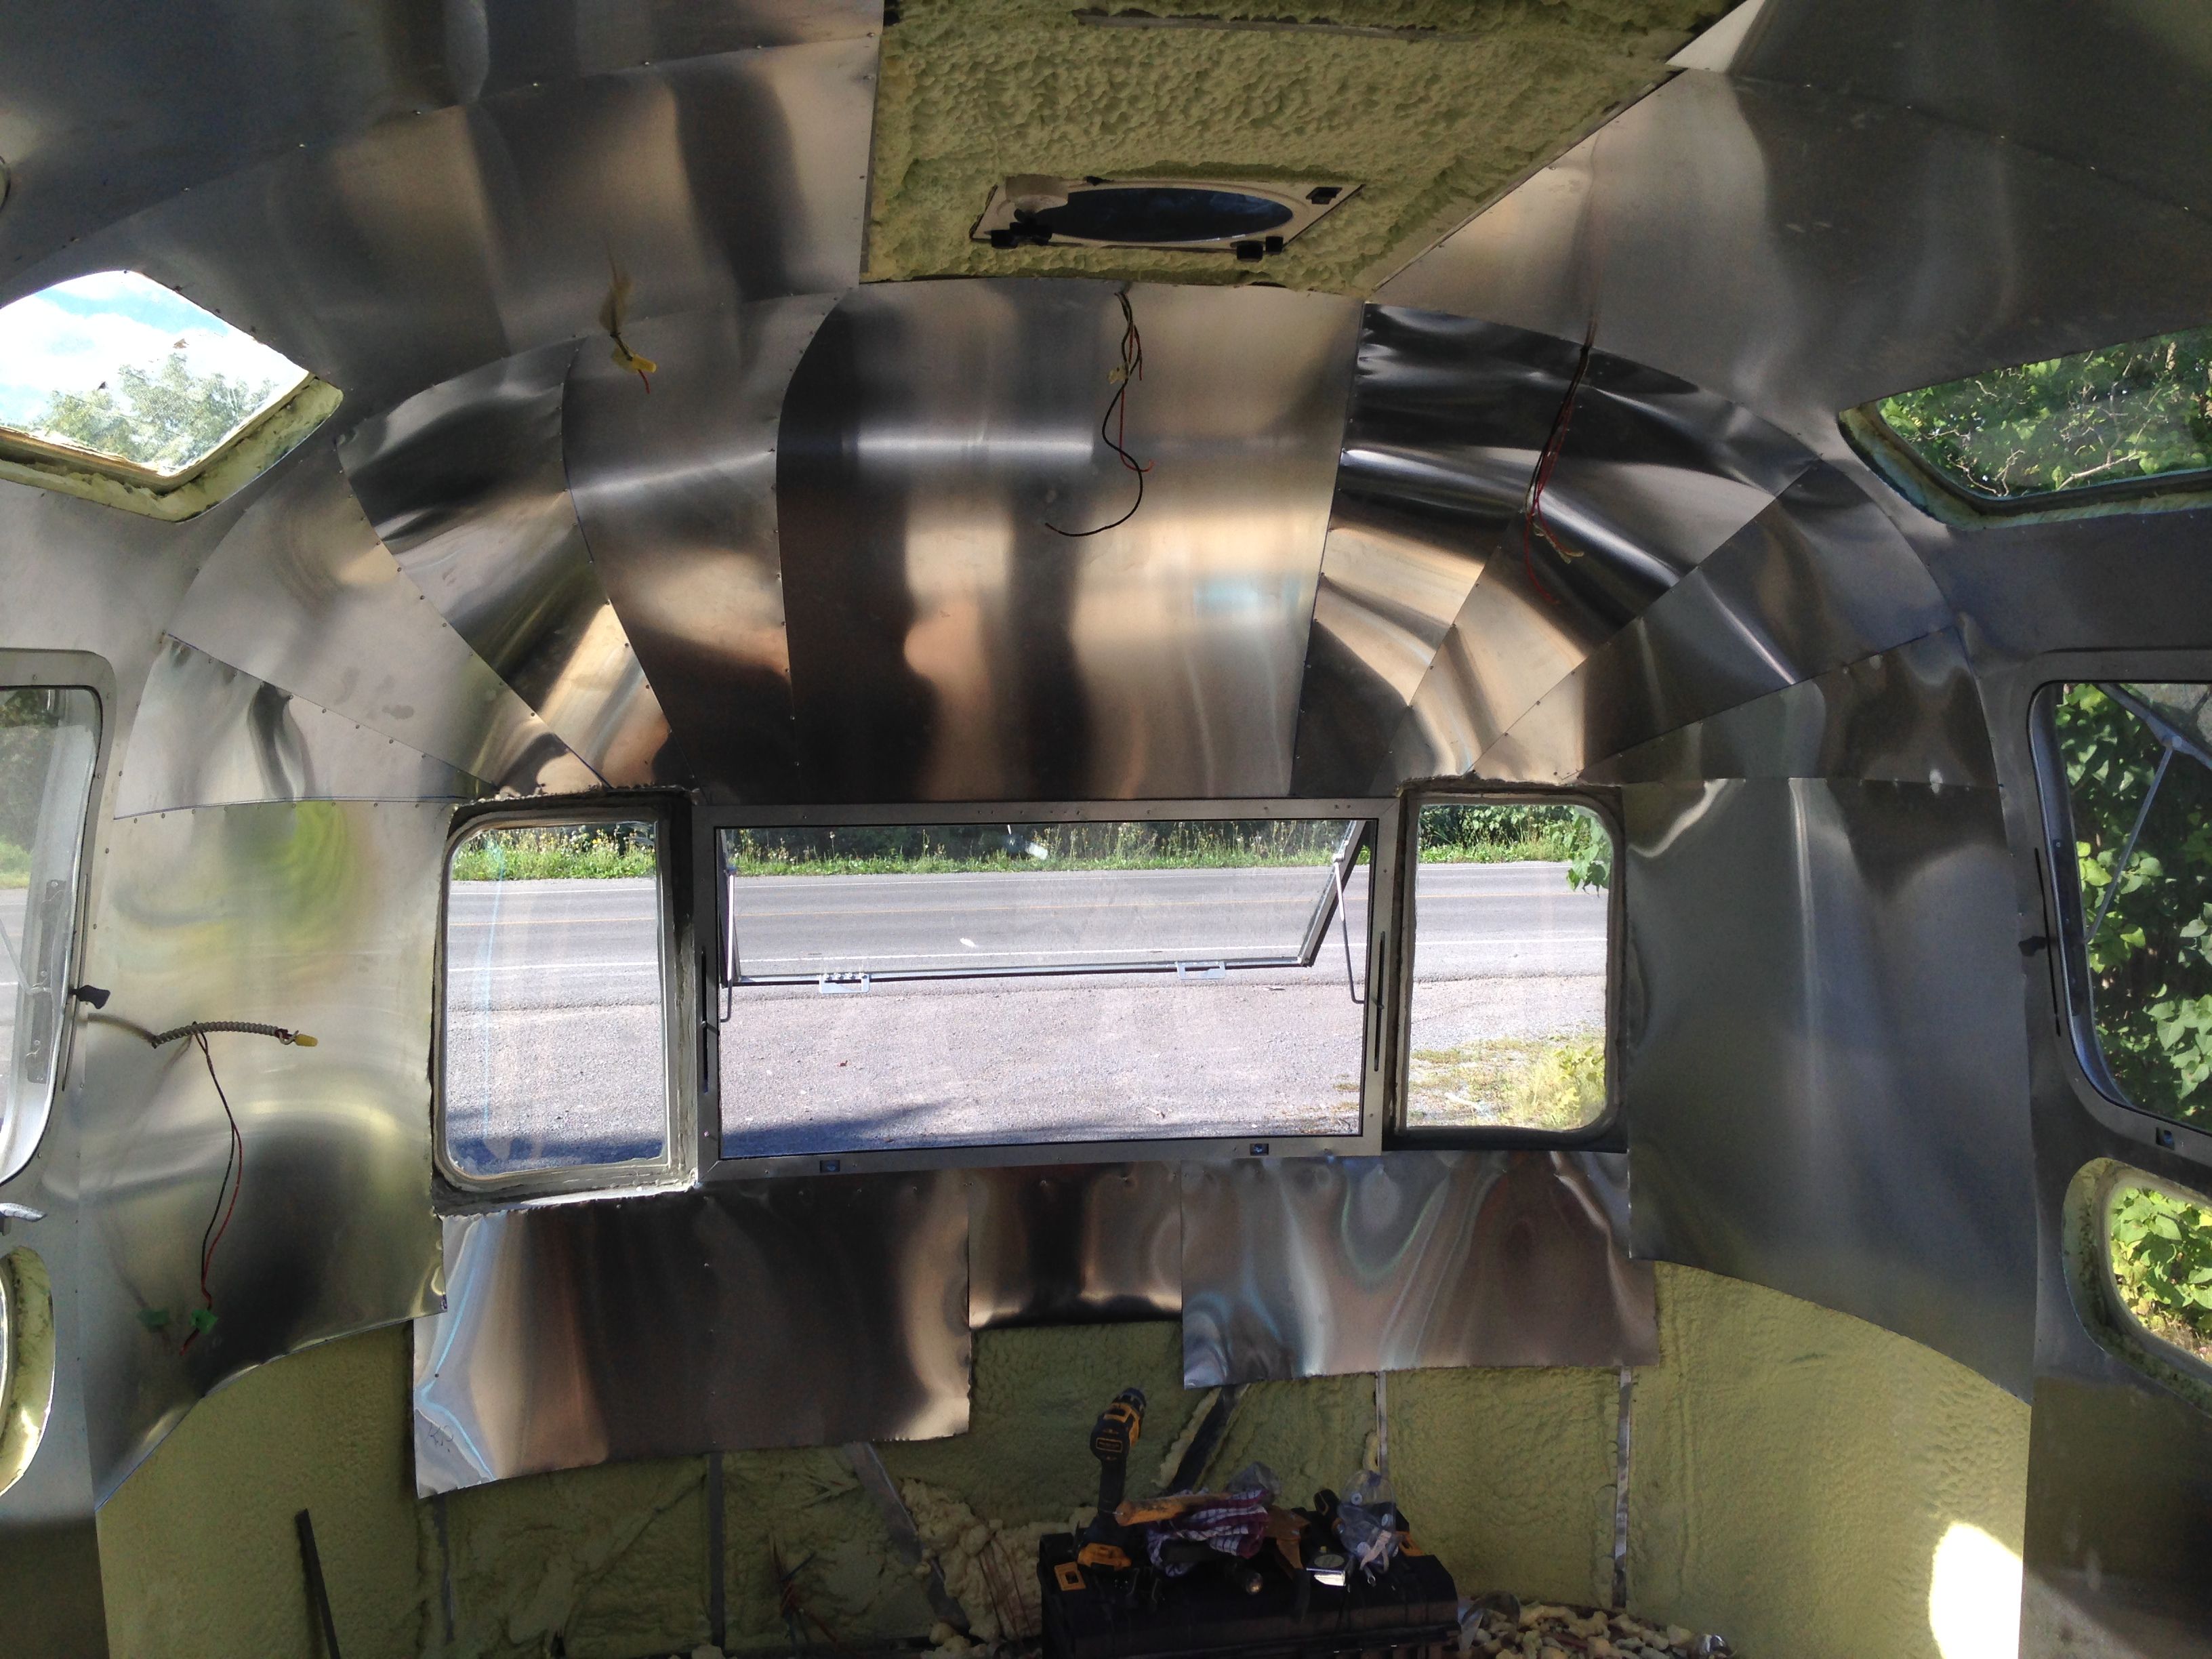 Here are a few closeups of the finished curves. Many fingerprints but no scratches!   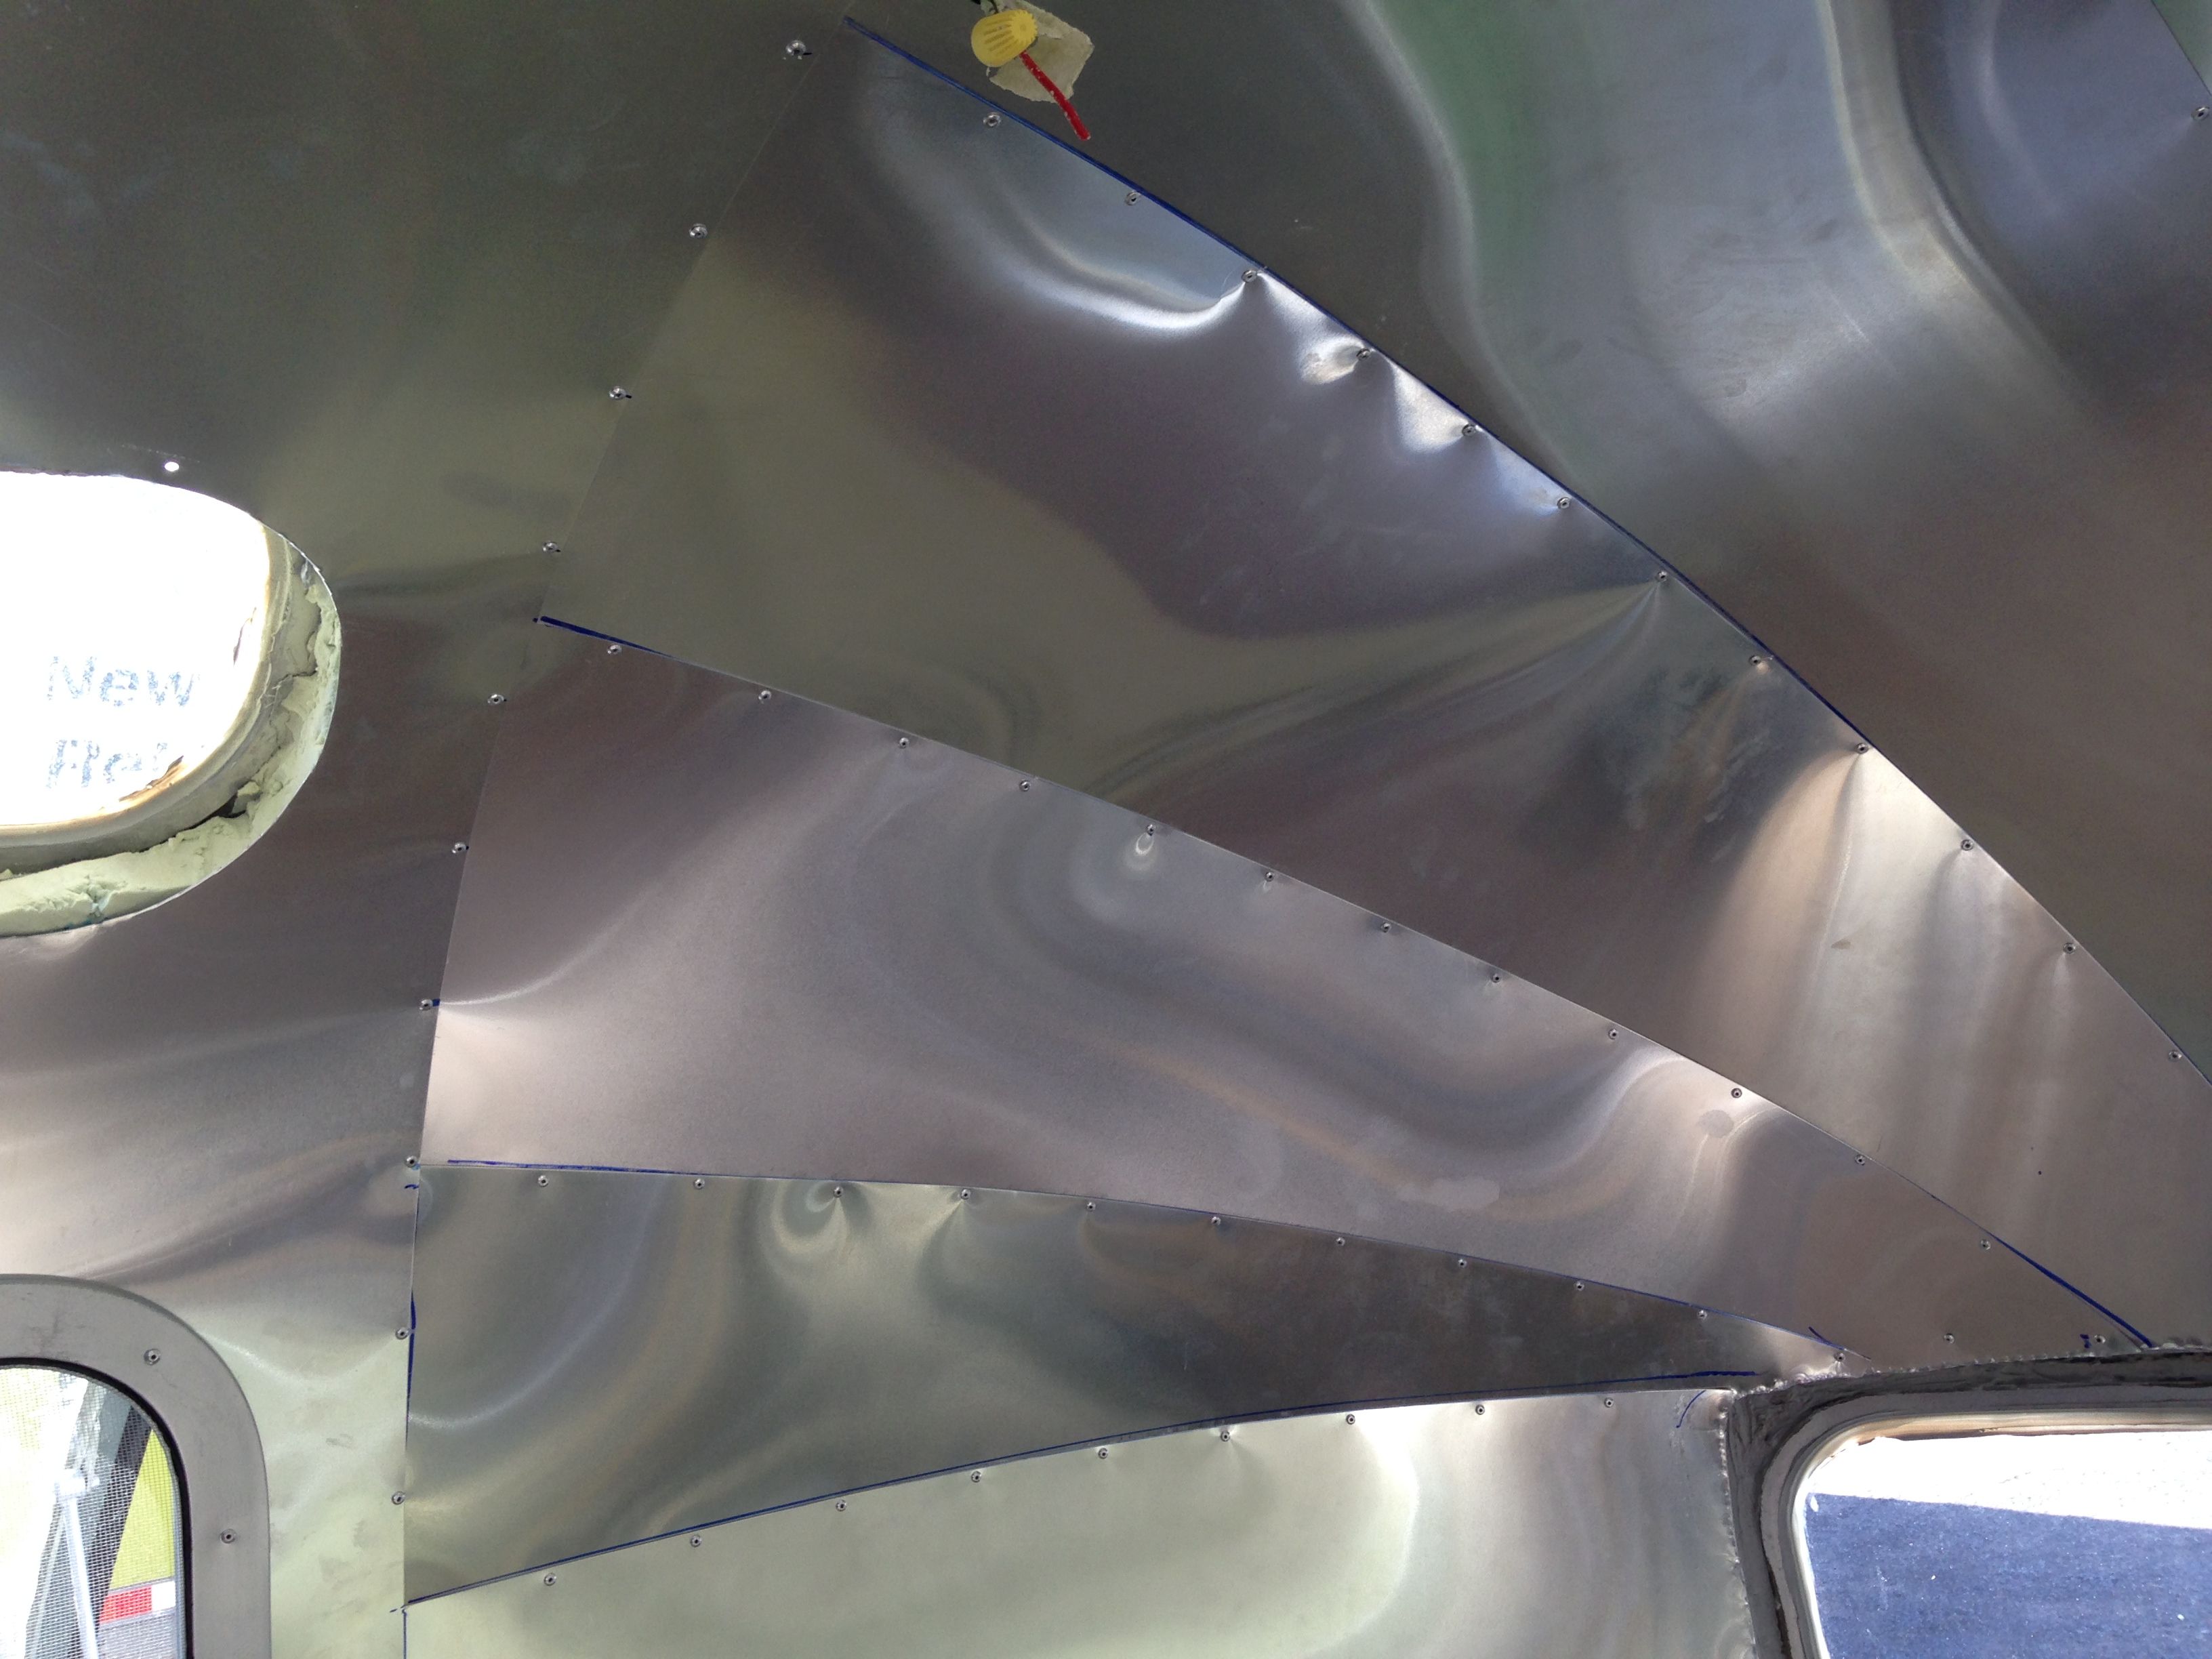 |
| json metadata | {"tags":["airstream","skins","panels","off-grid","living"],"image":["https://steemitimages.com/DQmeicskVKcN7UEbc2fUrpshFdvvAozA1DGNSnkfjvizniJ/2014-08-26_01.jpg","https://steemitimages.com/DQmYvdEWo88zVu7WHiPMdtokmZ3kuFMaieZqAd5sZunXuzt/2014-08-26_03.jpg","https://steemitimages.com/DQmfMksXJ2LxvPqUDPTueDHFTv8ghvBC4Ux9caQmjG1wVKK/2014-08-26_02.jpg","https://steemitimages.com/DQmVbmBBSyw3XzqUvCBRRwqsnqomiDnQbHZo1e7dGTH9ebw/2014-08-27_01.jpg","https://steemitimages.com/DQmbYd9Y86NAx8BtFJHZzPsx72R7HBFuNwZQomjanEurNS9/2014-08-31_01.jpg","https://steemitimages.com/DQmf8BAJZVH9hwnTEAfCina2TyuSMCYktjtrLeYH54UmPbs/2014-08-31_02.jpg","https://steemitimages.com/DQmUsewHWh78qw2L1G5Kwzr4jPDC6qL2xsCDRiZJV9jrBCP/2014-09-01.jpg","https://steemitimages.com/DQmdNWSJd17J1Ud5wYzeRsk9wDYB98u2r89fQh2QAVZdgNu/2014-08-26_04.jpg","https://steemitimages.com/DQmSKaxKETwUB4HiBScDbKm3Ss9KEwPZkhKGZiRhVQkVMn6/2014-09-06_01.jpg","https://steemitimages.com/DQmdaJyzfXMRpVFSm7UJVBvmYAjcf6Lcy6GomBfM5qnKvfL/2014-09-06_02.jpg","https://steemitimages.com/DQmSm1xiCGEdnHoAdqJJ1TwqNYmLXCYDn4yaTkcV5J3syEr/2014-09-06_03.jpg","https://steemitimages.com/DQmYtDxMjzkPx9i8Wk3mSGskG9NM8Jog83KE23g7KXYypB4/2014-09-07_01.jpg","https://steemitimages.com/DQmSukMPHkKSqc6TH4bUYRpZTvkqTRs2b9cxkZJYuBfAD1H/2014-09-07_02.jpg","https://steemitimages.com/DQmRBDp9xVcLV2rtEzAScwkNXVbUm5soUszNe5iRd5h4Vp1/2014-09-07_03.jpg","https://steemitimages.com/DQmQELRtJ8HiMGjCaebp2T9zgqRJJQueptqvNoMm5mBUSS4/2014-09-07_07.jpg","https://steemitimages.com/DQmfJYr231LL2jpHJ7dcB6wdYX8SMA1JScqEAAxmAxmrVBH/2014-09-07-_06.jpg","https://steemitimages.com/DQmNvso5bJCEAV98nEPbC14w76mDN1EfTXMFHnRz6tq6bXm/2014-09-07_04.jpg","https://steemitimages.com/DQmQxRzGw9qkDX5CFQMjp8N6xnytkU799UFyirQJmGM5WML/2014-09-07_05.jpg"],"app":"steemit/0.1","format":"markdown"} |
| Transaction Info | Block #13932450/Trx 7d4ae64e39caca6f6050d999eb22f406c2700b1c |
View Raw JSON Data
{
"trx_id": "7d4ae64e39caca6f6050d999eb22f406c2700b1c",
"block": 13932450,
"trx_in_block": 7,
"op_in_trx": 0,
"virtual_op": 0,
"timestamp": "2017-07-23T10:36:39",
"op": [
"comment",
{
"parent_author": "",
"parent_permlink": "airstream",
"author": "mistahlee",
"permlink": "vintage-airstream-travel-trailer-renovation-post-7-interior-aluminum-skins",
"title": "Vintage Airstream Travel Trailer Renovation: Post 7 - Interior Aluminum Skins",
"body": "Putting on the interior walls has been challenging, particularly because I do not have the original walls to use as templates. Everything has to be measured precisely, cut and riveted securely. In this post I’ll explain the simplest method I’ve found.\n\nFor the size of my Airstream, I needed 18 sheets of 4 x 8 .032 aluminum. Buying in that quantity should provide you with a much better per sheet price than individual sheets. I was able to get all my aluminum for under $1,000.00 CDN with delivery.\n\nYou will need:\n\n– a grinder\n\n– several metal cut off disks\n\n– WD-40\n\n– Tin Snips\n\n– All the usual airstream tools – riveter, drill, rivets, measuring tape, etc…\n\nBelow: First panel installed.\n\n\n\nOnce you have made your measurements, place the full sheet of aluminum on something flat, clamp it down, and drawn the lines you intend to cut on the side that will not be exposed. Spray the lines with WD-40, but only do one window at a time as the spray will distort your lines. The WD-40 helps the cut off wheel slide along and prolongs its life.\n\nI would advise using the grinder to cut straight lines only. The curved edges of each window should be done by hand with the tin snips. The cut does not have to be perfect since your frames will cover the edges.\n\n\n\nThe metal fragments from the grinder can slide under and easily scratch your aluminum so be sure to brush them away often.\n\n\n\nInstalling the sheets inside the Airstream is really a two person job. Have one person hold the sheet in place, while the second drills and rivets. Apply quite a bit of pressure to the aluminum so that it follows the curve and does not create spaces between your next sheet of aluminum. Measure accurately, from one support gusset to the next as that is where the rivets should go.\n\nHere is the first wall panel on inside. As you can see, the top vista window frame is the incorrect size, fortunately you can still order them from Silver Trailer Supply.\n\n\n\nDon’t forget to make holes for all your electrical.\n\n\n\nAlthough aluminum is lightweight, any extra weight that can be excluded is beneficial. I have decided not to run the aluminum sheets from ceiling to floor where there will be cabinets that will cover the wall anyway.\n\n\n\n\n\nThis is a useful tool for cutting hard to access areas. Its called a rotary tool and has dozens of uses, you can put different attachments on, use it as a cutting tool, grinder, polisher, engraver, etc…\n\n\n\nThe curved front and back sections of the Airstream trailer was a job that I had been contemplating for several months. I anticipated that this would be very difficult, especially without templates, but it turns out that it was actually the easiest part of the interior so far. Here's my method:\n\nI first began by installing a large piece in the centre that is tapered at the bottom. It is 6 inches wider at the top, which leaves several inches on each side of the window frame below. You can go with whatever size you prefer as long as the aluminum will fit the contour, keeping in mind that the wall curves down as well as around. It does not matter if your cuts are perfect because each of the following sheets will slightly overlap the previous and you should keep the already cut sides exposed.\n\nUse full 4×8 sheets for the normal walls where the vista view windows are so that there is a perfect straight edge to overlap the ends of the cut pieces you will use for the curved end. You will need to hold those walls on with temporary rivets and put permanent ones in place as each curved wall sheet slides underneath.\n\n\n\nI wrote the details of the next part directly on the image as it is easier to understand that way. See below.\n\n\n\nFollow a similar process for each subsequent sheet you put on. Use the temporary rivets in the regular wall sheets as a guide to let you know where your pieces should be placed.\n\n\n\nRepeat the process on the opposite side. Make sure measurements are exact before riveting! This entire area will be one of the most visible on the interior when finished and blemishes will be very noticeable.\n\n\n\nWith each panel, the progress looks much better.\n\n\n\nWhen you reach the end of one side, you will need a much larger sheet to reach the bottom of the curved front windows. If you are building a wrap around couch there, as I am, you do not need the aluminum to extend to the floor, but rather just a few inches below the windows.\n\nMake sure you cut any holes for electrical outlets, etc…before you rivet the sheet in place.\n\n\n\nUse tin snips to cut any excess around the windows and then place your interior window frames and rivet over any jagged edges so that none are left visible. (In these photos I have not yet installed the window frames)\n\n\n\nHere are a few closeups of the finished curves. Many fingerprints but no scratches!\n\n\n\n\n\n",
"json_metadata": "{\"tags\":[\"airstream\",\"skins\",\"panels\",\"off-grid\",\"living\"],\"image\":[\"https://steemitimages.com/DQmeicskVKcN7UEbc2fUrpshFdvvAozA1DGNSnkfjvizniJ/2014-08-26_01.jpg\",\"https://steemitimages.com/DQmYvdEWo88zVu7WHiPMdtokmZ3kuFMaieZqAd5sZunXuzt/2014-08-26_03.jpg\",\"https://steemitimages.com/DQmfMksXJ2LxvPqUDPTueDHFTv8ghvBC4Ux9caQmjG1wVKK/2014-08-26_02.jpg\",\"https://steemitimages.com/DQmVbmBBSyw3XzqUvCBRRwqsnqomiDnQbHZo1e7dGTH9ebw/2014-08-27_01.jpg\",\"https://steemitimages.com/DQmbYd9Y86NAx8BtFJHZzPsx72R7HBFuNwZQomjanEurNS9/2014-08-31_01.jpg\",\"https://steemitimages.com/DQmf8BAJZVH9hwnTEAfCina2TyuSMCYktjtrLeYH54UmPbs/2014-08-31_02.jpg\",\"https://steemitimages.com/DQmUsewHWh78qw2L1G5Kwzr4jPDC6qL2xsCDRiZJV9jrBCP/2014-09-01.jpg\",\"https://steemitimages.com/DQmdNWSJd17J1Ud5wYzeRsk9wDYB98u2r89fQh2QAVZdgNu/2014-08-26_04.jpg\",\"https://steemitimages.com/DQmSKaxKETwUB4HiBScDbKm3Ss9KEwPZkhKGZiRhVQkVMn6/2014-09-06_01.jpg\",\"https://steemitimages.com/DQmdaJyzfXMRpVFSm7UJVBvmYAjcf6Lcy6GomBfM5qnKvfL/2014-09-06_02.jpg\",\"https://steemitimages.com/DQmSm1xiCGEdnHoAdqJJ1TwqNYmLXCYDn4yaTkcV5J3syEr/2014-09-06_03.jpg\",\"https://steemitimages.com/DQmYtDxMjzkPx9i8Wk3mSGskG9NM8Jog83KE23g7KXYypB4/2014-09-07_01.jpg\",\"https://steemitimages.com/DQmSukMPHkKSqc6TH4bUYRpZTvkqTRs2b9cxkZJYuBfAD1H/2014-09-07_02.jpg\",\"https://steemitimages.com/DQmRBDp9xVcLV2rtEzAScwkNXVbUm5soUszNe5iRd5h4Vp1/2014-09-07_03.jpg\",\"https://steemitimages.com/DQmQELRtJ8HiMGjCaebp2T9zgqRJJQueptqvNoMm5mBUSS4/2014-09-07_07.jpg\",\"https://steemitimages.com/DQmfJYr231LL2jpHJ7dcB6wdYX8SMA1JScqEAAxmAxmrVBH/2014-09-07-_06.jpg\",\"https://steemitimages.com/DQmNvso5bJCEAV98nEPbC14w76mDN1EfTXMFHnRz6tq6bXm/2014-09-07_04.jpg\",\"https://steemitimages.com/DQmQxRzGw9qkDX5CFQMjp8N6xnytkU799UFyirQJmGM5WML/2014-09-07_05.jpg\"],\"app\":\"steemit/0.1\",\"format\":\"markdown\"}"
}
]
}2017/07/23 04:33:21
2017/07/23 04:33:21
| voter | steeminator3000 |
| author | mistahlee |
| permlink | vintage-airstream-travel-trailer-renovation-post-6-spray-foam-insulation |
| weight | 10000 (100.00%) |
| Transaction Info | Block #13925197/Trx e70845ccb3213ad9aeba18ce1b1136f8db2f2837 |
View Raw JSON Data
{
  "trx_id": "e70845ccb3213ad9aeba18ce1b1136f8db2f2837",
  "block": 13925197,
  "trx_in_block": 3,
  "op_in_trx": 0,
  "virtual_op": 0,
  "timestamp": "2017-07-23T04:33:21",
  "op": [
    "vote",
    {
      "voter": "steeminator3000",
      "author": "mistahlee",
      "permlink": "vintage-airstream-travel-trailer-renovation-post-6-spray-foam-insulation",
      "weight": 10000
    }
  ]
}2017/07/23 04:33:03
2017/07/23 04:33:03
| voter | mistahlee |
| author | mistahlee |
| permlink | vintage-airstream-travel-trailer-renovation-post-6-spray-foam-insulation |
| weight | 10000 (100.00%) |
| Transaction Info | Block #13925191/Trx cf04af2699cef1bd29e1df524db90a516337e981 |
View Raw JSON Data
{
  "trx_id": "cf04af2699cef1bd29e1df524db90a516337e981",
  "block": 13925191,
  "trx_in_block": 10,
  "op_in_trx": 0,
  "virtual_op": 0,
  "timestamp": "2017-07-23T04:33:03",
  "op": [
    "vote",
    {
      "voter": "mistahlee",
      "author": "mistahlee",
      "permlink": "vintage-airstream-travel-trailer-renovation-post-6-spray-foam-insulation",
      "weight": 10000
    }
  ]
}mistahleepublished a new post: vintage-airstream-travel-trailer-renovation-post-6-spray-foam-insulation2017/07/23 04:33:03
mistahleepublished a new post: vintage-airstream-travel-trailer-renovation-post-6-spray-foam-insulation
2017/07/23 04:33:03
| parent author | |
| parent permlink | airstream |
| author | mistahlee |
| permlink | vintage-airstream-travel-trailer-renovation-post-6-spray-foam-insulation |
| title | Vintage Airstream Travel Trailer Renovation: Post 6 - Spray Foam Insulation |
| body | Back in the fall, I had 4 inches of spray foam insulation put in the floor and around the holding tanks. Now, it’s time to do the shell. Because of the room available in the walls, we will get between 1.5 and 2 inches of foam giving an R value of between 9 and 12, while the floor is R24. Tape up anything you don’t want the spray foam on. It has a serious adhesive quality and if it gets on your fans or windows, it will be very time consuming to get off. In the case of the vista view windows, I taped them with duct tape and we will spray foam right over them and dig them back out later – this is the only way to ensure good coverage along the frames and between the aluminum channels.  Below are a few photos of the actual spray foam process. The foam is very hard and adds a fair bit of structural integrity to the Airstream, it also secures all the electrical wires in place. Because the aluminum walls no longer bend when pressure is applied, it makes polishing the outer skin faster and easier. The foam itself is dense but extremely lightweight and solidifies almost instantly. 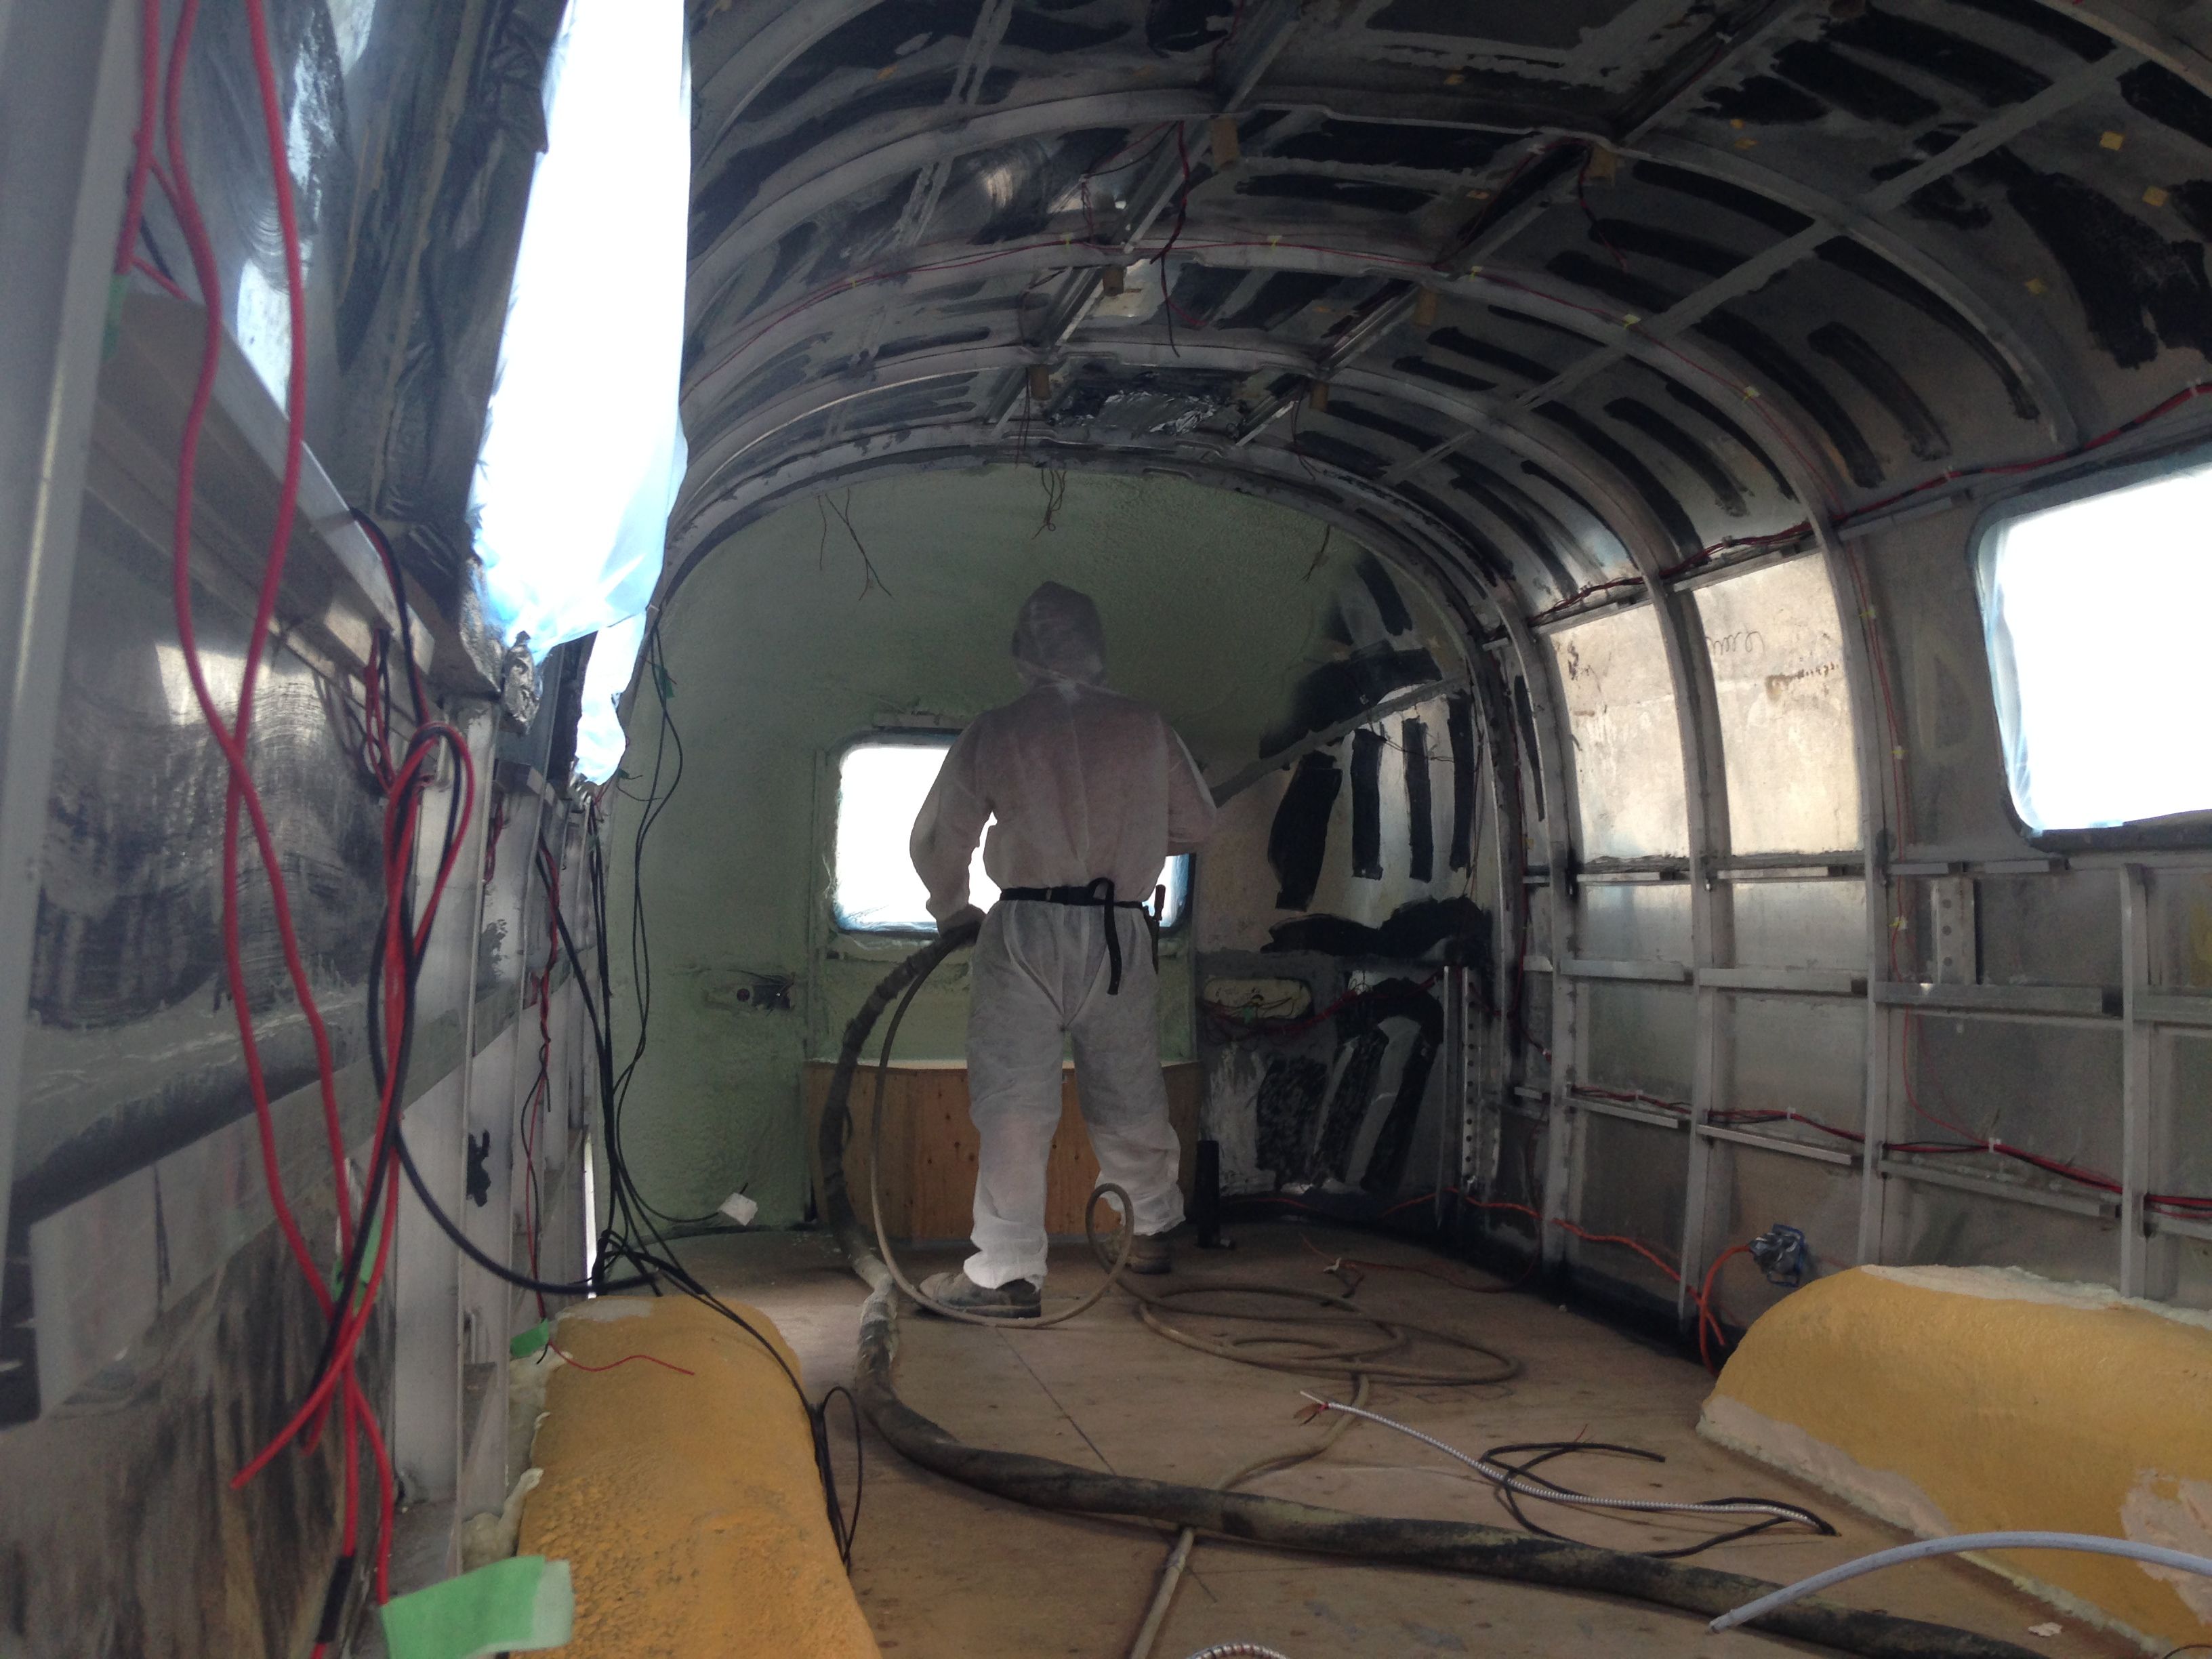 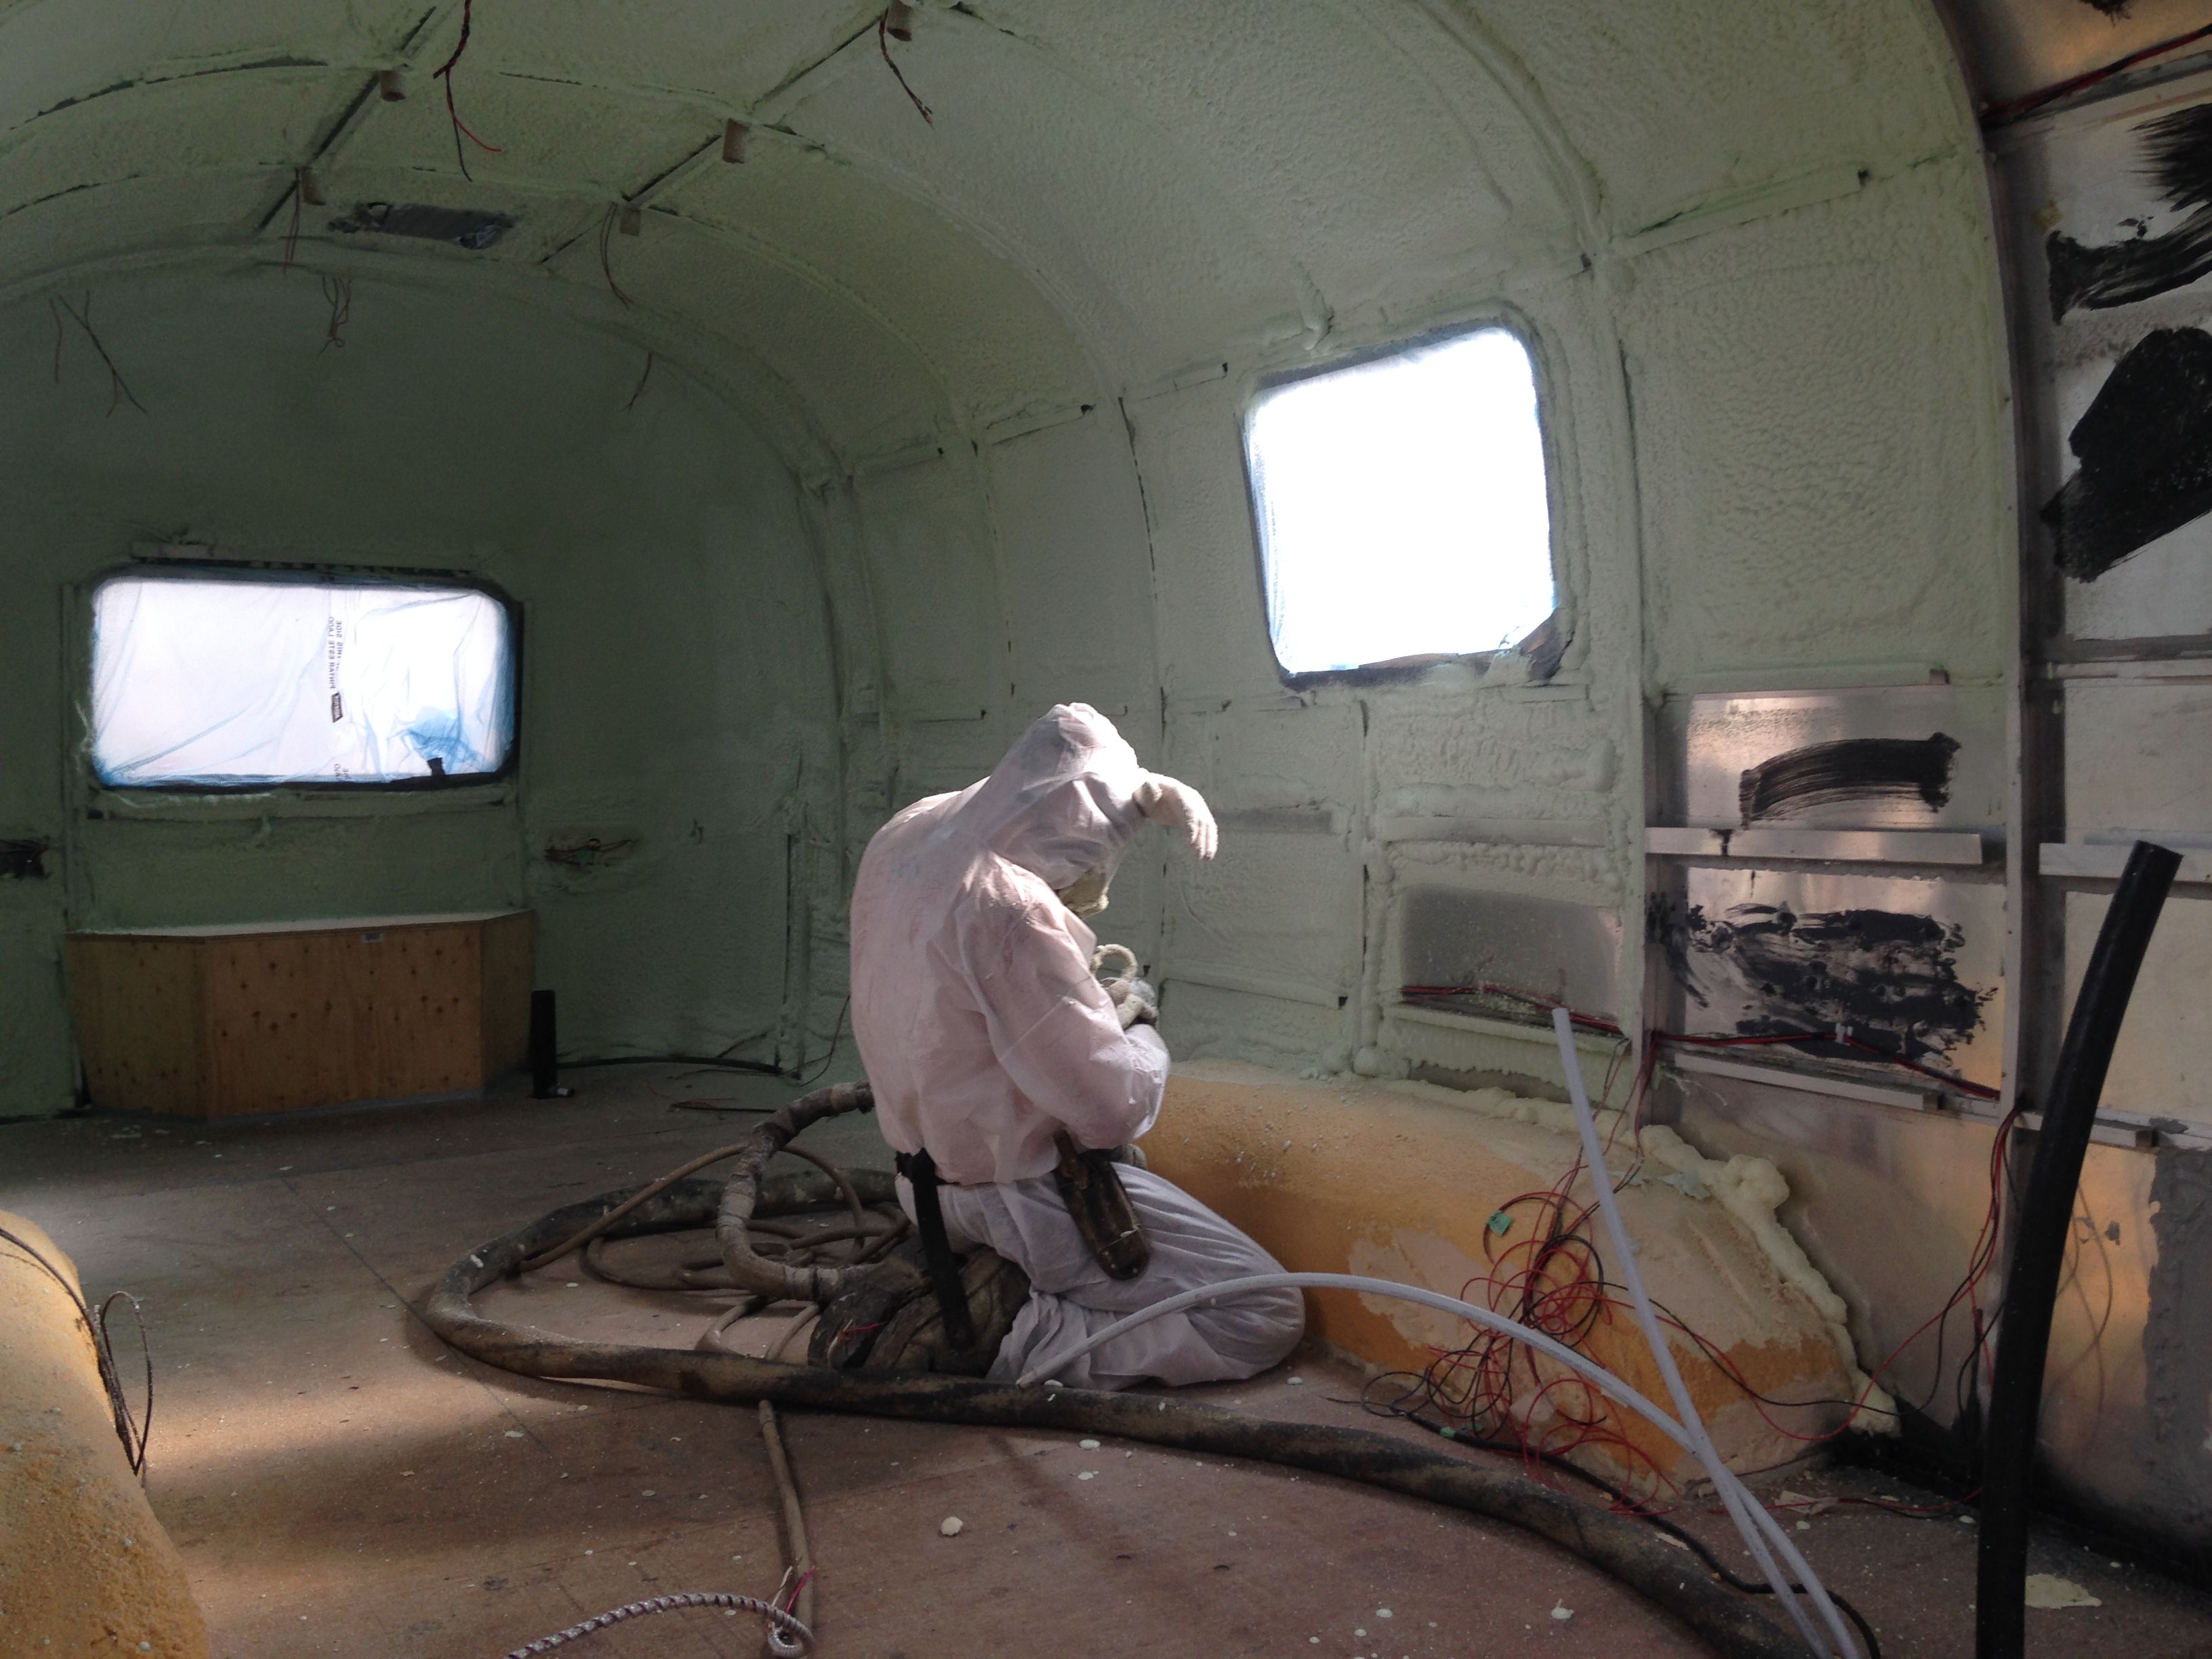 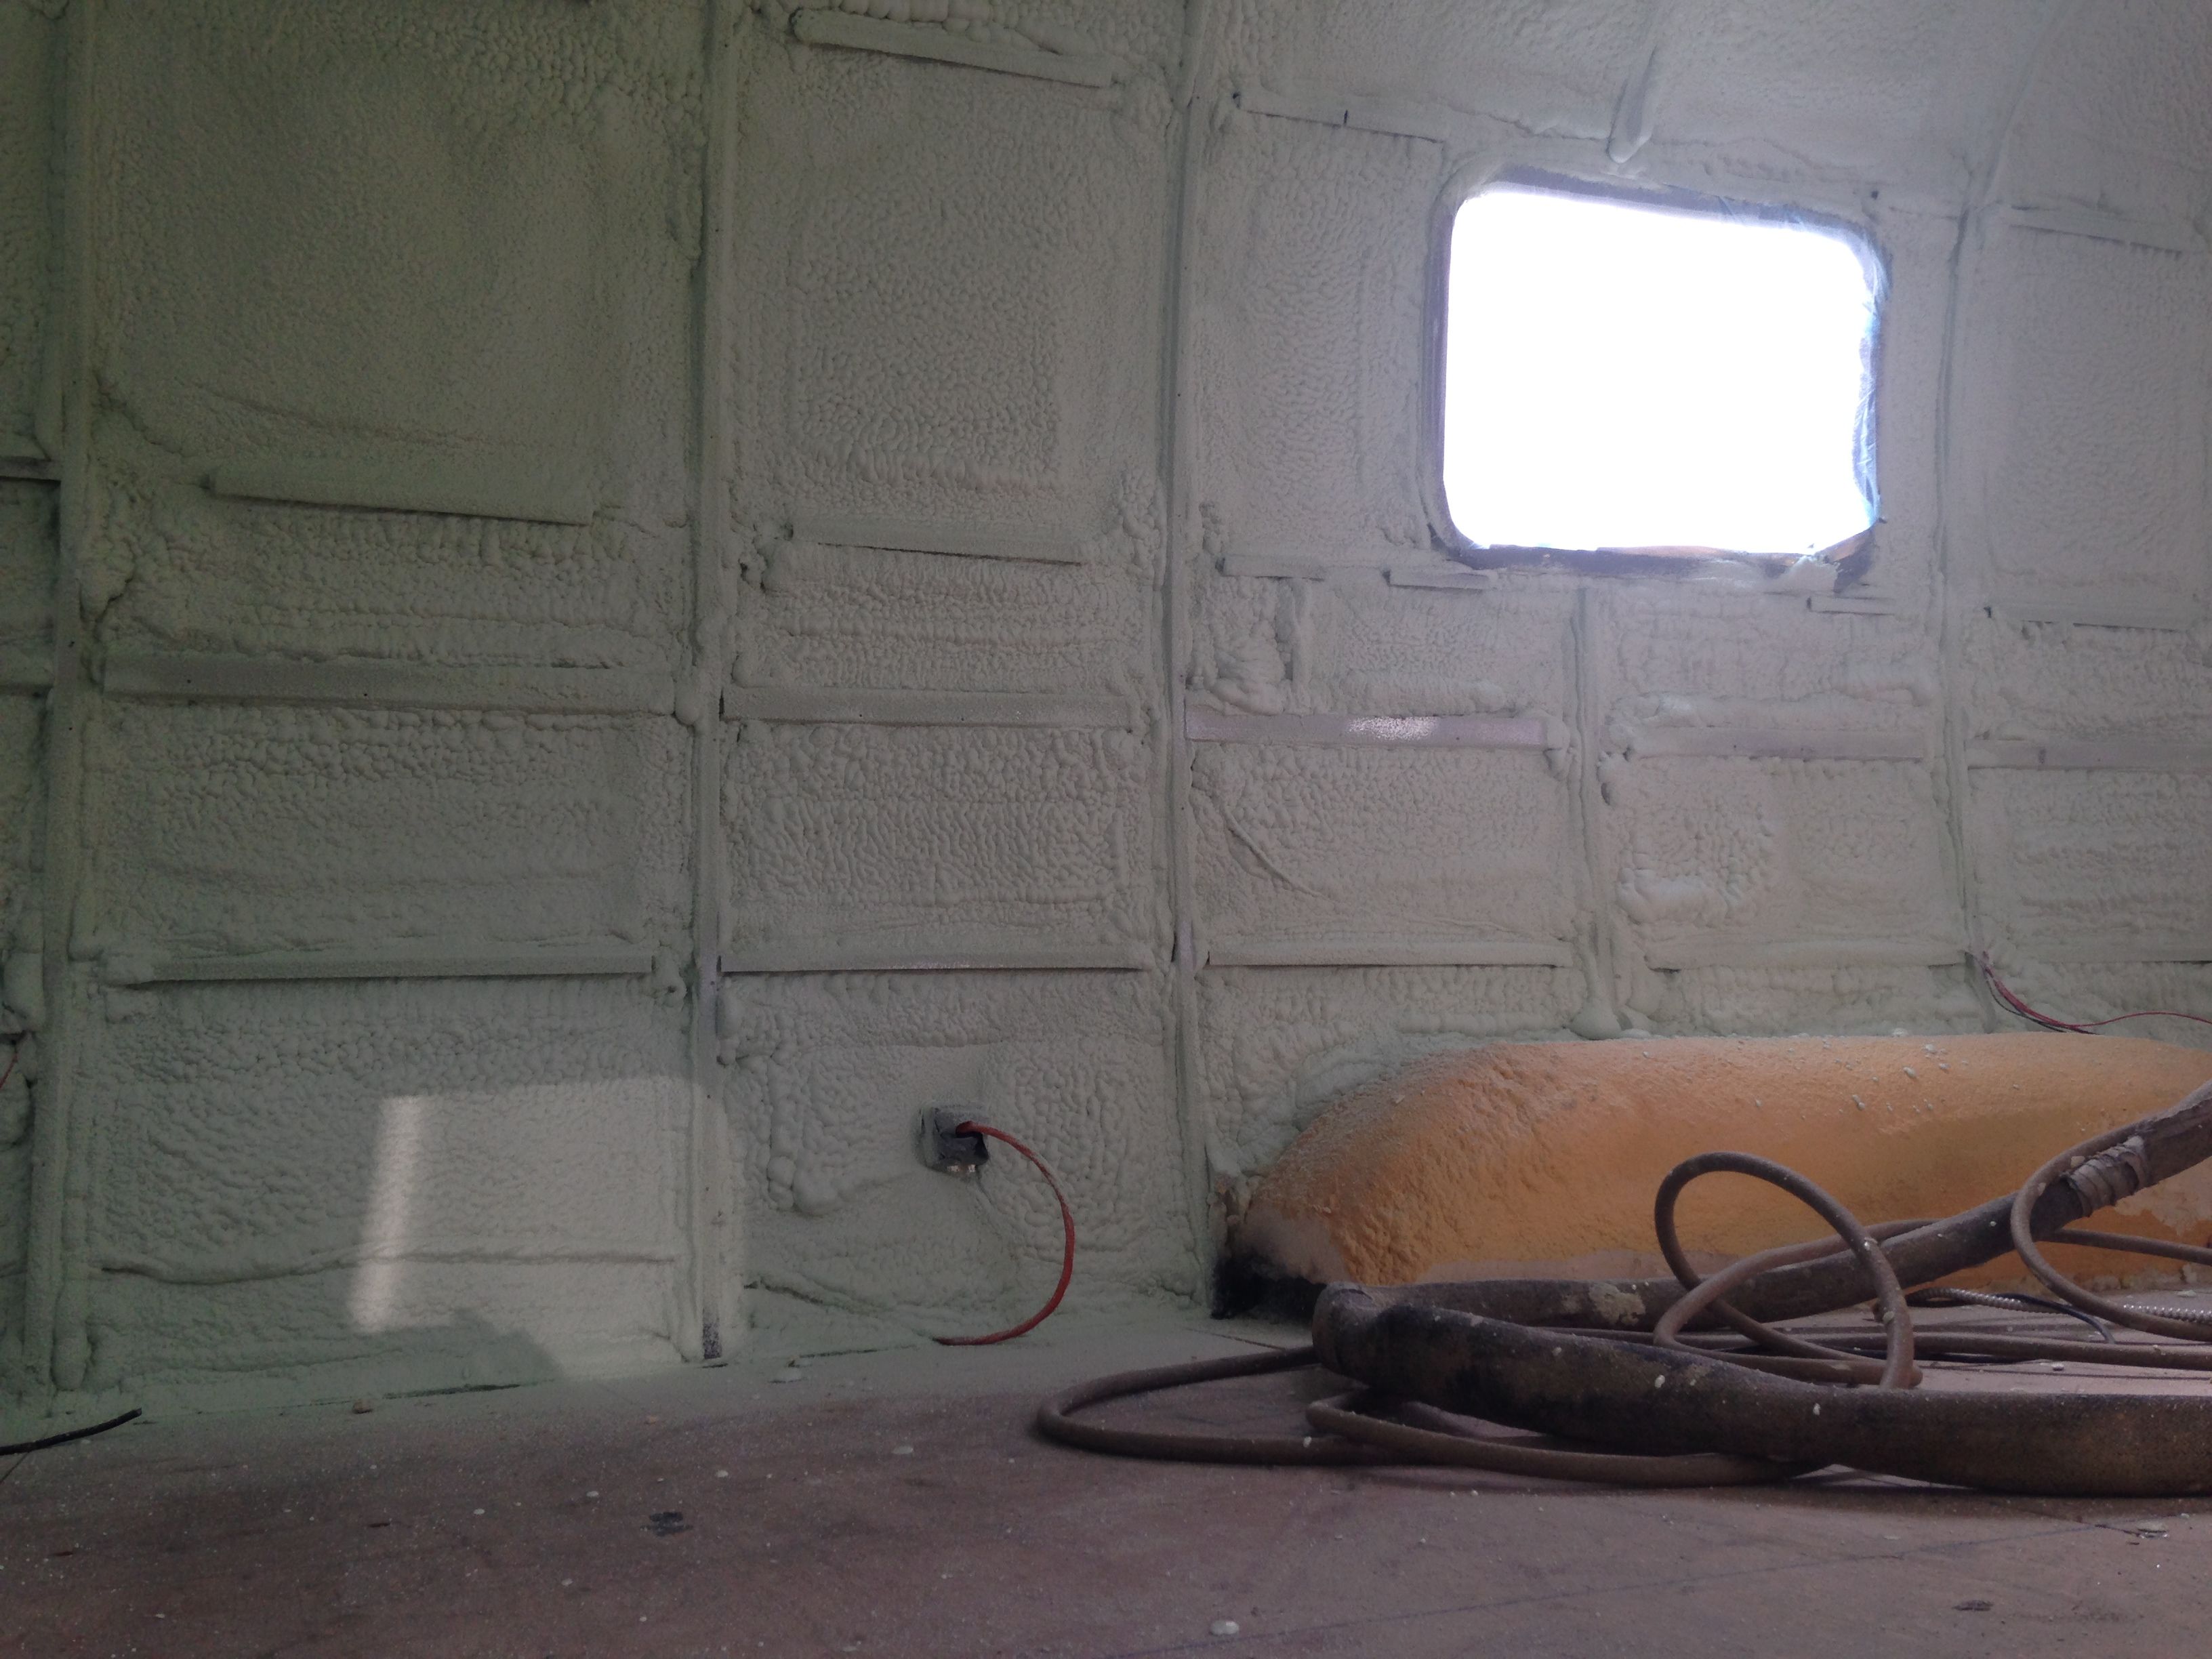 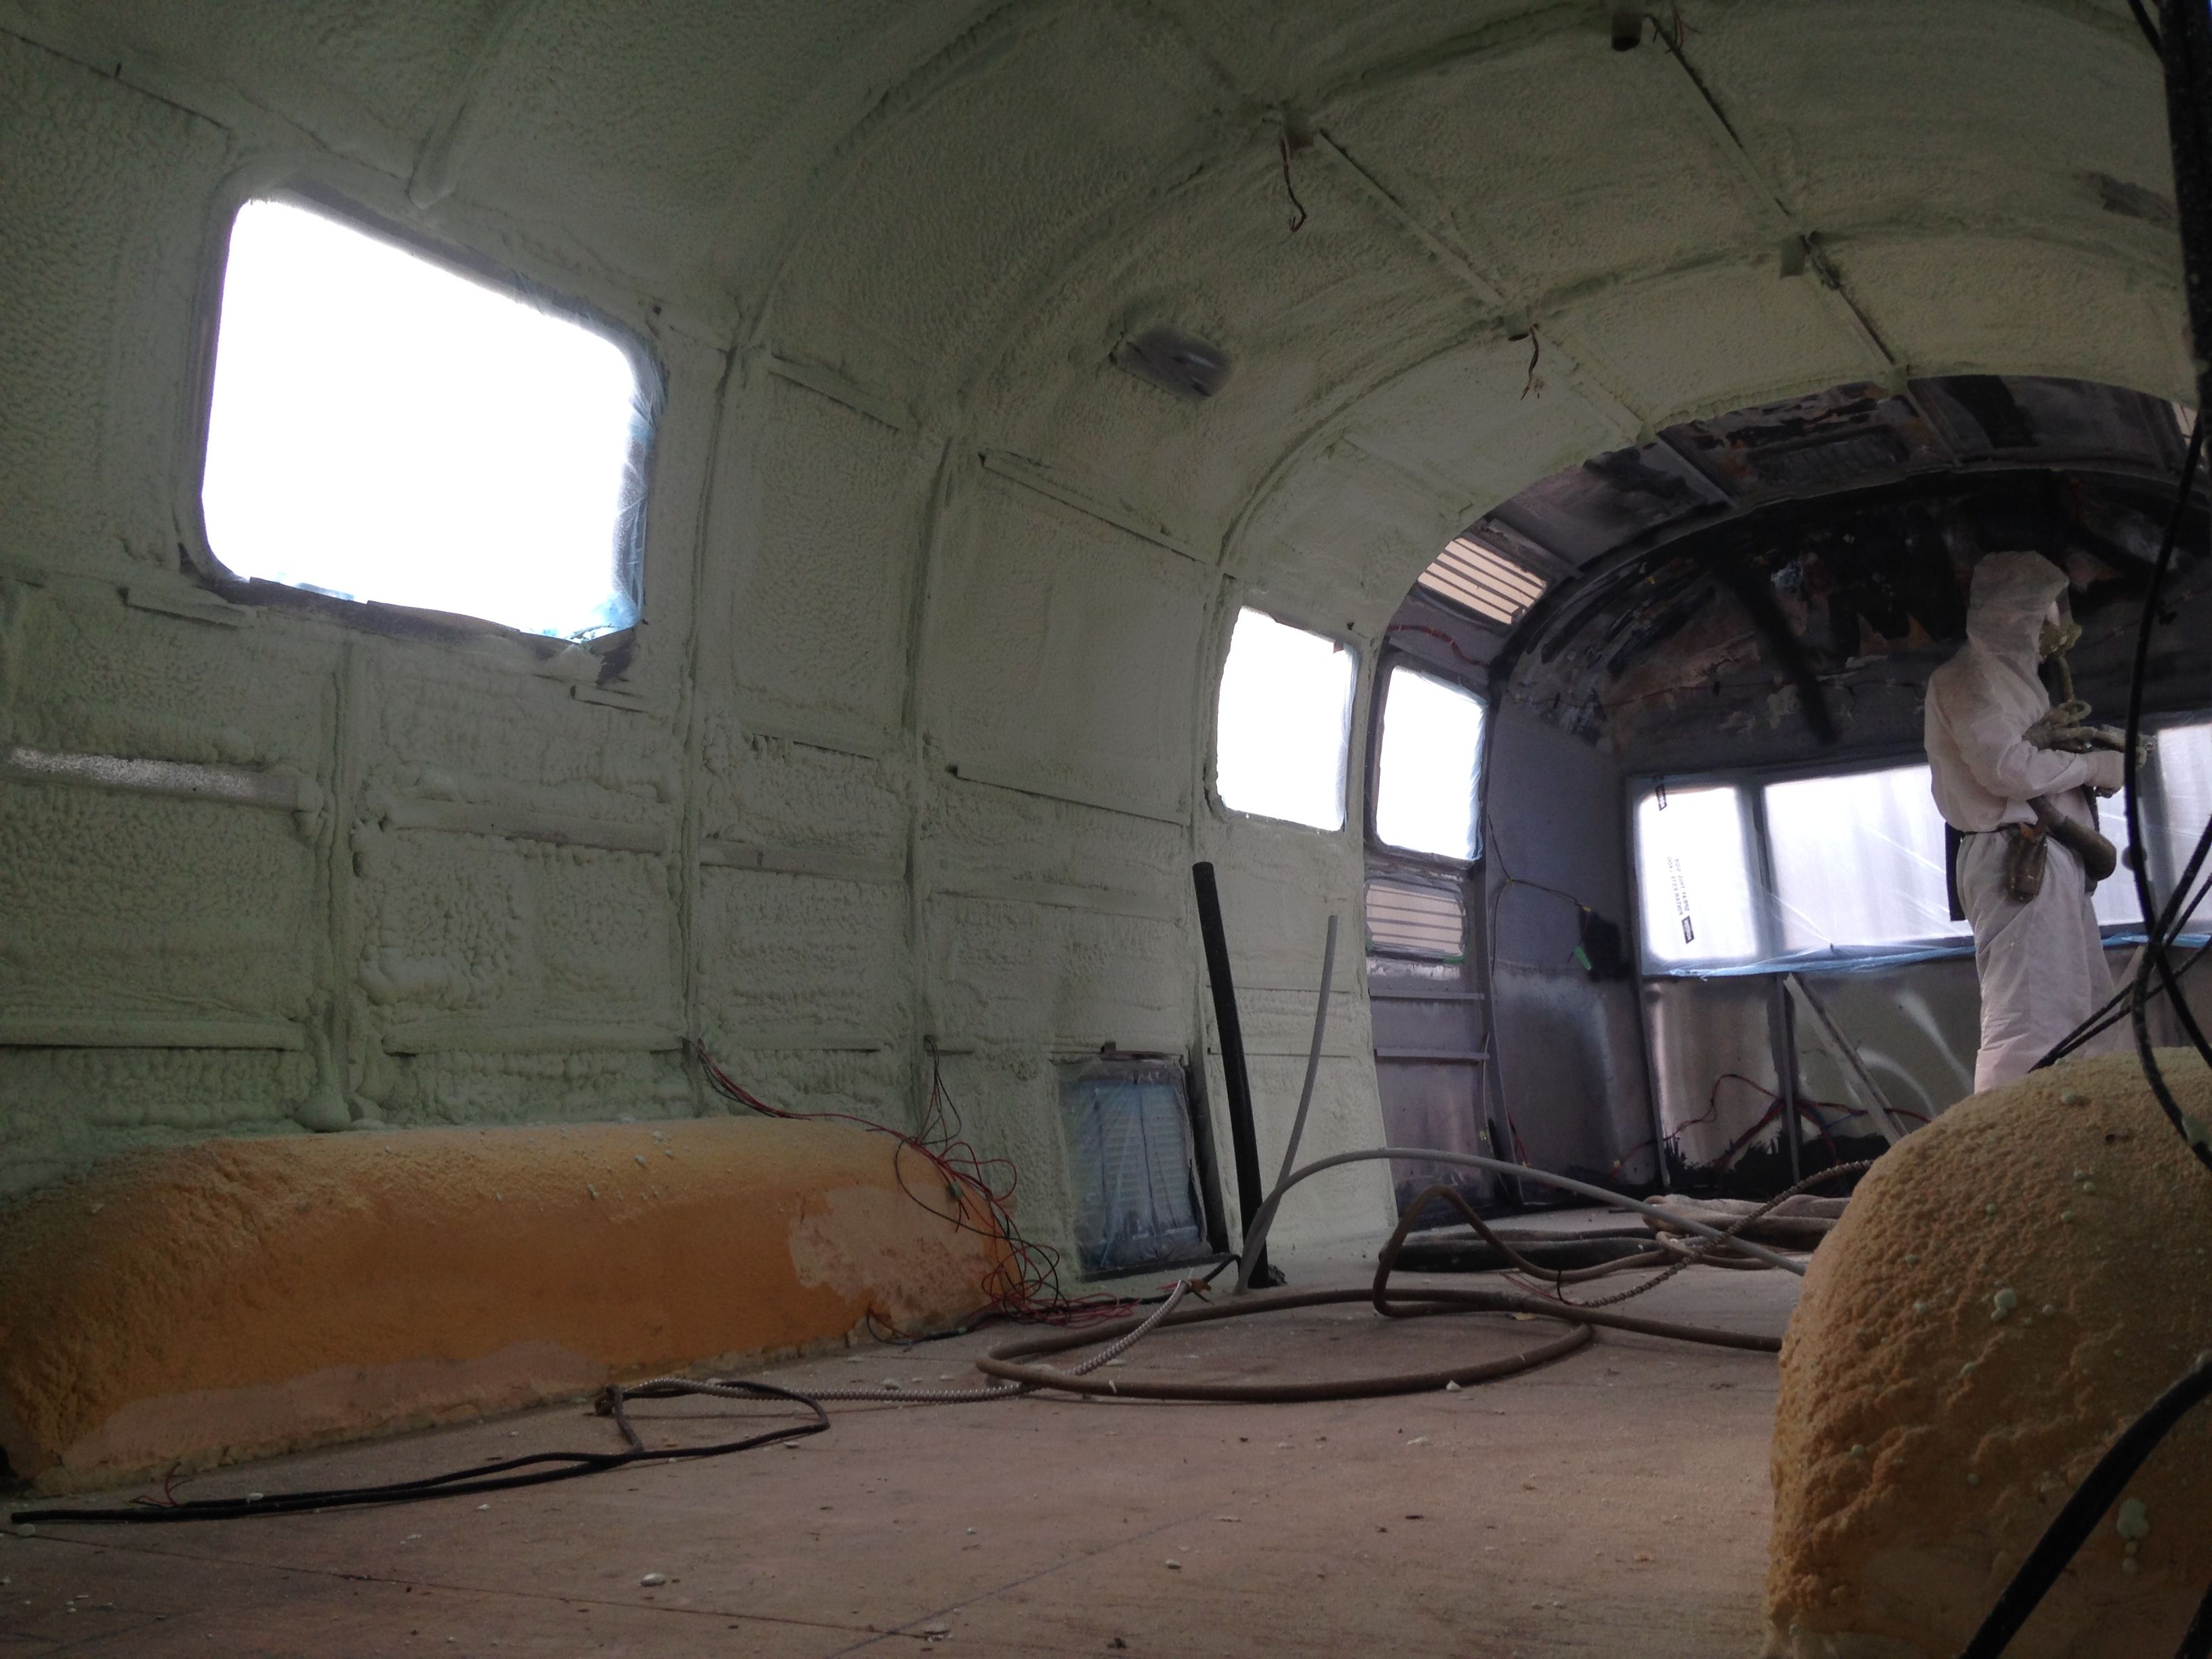 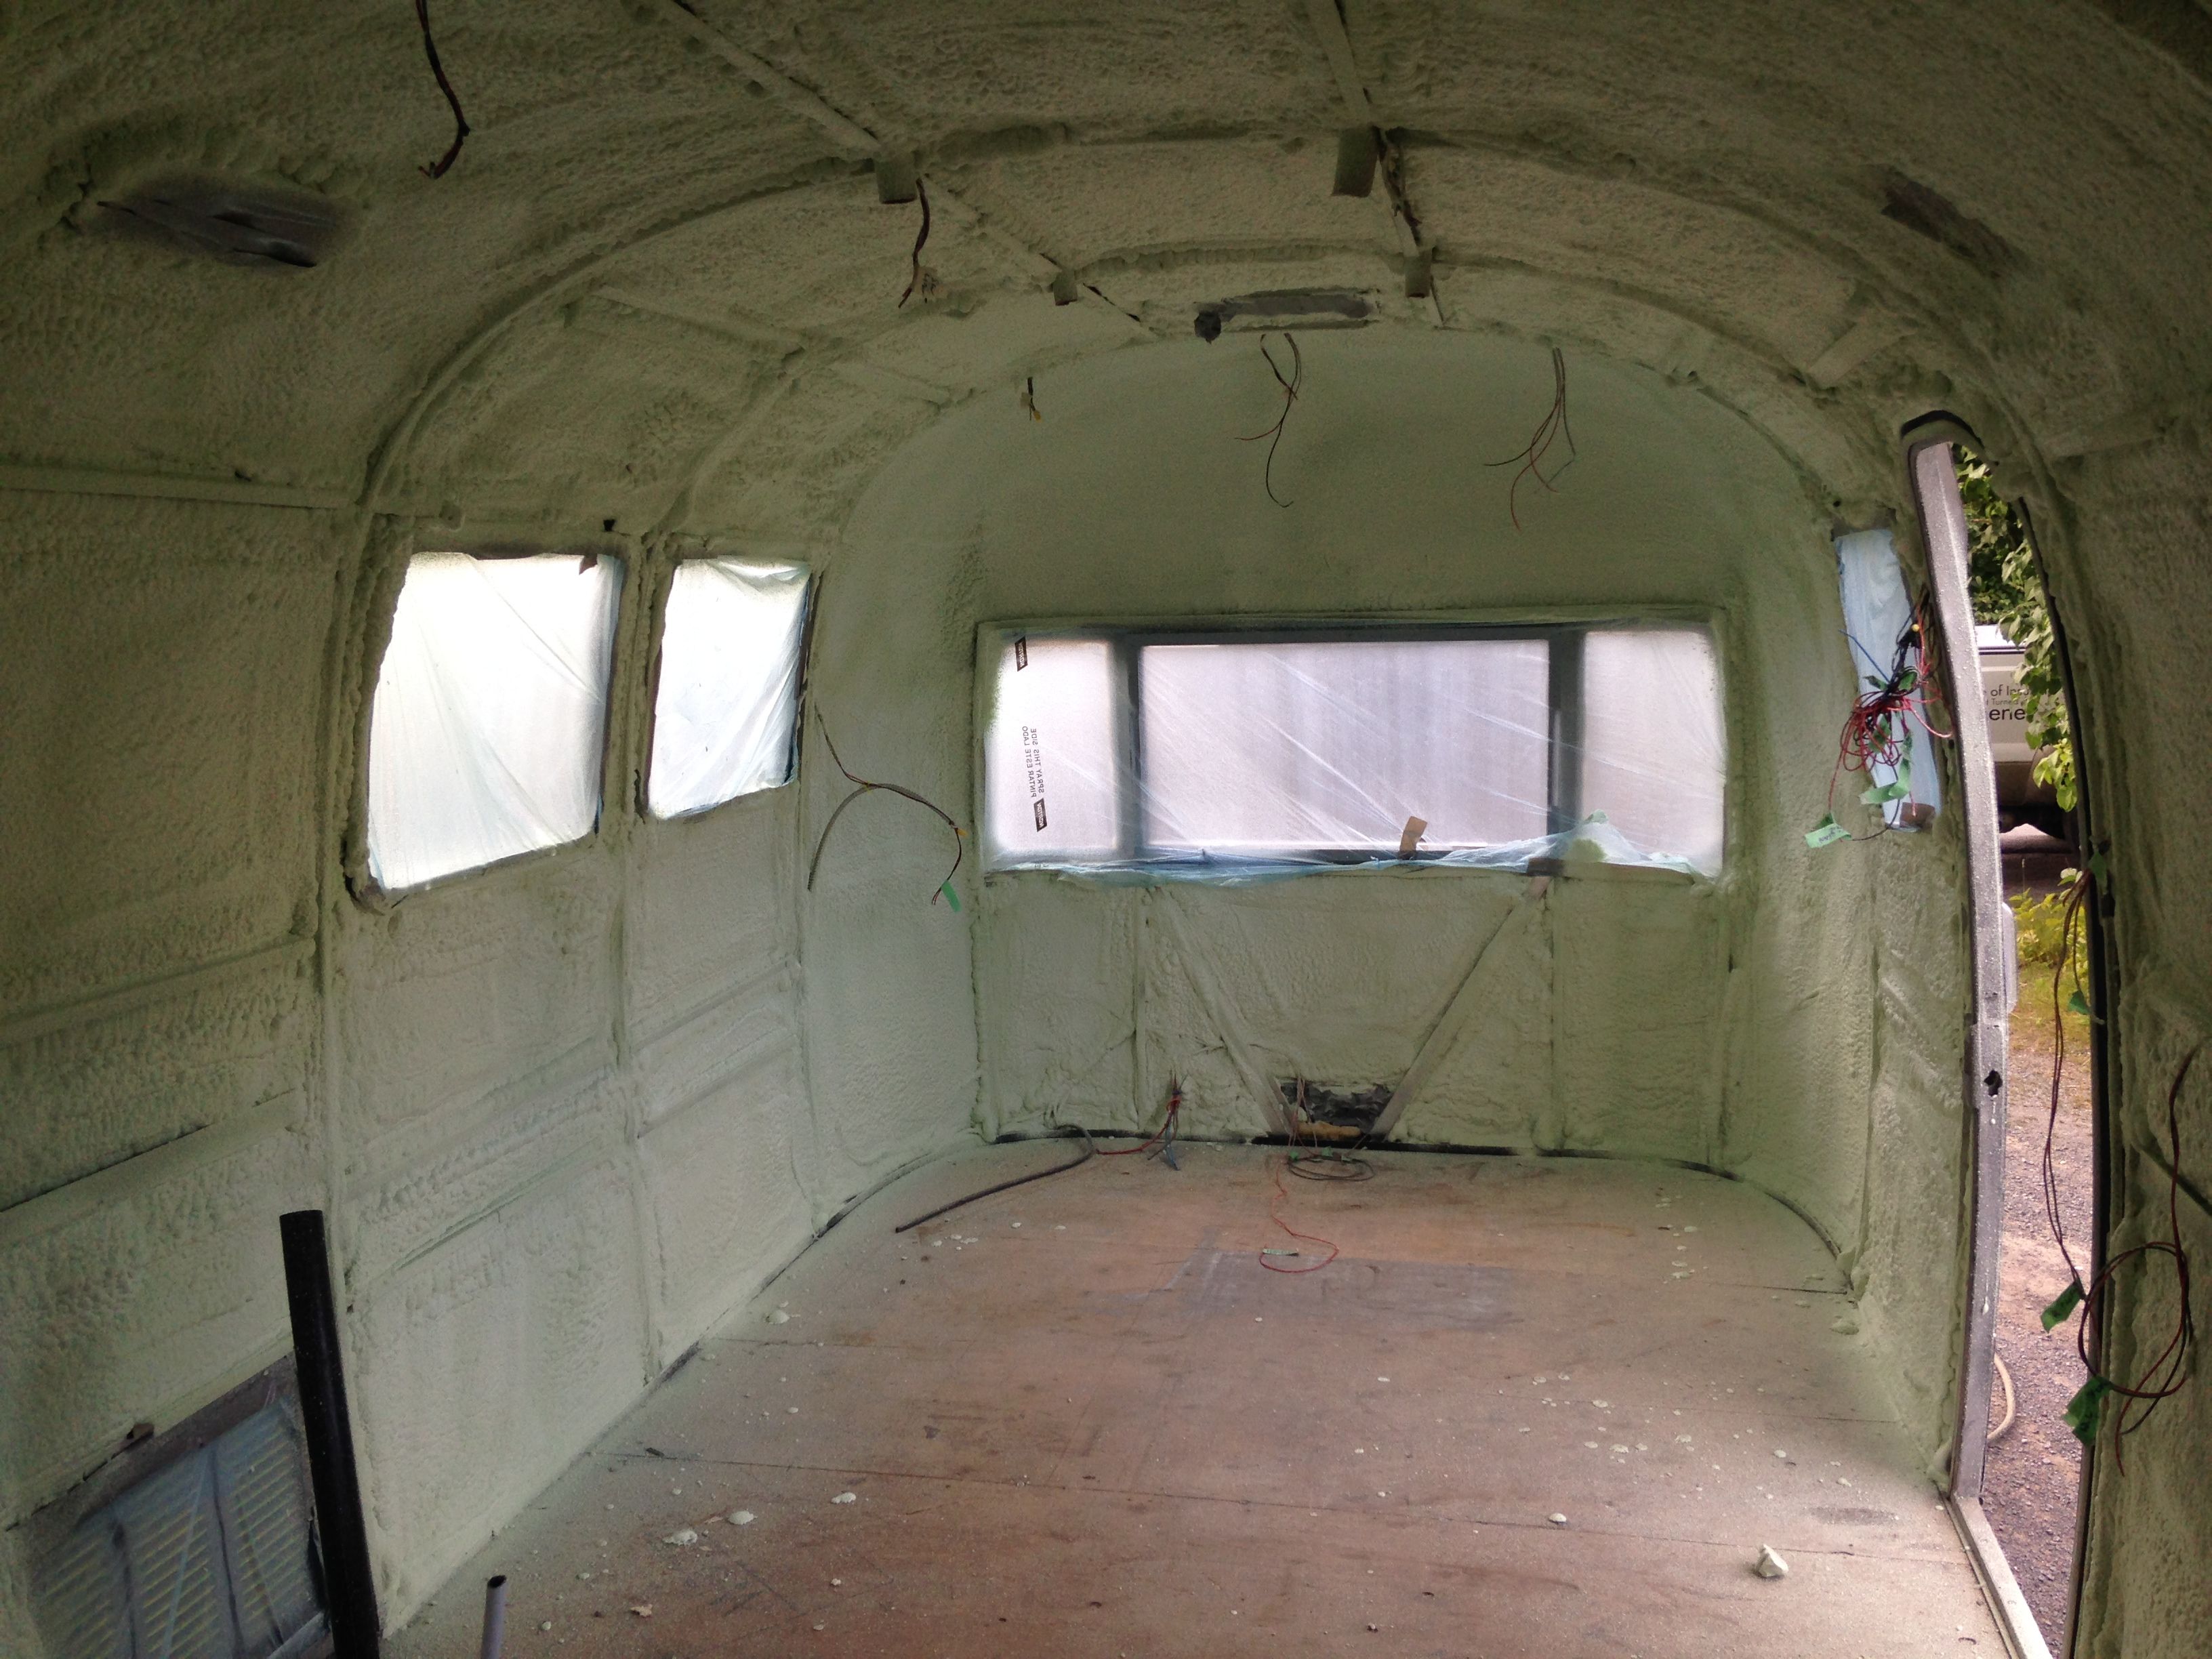   Be sure to have all your wires secured tightly to the walls before foaming so that none protrude when you have to shave the excess foam off – you may cut a wire in that case. Place the wires for your fixtures as close to the location that you want the lights, outlets, switches, etc. Once foamed over, they don’t move. I also wanted to have access to the bolts holding my solar panels down in the future, so I cut cardboard paper towel rolls in half and glued them to the ceiling around the bolts to prevent the spray foam from covering them. After spray foaming you can chisel the excess away by hand, or use your polisher to do it in a fraction of the time! Take the wool polishing pad off and replace it with 80 grit hook and loop sandpaper pads and you can have the whole trailer smoothed out in half an hour.   It is very important to wear a good quality mask and eye protection. You are going to be covered in spray foam dust.  |
| json metadata | {"tags":["airstream","insulation","trailer","spray","foam"],"image":["https://steemitimages.com/DQmPEUF3gwf6R7mar8tfbnx5rMULBZtR6YD9eqjN89Vqkmg/2014-08-22_03.jpg","https://steemitimages.com/DQmZAzXf4kHakvdZXSTcawFZ4wsha69vuJnhy9VToMPyeW2/1.jpg","https://steemitimages.com/DQmfDsSWLqDguYwZVxPz7HYFSzhp2XjwbAC1dGdzwuqJWBW/2.jpg","https://steemitimages.com/DQmeA7SgyNGnj6mZbdYP49LKHAX5QsQaq1as2V9eAFMtWxG/3.jpg","https://steemitimages.com/DQmUonEKuXtSidA85D4JLu5F3oJ37ebrCQBXyYiAv4JJ8wA/4.jpg","https://steemitimages.com/DQmekbXP7miiyEYTbsQFDK6Auy96v23991GanDL4itm8L6J/5.jpg","https://steemitimages.com/DQmPEUF3gwf6R7mar8tfbnx5rMULBZtR6YD9eqjN89Vqkmg/6.jpg","https://steemitimages.com/DQmcAfr4whUcSB47UhkHLeLNJs51AvLw7xbdQm1nUnvKwMQ/7.jpg","https://steemitimages.com/DQmXQAdXAPuD5C1hebir7vYuqiqqi98JEn8rtRt4z1mX2Ta/2014-08-23_02.jpg","https://steemitimages.com/DQmPgJ4N5GFXNufEvbuNE5i7tZT2HwHSGee9EUPTxyhfYea/2014-08-23_03.jpg","https://steemitimages.com/DQmf68Rq5Vx4a53a4exdWWm99VoLMHZGk8UrSVuVgGrEFne/2014-08-23_04.jpg"],"app":"steemit/0.1","format":"markdown"} |
| Transaction Info | Block #13925191/Trx cf04af2699cef1bd29e1df524db90a516337e981 |
View Raw JSON Data
{
"trx_id": "cf04af2699cef1bd29e1df524db90a516337e981",
"block": 13925191,
"trx_in_block": 10,
"op_in_trx": 0,
"virtual_op": 0,
"timestamp": "2017-07-23T04:33:03",
"op": [
"comment",
{
"parent_author": "",
"parent_permlink": "airstream",
"author": "mistahlee",
"permlink": "vintage-airstream-travel-trailer-renovation-post-6-spray-foam-insulation",
"title": "Vintage Airstream Travel Trailer Renovation: Post 6 - Spray Foam Insulation",
"body": "Back in the fall, I had 4 inches of spray foam insulation put in the floor and around the holding tanks. Now, it’s time to do the shell. Because of the room available in the walls, we will get between 1.5 and 2 inches of foam giving an R value of between 9 and 12, while the floor is R24.\n\nTape up anything you don’t want the spray foam on. It has a serious adhesive quality and if it gets on your fans or windows, it will be very time consuming to get off. In the case of the vista view windows, I taped them with duct tape and we will spray foam right over them and dig them back out later – this is the only way to ensure good coverage along the frames and between the aluminum channels.\n\n\n\nBelow are a few photos of the actual spray foam process. The foam is very hard and adds a fair bit of structural integrity to the Airstream, it also secures all the electrical wires in place. Because the aluminum walls no longer bend when pressure is applied, it makes polishing the outer skin faster and easier. The foam itself is dense but extremely lightweight and solidifies almost instantly.\n\n\n\n\n\n\n\n\n\n\n\n\n\n\n\nBe sure to have all your wires secured tightly to the walls before foaming so that none protrude when you have to shave the excess foam off – you may cut a wire in that case. Place the wires for your fixtures as close to the location that you want the lights, outlets, switches, etc. Once foamed over, they don’t move. I also wanted to have access to the bolts holding my solar panels down in the future, so I cut cardboard paper towel rolls in half and glued them to the ceiling around the bolts to prevent the spray foam from covering them.\n\nAfter spray foaming you can chisel the excess away by hand, or use your polisher to do it in a fraction of the time! Take the wool polishing pad off and replace it with 80 grit hook and loop sandpaper pads and you can have the whole trailer smoothed out in half an hour.\n\n\n\n\n\nIt is very important to wear a good quality mask and eye protection. You are going to be covered in spray foam dust.\n\n",
"json_metadata": "{\"tags\":[\"airstream\",\"insulation\",\"trailer\",\"spray\",\"foam\"],\"image\":[\"https://steemitimages.com/DQmPEUF3gwf6R7mar8tfbnx5rMULBZtR6YD9eqjN89Vqkmg/2014-08-22_03.jpg\",\"https://steemitimages.com/DQmZAzXf4kHakvdZXSTcawFZ4wsha69vuJnhy9VToMPyeW2/1.jpg\",\"https://steemitimages.com/DQmfDsSWLqDguYwZVxPz7HYFSzhp2XjwbAC1dGdzwuqJWBW/2.jpg\",\"https://steemitimages.com/DQmeA7SgyNGnj6mZbdYP49LKHAX5QsQaq1as2V9eAFMtWxG/3.jpg\",\"https://steemitimages.com/DQmUonEKuXtSidA85D4JLu5F3oJ37ebrCQBXyYiAv4JJ8wA/4.jpg\",\"https://steemitimages.com/DQmekbXP7miiyEYTbsQFDK6Auy96v23991GanDL4itm8L6J/5.jpg\",\"https://steemitimages.com/DQmPEUF3gwf6R7mar8tfbnx5rMULBZtR6YD9eqjN89Vqkmg/6.jpg\",\"https://steemitimages.com/DQmcAfr4whUcSB47UhkHLeLNJs51AvLw7xbdQm1nUnvKwMQ/7.jpg\",\"https://steemitimages.com/DQmXQAdXAPuD5C1hebir7vYuqiqqi98JEn8rtRt4z1mX2Ta/2014-08-23_02.jpg\",\"https://steemitimages.com/DQmPgJ4N5GFXNufEvbuNE5i7tZT2HwHSGee9EUPTxyhfYea/2014-08-23_03.jpg\",\"https://steemitimages.com/DQmf68Rq5Vx4a53a4exdWWm99VoLMHZGk8UrSVuVgGrEFne/2014-08-23_04.jpg\"],\"app\":\"steemit/0.1\",\"format\":\"markdown\"}"
}
]
}mistahleeclaimed reward balance: 0.027 SBD, 0.020 SP2017/07/22 16:26:21
mistahleeclaimed reward balance: 0.027 SBD, 0.020 SP
2017/07/22 16:26:21
| account | mistahlee |
| reward steem | 0.000 STEEM |
| reward sbd | 0.027 SBD |
| reward vests | 33.088898 VESTS |
| Transaction Info | Block #13910661/Trx bc9a36b92fd27df1ab286e6eed6dcc1290a095e0 |
View Raw JSON Data
{
  "trx_id": "bc9a36b92fd27df1ab286e6eed6dcc1290a095e0",
  "block": 13910661,
  "trx_in_block": 27,
  "op_in_trx": 0,
  "virtual_op": 0,
  "timestamp": "2017-07-22T16:26:21",
  "op": [
    "claim_reward_balance",
    {
      "account": "mistahlee",
      "reward_steem": "0.000 STEEM",
      "reward_sbd": "0.027 SBD",
      "reward_vests": "33.088898 VESTS"
    }
  ]
}2017/07/08 21:07:09
2017/07/08 21:07:09
| parent author | mistahlee |
| parent permlink | fully-rebuilt-1971-airstream-trailer-for-sale |
| author | egregorian |
| permlink | re-mistahlee-fully-rebuilt-1971-airstream-trailer-for-sale-20170708t210714063z |
| title | |
| body | Amazing Job! Love it! |
| json metadata | {"tags":["airstream"],"app":"steemit/0.1"} |
| Transaction Info | Block #13513476/Trx 93c4d90202d2cb084901cc78f4b950c7186c44ff |
View Raw JSON Data
{
  "trx_id": "93c4d90202d2cb084901cc78f4b950c7186c44ff",
  "block": 13513476,
  "trx_in_block": 1,
  "op_in_trx": 0,
  "virtual_op": 0,
  "timestamp": "2017-07-08T21:07:09",
  "op": [
    "comment",
    {
      "parent_author": "mistahlee",
      "parent_permlink": "fully-rebuilt-1971-airstream-trailer-for-sale",
      "author": "egregorian",
      "permlink": "re-mistahlee-fully-rebuilt-1971-airstream-trailer-for-sale-20170708t210714063z",
      "title": "",
      "body": "Amazing Job!  Love it!",
      "json_metadata": "{\"tags\":[\"airstream\"],\"app\":\"steemit/0.1\"}"
    }
  ]
}2017/07/08 21:04:48
2017/07/08 21:04:48
| parent author | mistahlee |
| parent permlink | vintage-airstream-travel-trailer-renovation-post-2-preparing-a-vintage-trailer-for-transport-and-gutting-the-interior |
| author | egregorian |
| permlink | re-mistahlee-vintage-airstream-travel-trailer-renovation-post-2-preparing-a-vintage-trailer-for-transport-and-gutting-the-interior-20170708t210453844z |
| title | |
| body | Oh my! I just found these I will start at the beginning! Check out my most recent post about doing the exact same thing! https://steemit.com/blog/@egregorian/the-build-1974-airsteam-sovereign-land-yacht-reflectix-complete |
| json metadata | {"tags":["airstream"],"links":["https://steemit.com/blog/@egregorian/the-build-1974-airsteam-sovereign-land-yacht-reflectix-complete"],"app":"steemit/0.1"} |
| Transaction Info | Block #13513429/Trx 85d7beaf1283121f6239827939d5308f11ff1b3f |
View Raw JSON Data
{
  "trx_id": "85d7beaf1283121f6239827939d5308f11ff1b3f",
  "block": 13513429,
  "trx_in_block": 14,
  "op_in_trx": 0,
  "virtual_op": 0,
  "timestamp": "2017-07-08T21:04:48",
  "op": [
    "comment",
    {
      "parent_author": "mistahlee",
      "parent_permlink": "vintage-airstream-travel-trailer-renovation-post-2-preparing-a-vintage-trailer-for-transport-and-gutting-the-interior",
      "author": "egregorian",
      "permlink": "re-mistahlee-vintage-airstream-travel-trailer-renovation-post-2-preparing-a-vintage-trailer-for-transport-and-gutting-the-interior-20170708t210453844z",
      "title": "",
      "body": "Oh my!  I just found these I will start at the beginning!  Check out my most recent post about doing the exact same thing! https://steemit.com/blog/@egregorian/the-build-1974-airsteam-sovereign-land-yacht-reflectix-complete",
      "json_metadata": "{\"tags\":[\"airstream\"],\"links\":[\"https://steemit.com/blog/@egregorian/the-build-1974-airsteam-sovereign-land-yacht-reflectix-complete\"],\"app\":\"steemit/0.1\"}"
    }
  ]
}mistahleereceived 0.027 SBD, 0.020 SP author reward for @mistahlee / fully-rebuilt-1971-airstream-trailer-for-sale2017/07/08 03:17:57
mistahleereceived 0.027 SBD, 0.020 SP author reward for @mistahlee / fully-rebuilt-1971-airstream-trailer-for-sale
2017/07/08 03:17:57
| author | mistahlee |
| permlink | fully-rebuilt-1971-airstream-trailer-for-sale |
| sbd payout | 0.027 SBD |
| steem payout | 0.000 STEEM |
| vesting payout | 33.088898 VESTS |
| Transaction Info | Block #13492101/Virtual Operation #33 |
View Raw JSON Data
{
  "trx_id": "0000000000000000000000000000000000000000",
  "block": 13492101,
  "trx_in_block": 4294967295,
  "op_in_trx": 0,
  "virtual_op": 33,
  "timestamp": "2017-07-08T03:17:57",
  "op": [
    "author_reward",
    {
      "author": "mistahlee",
      "permlink": "fully-rebuilt-1971-airstream-trailer-for-sale",
      "sbd_payout": "0.027 SBD",
      "steem_payout": "0.000 STEEM",
      "vesting_payout": "33.088898 VESTS"
    }
  ]
}2017/07/01 03:19:24
2017/07/01 03:19:24
| parent author | mistahlee |
| parent permlink | fully-rebuilt-1971-airstream-trailer-for-sale |
| author | cheetah |
| permlink | cheetah-re-mistahleefully-rebuilt-1971-airstream-trailer-for-sale |
| title | |
| body | Hi! I am a robot. I just upvoted you! I found similar content that readers might be interested in: https://mistahlee33.wordpress.com/2017/01/16/airstream-for-sale-96000-00-new-updated-photos/ |
| json metadata | |
| Transaction Info | Block #13291105/Trx e666fb1af690b9e559402f63b7eaa26658aabca5 |
View Raw JSON Data
{
  "trx_id": "e666fb1af690b9e559402f63b7eaa26658aabca5",
  "block": 13291105,
  "trx_in_block": 23,
  "op_in_trx": 0,
  "virtual_op": 0,
  "timestamp": "2017-07-01T03:19:24",
  "op": [
    "comment",
    {
      "parent_author": "mistahlee",
      "parent_permlink": "fully-rebuilt-1971-airstream-trailer-for-sale",
      "author": "cheetah",
      "permlink": "cheetah-re-mistahleefully-rebuilt-1971-airstream-trailer-for-sale",
      "title": "",
      "body": "Hi! I am a robot. I just upvoted you! I found similar content that readers might be interested in:\nhttps://mistahlee33.wordpress.com/2017/01/16/airstream-for-sale-96000-00-new-updated-photos/",
      "json_metadata": ""
    }
  ]
}cheetahupvoted (1.00%) @mistahlee / fully-rebuilt-1971-airstream-trailer-for-sale2017/07/01 03:19:21
cheetahupvoted (1.00%) @mistahlee / fully-rebuilt-1971-airstream-trailer-for-sale
2017/07/01 03:19:21
| voter | cheetah |
| author | mistahlee |
| permlink | fully-rebuilt-1971-airstream-trailer-for-sale |
| weight | 100 (1.00%) |
| Transaction Info | Block #13291104/Trx ae23784d20ef3636c57050820f10e38eed2d387e |
View Raw JSON Data
{
  "trx_id": "ae23784d20ef3636c57050820f10e38eed2d387e",
  "block": 13291104,
  "trx_in_block": 7,
  "op_in_trx": 0,
  "virtual_op": 0,
  "timestamp": "2017-07-01T03:19:21",
  "op": [
    "vote",
    {
      "voter": "cheetah",
      "author": "mistahlee",
      "permlink": "fully-rebuilt-1971-airstream-trailer-for-sale",
      "weight": 100
    }
  ]
}mistahleeupvoted (100.00%) @mistahlee / fully-rebuilt-1971-airstream-trailer-for-sale2017/07/01 03:17:57
mistahleeupvoted (100.00%) @mistahlee / fully-rebuilt-1971-airstream-trailer-for-sale
2017/07/01 03:17:57
| voter | mistahlee |
| author | mistahlee |
| permlink | fully-rebuilt-1971-airstream-trailer-for-sale |
| weight | 10000 (100.00%) |
| Transaction Info | Block #13291076/Trx ab9ef279c3457d6c68aa6b10f3ae16911691503c |
View Raw JSON Data
{
  "trx_id": "ab9ef279c3457d6c68aa6b10f3ae16911691503c",
  "block": 13291076,
  "trx_in_block": 20,
  "op_in_trx": 0,
  "virtual_op": 0,
  "timestamp": "2017-07-01T03:17:57",
  "op": [
    "vote",
    {
      "voter": "mistahlee",
      "author": "mistahlee",
      "permlink": "fully-rebuilt-1971-airstream-trailer-for-sale",
      "weight": 10000
    }
  ]
}mistahleepublished a new post: fully-rebuilt-1971-airstream-trailer-for-sale2017/07/01 03:17:57
mistahleepublished a new post: fully-rebuilt-1971-airstream-trailer-for-sale
2017/07/01 03:17:57
| parent author | |
| parent permlink | airstream |
| author | mistahlee |
| permlink | fully-rebuilt-1971-airstream-trailer-for-sale |
| title | Fully Rebuilt 1971 Airstream Trailer For Sale |
| body | Full shell-off restoration of a vintage classic Airstream. (Photos Below) $65,000 USD or BTC Here are just some of the upgrades we made: – Full solar power system including a 3000 watt pure since wave inverter, 480 watts in 3 roof mounted panels, charge controller, automated changeover switch, battery charger and display panel inside. – 4 season Precision Temp NSP 500 On Demand Tankless Water heater, vents out floor. – Stainless steel external power and water inlets – 2 huge 155ah SLA batteries with room for 2 more if desired – Natural Bamboo counter tops – All cupboards made from real wood, no particle board, etc. – Full, 4 burner Danby gas range – Propane or AC Helium fridge 8cuft Atwood 12007 – 2 Fan-tastic Fans front and rear – Electronic keypad lock, keyless entry and deadbolt installed – Security system including door alarm and camera with notifications sent directly to your phone – Hydraulic lift bed for plenty of storage – Custom made couch cushions with liftable sections for even more storage – King Tv Antennae – Soft closers on all doors and cupboards – Brand new never used on board shur-flo water pump – Multiple AC/DC power outlets to accommodate all electronics – Olympian Wave 8 portable catalytic heater (extremely effecient on propane use and will provide enough heat for even the harshest winter nights) – Closed Cell spray foam throughout – 4.5 inches in the floor and 1.5 inches in the walls – All aluminum interior walls – Walnut kitchen table that can be height adjustable and also converts into a queen size bed – Custom curtains – Internet ready with waterproof cable inlet – 30A electrical service with waterproof adapter for regular extension cord plug – Stainless steel light switches and GFCI outlets – Extra large and deep kitchen sink – Moen kitchen faucet with pull out spray mode – Bathroom waterfall faucet – Magnetic oversized Moen shower head – Bamboo seat in shower, stainless steel bathroom sink – Airhead composting toilet, no need for black tank – 2 x 30lbs Aluminum propane tanks on board – Entire propane system is brand new, every single line, fixture, etc was professionally installed and certified – See Level 2 Tank Monitoring System – Low profile, low power consumption, warm LED puck lights throughout on 4 seperate switches including one waterproof LED pucklight installed in the shower – Haier Washing machine – Beautiful brushed nickel fixtures throughout – GPS tracking security feature – Super heavy duty stainless steel hitch lock – New tires, less than 400km on them. Bearings professionally repacked. – Brand new LED rear tail lights, indicator lights and reflectors. – All new exterior reflectors – Every window has been resealed with the frames off and then put back together, 3 windows (including frames) have been replaced and are brand new, the others are in brand new condition. I’ve kept and will provide all manuals and extremely detailed notes on everything about this trailer. This Airstream is in fantastic condition and every inch has been restored, it has travelled less than 100km in its present condition and comes with brand new custom made axels that can support even more weight, which are not yet installed because the current ones are perfectly fine for now. Value of axels – $1,300.00 USD plus import and shipping from New York State. Things that need finishing touches: -Sterilight UV water system needs to be connected to 12v power and main water line -Rear LED tail lights, indicator lights are installed but need to be correctly hooked up inside -New Axels could be installed anytime, not essential at this time. -On board water pump has never been used and would need connecting if intending to use it -Breakaway box and electric brakes would need connecting if using to travel. Please inquire for any more details. Reasonable offers considered.  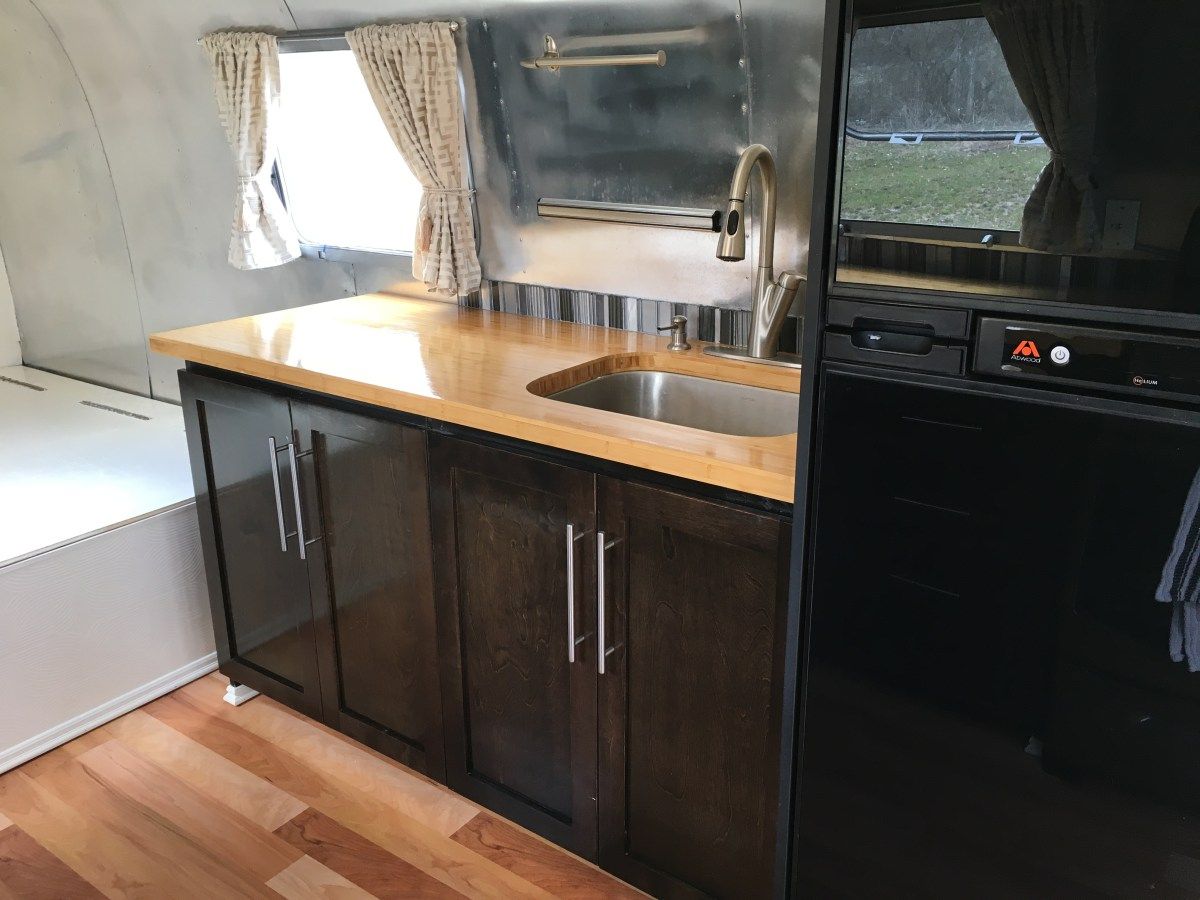 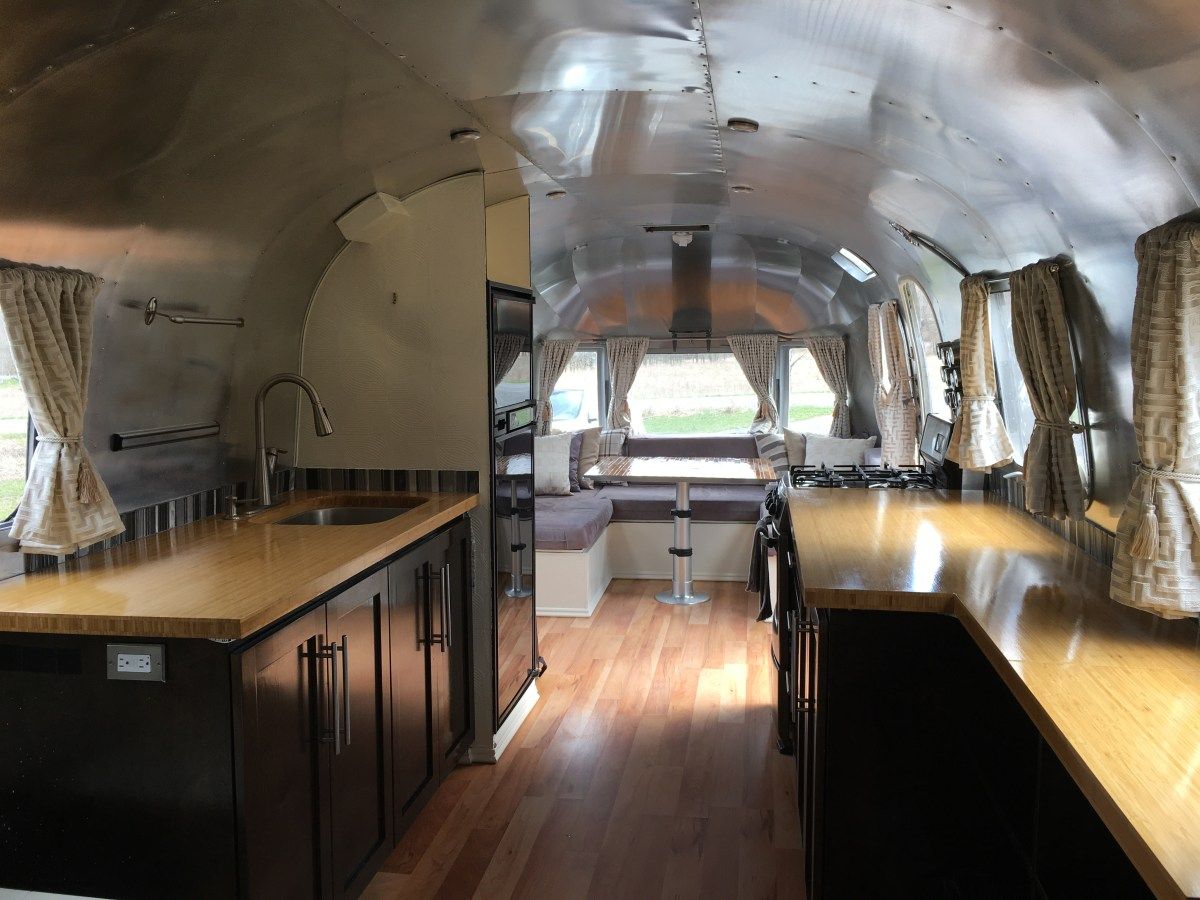 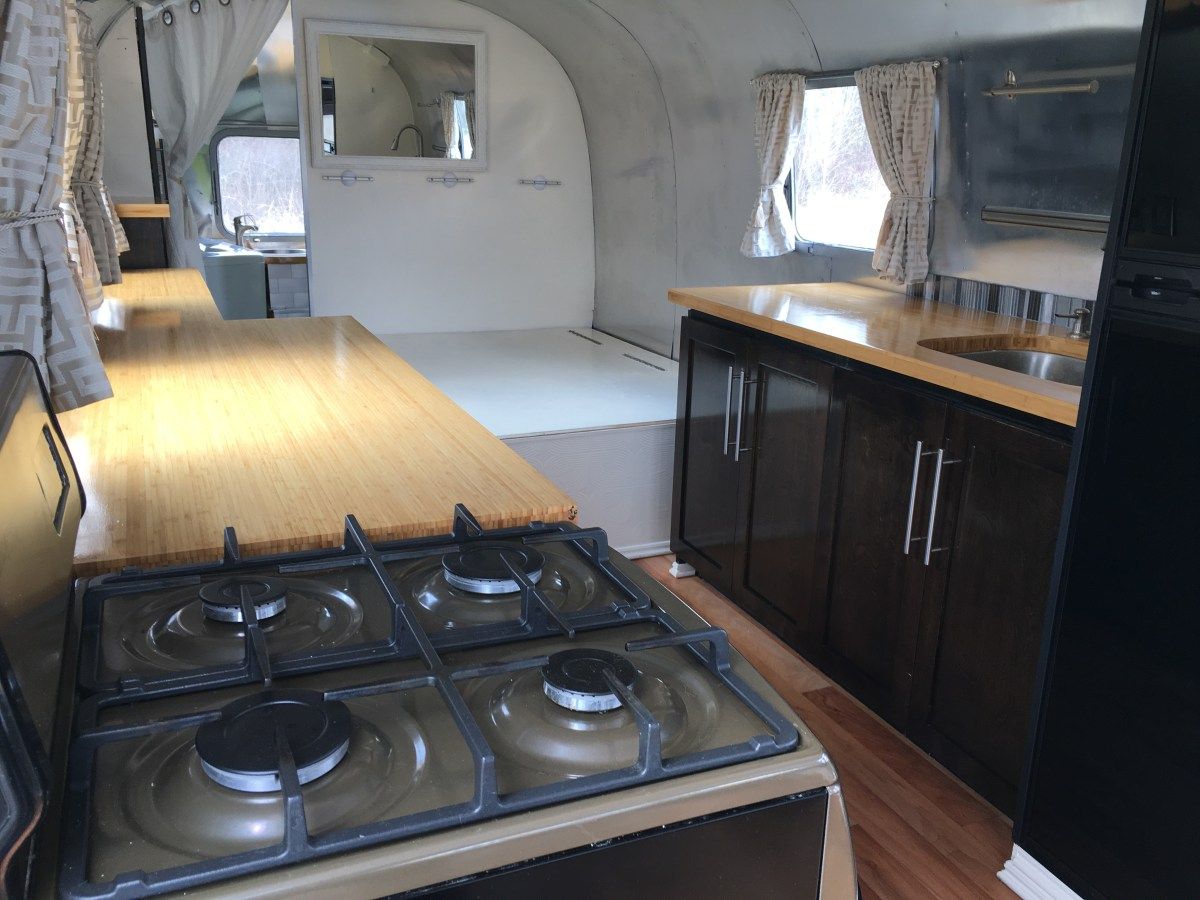  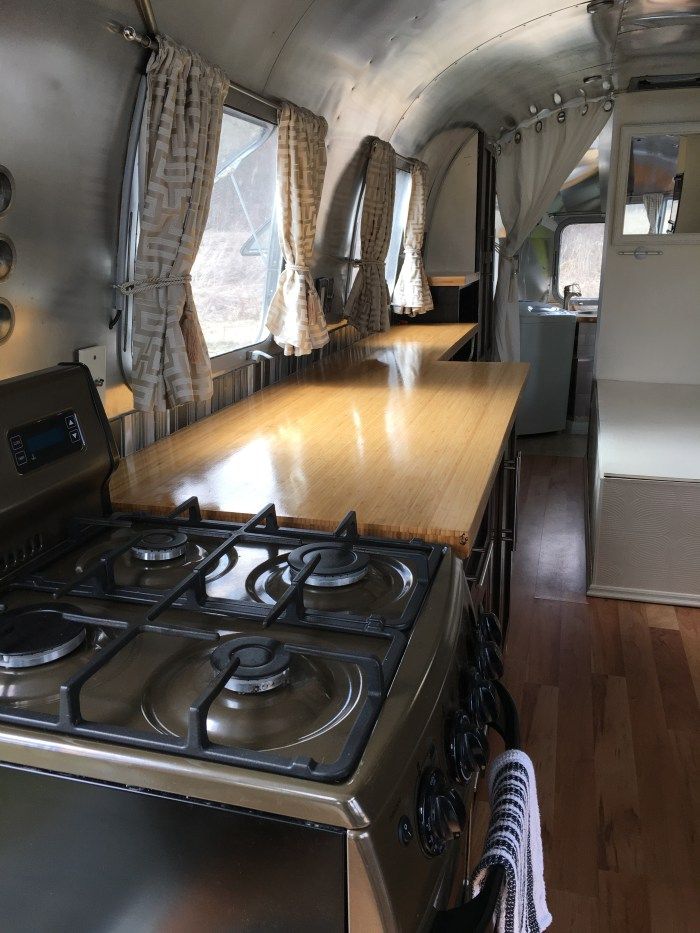!        |
| json metadata | {"tags":["airstream","sale","off-grid","vintage","trailer"],"image":["https://steemitimages.com/DQmUx9UwLFMEq7eknQyAQDHS6Hf1wXeT7MnPb7DsFqxPWUz/img_1600.jpg","https://steemitimages.com/DQmaCNozLRom32AWGkKYqVVMAoB8DX63YSAtgPK53tGxvm4/img_1598.jpg","https://steemitimages.com/DQmd2MqiwueFZZ9nfDLRcGf2Lrb8mz6eZvGBQwWcWyE3bLT/img_1604.jpg","https://steemitimages.com/DQmUQoi9tKsStpUGWJD6CrNAijV9Qm7eZeovjtfVxajsjSz/img_1594.jpg","https://steemitimages.com/DQmQMtria3ZyPHfcZSyz1FafpfpND5okh5JBFmonUSpHZjc/img_1596.jpg","https://steemitimages.com/DQmTnZoQyW5cJRmmQtpNmXdAGGqvQ7QE3WQxuZ7Y2bLSdsk/img_1593.jpg","https://steemitimages.com/DQmWpieGCkF55ZfQtWFfsJbcDNkvRmPJ4f6JLUeXZ2MiBbs/img_1606.jpg","https://steemitimages.com/DQmRM8hGCwL7eyR5ZdppDRLgAUCUob6Qx2bjfDV1j7xMANg/img_1613.jpg","https://steemitimages.com/DQmVsSTbhWJEMTAWn45imtPV3CTZ4aEzFm9p5m3KKDzWmg2/%24_27.JPG","https://steemitimages.com/DQmUE9T1ZNp9LhpBppZ4FASAzBfFEnMdzS4xovE1qX14trt/img_1633.jpg","https://steemitimages.com/DQmUKnqUZzKBqN8ok7TCB6eqhSH4nyCXqpwzUpqa8yKKuCA/img_1636.jpg","https://steemitimages.com/DQmcV3M9nGmFSuAtiHAwBm3DtotYcNivrKLDvz7wbVvH3YG/img_1644.jpg","https://steemitimages.com/DQmcPY8pjFvz1JyA8rRWKEPydFgeNWgTv83RfSGVwSjx8GA/img_1607.jpg"],"app":"steemit/0.1","format":"markdown"} |
| Transaction Info | Block #13291076/Trx ab9ef279c3457d6c68aa6b10f3ae16911691503c |
View Raw JSON Data
{
"trx_id": "ab9ef279c3457d6c68aa6b10f3ae16911691503c",
"block": 13291076,
"trx_in_block": 20,
"op_in_trx": 0,
"virtual_op": 0,
"timestamp": "2017-07-01T03:17:57",
"op": [
"comment",
{
"parent_author": "",
"parent_permlink": "airstream",
"author": "mistahlee",
"permlink": "fully-rebuilt-1971-airstream-trailer-for-sale",
"title": "Fully Rebuilt 1971 Airstream Trailer For Sale",
"body": "Full shell-off restoration of a vintage classic Airstream. (Photos Below)\n\n$65,000 USD or BTC\n\nHere are just some of the upgrades we made:\n\n– Full solar power system including a 3000 watt pure since wave inverter, 480 watts in 3 roof mounted panels, charge controller, automated changeover switch, battery charger and display panel inside. \n– 4 season Precision Temp NSP 500 On Demand Tankless Water heater, vents out floor. \n– Stainless steel external power and water inlets \n– 2 huge 155ah SLA batteries with room for 2 more if desired \n– Natural Bamboo counter tops \n– All cupboards made from real wood, no particle board, etc. \n– Full, 4 burner Danby gas range \n– Propane or AC Helium fridge 8cuft Atwood 12007 \n– 2 Fan-tastic Fans front and rear \n– Electronic keypad lock, keyless entry and deadbolt installed \n– Security system including door alarm and camera with notifications sent directly to your phone \n– Hydraulic lift bed for plenty of storage \n– Custom made couch cushions with liftable sections for even more storage \n– King Tv Antennae \n– Soft closers on all doors and cupboards \n– Brand new never used on board shur-flo water pump \n– Multiple AC/DC power outlets to accommodate all electronics \n– Olympian Wave 8 portable catalytic heater (extremely effecient on propane use and will provide enough heat for even the harshest winter nights) \n– Closed Cell spray foam throughout – 4.5 inches in the floor and 1.5 inches in the walls \n– All aluminum interior walls \n– Walnut kitchen table that can be height adjustable and also converts into a queen size bed\n– Custom curtains \n– Internet ready with waterproof cable inlet \n– 30A electrical service with waterproof adapter for regular extension cord plug \n– Stainless steel light switches and GFCI outlets \n– Extra large and deep kitchen sink \n– Moen kitchen faucet with pull out spray mode \n– Bathroom waterfall faucet \n– Magnetic oversized Moen shower head \n– Bamboo seat in shower, stainless steel bathroom sink \n– Airhead composting toilet, no need for black tank \n– 2 x 30lbs Aluminum propane tanks on board \n– Entire propane system is brand new, every single line, fixture, etc was professionally installed and certified \n– See Level 2 Tank Monitoring System \n– Low profile, low power consumption, warm LED puck lights throughout on 4 seperate switches including one waterproof LED pucklight installed in the shower \n– Haier Washing machine \n– Beautiful brushed nickel fixtures throughout \n– GPS tracking security feature\n– Super heavy duty stainless steel hitch lock\n– New tires, less than 400km on them. Bearings professionally repacked. \n– Brand new LED rear tail lights, indicator lights and reflectors. \n– All new exterior reflectors \n– Every window has been resealed with the frames off and then put back together, 3 windows (including frames) have been replaced and are brand new, the others are in brand new condition. \n\nI’ve kept and will provide all manuals and extremely detailed notes on everything about this trailer. \n\nThis Airstream is in fantastic condition and every inch has been restored, it has travelled less than 100km in its present condition and comes with brand new custom made axels that can support even more weight, which are not yet installed because the current ones are perfectly fine for now. Value of axels – $1,300.00 USD plus import and shipping from New York State. \n\n\n\nThings that need finishing touches: \n\n-Sterilight UV water system needs to be connected to 12v power and main water line \n-Rear LED tail lights, indicator lights are installed but need to be correctly hooked up inside \n-New Axels could be installed anytime, not essential at this time. \n-On board water pump has never been used and would need connecting if intending to use it \n-Breakaway box and electric brakes would need connecting if using to travel. \n\nPlease inquire for any more details. Reasonable offers considered.\n\n\n\n\n\n\n\n\n\n\n\n!\n\n\n\n\n\n\n\n\n\n\n\n\n\n",
"json_metadata": "{\"tags\":[\"airstream\",\"sale\",\"off-grid\",\"vintage\",\"trailer\"],\"image\":[\"https://steemitimages.com/DQmUx9UwLFMEq7eknQyAQDHS6Hf1wXeT7MnPb7DsFqxPWUz/img_1600.jpg\",\"https://steemitimages.com/DQmaCNozLRom32AWGkKYqVVMAoB8DX63YSAtgPK53tGxvm4/img_1598.jpg\",\"https://steemitimages.com/DQmd2MqiwueFZZ9nfDLRcGf2Lrb8mz6eZvGBQwWcWyE3bLT/img_1604.jpg\",\"https://steemitimages.com/DQmUQoi9tKsStpUGWJD6CrNAijV9Qm7eZeovjtfVxajsjSz/img_1594.jpg\",\"https://steemitimages.com/DQmQMtria3ZyPHfcZSyz1FafpfpND5okh5JBFmonUSpHZjc/img_1596.jpg\",\"https://steemitimages.com/DQmTnZoQyW5cJRmmQtpNmXdAGGqvQ7QE3WQxuZ7Y2bLSdsk/img_1593.jpg\",\"https://steemitimages.com/DQmWpieGCkF55ZfQtWFfsJbcDNkvRmPJ4f6JLUeXZ2MiBbs/img_1606.jpg\",\"https://steemitimages.com/DQmRM8hGCwL7eyR5ZdppDRLgAUCUob6Qx2bjfDV1j7xMANg/img_1613.jpg\",\"https://steemitimages.com/DQmVsSTbhWJEMTAWn45imtPV3CTZ4aEzFm9p5m3KKDzWmg2/%24_27.JPG\",\"https://steemitimages.com/DQmUE9T1ZNp9LhpBppZ4FASAzBfFEnMdzS4xovE1qX14trt/img_1633.jpg\",\"https://steemitimages.com/DQmUKnqUZzKBqN8ok7TCB6eqhSH4nyCXqpwzUpqa8yKKuCA/img_1636.jpg\",\"https://steemitimages.com/DQmcV3M9nGmFSuAtiHAwBm3DtotYcNivrKLDvz7wbVvH3YG/img_1644.jpg\",\"https://steemitimages.com/DQmcPY8pjFvz1JyA8rRWKEPydFgeNWgTv83RfSGVwSjx8GA/img_1607.jpg\"],\"app\":\"steemit/0.1\",\"format\":\"markdown\"}"
}
]
}mistahleeclaimed reward balance: 2.392 SBD, 1.690 SP2017/07/01 03:02:06
mistahleeclaimed reward balance: 2.392 SBD, 1.690 SP
2017/07/01 03:02:06
| account | mistahlee |
| reward steem | 0.000 STEEM |
| reward sbd | 2.392 SBD |
| reward vests | 2751.830263 VESTS |
| Transaction Info | Block #13290759/Trx d6a8cec81566797c0ff49e8374cebb2364053f67 |
View Raw JSON Data
{
  "trx_id": "d6a8cec81566797c0ff49e8374cebb2364053f67",
  "block": 13290759,
  "trx_in_block": 1,
  "op_in_trx": 0,
  "virtual_op": 0,
  "timestamp": "2017-07-01T03:02:06",
  "op": [
    "claim_reward_balance",
    {
      "account": "mistahlee",
      "reward_steem": "0.000 STEEM",
      "reward_sbd": "2.392 SBD",
      "reward_vests": "2751.830263 VESTS"
    }
  ]
}mistahleereceived 0.108 SBD, 0.076 SP author reward for @mistahlee / vintage-airstream-travel-trailer-renovation-post-4-stopping-leaks-your-sealant-options2017/06/29 04:53:15
mistahleereceived 0.108 SBD, 0.076 SP author reward for @mistahlee / vintage-airstream-travel-trailer-renovation-post-4-stopping-leaks-your-sealant-options
2017/06/29 04:53:15
| author | mistahlee |
| permlink | vintage-airstream-travel-trailer-renovation-post-4-stopping-leaks-your-sealant-options |
| sbd payout | 0.108 SBD |
| steem payout | 0.000 STEEM |
| vesting payout | 124.142643 VESTS |
| Transaction Info | Block #13235410/Virtual Operation #4 |
View Raw JSON Data
{
  "trx_id": "0000000000000000000000000000000000000000",
  "block": 13235410,
  "trx_in_block": 4294967295,
  "op_in_trx": 0,
  "virtual_op": 4,
  "timestamp": "2017-06-29T04:53:15",
  "op": [
    "author_reward",
    {
      "author": "mistahlee",
      "permlink": "vintage-airstream-travel-trailer-renovation-post-4-stopping-leaks-your-sealant-options",
      "sbd_payout": "0.108 SBD",
      "steem_payout": "0.000 STEEM",
      "vesting_payout": "124.142643 VESTS"
    }
  ]
}mistahleereceived 0.006 SP curation reward for @warrenvee / re-mistahlee-vintage-airstream-travel-trailer-renovation-post-4-polishing-a-vintage-trailer-20170622t044011357z2017/06/29 04:40:18
mistahleereceived 0.006 SP curation reward for @warrenvee / re-mistahlee-vintage-airstream-travel-trailer-renovation-post-4-polishing-a-vintage-trailer-20170622t044011357z
2017/06/29 04:40:18
| curator | mistahlee |
| reward | 10.345225 VESTS |
| comment author | warrenvee |
| comment permlink | re-mistahlee-vintage-airstream-travel-trailer-renovation-post-4-polishing-a-vintage-trailer-20170622t044011357z |
| Transaction Info | Block #13235152/Virtual Operation #9 |
View Raw JSON Data
{
  "trx_id": "0000000000000000000000000000000000000000",
  "block": 13235152,
  "trx_in_block": 4294967295,
  "op_in_trx": 0,
  "virtual_op": 9,
  "timestamp": "2017-06-29T04:40:18",
  "op": [
    "curation_reward",
    {
      "curator": "mistahlee",
      "reward": "10.345225 VESTS",
      "comment_author": "warrenvee",
      "comment_permlink": "re-mistahlee-vintage-airstream-travel-trailer-renovation-post-4-polishing-a-vintage-trailer-20170622t044011357z"
    }
  ]
}mistahleereceived 2.284 SBD, 1.607 SP author reward for @mistahlee / vintage-airstream-travel-trailer-renovation-post-4-polishing-a-vintage-trailer2017/06/29 04:36:00
mistahleereceived 2.284 SBD, 1.607 SP author reward for @mistahlee / vintage-airstream-travel-trailer-renovation-post-4-polishing-a-vintage-trailer
2017/06/29 04:36:00
| author | mistahlee |
| permlink | vintage-airstream-travel-trailer-renovation-post-4-polishing-a-vintage-trailer |
| sbd payout | 2.284 SBD |
| steem payout | 0.000 STEEM |
| vesting payout | 2617.342395 VESTS |
| Transaction Info | Block #13235067/Virtual Operation #8 |
View Raw JSON Data
{
  "trx_id": "0000000000000000000000000000000000000000",
  "block": 13235067,
  "trx_in_block": 4294967295,
  "op_in_trx": 0,
  "virtual_op": 8,
  "timestamp": "2017-06-29T04:36:00",
  "op": [
    "author_reward",
    {
      "author": "mistahlee",
      "permlink": "vintage-airstream-travel-trailer-renovation-post-4-polishing-a-vintage-trailer",
      "sbd_payout": "2.284 SBD",
      "steem_payout": "0.000 STEEM",
      "vesting_payout": "2617.342395 VESTS"
    }
  ]
}mistahleefollowed @dollarvigilante2017/06/22 15:40:45
mistahleefollowed @dollarvigilante
2017/06/22 15:40:45
| required auths | [] |
| required posting auths | ["mistahlee"] |
| id | follow |
| json | ["follow",{"follower":"mistahlee","following":"dollarvigilante","what":["blog"]}] |
| Transaction Info | Block #13047132/Trx f74f0602c4367613d8e10cc908f937a06e18a18c |
View Raw JSON Data
{
  "trx_id": "f74f0602c4367613d8e10cc908f937a06e18a18c",
  "block": 13047132,
  "trx_in_block": 3,
  "op_in_trx": 0,
  "virtual_op": 0,
  "timestamp": "2017-06-22T15:40:45",
  "op": [
    "custom_json",
    {
      "required_auths": [],
      "required_posting_auths": [
        "mistahlee"
      ],
      "id": "follow",
      "json": "[\"follow\",{\"follower\":\"mistahlee\",\"following\":\"dollarvigilante\",\"what\":[\"blog\"]}]"
    }
  ]
}2017/06/22 13:54:15
2017/06/22 13:54:15
| voter | mensphysique |
| author | mistahlee |
| permlink | vintage-airstream-travel-trailer-renovation-post-4-polishing-a-vintage-trailer |
| weight | 10000 (100.00%) |
| Transaction Info | Block #13045002/Trx d923fd8f1e741fb28df52509054ae156c20ead2b |
View Raw JSON Data
{
  "trx_id": "d923fd8f1e741fb28df52509054ae156c20ead2b",
  "block": 13045002,
  "trx_in_block": 25,
  "op_in_trx": 0,
  "virtual_op": 0,
  "timestamp": "2017-06-22T13:54:15",
  "op": [
    "vote",
    {
      "voter": "mensphysique",
      "author": "mistahlee",
      "permlink": "vintage-airstream-travel-trailer-renovation-post-4-polishing-a-vintage-trailer",
      "weight": 10000
    }
  ]
}2017/06/22 11:50:48
2017/06/22 11:50:48
| voter | firesteem |
| author | mistahlee |
| permlink | vintage-airstream-travel-trailer-renovation-post-4-polishing-a-vintage-trailer |
| weight | 10000 (100.00%) |
| Transaction Info | Block #13042536/Trx 540b553be6cd25d20097e13077cf327b02e1c379 |
View Raw JSON Data
{
  "trx_id": "540b553be6cd25d20097e13077cf327b02e1c379",
  "block": 13042536,
  "trx_in_block": 10,
  "op_in_trx": 0,
  "virtual_op": 0,
  "timestamp": "2017-06-22T11:50:48",
  "op": [
    "vote",
    {
      "voter": "firesteem",
      "author": "mistahlee",
      "permlink": "vintage-airstream-travel-trailer-renovation-post-4-polishing-a-vintage-trailer",
      "weight": 10000
    }
  ]
}2017/06/22 07:07:54
2017/06/22 07:07:54
| voter | innuendo |
| author | mistahlee |
| permlink | vintage-airstream-travel-trailer-renovation-post-4-polishing-a-vintage-trailer |
| weight | 2500 (25.00%) |
| Transaction Info | Block #13036878/Trx 7531b235bcecc8809b48ef43f5e978c2e1bc5aed |
View Raw JSON Data
{
  "trx_id": "7531b235bcecc8809b48ef43f5e978c2e1bc5aed",
  "block": 13036878,
  "trx_in_block": 4,
  "op_in_trx": 0,
  "virtual_op": 0,
  "timestamp": "2017-06-22T07:07:54",
  "op": [
    "vote",
    {
      "voter": "innuendo",
      "author": "mistahlee",
      "permlink": "vintage-airstream-travel-trailer-renovation-post-4-polishing-a-vintage-trailer",
      "weight": 2500
    }
  ]
}2017/06/22 06:09:21
2017/06/22 06:09:21
| parent author | mistahlee |
| parent permlink | vintage-airstream-travel-trailer-renovation-post-4-polishing-a-vintage-trailer |
| author | lukmarcus |
| permlink | re-mistahlee-vintage-airstream-travel-trailer-renovation-post-4-polishing-a-vintage-trailer-20170622t060920774z |
| title | |
| body | It's a nice post and I will give you upvote but please don't use tag *polish*. We use it only for content in Polish language. |
| json metadata | {"tags":["airstream"],"app":"steemit/0.1"} |
| Transaction Info | Block #13035708/Trx b06d950729cf8fc52048517b898b77a1804458d0 |
View Raw JSON Data
{
  "trx_id": "b06d950729cf8fc52048517b898b77a1804458d0",
  "block": 13035708,
  "trx_in_block": 9,
  "op_in_trx": 0,
  "virtual_op": 0,
  "timestamp": "2017-06-22T06:09:21",
  "op": [
    "comment",
    {
      "parent_author": "mistahlee",
      "parent_permlink": "vintage-airstream-travel-trailer-renovation-post-4-polishing-a-vintage-trailer",
      "author": "lukmarcus",
      "permlink": "re-mistahlee-vintage-airstream-travel-trailer-renovation-post-4-polishing-a-vintage-trailer-20170622t060920774z",
      "title": "",
      "body": "It's a nice post and I will give you upvote but please don't use tag *polish*. We use it only for content in Polish language.",
      "json_metadata": "{\"tags\":[\"airstream\"],\"app\":\"steemit/0.1\"}"
    }
  ]
}2017/06/22 06:09:09
2017/06/22 06:09:09
| voter | lukmarcus |
| author | mistahlee |
| permlink | vintage-airstream-travel-trailer-renovation-post-4-polishing-a-vintage-trailer |
| weight | 2500 (25.00%) |
| Transaction Info | Block #13035704/Trx 126e388800741f6e4c5ffbbf019f590ac6a622a8 |
View Raw JSON Data
{
  "trx_id": "126e388800741f6e4c5ffbbf019f590ac6a622a8",
  "block": 13035704,
  "trx_in_block": 31,
  "op_in_trx": 0,
  "virtual_op": 0,
  "timestamp": "2017-06-22T06:09:09",
  "op": [
    "vote",
    {
      "voter": "lukmarcus",
      "author": "mistahlee",
      "permlink": "vintage-airstream-travel-trailer-renovation-post-4-polishing-a-vintage-trailer",
      "weight": 2500
    }
  ]
}2017/06/22 04:58:15
2017/06/22 04:58:15
| parent author | warrenvee |
| parent permlink | re-mistahlee-vintage-airstream-travel-trailer-renovation-post-4-polishing-a-vintage-trailer-20170622t044011357z |
| author | mistahlee |
| permlink | re-warrenvee-re-mistahlee-vintage-airstream-travel-trailer-renovation-post-4-polishing-a-vintage-trailer-20170622t045815170z |
| title | |
| body | Thanks very much:) Glad ya like it |
| json metadata | {"tags":["airstream"],"app":"steemit/0.1"} |
| Transaction Info | Block #13034287/Trx eeb41c1aa86ea1e460324219199af3f0fa8c08cf |
View Raw JSON Data
{
  "trx_id": "eeb41c1aa86ea1e460324219199af3f0fa8c08cf",
  "block": 13034287,
  "trx_in_block": 6,
  "op_in_trx": 0,
  "virtual_op": 0,
  "timestamp": "2017-06-22T04:58:15",
  "op": [
    "comment",
    {
      "parent_author": "warrenvee",
      "parent_permlink": "re-mistahlee-vintage-airstream-travel-trailer-renovation-post-4-polishing-a-vintage-trailer-20170622t044011357z",
      "author": "mistahlee",
      "permlink": "re-warrenvee-re-mistahlee-vintage-airstream-travel-trailer-renovation-post-4-polishing-a-vintage-trailer-20170622t045815170z",
      "title": "",
      "body": "Thanks very much:) Glad ya like it",
      "json_metadata": "{\"tags\":[\"airstream\"],\"app\":\"steemit/0.1\"}"
    }
  ]
}2017/06/22 04:57:54
2017/06/22 04:57:54
| voter | mistahlee |
| author | warrenvee |
| permlink | re-mistahlee-vintage-airstream-travel-trailer-renovation-post-4-polishing-a-vintage-trailer-20170622t044011357z |
| weight | 10000 (100.00%) |
| Transaction Info | Block #13034280/Trx 043d6d32e0b441a02a50b789dc5161b27d2100e7 |
View Raw JSON Data
{
  "trx_id": "043d6d32e0b441a02a50b789dc5161b27d2100e7",
  "block": 13034280,
  "trx_in_block": 18,
  "op_in_trx": 0,
  "virtual_op": 0,
  "timestamp": "2017-06-22T04:57:54",
  "op": [
    "vote",
    {
      "voter": "mistahlee",
      "author": "warrenvee",
      "permlink": "re-mistahlee-vintage-airstream-travel-trailer-renovation-post-4-polishing-a-vintage-trailer-20170622t044011357z",
      "weight": 10000
    }
  ]
}2017/06/22 04:54:54
2017/06/22 04:54:54
| parent author | |
| parent permlink | airstream |
| author | mistahlee |
| permlink | vintage-airstream-travel-trailer-renovation-post-4-stopping-leaks-your-sealant-options |
| title | Vintage Airstream Travel Trailer Renovation: Post 5 - Stopping Leaks, your Sealant Options |
| body | There are many online forums suggesting a variety of sealants for Airstream trailers and everyone seems to have a favourite for certain applications. I decided to try them all out and some others too that I had not heard mentioned before. Here’s what I discovered… Trempro 635 Probably the best general purpose sealant for any application with Airstreams. This sealant is very easy to apply smoothly with your finger for visible seals and comes in grey so it will blend in well. It adheres perfectly to aluminum, withstands all kinds of weather for external applications, has flexibility, does not crack and can be used on the inside or outside. You can also use it to seal windows or replace gaskets that are no longer available. It keeps well if you do not finish an entire tube at once. It is not as easy to find as some of the other sealants. Big box hardware stores like Home Depot do not carry it and more specialized stores like Fastenal have to order it in which can take a few days. It is also a little more expensive than some of the others, costing about $12CDN per tube.  Sika Construction Sealant This is very similar to Trempro 635. Its appearance and feel is almost identical. It might even work a little better on roof applications because it seems to completely withstand the sun. Has great flex, dries well, costs about half the price as Trempro and can be purchased at Home Depot without needing to order. Unlike Trempro, this product pretty much needs to be used all at once as it hardens overnight no matter how you plug it up. I did not use it on any interior applications, though you probably could. Many people have written about a product called Sikaflex which I did not find anywhere, however this Sika construction sealant must be pretty close.  Parbond This sealant is more runny than the polyurethane-like ones above, therefore it will seep into small crevices nicely that otherwise might not be accessible to a nozzle. It is not useful for indoor applications and its fumes are very strong. The big draw with this one is that the colour matches aluminum almost perfectly. It is a very sparkly, metallic colour that you wont even notice and it is very easy to apply right out of the tube in a straight, neat line. You will not need to flatten it out with your fingers so its not very messy either. Unfortunately, over time it does peel and crumble in the elements. It will need to be re-applied every so often. It costs about $10CDN and needs to be specially ordered.  Brush On Seam Sealer This product is great for sealing around the aluminum channel and your plywood subfloor and any interior rivets, bolts or screws. They say it is brush on but its quite thick for that so I just used a rubber glove and applied with my hand. It dries a little firmer than Trempro or Sikaflex but still allows a bit of flex. It is airtight, that is for sure. It can be purchased off the shelf at Napa Auto Parts for $45CDN per quart.  Varathane Bar and Table Finish This is a two part epoxy resin/hardener mixture. It is not useful on aluminum but it is great to put a layer a couple inches out from the aluminum channel on the plywood floor. This will protect against any moisture that may accumulate below the visible floor. It dries very hard, although it always looks wet and transparent. It dries flat so you do not have to worry about an uneven floor. You can pour it or apply it with a brush easily, but the brush will not be useable again. As long as you keep the two mixtures separate you can use it for a long time but as soon as they are mixed you must apply it and whatever you don’t use will become rock hard. This stuff is quite expensive but will last a long time and you will find other interesting uses for it too on other projects.  Leak Seal This product works surprisingly well for small applications. I sprayed some on a few rivets inside to test it out and under the aluminum channel that keeps the shell fastened to the plywood. It sprays just like spray paint but after two coats it dries with a very thick rubbery texture. I would not suggest using it for exterior application. Available at many stores and is about $12CDN per can. (https://steemitimages.com/DQmcYVNSTERr6b4WFhr8CNZcHyenWokdogbEWXURVyCMRmf/screen-shot-2014-08-03-at-9-49-59-pm.png) Acryl-R This is a product that is common to Airstream threads. I purchased some and was quite disappointed. You need a special applicator to use it and it is for external use but it did a much poorer job than the Trempro or Sika sealants. Its difficult to apply, is too hard to work with and you should wear some type of ventilator as these fumes are intense.  Below is a photo of a vent that I installed. It has Trempro 635 around it covering all the rivets. The dark colour in the panel next to the vent is the Napa Brush-on Seam Sealer and the dark area on the plywood is the epoxy resin.  A few more photos below of the rivets and aluminum channel being sealed up.   Once all sealants are dry, give your Airstream a good test in a major rain storm or with a hose to check for any leaks you may have missed. Seals around the windows are often overlooked but a common place for leaks. |
| json metadata | {"tags":["airstream","leaks","sealant","trailer","water"],"image":["https://steemitimages.com/DQmPXLjpCAi3ihCc3uX6bt38ix78QCpxTjMu8uDotWKNy9H/screen-shot-2014-08-03-at-9-49-25-pm.png","https://steemitimages.com/DQmXzdQdncMXQCbVGog6xM15zns7tT9vP2CYLvZNbztsGLX/22278-sikaflexconstsealant_300ml_white_4.jpg","https://steemitimages.com/DQmQF37TvJU6u9LrjXjGBG32RHkYjgLyzT44HZ7Kfs7bHqV/vts-256-2.jpg","https://steemitimages.com/DQmWy8tHVnpV7oGFCVNpmZFbDdxd56tugwz1z32fVwT42Lm/nwm.jpg","https://steemitimages.com/DQmTsVeRRqpv6Zvu422h1dvmC3upo6yqnm8VMh1Si1J8qBx/y236000_4.jpg","https://steemitimages.com/DQmcYVNSTERr6b4WFhr8CNZcHyenWokdogbEWXURVyCMRmf/screen-shot-2014-08-03-at-9-49-59-pm.png","https://steemitimages.com/DQmP5tCA9a16a8SQWqdLSCKDhw6Upb3KPiK1JUoADfy14o8/small_acryl-r-16oz-can.jpg","https://steemitimages.com/DQmQizsw7Y8jbXZzaMs86WiMNGXX1dorKNHs4qTW47XSpR5/2014-07-24_03.jpg","https://steemitimages.com/DQmNsAx6jySuV5Fqg8VyRU9ARtGNWMacZiqMxX53dA9LKMZ/2014-07-24_04.jpg","https://steemitimages.com/DQmNUHGCpueWZAbJAdKjpzGCBTRY7tiFjy8ymJhxe7saxj4/2014-07-24_02.jpg"],"app":"steemit/0.1","format":"markdown"} |
| Transaction Info | Block #13034220/Trx 124b3f65c0053aff18940542854128236685464d |
View Raw JSON Data
{
"trx_id": "124b3f65c0053aff18940542854128236685464d",
"block": 13034220,
"trx_in_block": 20,
"op_in_trx": 0,
"virtual_op": 0,
"timestamp": "2017-06-22T04:54:54",
"op": [
"comment",
{
"parent_author": "",
"parent_permlink": "airstream",
"author": "mistahlee",
"permlink": "vintage-airstream-travel-trailer-renovation-post-4-stopping-leaks-your-sealant-options",
"title": "Vintage Airstream Travel Trailer Renovation: Post 5 - Stopping Leaks, your Sealant Options",
"body": "There are many online forums suggesting a variety of sealants for Airstream trailers and everyone seems to have a favourite for certain applications. I decided to try them all out and some others too that I had not heard mentioned before. Here’s what I discovered…\n\nTrempro 635\n\nProbably the best general purpose sealant for any application with Airstreams. This sealant is very easy to apply smoothly with your finger for visible seals and comes in grey so it will blend in well. It adheres perfectly to aluminum, withstands all kinds of weather for external applications, has flexibility, does not crack and can be used on the inside or outside. You can also use it to seal windows or replace gaskets that are no longer available. It keeps well if you do not finish an entire tube at once.\n\nIt is not as easy to find as some of the other sealants. Big box hardware stores like Home Depot do not carry it and more specialized stores like Fastenal have to order it in which can take a few days. It is also a little more expensive than some of the others, costing about $12CDN per tube.\n\n\n\nSika Construction Sealant\n\nThis is very similar to Trempro 635. Its appearance and feel is almost identical. It might even work a little better on roof applications because it seems to completely withstand the sun. Has great flex, dries well, costs about half the price as Trempro and can be purchased at Home Depot without needing to order. Unlike Trempro, this product pretty much needs to be used all at once as it hardens overnight no matter how you plug it up. I did not use it on any interior applications, though you probably could. Many people have written about a product called Sikaflex which I did not find anywhere, however this Sika construction sealant must be pretty close.\n\n\n\nParbond\n\nThis sealant is more runny than the polyurethane-like ones above, therefore it will seep into small crevices nicely that otherwise might not be accessible to a nozzle. It is not useful for indoor applications and its fumes are very strong. The big draw with this one is that the colour matches aluminum almost perfectly. It is a very sparkly, metallic colour that you wont even notice and it is very easy to apply right out of the tube in a straight, neat line. You will not need to flatten it out with your fingers so its not very messy either. Unfortunately, over time it does peel and crumble in the elements. It will need to be re-applied every so often. It costs about $10CDN and needs to be specially ordered.\n\n\n\nBrush On Seam Sealer\n\nThis product is great for sealing around the aluminum channel and your plywood subfloor and any interior rivets, bolts or screws. They say it is brush on but its quite thick for that so I just used a rubber glove and applied with my hand. It dries a little firmer than Trempro or Sikaflex but still allows a bit of flex. It is airtight, that is for sure. It can be purchased off the shelf at Napa Auto Parts for $45CDN per quart.\n\n\n\nVarathane Bar and Table Finish\n\nThis is a two part epoxy resin/hardener mixture. It is not useful on aluminum but it is great to put a layer a couple inches out from the aluminum channel on the plywood floor. This will protect against any moisture that may accumulate below the visible floor. It dries very hard, although it always looks wet and transparent. It dries flat so you do not have to worry about an uneven floor. You can pour it or apply it with a brush easily, but the brush will not be useable again. As long as you keep the two mixtures separate you can use it for a long time but as soon as they are mixed you must apply it and whatever you don’t use will become rock hard. This stuff is quite expensive but will last a long time and you will find other interesting uses for it too on other projects.\n\n\n\nLeak Seal\n\nThis product works surprisingly well for small applications. I sprayed some on a few rivets inside to test it out and under the aluminum channel that keeps the shell fastened to the plywood. It sprays just like spray paint but after two coats it dries with a very thick rubbery texture. I would not suggest using it for exterior application. Available at many stores and is about $12CDN per can.\n\n(https://steemitimages.com/DQmcYVNSTERr6b4WFhr8CNZcHyenWokdogbEWXURVyCMRmf/screen-shot-2014-08-03-at-9-49-59-pm.png)\n\nAcryl-R\n\nThis is a product that is common to Airstream threads. I purchased some and was quite disappointed. You need a special applicator to use it and it is for external use but it did a much poorer job than the Trempro or Sika sealants. Its difficult to apply, is too hard to work with and you should wear some type of ventilator as these fumes are intense.\n\n\n\nBelow is a photo of a vent that I installed. It has Trempro 635 around it covering all the rivets. The dark colour in the panel next to the vent is the Napa Brush-on Seam Sealer and the dark area on the plywood is the epoxy resin.\n\n\n\nA few more photos below of the rivets and aluminum channel being sealed up.\n\n\n\n\n\nOnce all sealants are dry, give your Airstream a good test in a major rain storm or with a hose to check for any leaks you may have missed. Seals around the windows are often overlooked but a common place for leaks.",
"json_metadata": "{\"tags\":[\"airstream\",\"leaks\",\"sealant\",\"trailer\",\"water\"],\"image\":[\"https://steemitimages.com/DQmPXLjpCAi3ihCc3uX6bt38ix78QCpxTjMu8uDotWKNy9H/screen-shot-2014-08-03-at-9-49-25-pm.png\",\"https://steemitimages.com/DQmXzdQdncMXQCbVGog6xM15zns7tT9vP2CYLvZNbztsGLX/22278-sikaflexconstsealant_300ml_white_4.jpg\",\"https://steemitimages.com/DQmQF37TvJU6u9LrjXjGBG32RHkYjgLyzT44HZ7Kfs7bHqV/vts-256-2.jpg\",\"https://steemitimages.com/DQmWy8tHVnpV7oGFCVNpmZFbDdxd56tugwz1z32fVwT42Lm/nwm.jpg\",\"https://steemitimages.com/DQmTsVeRRqpv6Zvu422h1dvmC3upo6yqnm8VMh1Si1J8qBx/y236000_4.jpg\",\"https://steemitimages.com/DQmcYVNSTERr6b4WFhr8CNZcHyenWokdogbEWXURVyCMRmf/screen-shot-2014-08-03-at-9-49-59-pm.png\",\"https://steemitimages.com/DQmP5tCA9a16a8SQWqdLSCKDhw6Upb3KPiK1JUoADfy14o8/small_acryl-r-16oz-can.jpg\",\"https://steemitimages.com/DQmQizsw7Y8jbXZzaMs86WiMNGXX1dorKNHs4qTW47XSpR5/2014-07-24_03.jpg\",\"https://steemitimages.com/DQmNsAx6jySuV5Fqg8VyRU9ARtGNWMacZiqMxX53dA9LKMZ/2014-07-24_04.jpg\",\"https://steemitimages.com/DQmNUHGCpueWZAbJAdKjpzGCBTRY7tiFjy8ymJhxe7saxj4/2014-07-24_02.jpg\"],\"app\":\"steemit/0.1\",\"format\":\"markdown\"}"
}
]
}2017/06/22 04:53:57
2017/06/22 04:53:57
| voter | kwf |
| author | mistahlee |
| permlink | vintage-airstream-travel-trailer-renovation-post-4-stopping-leaks-your-sealant-options |
| weight | 10000 (100.00%) |
| Transaction Info | Block #13034201/Trx 1720097b28b157e41d35bcdce0abe48228bd5789 |
View Raw JSON Data
{
  "trx_id": "1720097b28b157e41d35bcdce0abe48228bd5789",
  "block": 13034201,
  "trx_in_block": 3,
  "op_in_trx": 0,
  "virtual_op": 0,
  "timestamp": "2017-06-22T04:53:57",
  "op": [
    "vote",
    {
      "voter": "kwf",
      "author": "mistahlee",
      "permlink": "vintage-airstream-travel-trailer-renovation-post-4-stopping-leaks-your-sealant-options",
      "weight": 10000
    }
  ]
}2017/06/22 04:53:39
2017/06/22 04:53:39
| voter | teukukhaidir |
| author | mistahlee |
| permlink | vintage-airstream-travel-trailer-renovation-post-4-stopping-leaks-your-sealant-options |
| weight | 10000 (100.00%) |
| Transaction Info | Block #13034195/Trx 8649d18b6f702d6c0b8b5682bde992a7fed08479 |
View Raw JSON Data
{
  "trx_id": "8649d18b6f702d6c0b8b5682bde992a7fed08479",
  "block": 13034195,
  "trx_in_block": 10,
  "op_in_trx": 0,
  "virtual_op": 0,
  "timestamp": "2017-06-22T04:53:39",
  "op": [
    "vote",
    {
      "voter": "teukukhaidir",
      "author": "mistahlee",
      "permlink": "vintage-airstream-travel-trailer-renovation-post-4-stopping-leaks-your-sealant-options",
      "weight": 10000
    }
  ]
}2017/06/22 04:53:15
2017/06/22 04:53:15
| voter | mistahlee |
| author | mistahlee |
| permlink | vintage-airstream-travel-trailer-renovation-post-4-stopping-leaks-your-sealant-options |
| weight | 10000 (100.00%) |
| Transaction Info | Block #13034187/Trx bdf7f1a5d2c3b1bfa50609bbcd6d55b91c90580b |
View Raw JSON Data
{
  "trx_id": "bdf7f1a5d2c3b1bfa50609bbcd6d55b91c90580b",
  "block": 13034187,
  "trx_in_block": 8,
  "op_in_trx": 0,
  "virtual_op": 0,
  "timestamp": "2017-06-22T04:53:15",
  "op": [
    "vote",
    {
      "voter": "mistahlee",
      "author": "mistahlee",
      "permlink": "vintage-airstream-travel-trailer-renovation-post-4-stopping-leaks-your-sealant-options",
      "weight": 10000
    }
  ]
}2017/06/22 04:53:15
2017/06/22 04:53:15
| parent author | |
| parent permlink | airstream |
| author | mistahlee |
| permlink | vintage-airstream-travel-trailer-renovation-post-4-stopping-leaks-your-sealant-options |
| title | Vintage Airstream Travel Trailer Renovation: Post 4 - Stopping Leaks, your Sealant Options |
| body | There are many online forums suggesting a variety of sealants for Airstream trailers and everyone seems to have a favourite for certain applications. I decided to try them all out and some others too that I had not heard mentioned before. Here’s what I discovered… Trempro 635 Probably the best general purpose sealant for any application with Airstreams. This sealant is very easy to apply smoothly with your finger for visible seals and comes in grey so it will blend in well. It adheres perfectly to aluminum, withstands all kinds of weather for external applications, has flexibility, does not crack and can be used on the inside or outside. You can also use it to seal windows or replace gaskets that are no longer available. It keeps well if you do not finish an entire tube at once. It is not as easy to find as some of the other sealants. Big box hardware stores like Home Depot do not carry it and more specialized stores like Fastenal have to order it in which can take a few days. It is also a little more expensive than some of the others, costing about $12CDN per tube.  Sika Construction Sealant This is very similar to Trempro 635. Its appearance and feel is almost identical. It might even work a little better on roof applications because it seems to completely withstand the sun. Has great flex, dries well, costs about half the price as Trempro and can be purchased at Home Depot without needing to order. Unlike Trempro, this product pretty much needs to be used all at once as it hardens overnight no matter how you plug it up. I did not use it on any interior applications, though you probably could. Many people have written about a product called Sikaflex which I did not find anywhere, however this Sika construction sealant must be pretty close.  Parbond This sealant is more runny than the polyurethane-like ones above, therefore it will seep into small crevices nicely that otherwise might not be accessible to a nozzle. It is not useful for indoor applications and its fumes are very strong. The big draw with this one is that the colour matches aluminum almost perfectly. It is a very sparkly, metallic colour that you wont even notice and it is very easy to apply right out of the tube in a straight, neat line. You will not need to flatten it out with your fingers so its not very messy either. Unfortunately, over time it does peel and crumble in the elements. It will need to be re-applied every so often. It costs about $10CDN and needs to be specially ordered.  Brush On Seam Sealer This product is great for sealing around the aluminum channel and your plywood subfloor and any interior rivets, bolts or screws. They say it is brush on but its quite thick for that so I just used a rubber glove and applied with my hand. It dries a little firmer than Trempro or Sikaflex but still allows a bit of flex. It is airtight, that is for sure. It can be purchased off the shelf at Napa Auto Parts for $45CDN per quart.  Varathane Bar and Table Finish This is a two part epoxy resin/hardener mixture. It is not useful on aluminum but it is great to put a layer a couple inches out from the aluminum channel on the plywood floor. This will protect against any moisture that may accumulate below the visible floor. It dries very hard, although it always looks wet and transparent. It dries flat so you do not have to worry about an uneven floor. You can pour it or apply it with a brush easily, but the brush will not be useable again. As long as you keep the two mixtures separate you can use it for a long time but as soon as they are mixed you must apply it and whatever you don’t use will become rock hard. This stuff is quite expensive but will last a long time and you will find other interesting uses for it too on other projects.  Leak Seal This product works surprisingly well for small applications. I sprayed some on a few rivets inside to test it out and under the aluminum channel that keeps the shell fastened to the plywood. It sprays just like spray paint but after two coats it dries with a very thick rubbery texture. I would not suggest using it for exterior application. Available at many stores and is about $12CDN per can. (https://steemitimages.com/DQmcYVNSTERr6b4WFhr8CNZcHyenWokdogbEWXURVyCMRmf/screen-shot-2014-08-03-at-9-49-59-pm.png) Acryl-R This is a product that is common to Airstream threads. I purchased some and was quite disappointed. You need a special applicator to use it and it is for external use but it did a much poorer job than the Trempro or Sika sealants. Its difficult to apply, is too hard to work with and you should wear some type of ventilator as these fumes are intense.  Below is a photo of a vent that I installed. It has Trempro 635 around it covering all the rivets. The dark colour in the panel next to the vent is the Napa Brush-on Seam Sealer and the dark area on the plywood is the epoxy resin.  A few more photos below of the rivets and aluminum channel being sealed up.   Once all sealants are dry, give your Airstream a good test in a major rain storm or with a hose to check for any leaks you may have missed. Seals around the windows are often overlooked but a common place for leaks. |
| json metadata | {"tags":["airstream","leaks","sealant","trailer","water"],"image":["https://steemitimages.com/DQmPXLjpCAi3ihCc3uX6bt38ix78QCpxTjMu8uDotWKNy9H/screen-shot-2014-08-03-at-9-49-25-pm.png","https://steemitimages.com/DQmXzdQdncMXQCbVGog6xM15zns7tT9vP2CYLvZNbztsGLX/22278-sikaflexconstsealant_300ml_white_4.jpg","https://steemitimages.com/DQmQF37TvJU6u9LrjXjGBG32RHkYjgLyzT44HZ7Kfs7bHqV/vts-256-2.jpg","https://steemitimages.com/DQmWy8tHVnpV7oGFCVNpmZFbDdxd56tugwz1z32fVwT42Lm/nwm.jpg","https://steemitimages.com/DQmTsVeRRqpv6Zvu422h1dvmC3upo6yqnm8VMh1Si1J8qBx/y236000_4.jpg","https://steemitimages.com/DQmcYVNSTERr6b4WFhr8CNZcHyenWokdogbEWXURVyCMRmf/screen-shot-2014-08-03-at-9-49-59-pm.png","https://steemitimages.com/DQmP5tCA9a16a8SQWqdLSCKDhw6Upb3KPiK1JUoADfy14o8/small_acryl-r-16oz-can.jpg","https://steemitimages.com/DQmQizsw7Y8jbXZzaMs86WiMNGXX1dorKNHs4qTW47XSpR5/2014-07-24_03.jpg","https://steemitimages.com/DQmNsAx6jySuV5Fqg8VyRU9ARtGNWMacZiqMxX53dA9LKMZ/2014-07-24_04.jpg","https://steemitimages.com/DQmNUHGCpueWZAbJAdKjpzGCBTRY7tiFjy8ymJhxe7saxj4/2014-07-24_02.jpg"],"app":"steemit/0.1","format":"markdown"} |
| Transaction Info | Block #13034187/Trx bdf7f1a5d2c3b1bfa50609bbcd6d55b91c90580b |
View Raw JSON Data
{
"trx_id": "bdf7f1a5d2c3b1bfa50609bbcd6d55b91c90580b",
"block": 13034187,
"trx_in_block": 8,
"op_in_trx": 0,
"virtual_op": 0,
"timestamp": "2017-06-22T04:53:15",
"op": [
"comment",
{
"parent_author": "",
"parent_permlink": "airstream",
"author": "mistahlee",
"permlink": "vintage-airstream-travel-trailer-renovation-post-4-stopping-leaks-your-sealant-options",
"title": "Vintage Airstream Travel Trailer Renovation: Post 4 - Stopping Leaks, your Sealant Options",
"body": "There are many online forums suggesting a variety of sealants for Airstream trailers and everyone seems to have a favourite for certain applications. I decided to try them all out and some others too that I had not heard mentioned before. Here’s what I discovered…\n\nTrempro 635\n\nProbably the best general purpose sealant for any application with Airstreams. This sealant is very easy to apply smoothly with your finger for visible seals and comes in grey so it will blend in well. It adheres perfectly to aluminum, withstands all kinds of weather for external applications, has flexibility, does not crack and can be used on the inside or outside. You can also use it to seal windows or replace gaskets that are no longer available. It keeps well if you do not finish an entire tube at once.\n\nIt is not as easy to find as some of the other sealants. Big box hardware stores like Home Depot do not carry it and more specialized stores like Fastenal have to order it in which can take a few days. It is also a little more expensive than some of the others, costing about $12CDN per tube.\n\n\n\nSika Construction Sealant\n\nThis is very similar to Trempro 635. Its appearance and feel is almost identical. It might even work a little better on roof applications because it seems to completely withstand the sun. Has great flex, dries well, costs about half the price as Trempro and can be purchased at Home Depot without needing to order. Unlike Trempro, this product pretty much needs to be used all at once as it hardens overnight no matter how you plug it up. I did not use it on any interior applications, though you probably could. Many people have written about a product called Sikaflex which I did not find anywhere, however this Sika construction sealant must be pretty close.\n\n\n\nParbond\n\nThis sealant is more runny than the polyurethane-like ones above, therefore it will seep into small crevices nicely that otherwise might not be accessible to a nozzle. It is not useful for indoor applications and its fumes are very strong. The big draw with this one is that the colour matches aluminum almost perfectly. It is a very sparkly, metallic colour that you wont even notice and it is very easy to apply right out of the tube in a straight, neat line. You will not need to flatten it out with your fingers so its not very messy either. Unfortunately, over time it does peel and crumble in the elements. It will need to be re-applied every so often. It costs about $10CDN and needs to be specially ordered.\n\n\n\nBrush On Seam Sealer\n\nThis product is great for sealing around the aluminum channel and your plywood subfloor and any interior rivets, bolts or screws. They say it is brush on but its quite thick for that so I just used a rubber glove and applied with my hand. It dries a little firmer than Trempro or Sikaflex but still allows a bit of flex. It is airtight, that is for sure. It can be purchased off the shelf at Napa Auto Parts for $45CDN per quart.\n\n\n\nVarathane Bar and Table Finish\n\nThis is a two part epoxy resin/hardener mixture. It is not useful on aluminum but it is great to put a layer a couple inches out from the aluminum channel on the plywood floor. This will protect against any moisture that may accumulate below the visible floor. It dries very hard, although it always looks wet and transparent. It dries flat so you do not have to worry about an uneven floor. You can pour it or apply it with a brush easily, but the brush will not be useable again. As long as you keep the two mixtures separate you can use it for a long time but as soon as they are mixed you must apply it and whatever you don’t use will become rock hard. This stuff is quite expensive but will last a long time and you will find other interesting uses for it too on other projects.\n\n\n\nLeak Seal\n\nThis product works surprisingly well for small applications. I sprayed some on a few rivets inside to test it out and under the aluminum channel that keeps the shell fastened to the plywood. It sprays just like spray paint but after two coats it dries with a very thick rubbery texture. I would not suggest using it for exterior application. Available at many stores and is about $12CDN per can.\n\n(https://steemitimages.com/DQmcYVNSTERr6b4WFhr8CNZcHyenWokdogbEWXURVyCMRmf/screen-shot-2014-08-03-at-9-49-59-pm.png)\n\nAcryl-R\n\nThis is a product that is common to Airstream threads. I purchased some and was quite disappointed. You need a special applicator to use it and it is for external use but it did a much poorer job than the Trempro or Sika sealants. Its difficult to apply, is too hard to work with and you should wear some type of ventilator as these fumes are intense.\n\n\n\nBelow is a photo of a vent that I installed. It has Trempro 635 around it covering all the rivets. The dark colour in the panel next to the vent is the Napa Brush-on Seam Sealer and the dark area on the plywood is the epoxy resin.\n\n\n\nA few more photos below of the rivets and aluminum channel being sealed up.\n\n\n\n\n\nOnce all sealants are dry, give your Airstream a good test in a major rain storm or with a hose to check for any leaks you may have missed. Seals around the windows are often overlooked but a common place for leaks.",
"json_metadata": "{\"tags\":[\"airstream\",\"leaks\",\"sealant\",\"trailer\",\"water\"],\"image\":[\"https://steemitimages.com/DQmPXLjpCAi3ihCc3uX6bt38ix78QCpxTjMu8uDotWKNy9H/screen-shot-2014-08-03-at-9-49-25-pm.png\",\"https://steemitimages.com/DQmXzdQdncMXQCbVGog6xM15zns7tT9vP2CYLvZNbztsGLX/22278-sikaflexconstsealant_300ml_white_4.jpg\",\"https://steemitimages.com/DQmQF37TvJU6u9LrjXjGBG32RHkYjgLyzT44HZ7Kfs7bHqV/vts-256-2.jpg\",\"https://steemitimages.com/DQmWy8tHVnpV7oGFCVNpmZFbDdxd56tugwz1z32fVwT42Lm/nwm.jpg\",\"https://steemitimages.com/DQmTsVeRRqpv6Zvu422h1dvmC3upo6yqnm8VMh1Si1J8qBx/y236000_4.jpg\",\"https://steemitimages.com/DQmcYVNSTERr6b4WFhr8CNZcHyenWokdogbEWXURVyCMRmf/screen-shot-2014-08-03-at-9-49-59-pm.png\",\"https://steemitimages.com/DQmP5tCA9a16a8SQWqdLSCKDhw6Upb3KPiK1JUoADfy14o8/small_acryl-r-16oz-can.jpg\",\"https://steemitimages.com/DQmQizsw7Y8jbXZzaMs86WiMNGXX1dorKNHs4qTW47XSpR5/2014-07-24_03.jpg\",\"https://steemitimages.com/DQmNsAx6jySuV5Fqg8VyRU9ARtGNWMacZiqMxX53dA9LKMZ/2014-07-24_04.jpg\",\"https://steemitimages.com/DQmNUHGCpueWZAbJAdKjpzGCBTRY7tiFjy8ymJhxe7saxj4/2014-07-24_02.jpg\"],\"app\":\"steemit/0.1\",\"format\":\"markdown\"}"
}
]
}2017/06/22 04:40:21
2017/06/22 04:40:21
| voter | warrenvee |
| author | mistahlee |
| permlink | vintage-airstream-travel-trailer-renovation-post-4-polishing-a-vintage-trailer |
| weight | 10000 (100.00%) |
| Transaction Info | Block #13033929/Trx 513156b7d04df9dc3b95e23797e5530c7ce2e050 |
View Raw JSON Data
{
  "trx_id": "513156b7d04df9dc3b95e23797e5530c7ce2e050",
  "block": 13033929,
  "trx_in_block": 11,
  "op_in_trx": 0,
  "virtual_op": 0,
  "timestamp": "2017-06-22T04:40:21",
  "op": [
    "vote",
    {
      "voter": "warrenvee",
      "author": "mistahlee",
      "permlink": "vintage-airstream-travel-trailer-renovation-post-4-polishing-a-vintage-trailer",
      "weight": 10000
    }
  ]
}2017/06/22 04:40:18
2017/06/22 04:40:18
| parent author | mistahlee |
| parent permlink | vintage-airstream-travel-trailer-renovation-post-4-polishing-a-vintage-trailer |
| author | warrenvee |
| permlink | re-mistahlee-vintage-airstream-travel-trailer-renovation-post-4-polishing-a-vintage-trailer-20170622t044011357z |
| title | |
| body | I like the finished look, Good job bud :) I will have to follow you |
| json metadata | {"tags":["airstream"],"app":"steemit/0.1"} |
| Transaction Info | Block #13033928/Trx ae87bf104910455a1757d935ac97dc6f17513dfa |
View Raw JSON Data
{
  "trx_id": "ae87bf104910455a1757d935ac97dc6f17513dfa",
  "block": 13033928,
  "trx_in_block": 4,
  "op_in_trx": 0,
  "virtual_op": 0,
  "timestamp": "2017-06-22T04:40:18",
  "op": [
    "comment",
    {
      "parent_author": "mistahlee",
      "parent_permlink": "vintage-airstream-travel-trailer-renovation-post-4-polishing-a-vintage-trailer",
      "author": "warrenvee",
      "permlink": "re-mistahlee-vintage-airstream-travel-trailer-renovation-post-4-polishing-a-vintage-trailer-20170622t044011357z",
      "title": "",
      "body": "I like the finished look, Good job bud :) I will have to follow you",
      "json_metadata": "{\"tags\":[\"airstream\"],\"app\":\"steemit/0.1\"}"
    }
  ]
}mistahleeupdated their account properties2017/06/22 04:37:33
mistahleeupdated their account properties
2017/06/22 04:37:33
| account | mistahlee |
| memo key | STM5uHVDHdWpF3mPDn7oC9yagSxqSA6vmc3ooWaFMTCHQQJYg1u8U |
| json metadata | {"profile":{"name":"mistah lee"}} |
| Transaction Info | Block #13033873/Trx 58b8c9fcb3b0fcdfc14545aee0716ca00345b847 |
View Raw JSON Data
{
  "trx_id": "58b8c9fcb3b0fcdfc14545aee0716ca00345b847",
  "block": 13033873,
  "trx_in_block": 9,
  "op_in_trx": 0,
  "virtual_op": 0,
  "timestamp": "2017-06-22T04:37:33",
  "op": [
    "account_update",
    {
      "account": "mistahlee",
      "memo_key": "STM5uHVDHdWpF3mPDn7oC9yagSxqSA6vmc3ooWaFMTCHQQJYg1u8U",
      "json_metadata": "{\"profile\":{\"name\":\"mistah lee\"}}"
    }
  ]
}2017/06/22 04:36:00
2017/06/22 04:36:00
| voter | mistahlee |
| author | mistahlee |
| permlink | vintage-airstream-travel-trailer-renovation-post-4-polishing-a-vintage-trailer |
| weight | 10000 (100.00%) |
| Transaction Info | Block #13033842/Trx 642819bb64d1bf1517e5e22debd15d5184847ad5 |
View Raw JSON Data
{
  "trx_id": "642819bb64d1bf1517e5e22debd15d5184847ad5",
  "block": 13033842,
  "trx_in_block": 17,
  "op_in_trx": 0,
  "virtual_op": 0,
  "timestamp": "2017-06-22T04:36:00",
  "op": [
    "vote",
    {
      "voter": "mistahlee",
      "author": "mistahlee",
      "permlink": "vintage-airstream-travel-trailer-renovation-post-4-polishing-a-vintage-trailer",
      "weight": 10000
    }
  ]
}mistahleepublished a new post: vintage-airstream-travel-trailer-renovation-post-4-polishing-a-vintage-trailer2017/06/22 04:36:00
mistahleepublished a new post: vintage-airstream-travel-trailer-renovation-post-4-polishing-a-vintage-trailer
2017/06/22 04:36:00
| parent author | |
| parent permlink | airstream |
| author | mistahlee |
| permlink | vintage-airstream-travel-trailer-renovation-post-4-polishing-a-vintage-trailer |
| title | Vintage Airstream Travel Trailer Renovation: Post 4 - Polishing A Vintage Trailer |
| body | If your Airstream is from the mid 60’s or later, you have a plasticoat that needs to be removed before polishing. In my case, the plasticoat was peeling off the top and some of the sides.  It is not very difficult to remove, but it is messy. Many people online have suggested using a product called Eldorado paint stripper but its very expensive and needs to be ordered. You can use any paint stripper that is safe for aluminum and it will work just fine. I used this product (below) that I found at Home Depot. Two cans will likely be enough for my 31 foot Land Yacht. 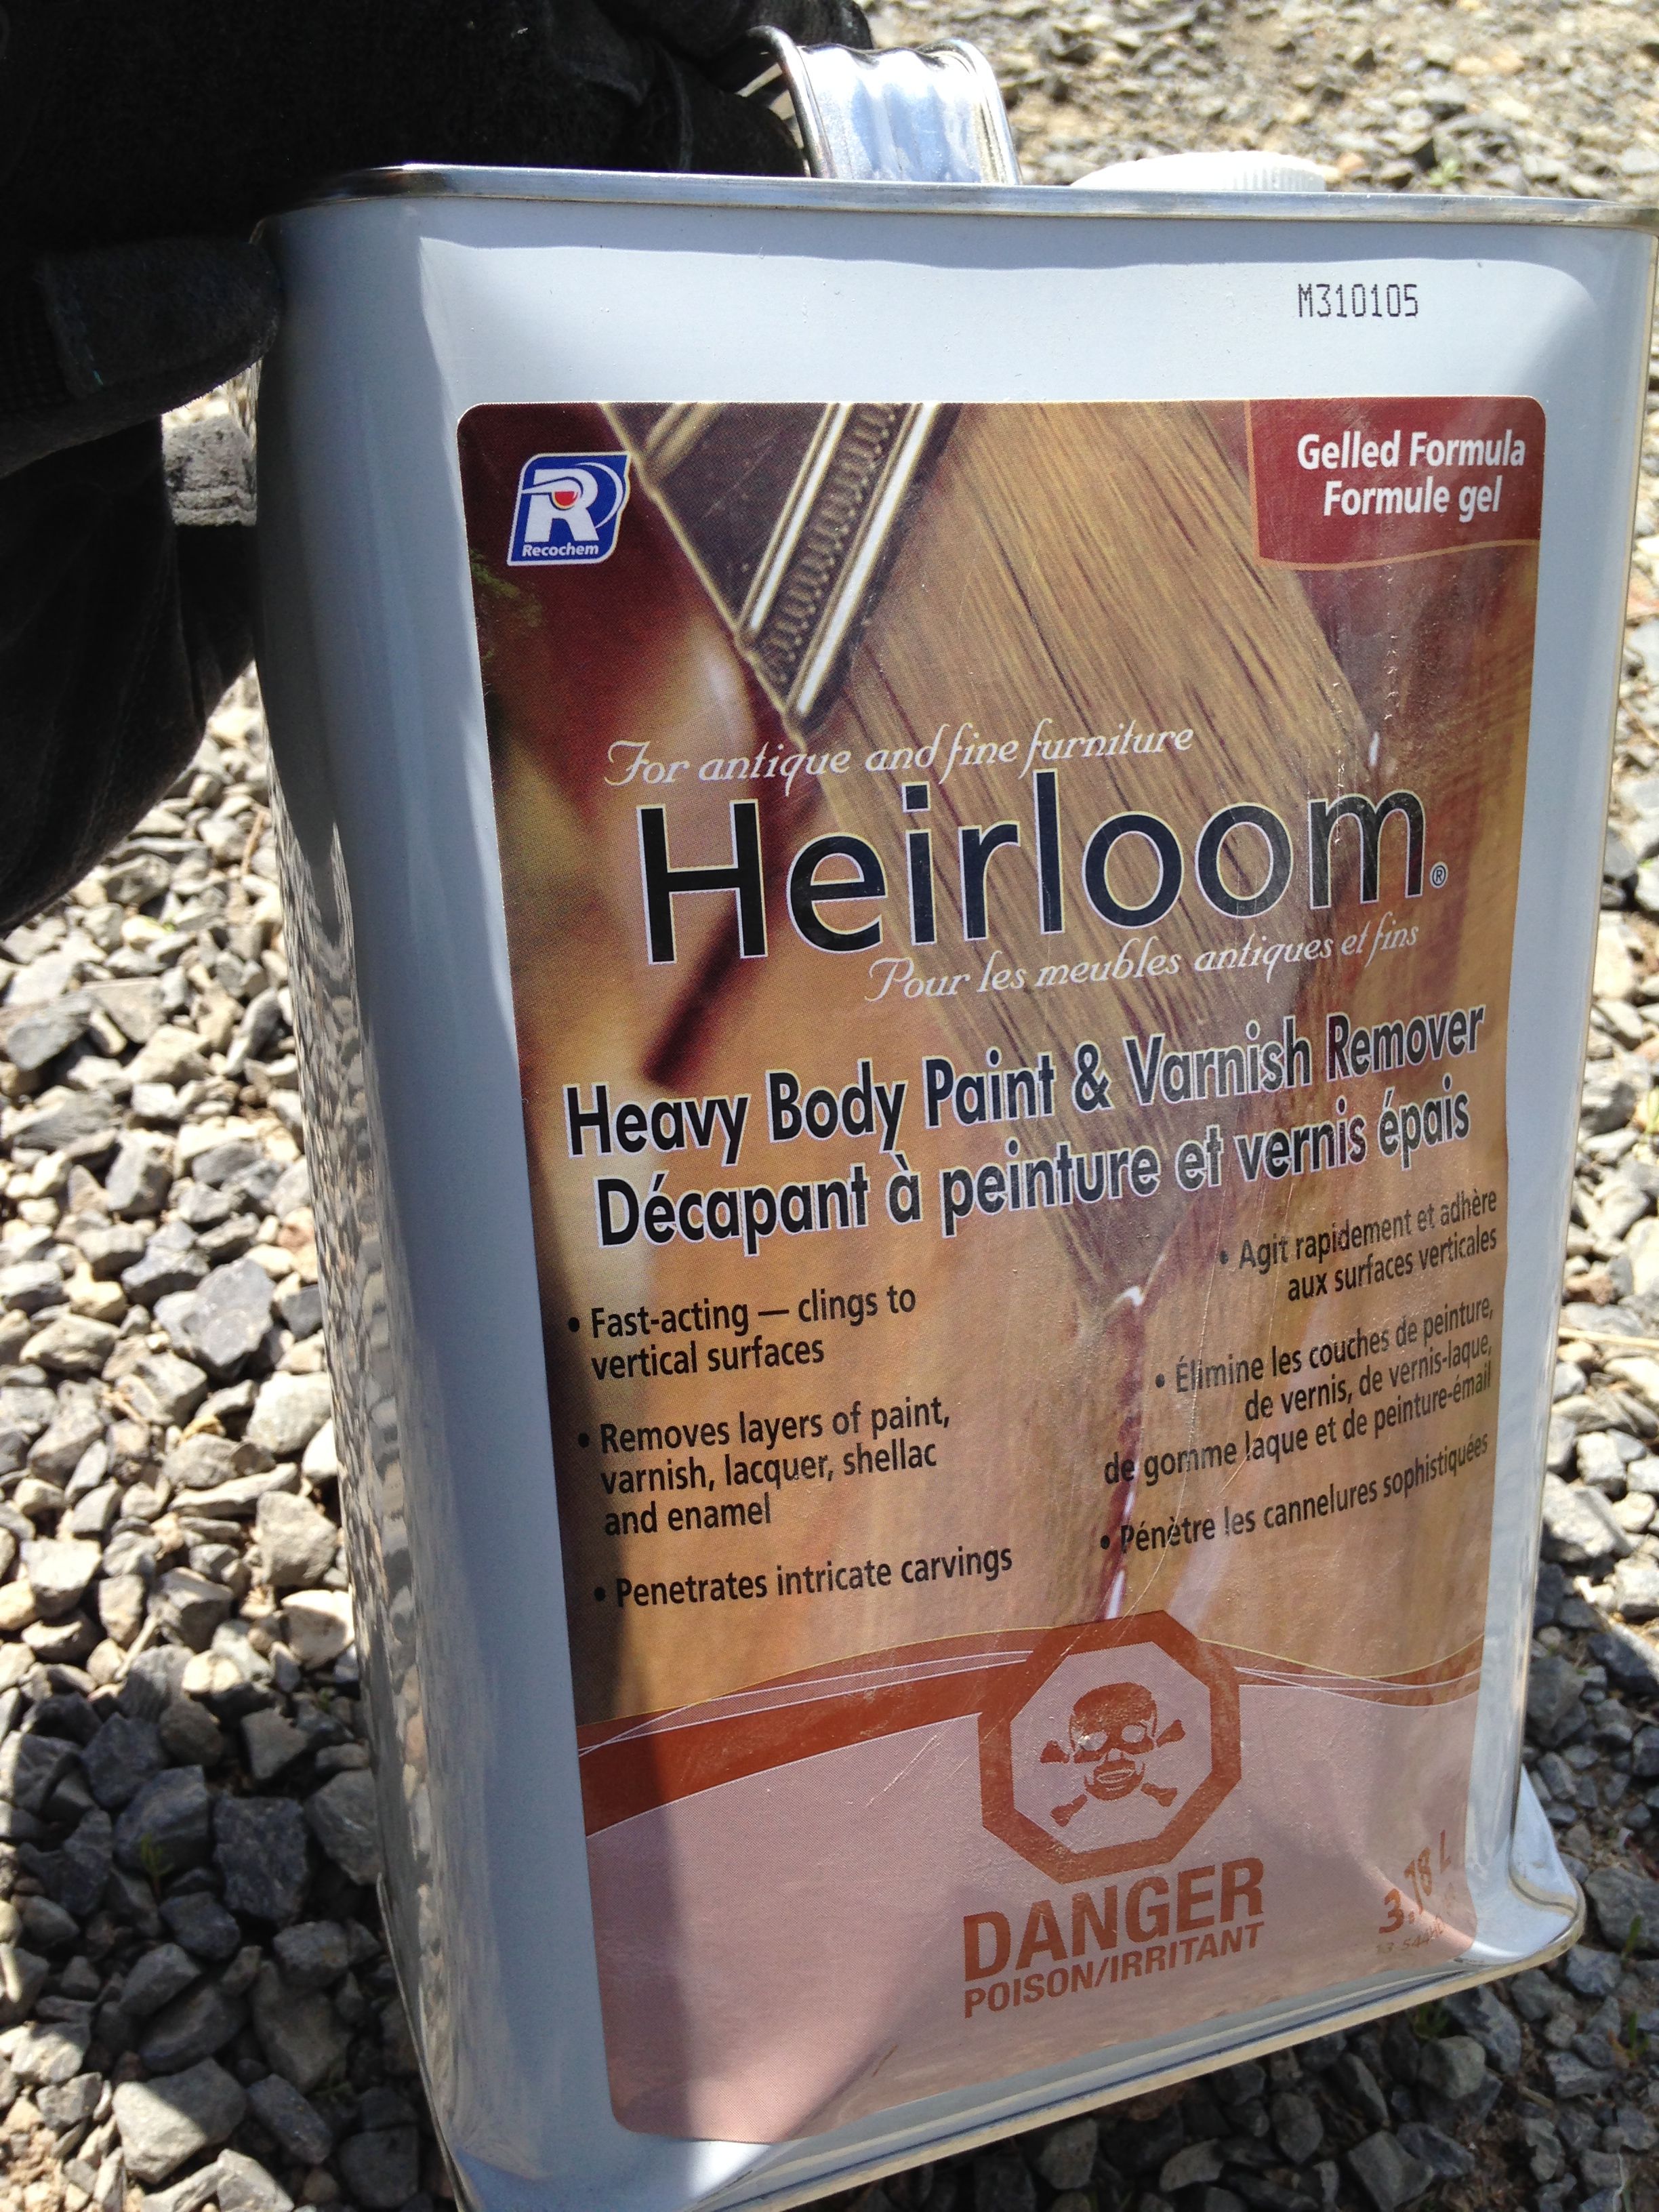 Use a paintbrush, it applies in a clear gel form. Wear rubber gloves as it is obviously very corrosive and you want to avoid skin contact. Apply it liberally and let it sit for about 20 minutes or so. You will see the plasticoat start to bubble up almost immediately. Below is another photo showing the plasticoat corroding from the roof, but it is still completely in tact along the sides. It all has to be removed for a proper polish to take effect. 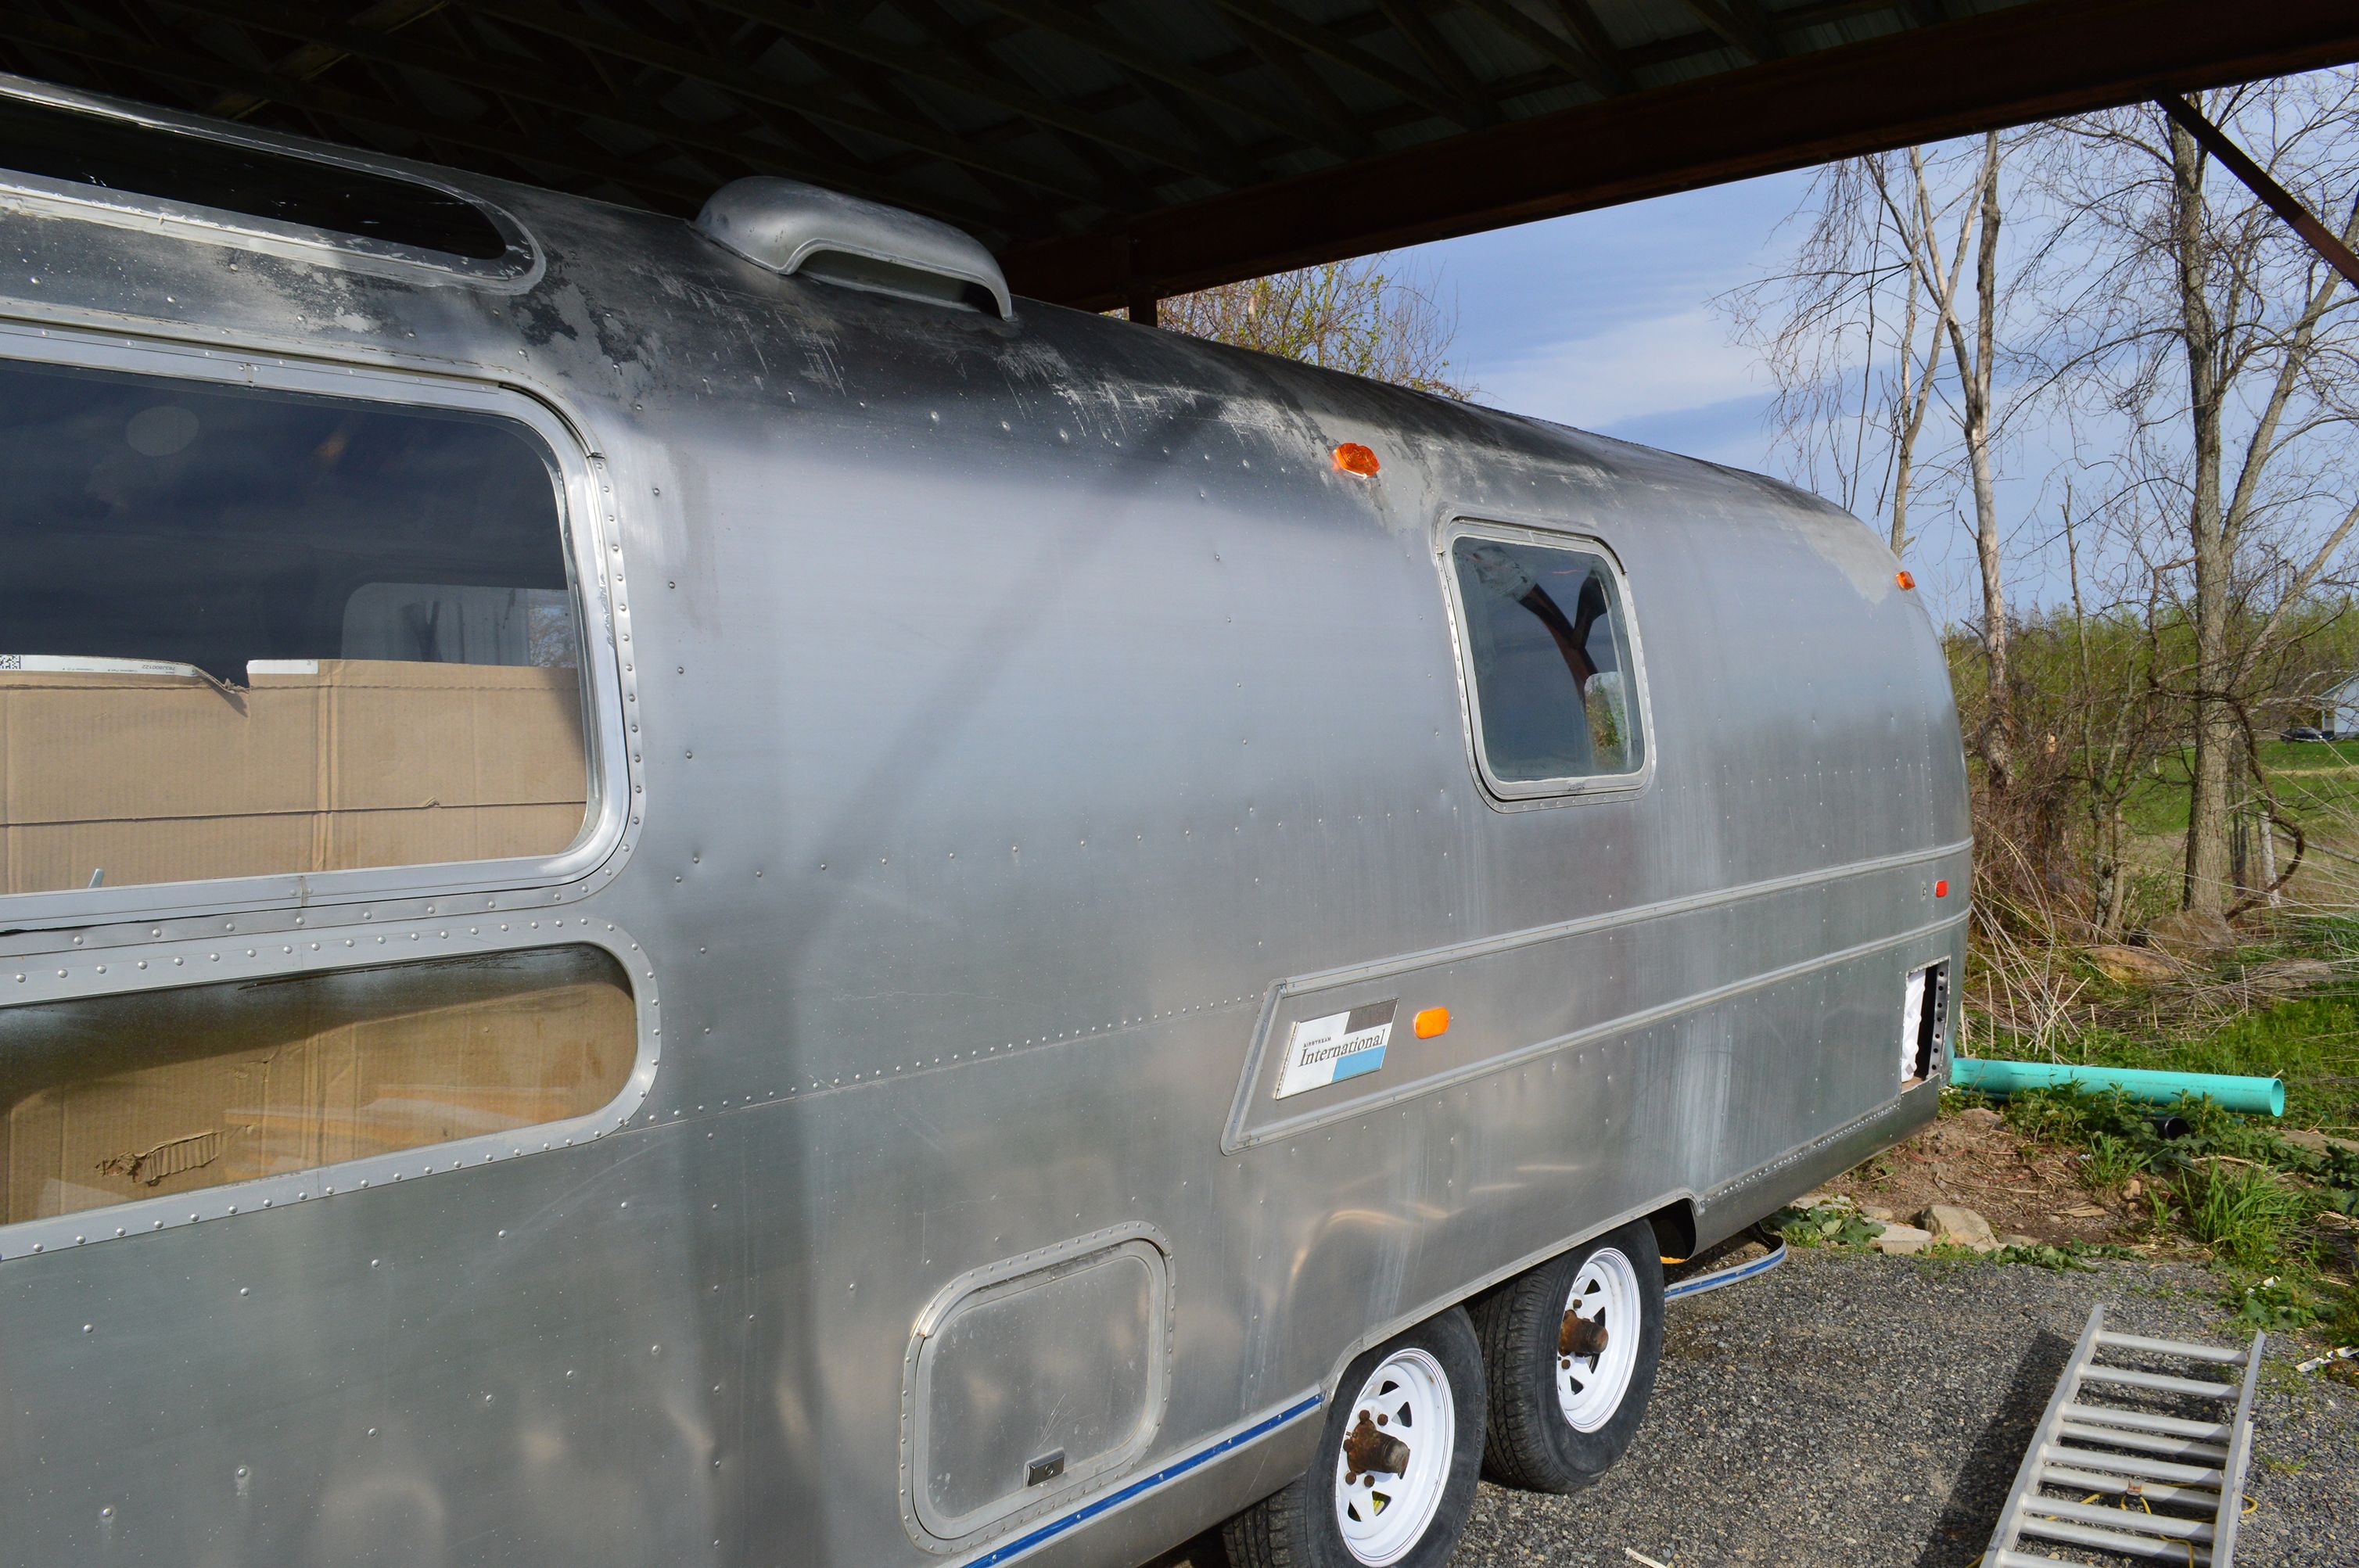 You can remove the paint stripper with a power washer, or in my case, since we are way out at a workshop in the country with no running water, you can also just scrape it off with a plastic scrapper. This is the messy part. Below is a photo of one of the large side panels. You can see the aluminum in the foreground and the clear outline of where plasticoat remains. It is a very noticeable difference and will bring up a slight shine to your Airstream before you even begin the multi-stage polishing process.  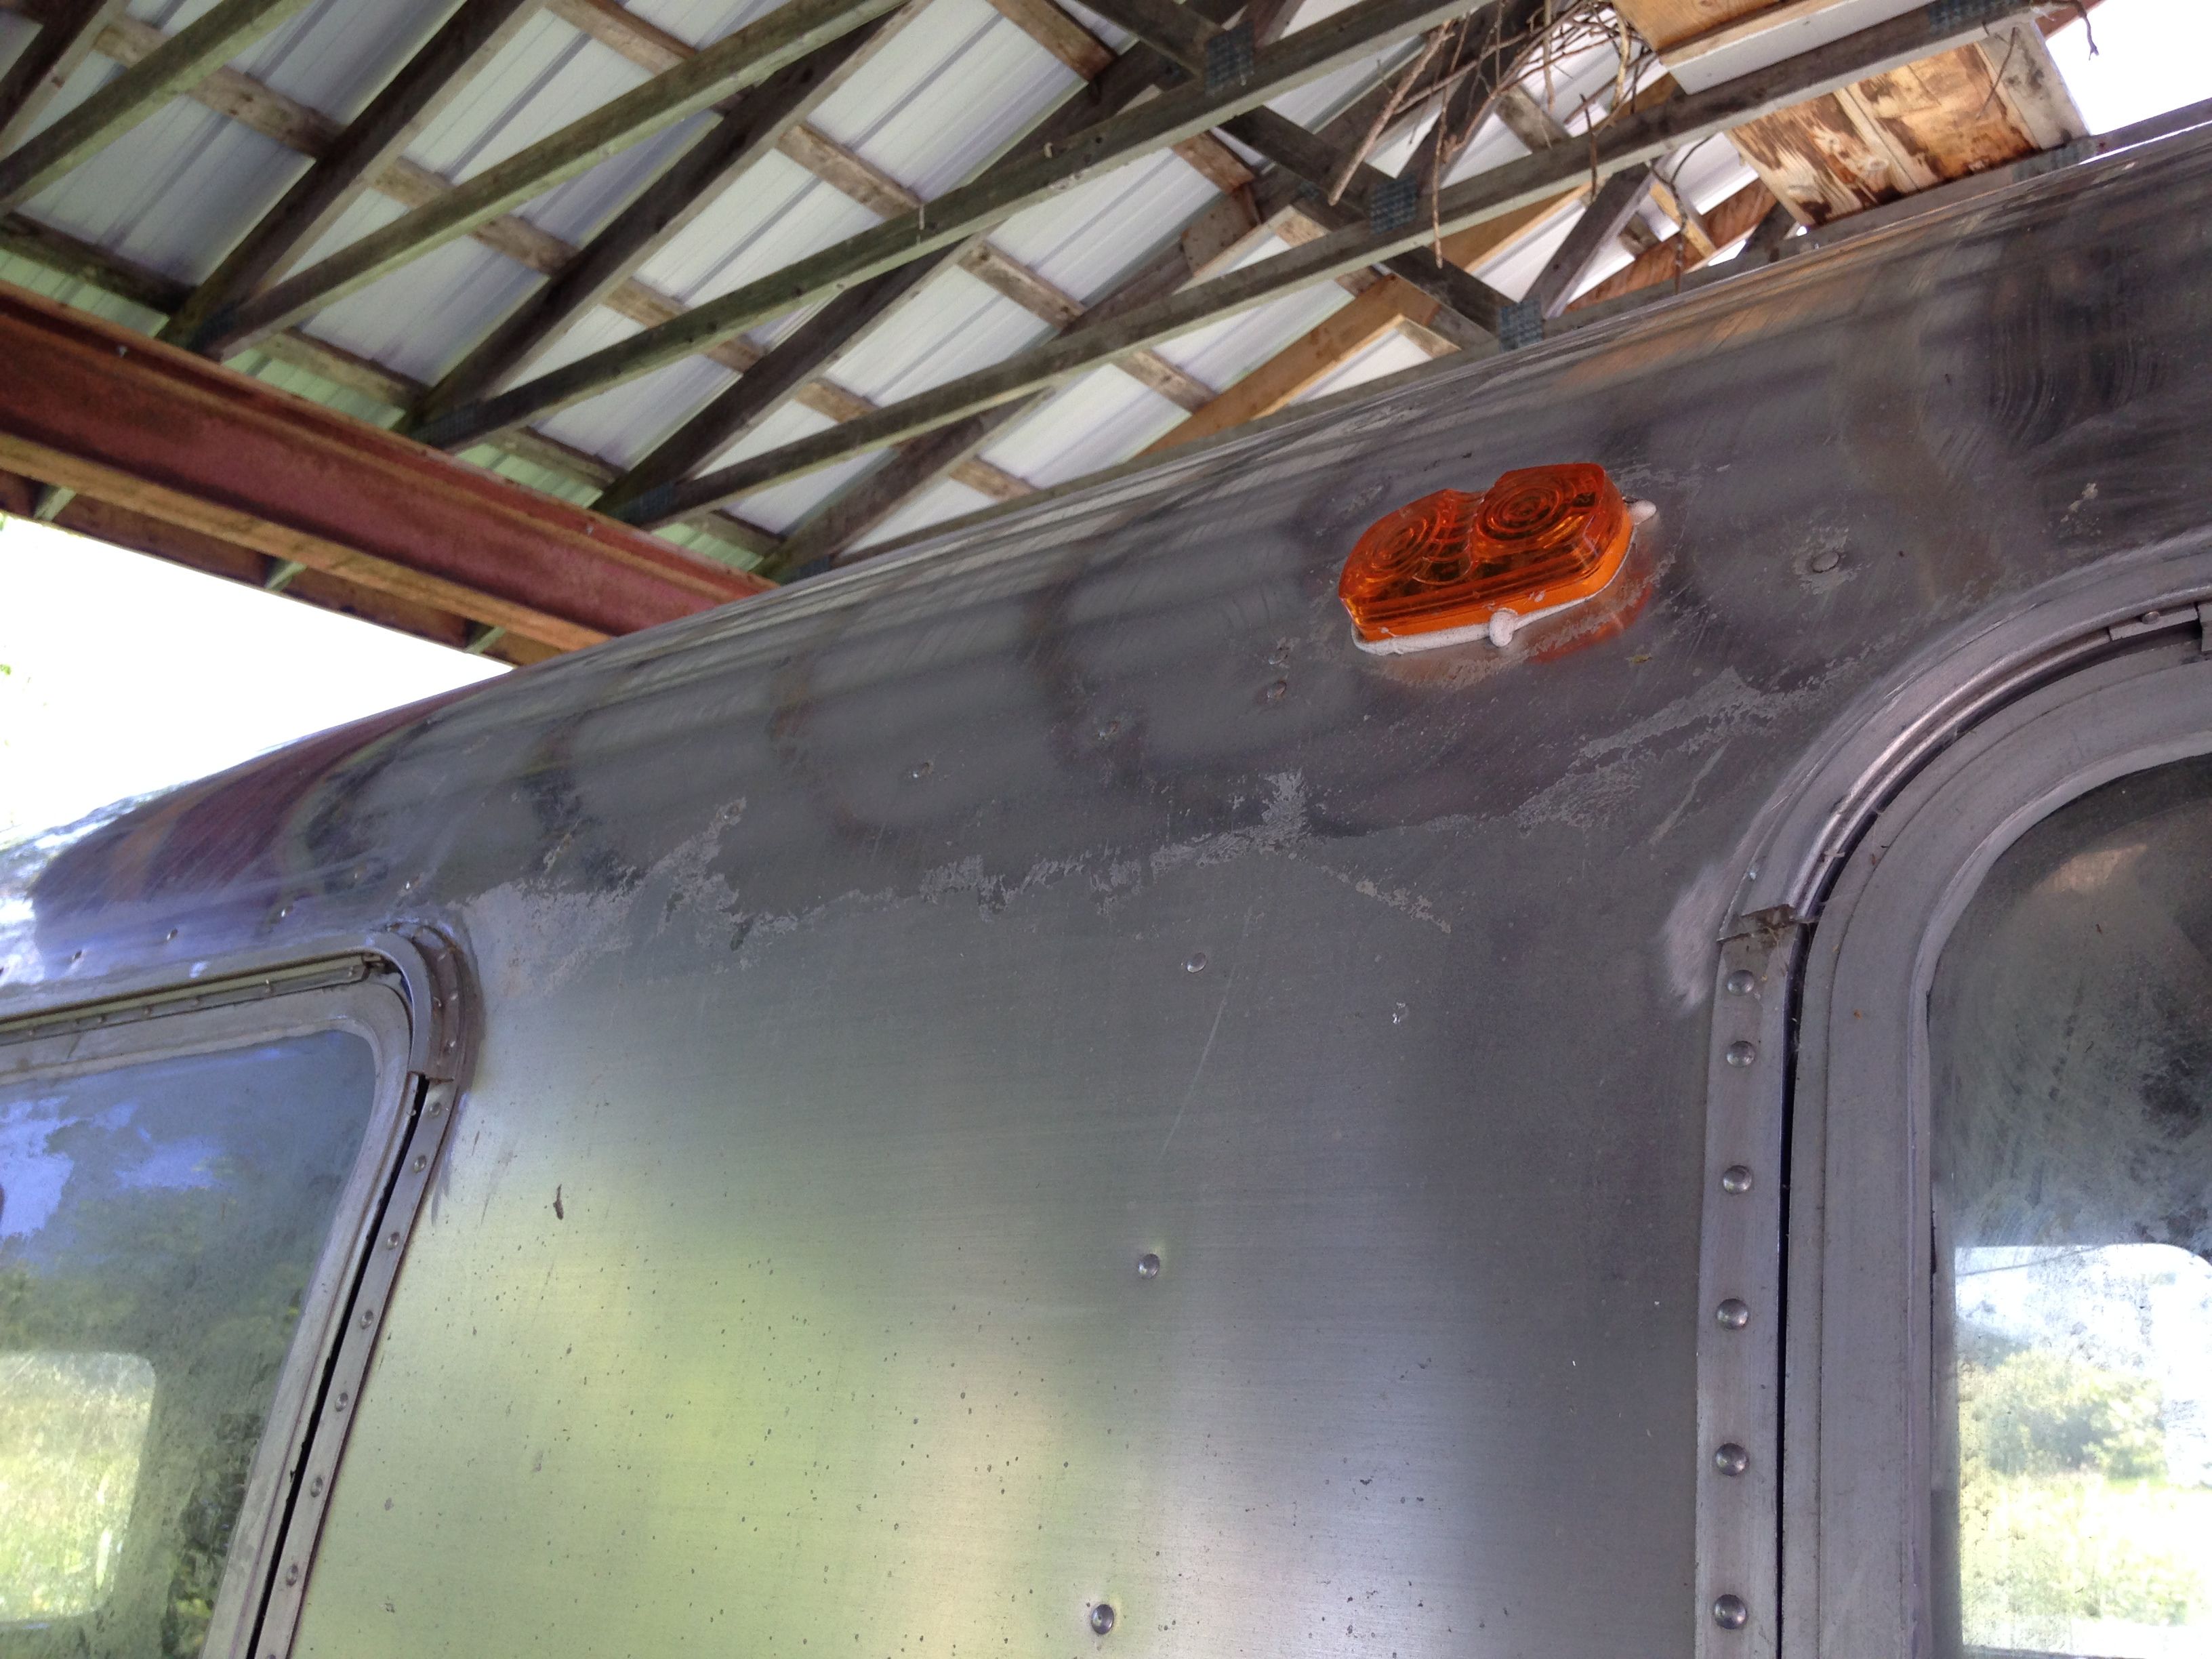 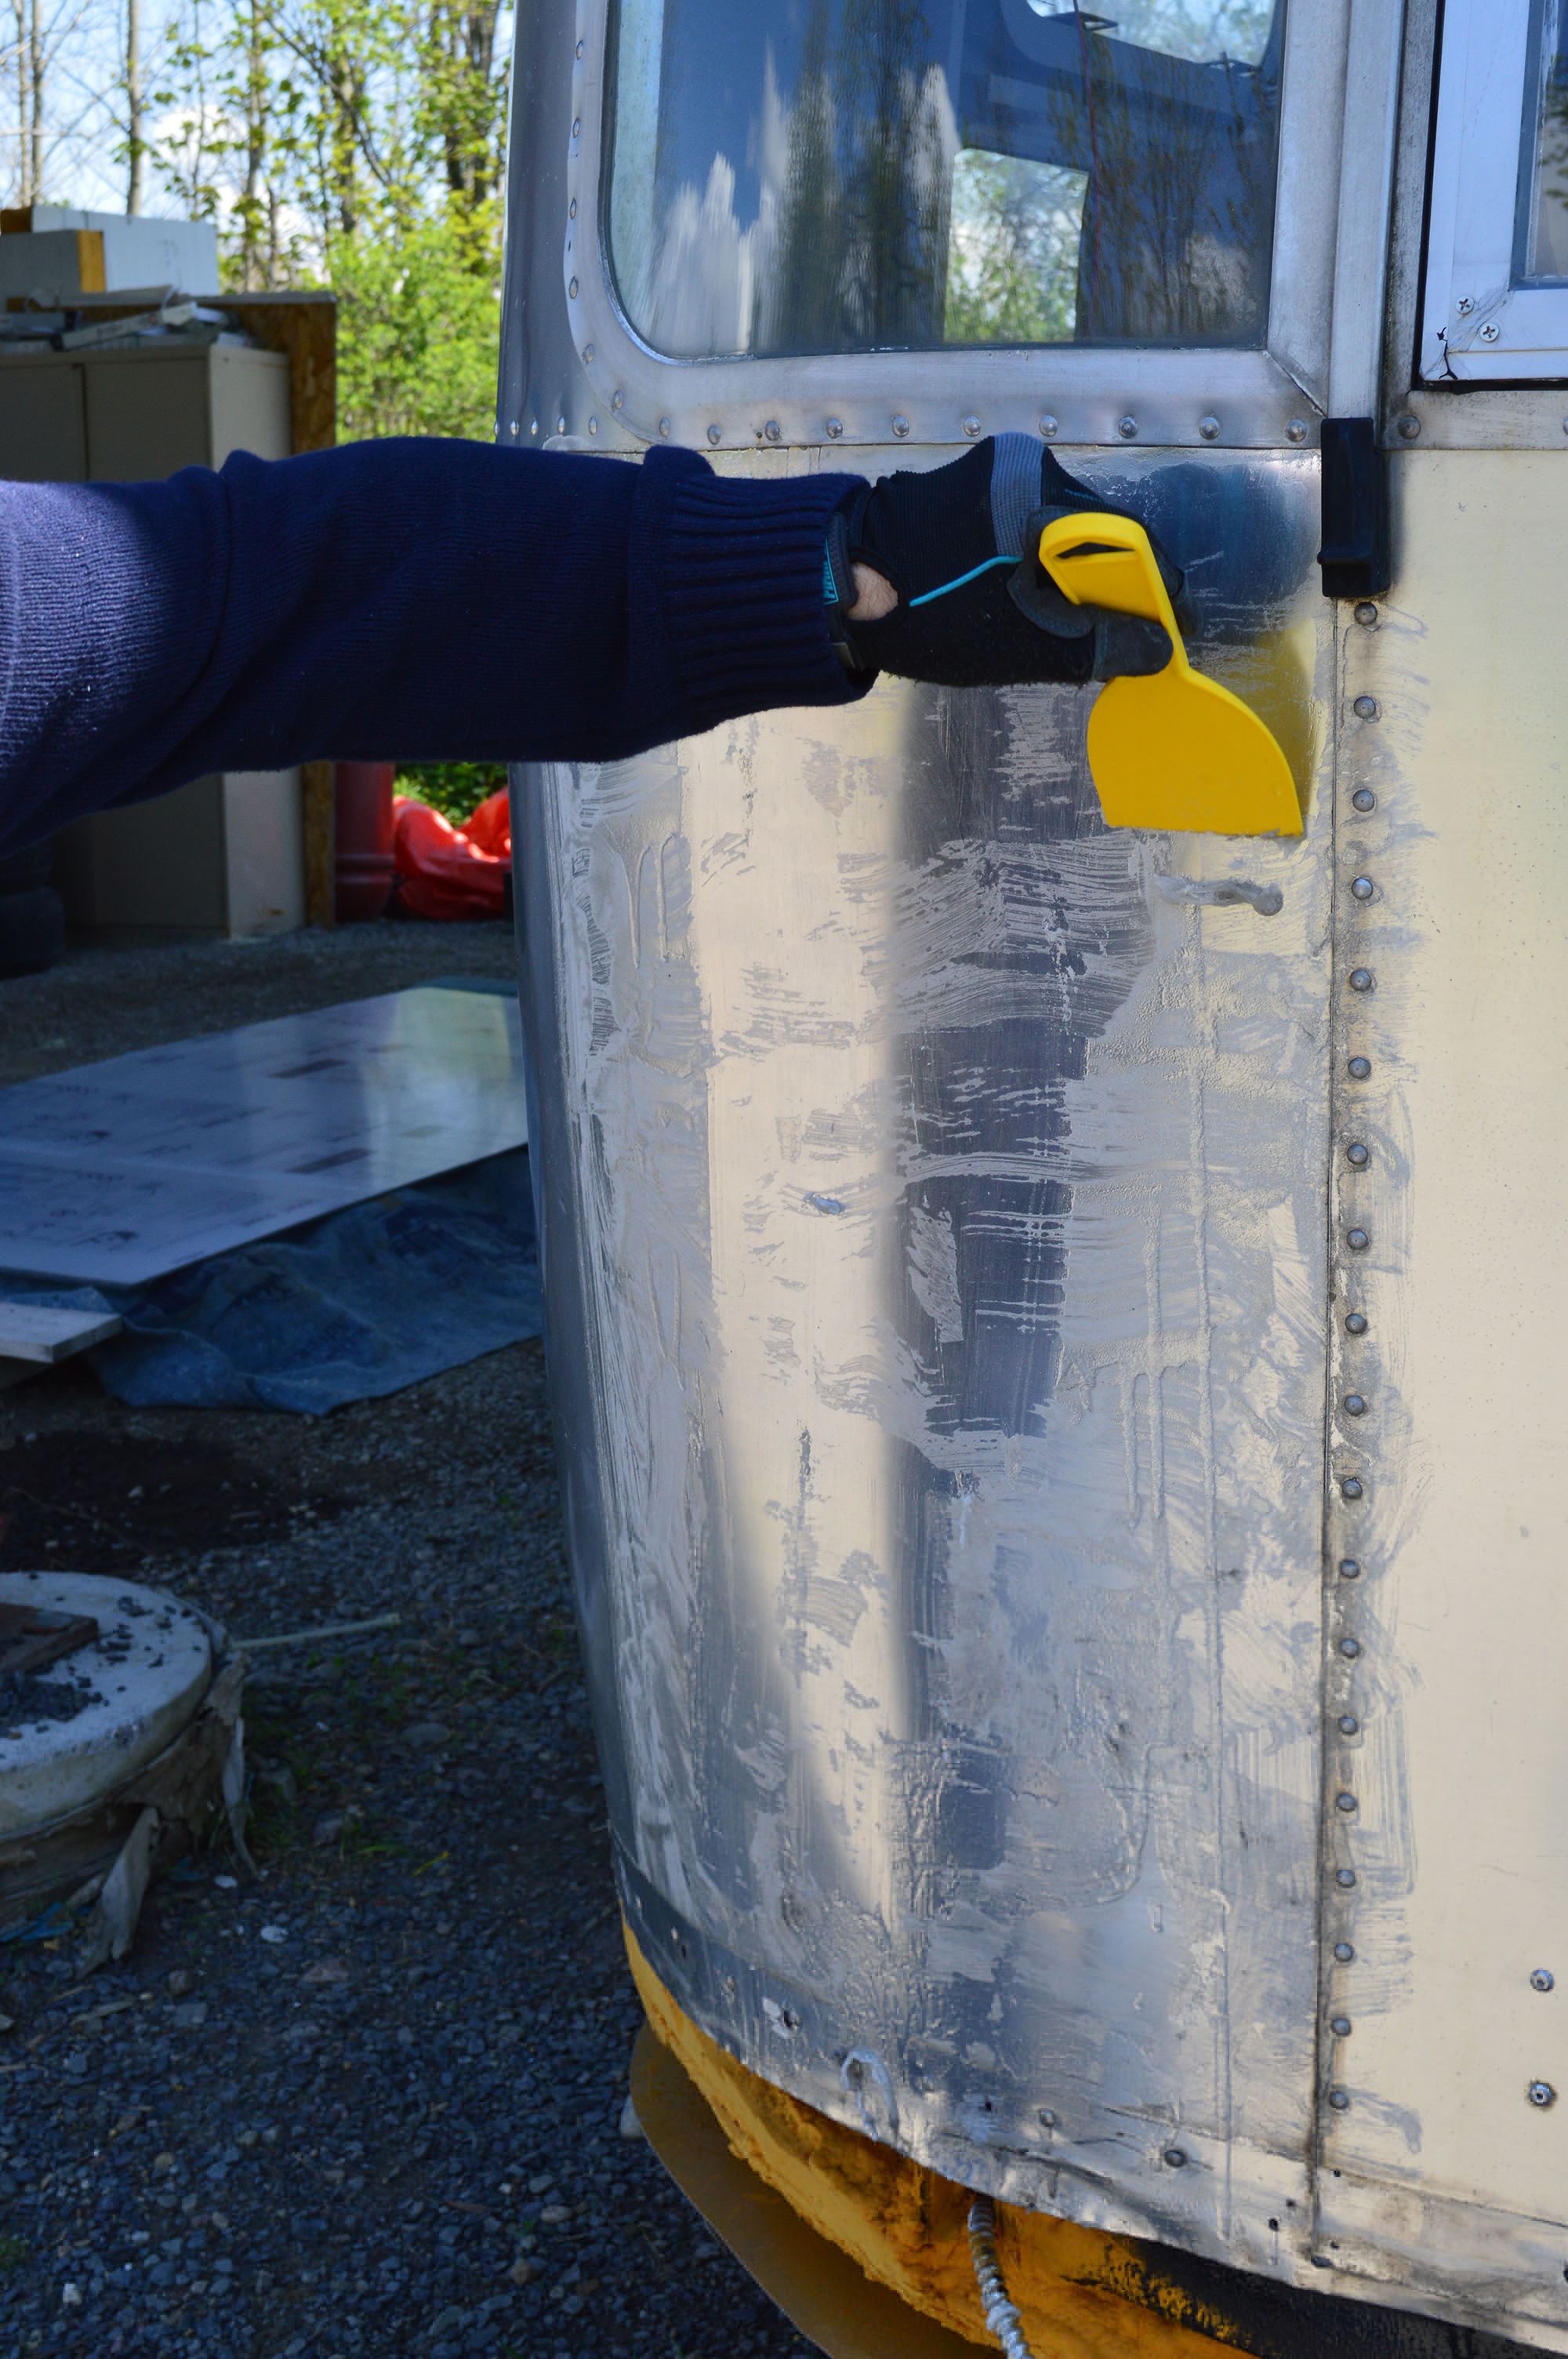 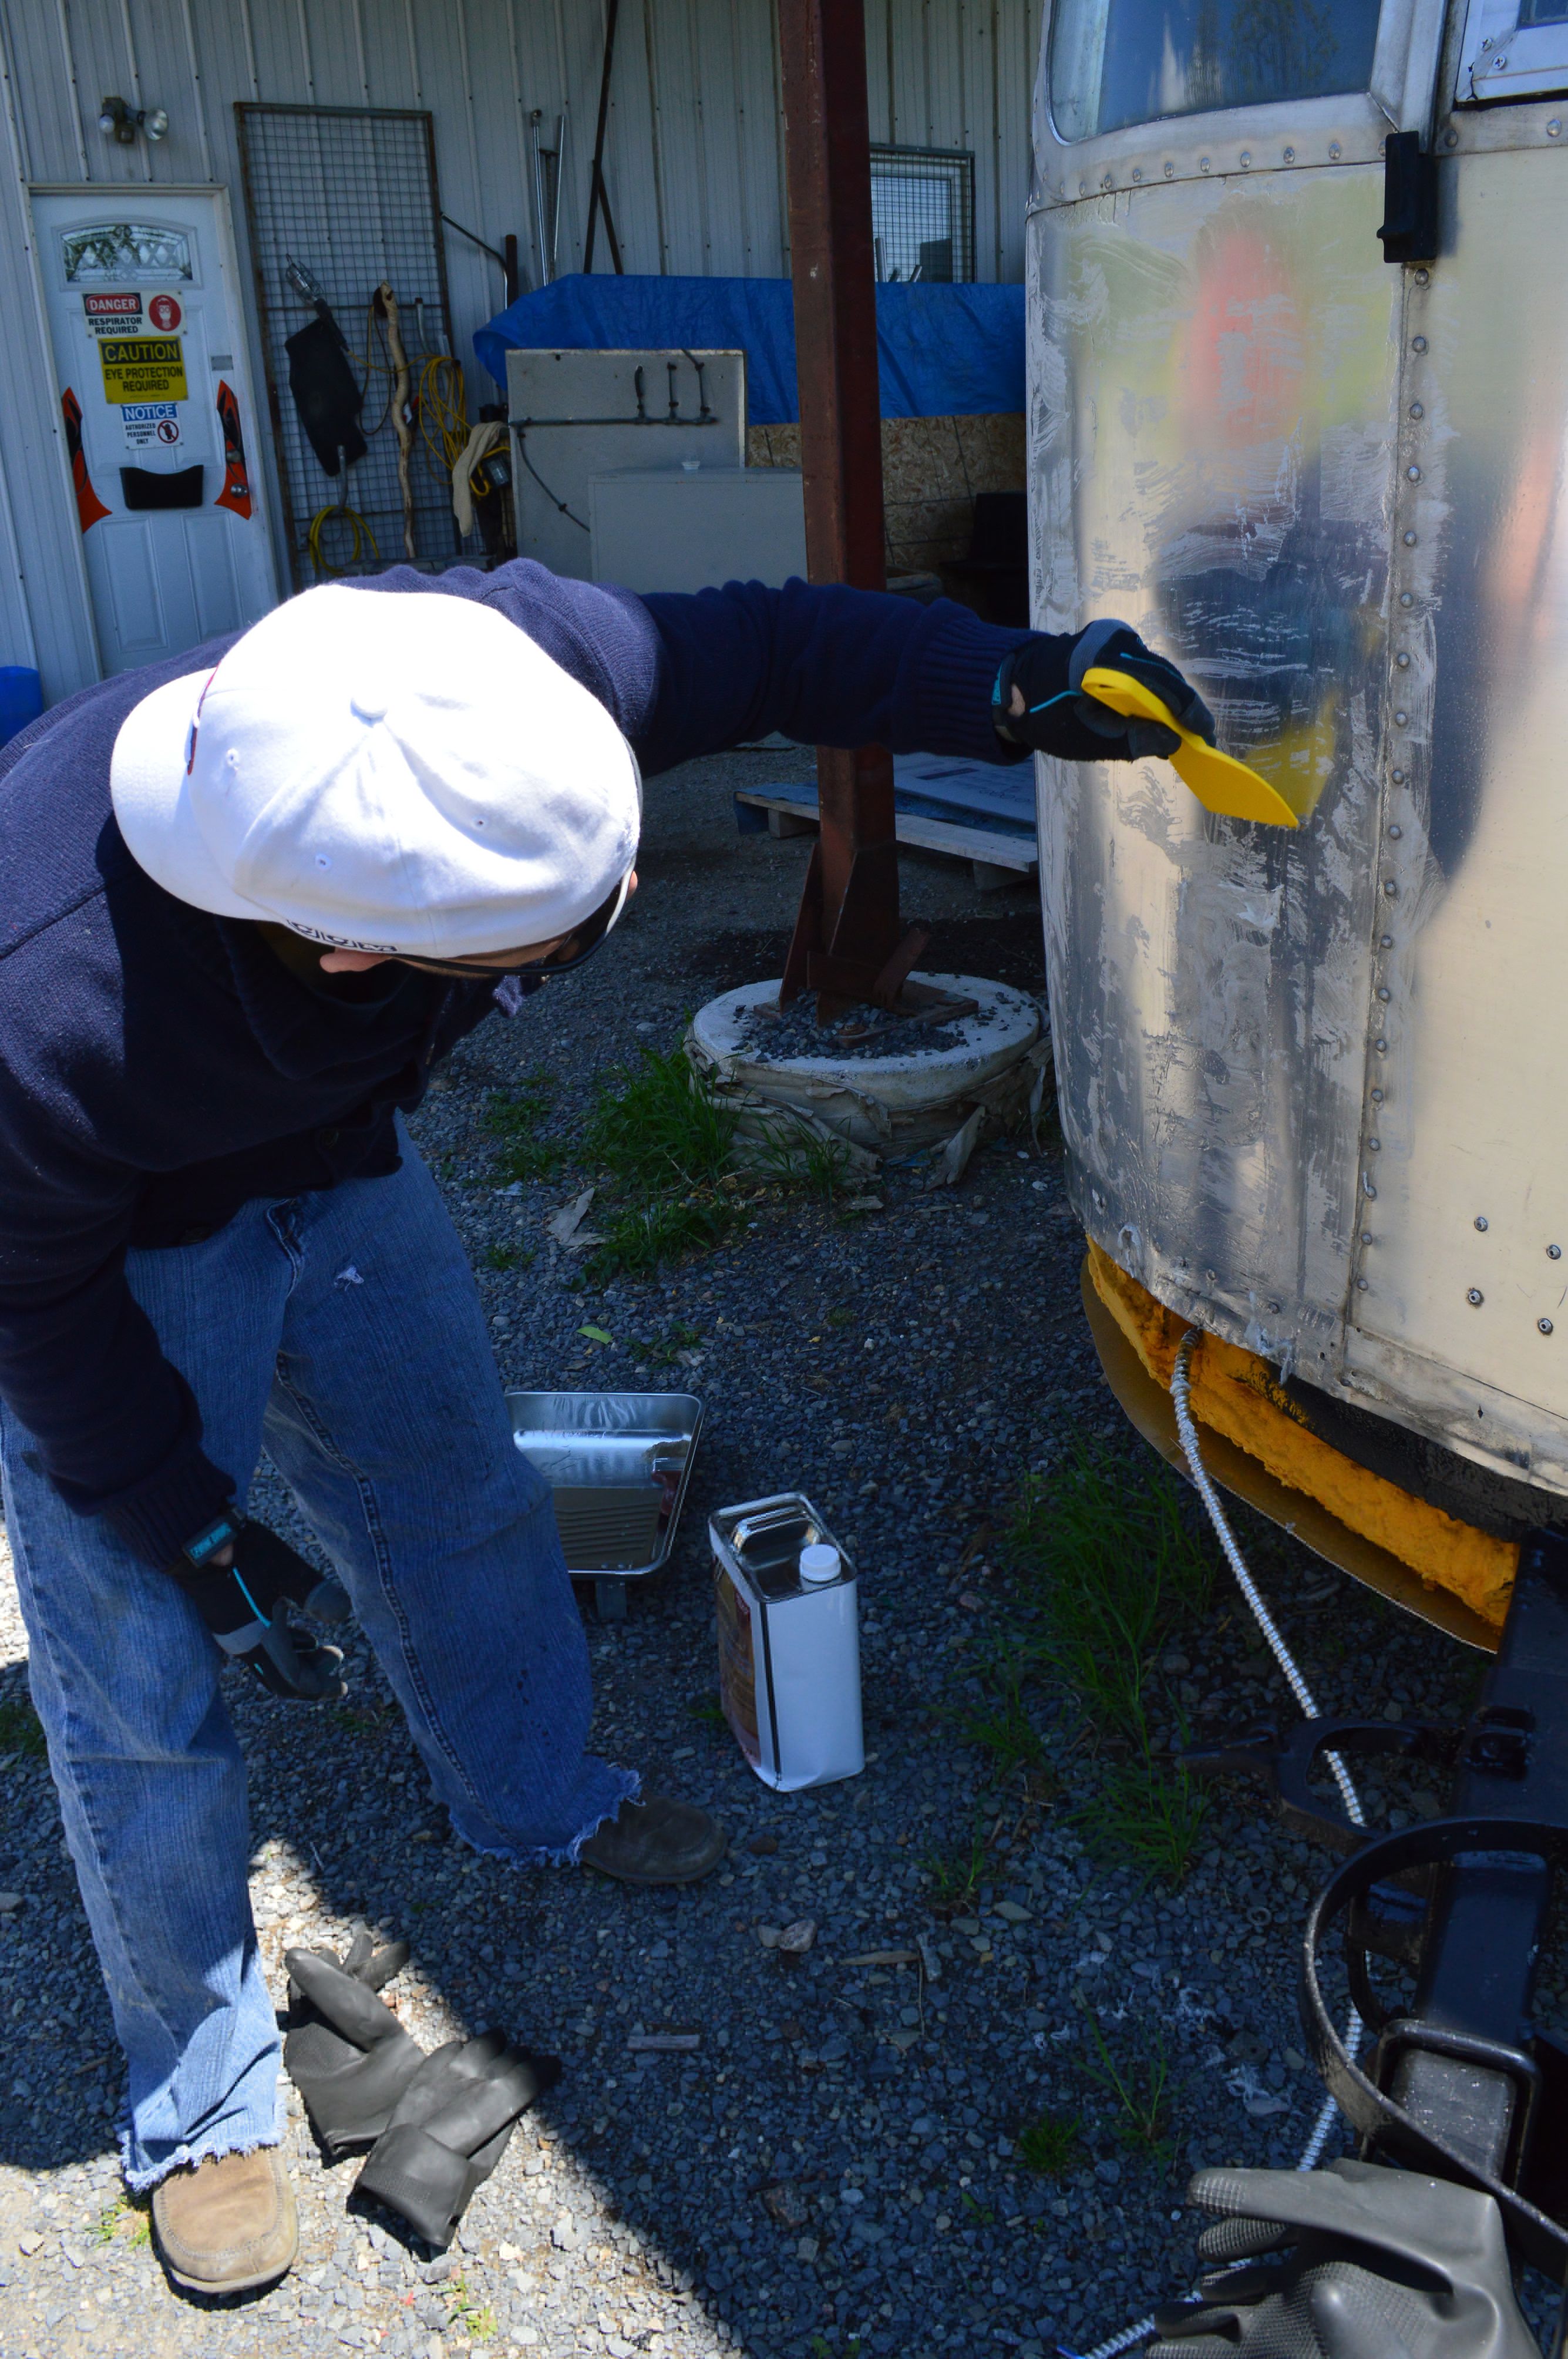 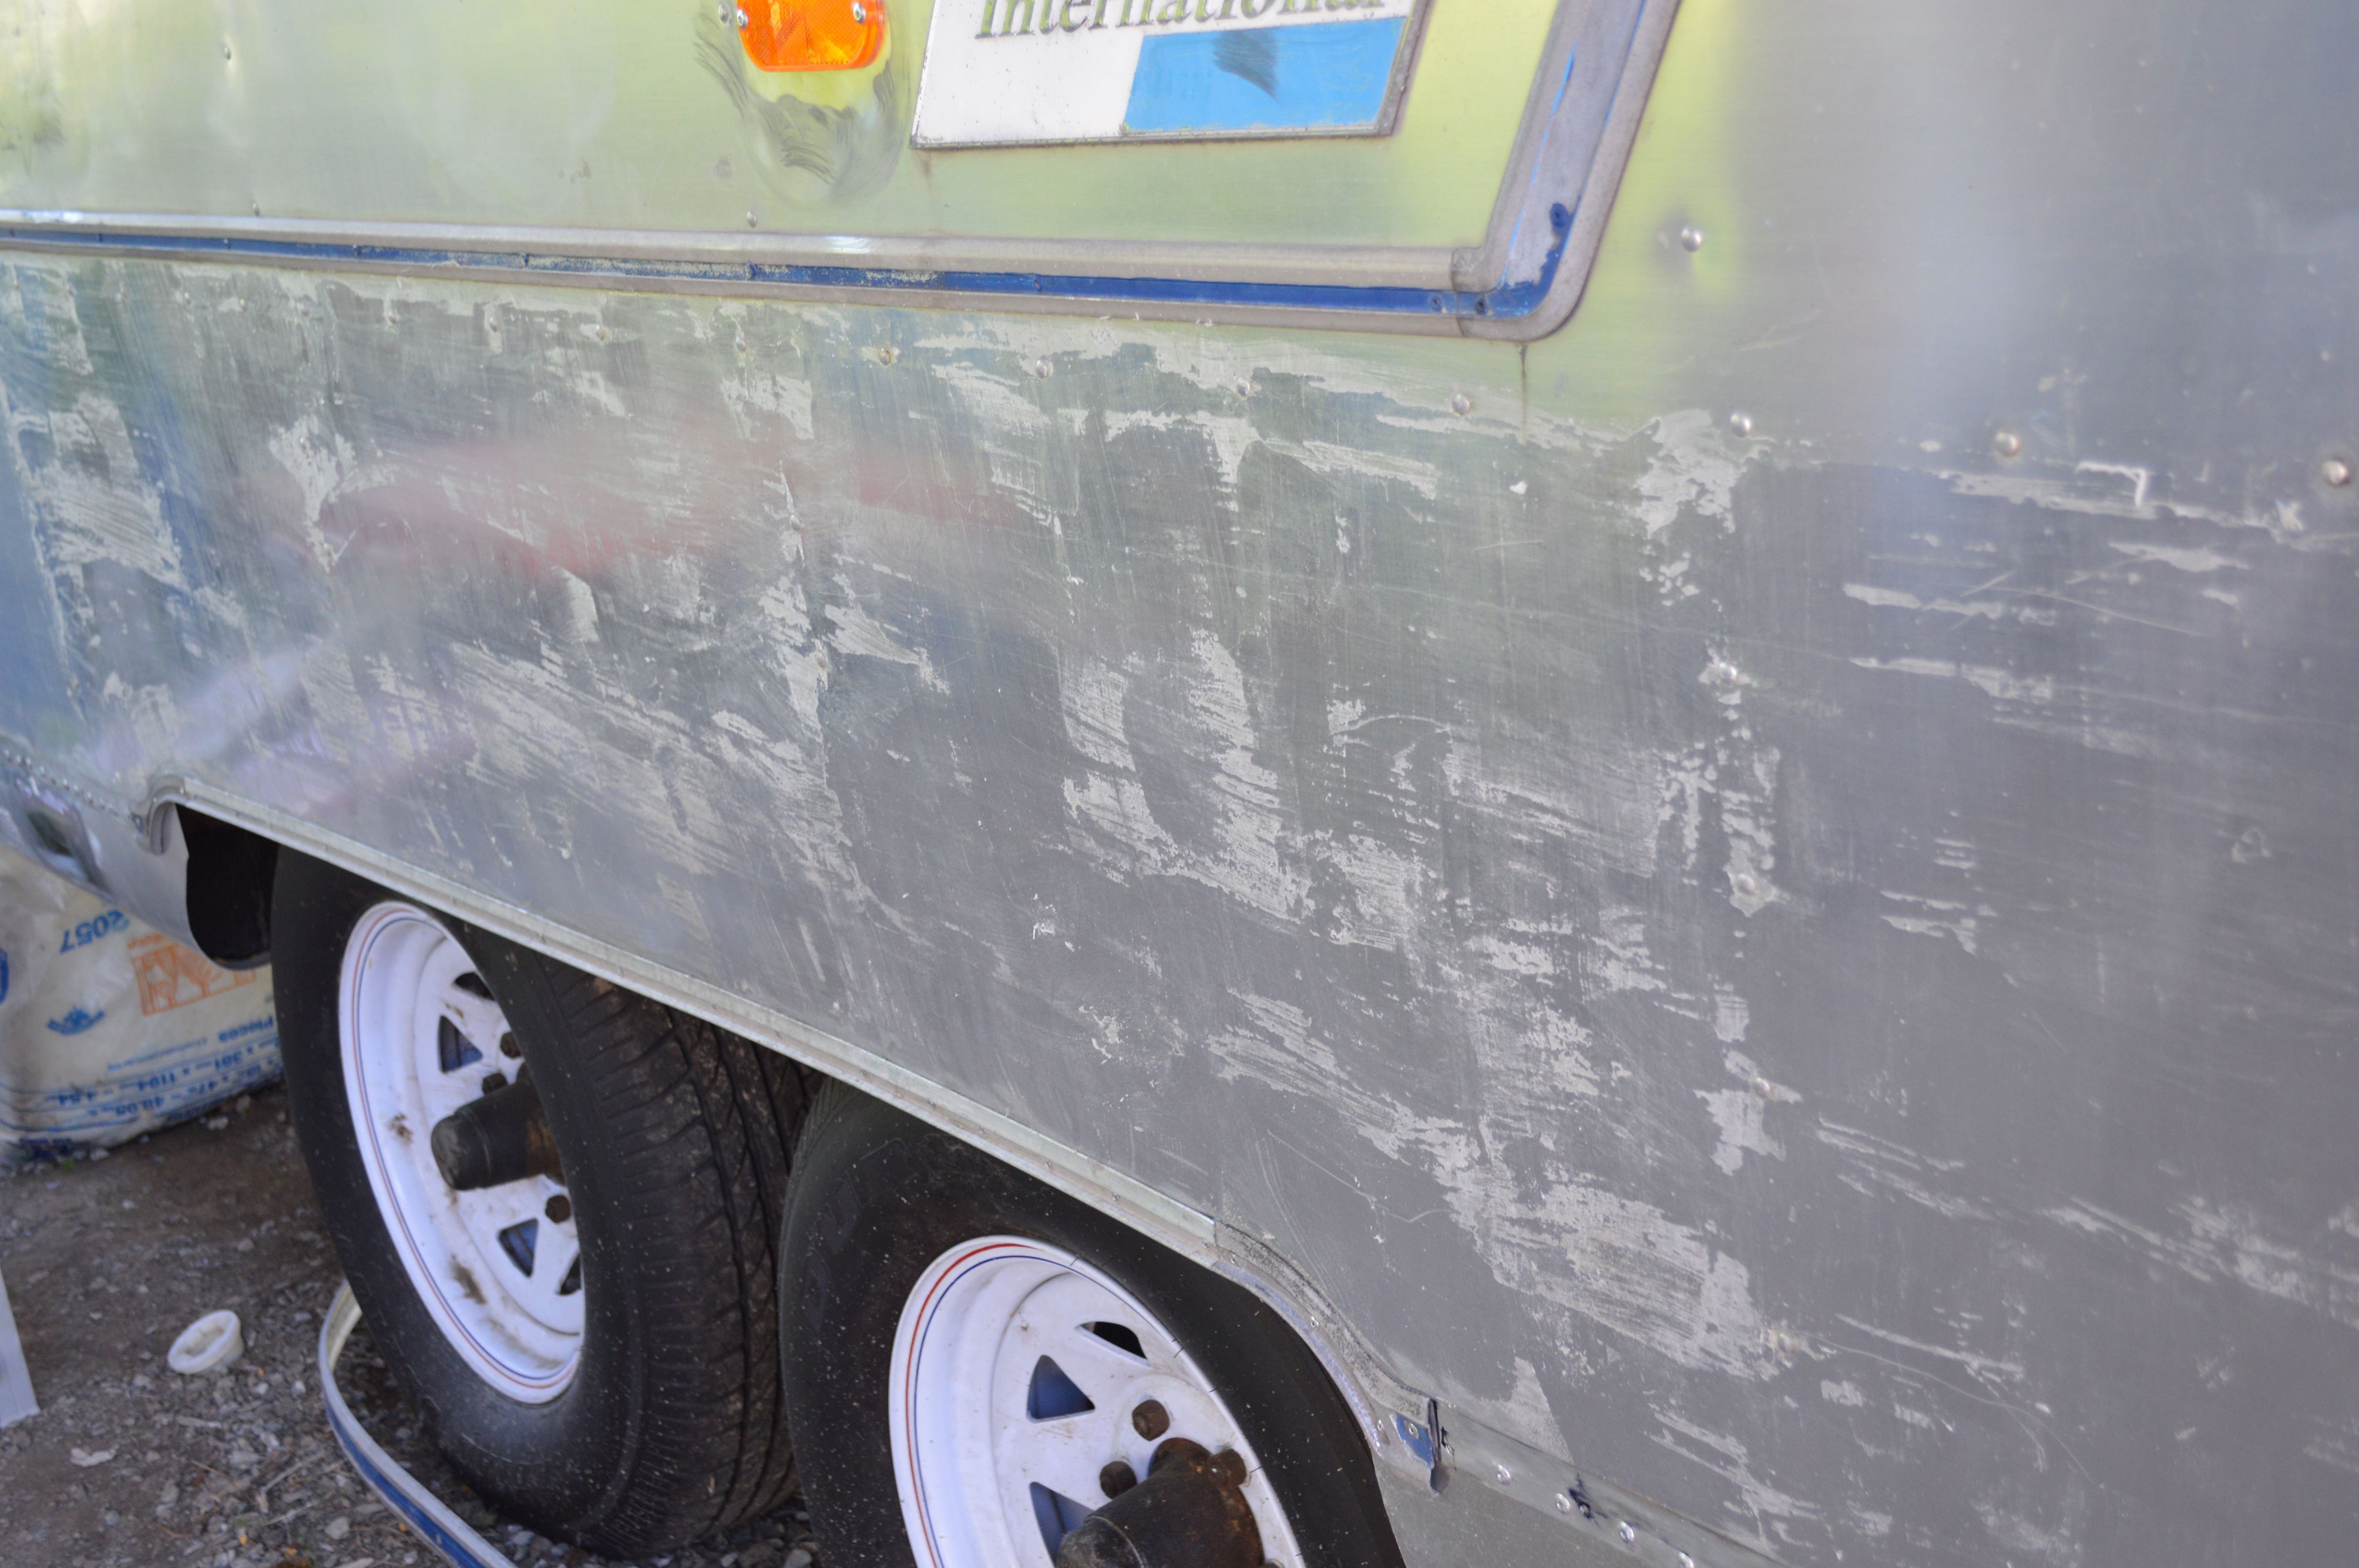 Once your plasticoat is removed, you are ready to start polishing but you will need several things first. 1. A variable speed polisher. Both the Dewalt DWP849X and the Makita 9227 are good choices. I went with the Dewalt. Use it on a low speed.  2. A polishing pad. You will need to get all wool, I found them at Napa Auto Parts for $20.00 They can be washed in the washing machine, but likely you will still need a couple of them. 3. A polishing spur, helps clean and maintain the life of your pad. 4. Nuvite Aluminum polish. It is widely regarded as the best on the market. There are quite a few grades to select from depending on the condition of your aluminum. Grade F9 is very coarse and is the first stage to be applied if your aluminum needs major repair. In my case, I will follow it up with grade C (medium) and then finally grade S (very fine) will give it the mirror shine. Grade S needs to be applied with an orbital polisher and not the variable speed that was mentioned before. There is an orbital polisher on the market called the Cyclo that supposedly does a great job but it is ridiculously priced..somewhere around $400 dollars, so any cheap $25.00 dollar Canadian Tire special with an old cotton sheet or t-shirt around the buffer will work just as well but may take longer. Vintage Trailer Supply has a really good selection of polishing tools and the Nuvite polish. Here is a link: http://www.vintagetrailersupply.com/searchresults.asp?Extensive_Search=Y&Search=nuvite+polish&x=0&y=0 If the aluminum has heavy pitting or scratches, it may be necessary to use 600 grit sandpaper before polishing. If you do not sand out the damage, it will appear even darker and more obvious once the polish is applied. It is possible to polish it out with many many passes, however the polish is expensive and sanding is faster. Below you can see the swirled areas are where I have used the sandpaper. Once you apply the Nuvite F9 polish, it immediately makes a huge difference – note the shiny area in the second photo.   This is after just one pass with the F9. It should be very clear which parts are polished. 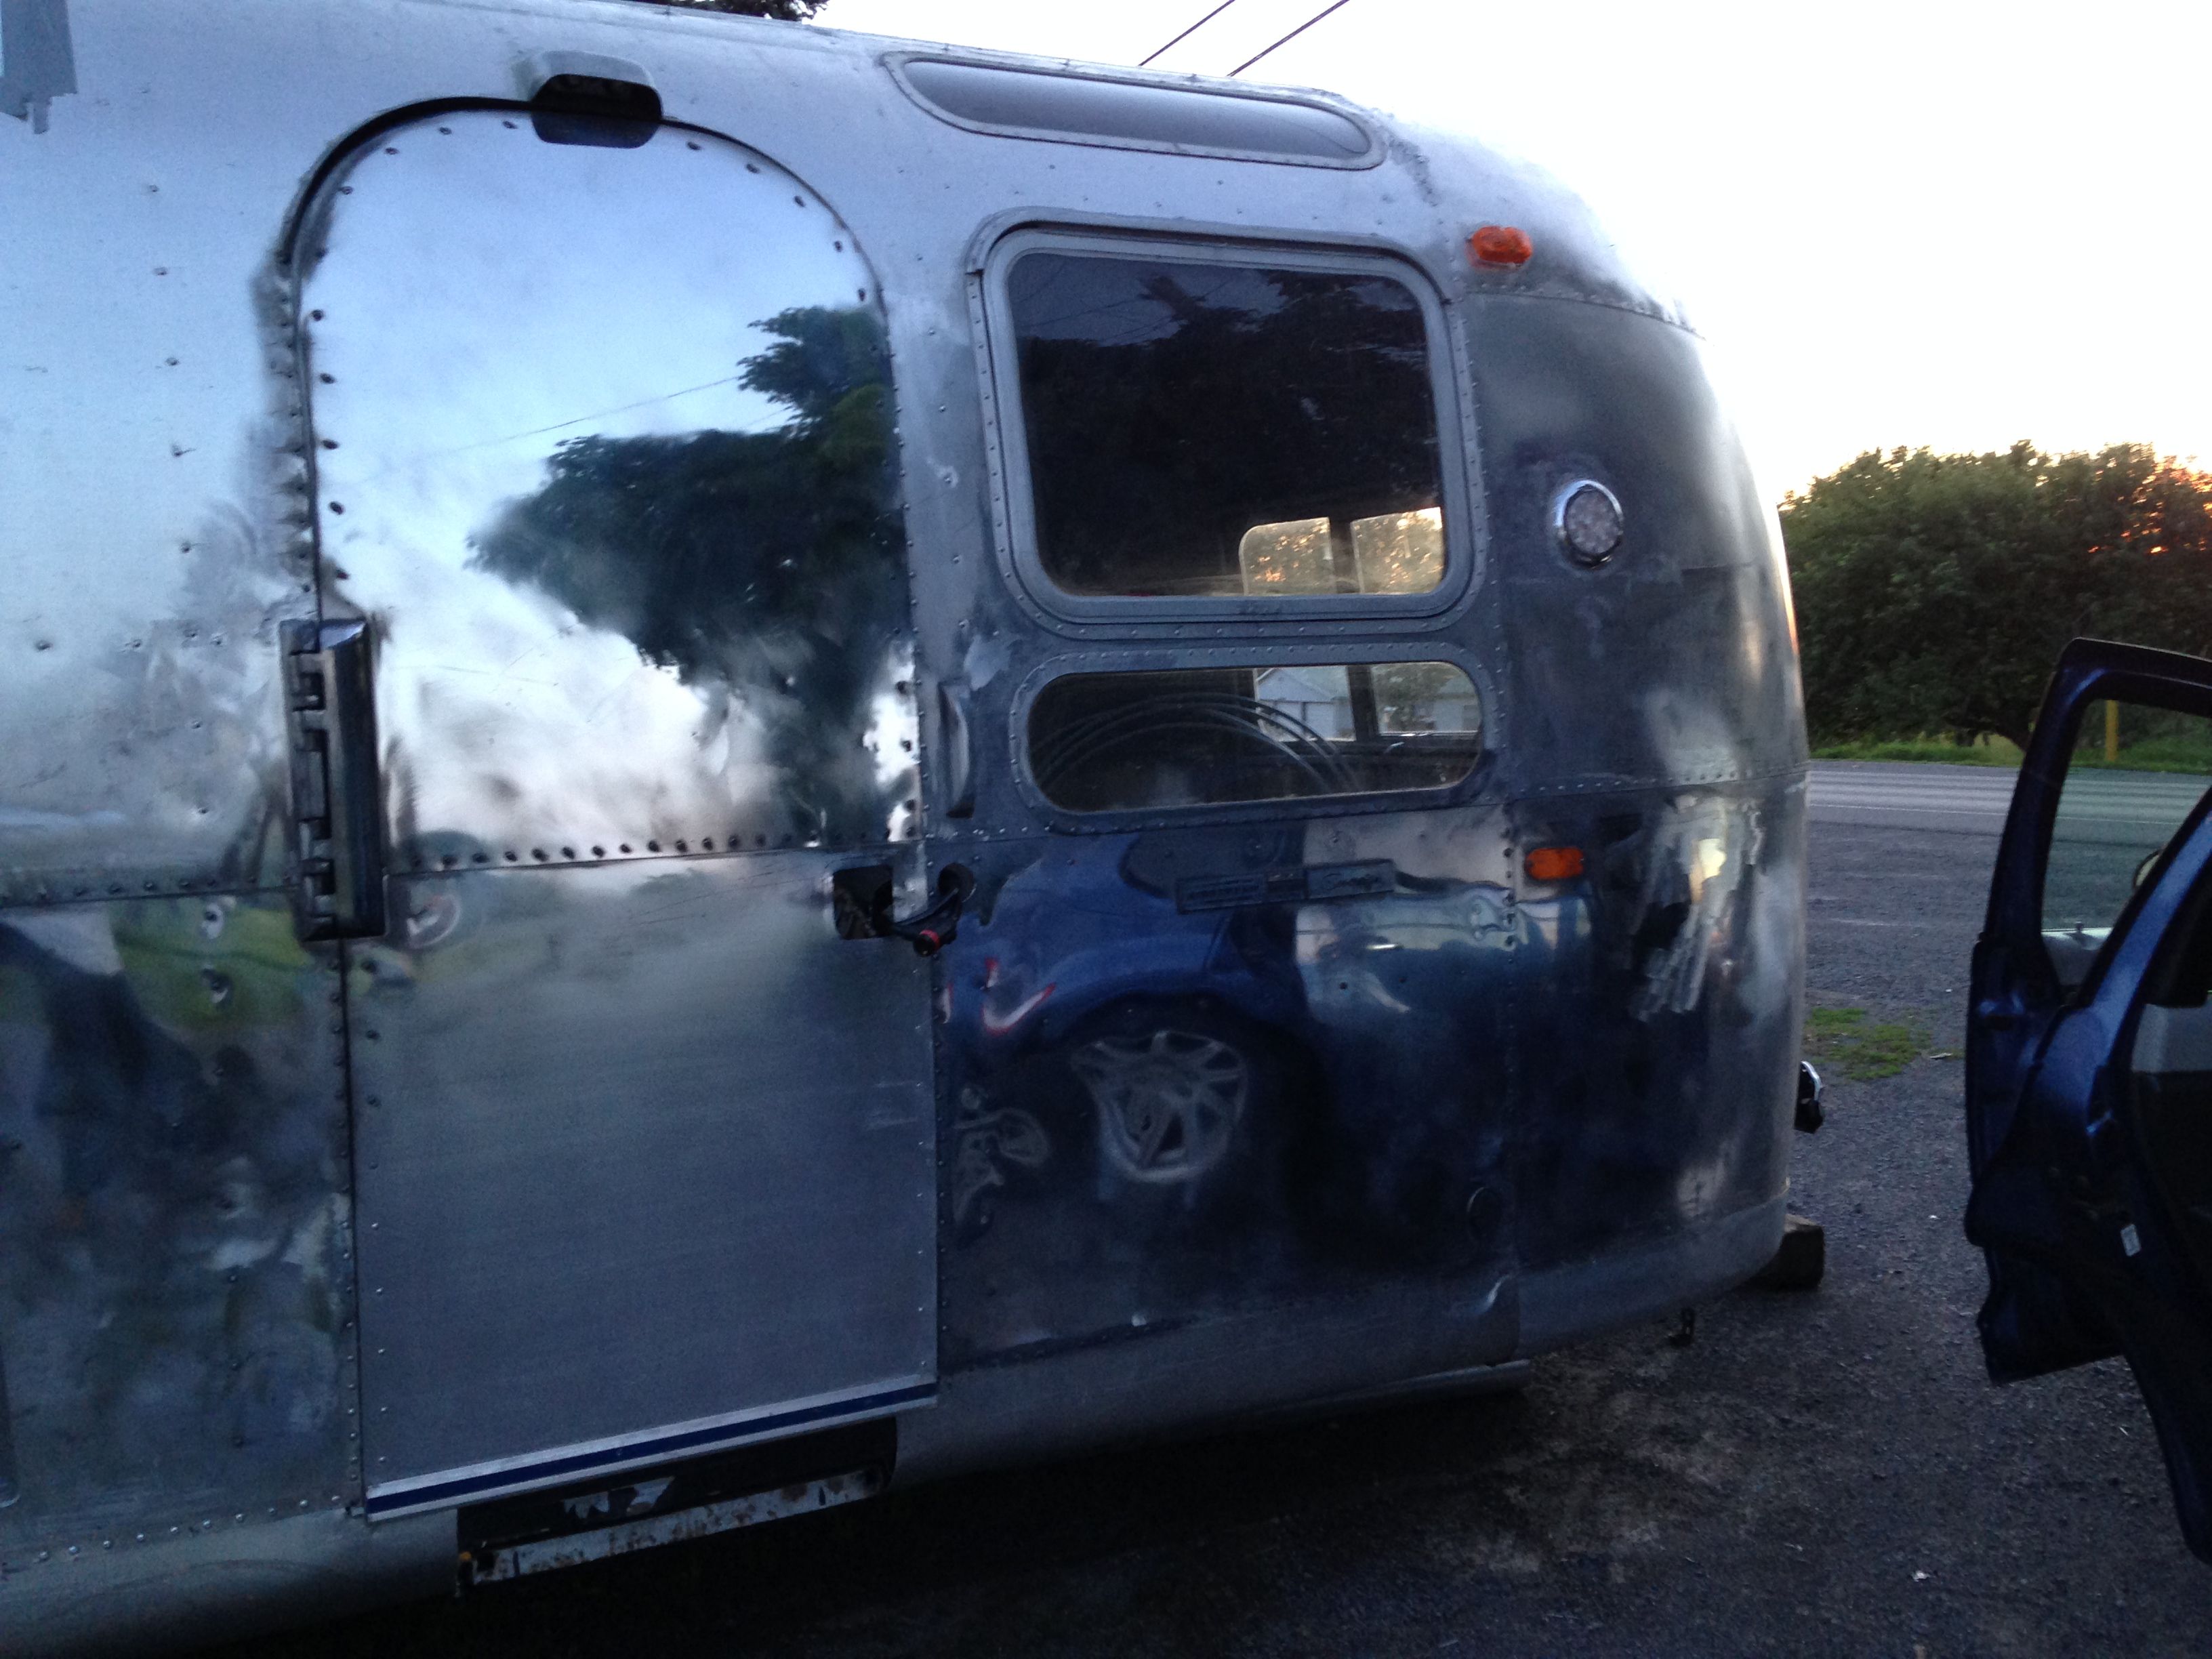   You may have to touch up some missed spots with the sandpaper after the first pass. It will bring up imperfections that you may not have noticed before.  This is still after just one pass. I think this area will need another one at least, possibly 2. The upper front of the Airstream was in very poor condition. Removing the clearcoat improves the appearance but even so, this is what I still had to work with on the front centre panel. The second photo shows where I have begun to sand.  This is what it looks like after applying the F9   And finally, after applying the other two polishes - you achieve the mirror like finish!  I recommend doing the entire trailer in one coat at a time before moving on to the finer polishes. This is a very time consuming process and therefore, it is not uncommon for companies to charge over $5,000.00 for polishing services alone on a trailer this size. |
| json metadata | {"tags":["airstream","polishing","polish","trailer","aluminum"],"image":["https://steemitimages.com/DQmexr25iXRrxS5et4R2KJEotZWPmDiLN6V1dKm9rJ9tY12/photo-1.jpg","https://steemitimages.com/DQmUVwH76pQ2a3H92T1nNxizVBfP2NT4SqLG98VNoBoavPb/2014-05-18_01.jpg","https://steemitimages.com/DQmUAGi71Akk7ymizQmFao5povisZ13GhxbXFHEuBYb4txZ/dsc_0160.jpg","https://steemitimages.com/DQmZ6SqFNn8zWH2pybZrBpfdUbzAmgWgiiUmzQzD3izbC52/photo.jpg","https://steemitimages.com/DQmSdVQLaPPjCUWDbcypS5ksHbjm7VWT24QViwduqBAjCjV/photo-3.jpg","https://steemitimages.com/DQmaEvfhMAxbmGiHwoV8APh1eiA1aQiYCZtofbyJtNnKCtS/2014-06-07_02.jpg","https://steemitimages.com/DQmdXC1qpRiuw3FfHhhj9L1BiGFp5exZuAUsWdcN2GULGxm/2014-06-07_03.jpg","https://steemitimages.com/DQmUnfLvUvEe5WtLeSYyNiQ7TJzcG1VCuxPuBZSYqzLrUmi/2014-06-07_101.jpg","https://steemitimages.com/DQmSd8uPCrkG3mc9QZn3bw6yT9aaVKbyErHQdeRHvB89Jio/screen-shot-2014-06-05-at-11-16-28-am1.png","https://steemitimages.com/DQmQ7zkszG4H6Un6BTtb6B4YRGhcFhQ7w5WdfbxNUwGYE3v/2014-06-07_09.jpg","https://steemitimages.com/DQmNvHiDkq2pwNkHgrMCTm69oZGX6PCDSyUVB6RiX2RKHwc/2014-07-02-first-part-of-polish.jpg","https://steemitimages.com/DQmSenFrE2o7vScxZUHYQxCBmX14STf4Zdpw4aBFkep4vnE/2014-07-09.jpg","https://steemitimages.com/DQmWhqpdZPqeMzaZ3eZyuhEWmvVQCkDeid3VPjMmNRHUzC8/2014-07-11_02.jpg","https://steemitimages.com/DQmQLr5vL6FrMKob3i5iL4euUHspBJKtThE6QKxZK4ftGgt/2014-07-26_01.jpg","https://steemitimages.com/DQmQE4gedzJkBHUEmF55L1Y7nokeKh9qu4hcee2WFdctmRb/2014-07-26_02.jpg","https://steemitimages.com/DQmcQpht86LU3f5JMXunfQ1ZLvRa59bgSBWLgRQGaymer1h/Screen%20Shot%202017-06-22%20at%2012.27.43%20AM.png","https://steemitimages.com/DQmNUoWCBLhPbYh5JRm65LX8LJ9jQtMNGxKkpxQWZ5gkp3W/2014-07-27_06.jpg","https://steemitimages.com/DQmacka2qmjsX3Eai4y1gyHbvodBRRNVf675zbRRcJCqWSh/2014-07-27_07.jpg","https://steemitimages.com/DQmegwxNMDnmy172LvVHWyjBoF1wQ8Q7GJSHCcuFEqxDzyn/2014-07-27_08.jpg"],"links":["http://www.vintagetrailersupply.com/searchresults.asp?Extensive_Search=Y&Search=nuvite+polish&x=0&y=0"],"app":"steemit/0.1","format":"markdown"} |
| Transaction Info | Block #13033842/Trx 642819bb64d1bf1517e5e22debd15d5184847ad5 |
View Raw JSON Data
{
"trx_id": "642819bb64d1bf1517e5e22debd15d5184847ad5",
"block": 13033842,
"trx_in_block": 17,
"op_in_trx": 0,
"virtual_op": 0,
"timestamp": "2017-06-22T04:36:00",
"op": [
"comment",
{
"parent_author": "",
"parent_permlink": "airstream",
"author": "mistahlee",
"permlink": "vintage-airstream-travel-trailer-renovation-post-4-polishing-a-vintage-trailer",
"title": "Vintage Airstream Travel Trailer Renovation: Post 4 - Polishing A Vintage Trailer",
"body": "If your Airstream is from the mid 60’s or later, you have a plasticoat that needs to be removed before polishing. In my case, the plasticoat was peeling off the top and some of the sides.\n\n\n\nIt is not very difficult to remove, but it is messy. Many people online have suggested using a product called Eldorado paint stripper but its very expensive and needs to be ordered. You can use any paint stripper that is safe for aluminum and it will work just fine. I used this product (below) that I found at Home Depot. Two cans will likely be enough for my 31 foot Land Yacht.\n\n\n\nUse a paintbrush, it applies in a clear gel form. Wear rubber gloves as it is obviously very corrosive and you want to avoid skin contact. Apply it liberally and let it sit for about 20 minutes or so. You will see the plasticoat start to bubble up almost immediately. Below is another photo showing the plasticoat corroding from the roof, but it is still completely in tact along the sides. It all has to be removed for a proper polish to take effect.\n\n\n\nYou can remove the paint stripper with a power washer, or in my case, since we are way out at a workshop in the country with no running water, you can also just scrape it off with a plastic scrapper. This is the messy part.\n\nBelow is a photo of one of the large side panels. You can see the aluminum in the foreground and the clear outline of where plasticoat remains. It is a very noticeable difference and will bring up a slight shine to your Airstream before you even begin the multi-stage polishing process.\n\n\n\n\n\n\n\n\n\n\n\nOnce your plasticoat is removed, you are ready to start polishing but you will need several things first.\n\n1. A variable speed polisher. Both the Dewalt DWP849X and the Makita 9227 are good choices. I went with the Dewalt. Use it on a low speed.\n\n\n\n2. A polishing pad. You will need to get all wool, I found them at Napa Auto Parts for $20.00 They can be washed in the washing machine, but likely you will still need a couple of them.\n\n3. A polishing spur, helps clean and maintain the life of your pad.\n\n4. Nuvite Aluminum polish. It is widely regarded as the best on the market. There are quite a few grades to select from depending on the condition of your aluminum. Grade F9 is very coarse and is the first stage to be applied if your aluminum needs major repair. In my case, I will follow it up with grade C (medium) and then finally grade S (very fine) will give it the mirror shine. Grade S needs to be applied with an orbital polisher and not the variable speed that was mentioned before. There is an orbital polisher on the market called the Cyclo that supposedly does a great job but it is ridiculously priced..somewhere around $400 dollars, so any cheap $25.00 dollar Canadian Tire special with an old cotton sheet or t-shirt around the buffer will work just as well but may take longer.\n\nVintage Trailer Supply has a really good selection of polishing tools and the Nuvite polish. Here is a link:\n\nhttp://www.vintagetrailersupply.com/searchresults.asp?Extensive_Search=Y&Search=nuvite+polish&x=0&y=0\n\nIf the aluminum has heavy pitting or scratches, it may be necessary to use 600 grit sandpaper before polishing. If you do not sand out the damage, it will appear even darker and more obvious once the polish is applied. It is possible to polish it out with many many passes, however the polish is expensive and sanding is faster.\n\nBelow you can see the swirled areas are where I have used the sandpaper. Once you apply the Nuvite F9 polish, it immediately makes a huge difference – note the shiny area in the second photo.\n\n\n\n\n\nThis is after just one pass with the F9. It should be very clear which parts are polished.\n\n\n\n\n\n\n\nYou may have to touch up some missed spots with the sandpaper after the first pass. It will bring up imperfections that you may not have noticed before.\n\n\n\nThis is still after just one pass. I think this area will need another one at least, possibly 2.\n\nThe upper front of the Airstream was in very poor condition. Removing the clearcoat improves the appearance but even so, this is what I still had to work with on the front centre panel. The second photo shows where I have begun to sand.\n\n\n\nThis is what it looks like after applying the F9\n\n\n\n\n\nAnd finally, after applying the other two polishes - you achieve the mirror like finish!\n\n\n\nI recommend doing the entire trailer in one coat at a time before moving on to the finer polishes. This is a very time consuming process and therefore, it is not uncommon for companies to charge over $5,000.00 for polishing services alone on a trailer this size.",
"json_metadata": "{\"tags\":[\"airstream\",\"polishing\",\"polish\",\"trailer\",\"aluminum\"],\"image\":[\"https://steemitimages.com/DQmexr25iXRrxS5et4R2KJEotZWPmDiLN6V1dKm9rJ9tY12/photo-1.jpg\",\"https://steemitimages.com/DQmUVwH76pQ2a3H92T1nNxizVBfP2NT4SqLG98VNoBoavPb/2014-05-18_01.jpg\",\"https://steemitimages.com/DQmUAGi71Akk7ymizQmFao5povisZ13GhxbXFHEuBYb4txZ/dsc_0160.jpg\",\"https://steemitimages.com/DQmZ6SqFNn8zWH2pybZrBpfdUbzAmgWgiiUmzQzD3izbC52/photo.jpg\",\"https://steemitimages.com/DQmSdVQLaPPjCUWDbcypS5ksHbjm7VWT24QViwduqBAjCjV/photo-3.jpg\",\"https://steemitimages.com/DQmaEvfhMAxbmGiHwoV8APh1eiA1aQiYCZtofbyJtNnKCtS/2014-06-07_02.jpg\",\"https://steemitimages.com/DQmdXC1qpRiuw3FfHhhj9L1BiGFp5exZuAUsWdcN2GULGxm/2014-06-07_03.jpg\",\"https://steemitimages.com/DQmUnfLvUvEe5WtLeSYyNiQ7TJzcG1VCuxPuBZSYqzLrUmi/2014-06-07_101.jpg\",\"https://steemitimages.com/DQmSd8uPCrkG3mc9QZn3bw6yT9aaVKbyErHQdeRHvB89Jio/screen-shot-2014-06-05-at-11-16-28-am1.png\",\"https://steemitimages.com/DQmQ7zkszG4H6Un6BTtb6B4YRGhcFhQ7w5WdfbxNUwGYE3v/2014-06-07_09.jpg\",\"https://steemitimages.com/DQmNvHiDkq2pwNkHgrMCTm69oZGX6PCDSyUVB6RiX2RKHwc/2014-07-02-first-part-of-polish.jpg\",\"https://steemitimages.com/DQmSenFrE2o7vScxZUHYQxCBmX14STf4Zdpw4aBFkep4vnE/2014-07-09.jpg\",\"https://steemitimages.com/DQmWhqpdZPqeMzaZ3eZyuhEWmvVQCkDeid3VPjMmNRHUzC8/2014-07-11_02.jpg\",\"https://steemitimages.com/DQmQLr5vL6FrMKob3i5iL4euUHspBJKtThE6QKxZK4ftGgt/2014-07-26_01.jpg\",\"https://steemitimages.com/DQmQE4gedzJkBHUEmF55L1Y7nokeKh9qu4hcee2WFdctmRb/2014-07-26_02.jpg\",\"https://steemitimages.com/DQmcQpht86LU3f5JMXunfQ1ZLvRa59bgSBWLgRQGaymer1h/Screen%20Shot%202017-06-22%20at%2012.27.43%20AM.png\",\"https://steemitimages.com/DQmNUoWCBLhPbYh5JRm65LX8LJ9jQtMNGxKkpxQWZ5gkp3W/2014-07-27_06.jpg\",\"https://steemitimages.com/DQmacka2qmjsX3Eai4y1gyHbvodBRRNVf675zbRRcJCqWSh/2014-07-27_07.jpg\",\"https://steemitimages.com/DQmegwxNMDnmy172LvVHWyjBoF1wQ8Q7GJSHCcuFEqxDzyn/2014-07-27_08.jpg\"],\"links\":[\"http://www.vintagetrailersupply.com/searchresults.asp?Extensive_Search=Y&Search=nuvite+polish&x=0&y=0\"],\"app\":\"steemit/0.1\",\"format\":\"markdown\"}"
}
]
}mistahleeclaimed reward balance: 2.839 SBD, 2.963 SP2017/05/29 10:11:27
mistahleeclaimed reward balance: 2.839 SBD, 2.963 SP
2017/05/29 10:11:27
| account | mistahlee |
| reward steem | 0.000 STEEM |
| reward sbd | 2.839 SBD |
| reward vests | 4825.016595 VESTS |
| Transaction Info | Block #12350134/Trx 6a5f54b878280116042739150500beda735497db |
View Raw JSON Data
{
  "trx_id": "6a5f54b878280116042739150500beda735497db",
  "block": 12350134,
  "trx_in_block": 3,
  "op_in_trx": 0,
  "virtual_op": 0,
  "timestamp": "2017-05-29T10:11:27",
  "op": [
    "claim_reward_balance",
    {
      "account": "mistahlee",
      "reward_steem": "0.000 STEEM",
      "reward_sbd": "2.839 SBD",
      "reward_vests": "4825.016595 VESTS"
    }
  ]
}mistahleereceived 2.798 SBD, 2.920 SP author reward for @mistahlee / vintage-airstream-travel-trailer-renovation-post-2-preparing-a-vintage-trailer-for-transport-and-gutting-the-interior2017/05/28 03:36:00
mistahleereceived 2.798 SBD, 2.920 SP author reward for @mistahlee / vintage-airstream-travel-trailer-renovation-post-2-preparing-a-vintage-trailer-for-transport-and-gutting-the-interior
2017/05/28 03:36:00
| author | mistahlee |
| permlink | vintage-airstream-travel-trailer-renovation-post-2-preparing-a-vintage-trailer-for-transport-and-gutting-the-interior |
| sbd payout | 2.798 SBD |
| steem payout | 0.000 STEEM |
| vesting payout | 4754.529766 VESTS |
| Transaction Info | Block #12313456/Virtual Operation #3 |
View Raw JSON Data
{
  "trx_id": "0000000000000000000000000000000000000000",
  "block": 12313456,
  "trx_in_block": 4294967295,
  "op_in_trx": 0,
  "virtual_op": 3,
  "timestamp": "2017-05-28T03:36:00",
  "op": [
    "author_reward",
    {
      "author": "mistahlee",
      "permlink": "vintage-airstream-travel-trailer-renovation-post-2-preparing-a-vintage-trailer-for-transport-and-gutting-the-interior",
      "sbd_payout": "2.798 SBD",
      "steem_payout": "0.000 STEEM",
      "vesting_payout": "4754.529766 VESTS"
    }
  ]
}mistahleereceived 0.041 SBD, 0.043 SP author reward for @mistahlee / vintage-airstream-travel-trailer-renovation-post-1-before-and-after-pics2017/05/23 04:34:42
mistahleereceived 0.041 SBD, 0.043 SP author reward for @mistahlee / vintage-airstream-travel-trailer-renovation-post-1-before-and-after-pics
2017/05/23 04:34:42
| author | mistahlee |
| permlink | vintage-airstream-travel-trailer-renovation-post-1-before-and-after-pics |
| sbd payout | 0.041 SBD |
| steem payout | 0.000 STEEM |
| vesting payout | 70.486829 VESTS |
| Transaction Info | Block #12170757/Virtual Operation #3 |
View Raw JSON Data
{
  "trx_id": "0000000000000000000000000000000000000000",
  "block": 12170757,
  "trx_in_block": 4294967295,
  "op_in_trx": 0,
  "virtual_op": 3,
  "timestamp": "2017-05-23T04:34:42",
  "op": [
    "author_reward",
    {
      "author": "mistahlee",
      "permlink": "vintage-airstream-travel-trailer-renovation-post-1-before-and-after-pics",
      "sbd_payout": "0.041 SBD",
      "steem_payout": "0.000 STEEM",
      "vesting_payout": "70.486829 VESTS"
    }
  ]
}2017/05/22 03:17:27
2017/05/22 03:17:27
| parent author | |
| parent permlink | airstream |
| author | mistahlee |
| permlink | vintage-airstream-travel-trailer-renovation-post-3-removing-the-shell-and-putting-it-back-together |
| title | Vintage Airstream Travel Trailer Renovation: Post 3 - Removing the Shell, insulating and Putting Back Together |
| body | Removing the shell requires some preliminary work: You will first need to remove the windows and you will need somewhere to suspend the entire structure. Fortunately we had a pre-existing shelter to hang from, however I have seen some other people have created a frame out of 2x4's. Its also a good idea to stabilize it with some cinder blocks or lumber so the entire shell does not sway while suspended. You will also need to remove the decorative strip around the base where the shell meets the chassis and then remove all the exterior rivets. There is a metal plate at the front behind the propane tanks that will need to have all of the rivets removed to release the shell. Removing the windows is quite simple. Un-attach the locking mechanisms from inside and remove the window arms. Its a good idea to remove the interior window frames too if you plan on cleaning or painting them. They are riveted in so removal can be done with the 1/8 drill bit. From outside the trailer (you will need a step ladder) open the windows and lift them up on a 45 degree angle. From this position gently pull out and the entire window should just slide right out from its position. Handle these carefully, they are fairly durable but extremely expensive to replace if dropped. Once the windows are removed, you can place a 2x4 or in our case steel cylinders through the windows and secure them to your suspension harness. Use a towel to pad around the window frames as they can bend easily when lifting the shell off. When you have removed all of the rivets around the perimeter of the base and the rivets from the front metal place, hoist the shell up and it should lift up fairly easily. From there, have your tow vehicle pull the base and chassis leaving the shell suspended and easy to work on. Here are some photos of the shell suspended, the chassis and all the interesting things we found in there…     You can see the obviously poor condition of the 42 year old insulation underneath the plywood floor. Surprisingly the chassis was not too bad. A few spots had to be sandblasted and re-welded and then everything epoxied to prevent future rust. The floor will be insulated with 4 inches of spray foam that will give an R value of 24. We cut the plywood floor into sections to remove it a piece at a time, but be careful not to cut too deep as the fresh water and grey tank are side by side about half way up and the black tank is right at the rear but they all sit directly under the plywood. 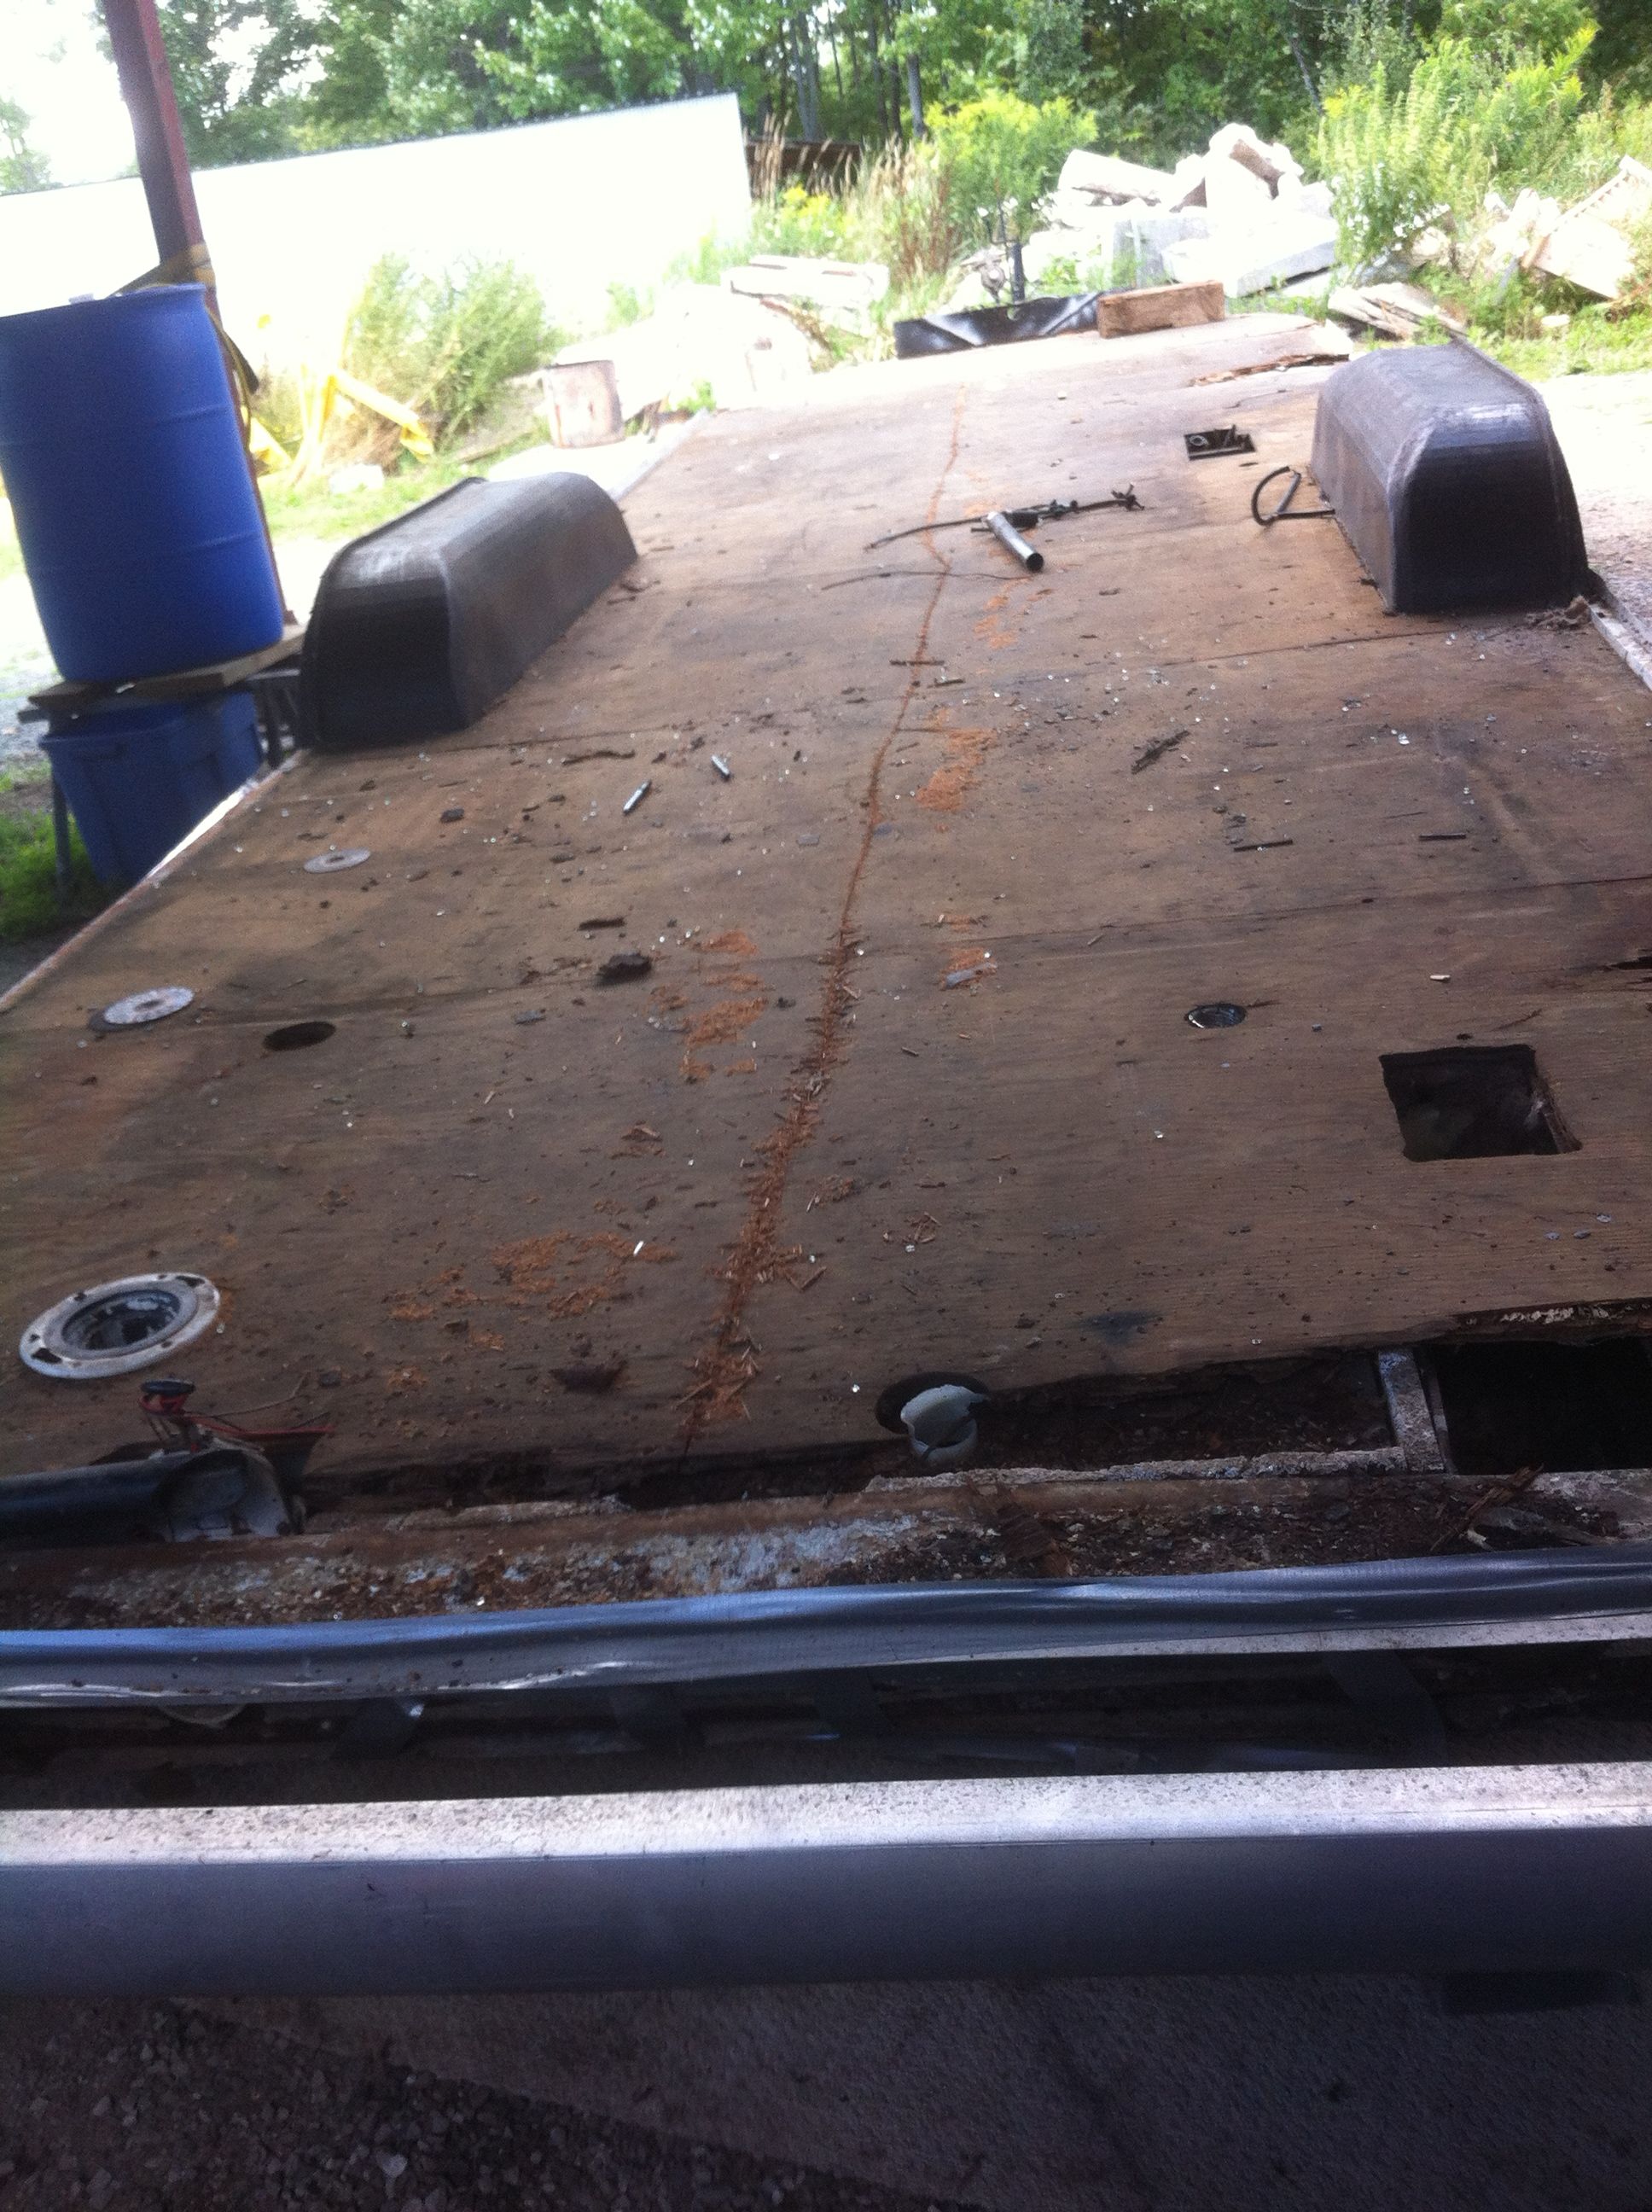 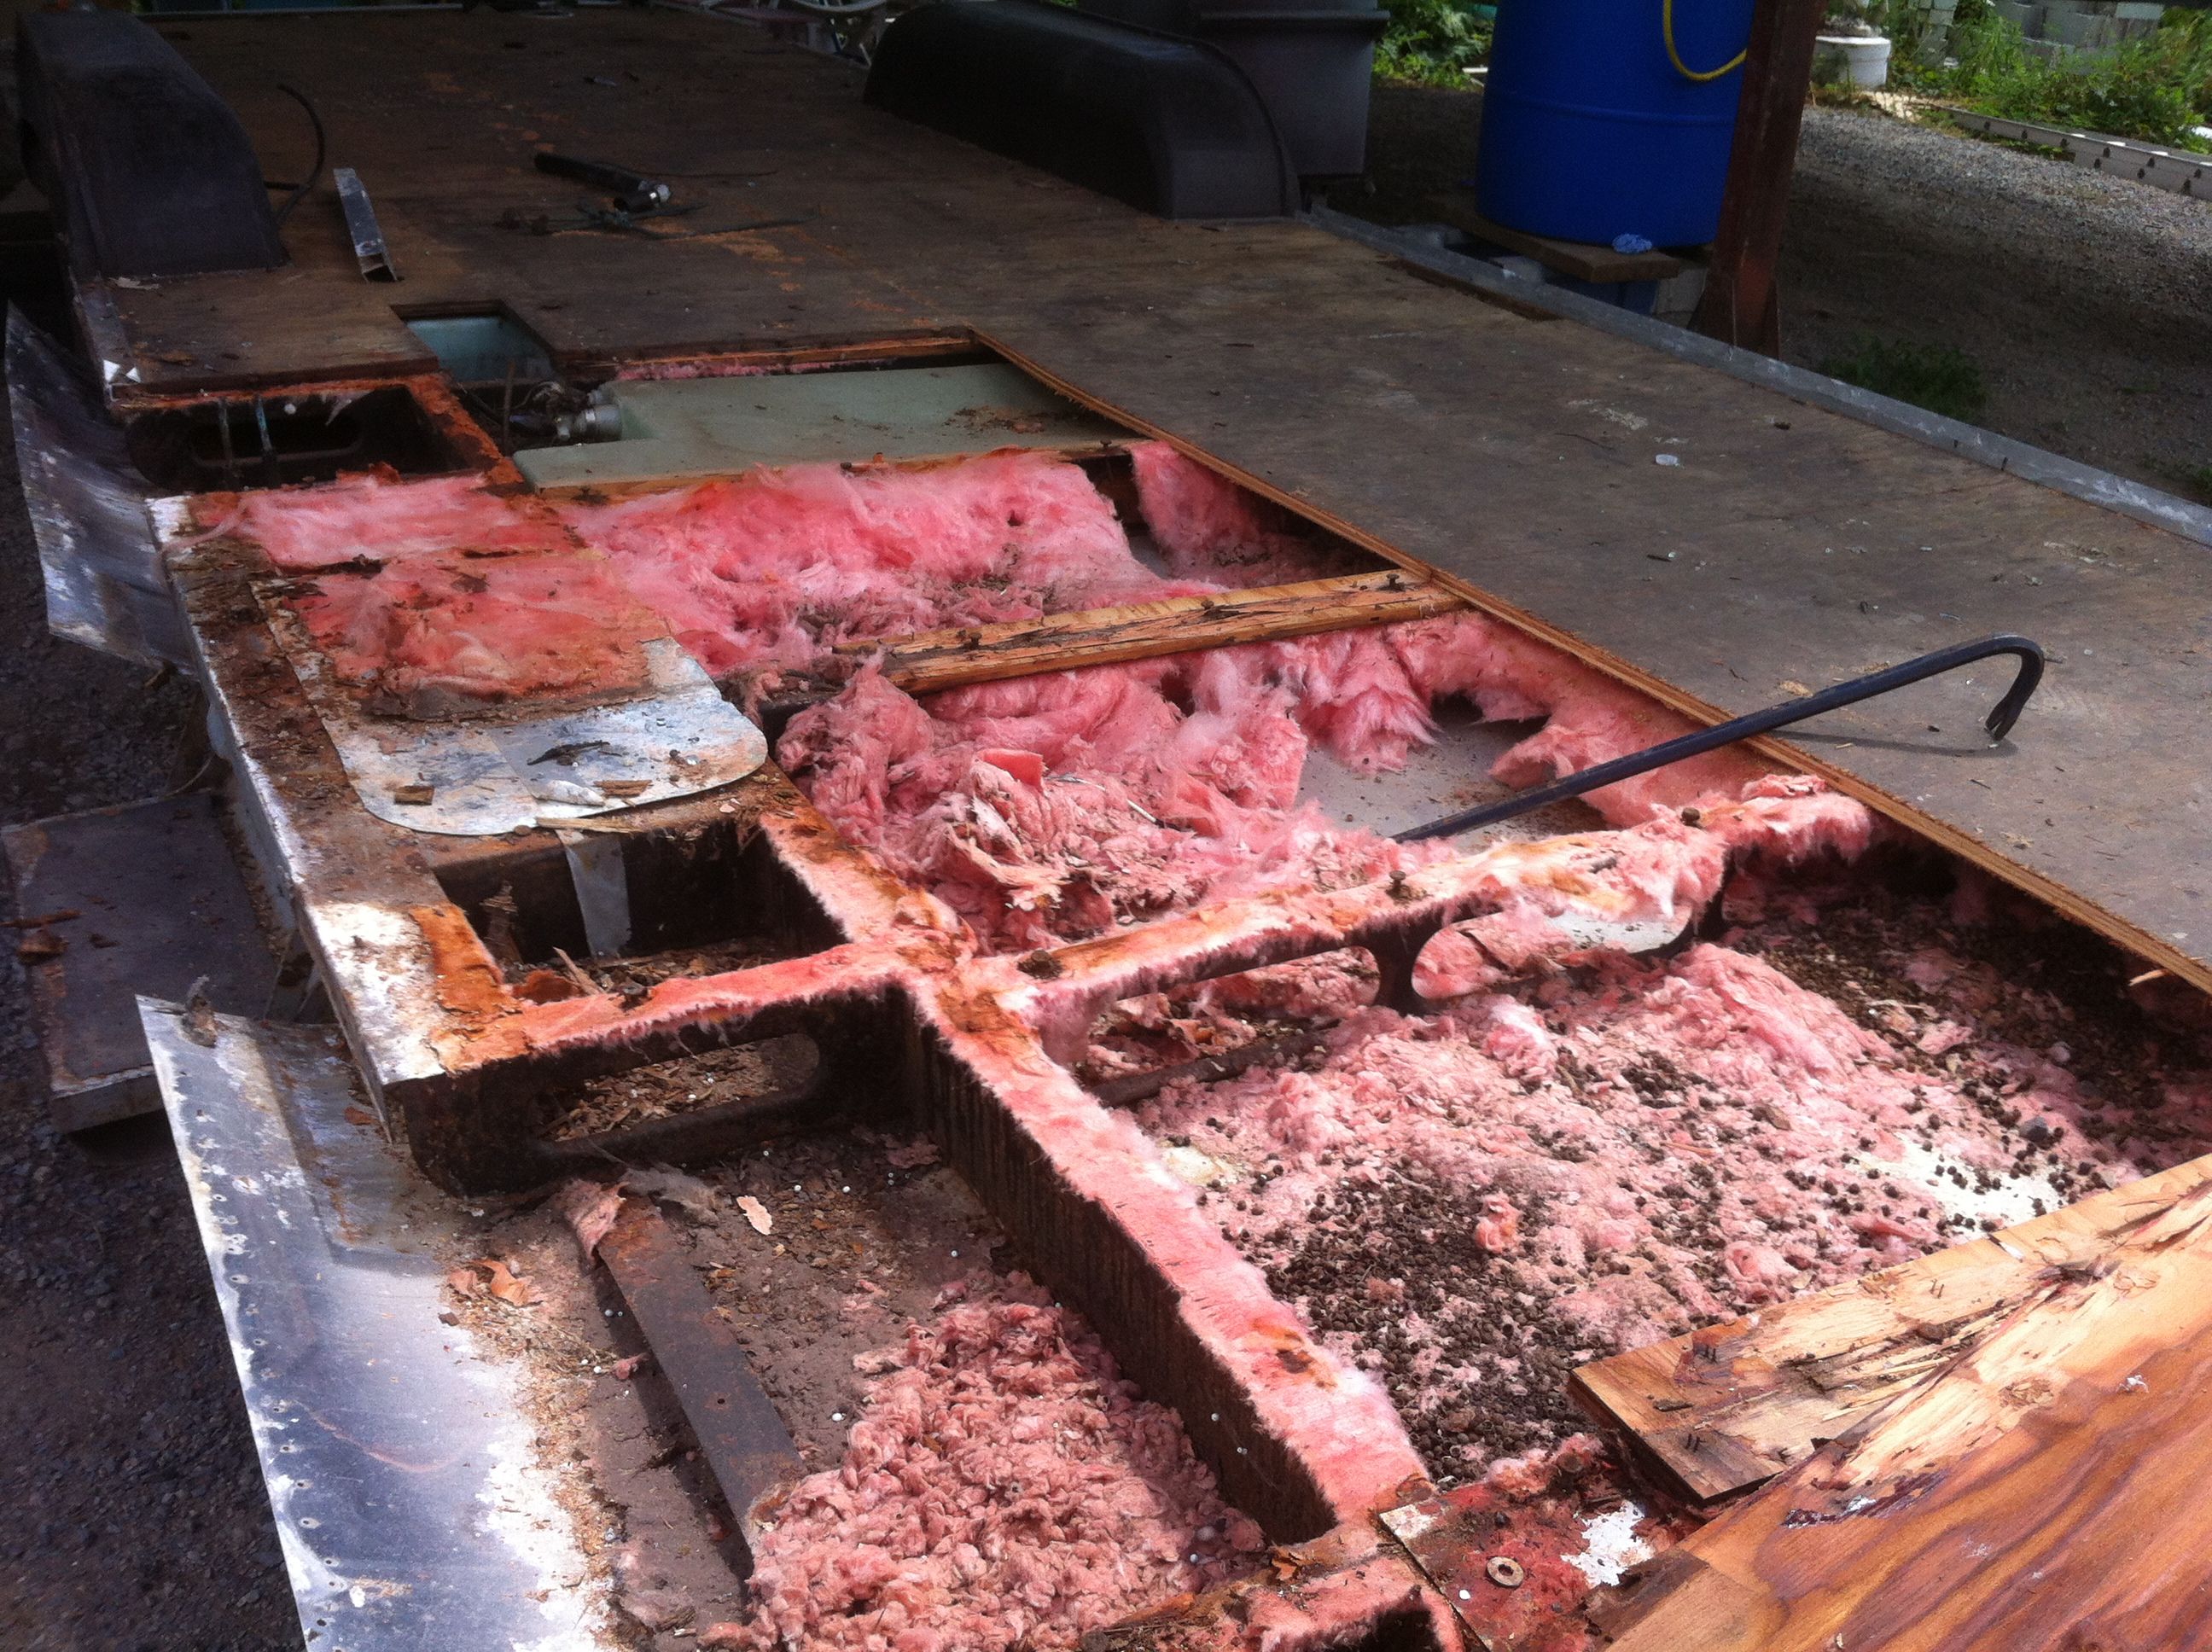 This is what it looked like under the floor. Those brown coloured objects are nut shells, some squirrels and most likely other rodents had made a home in the floor. We also found one of their skeletons in there. 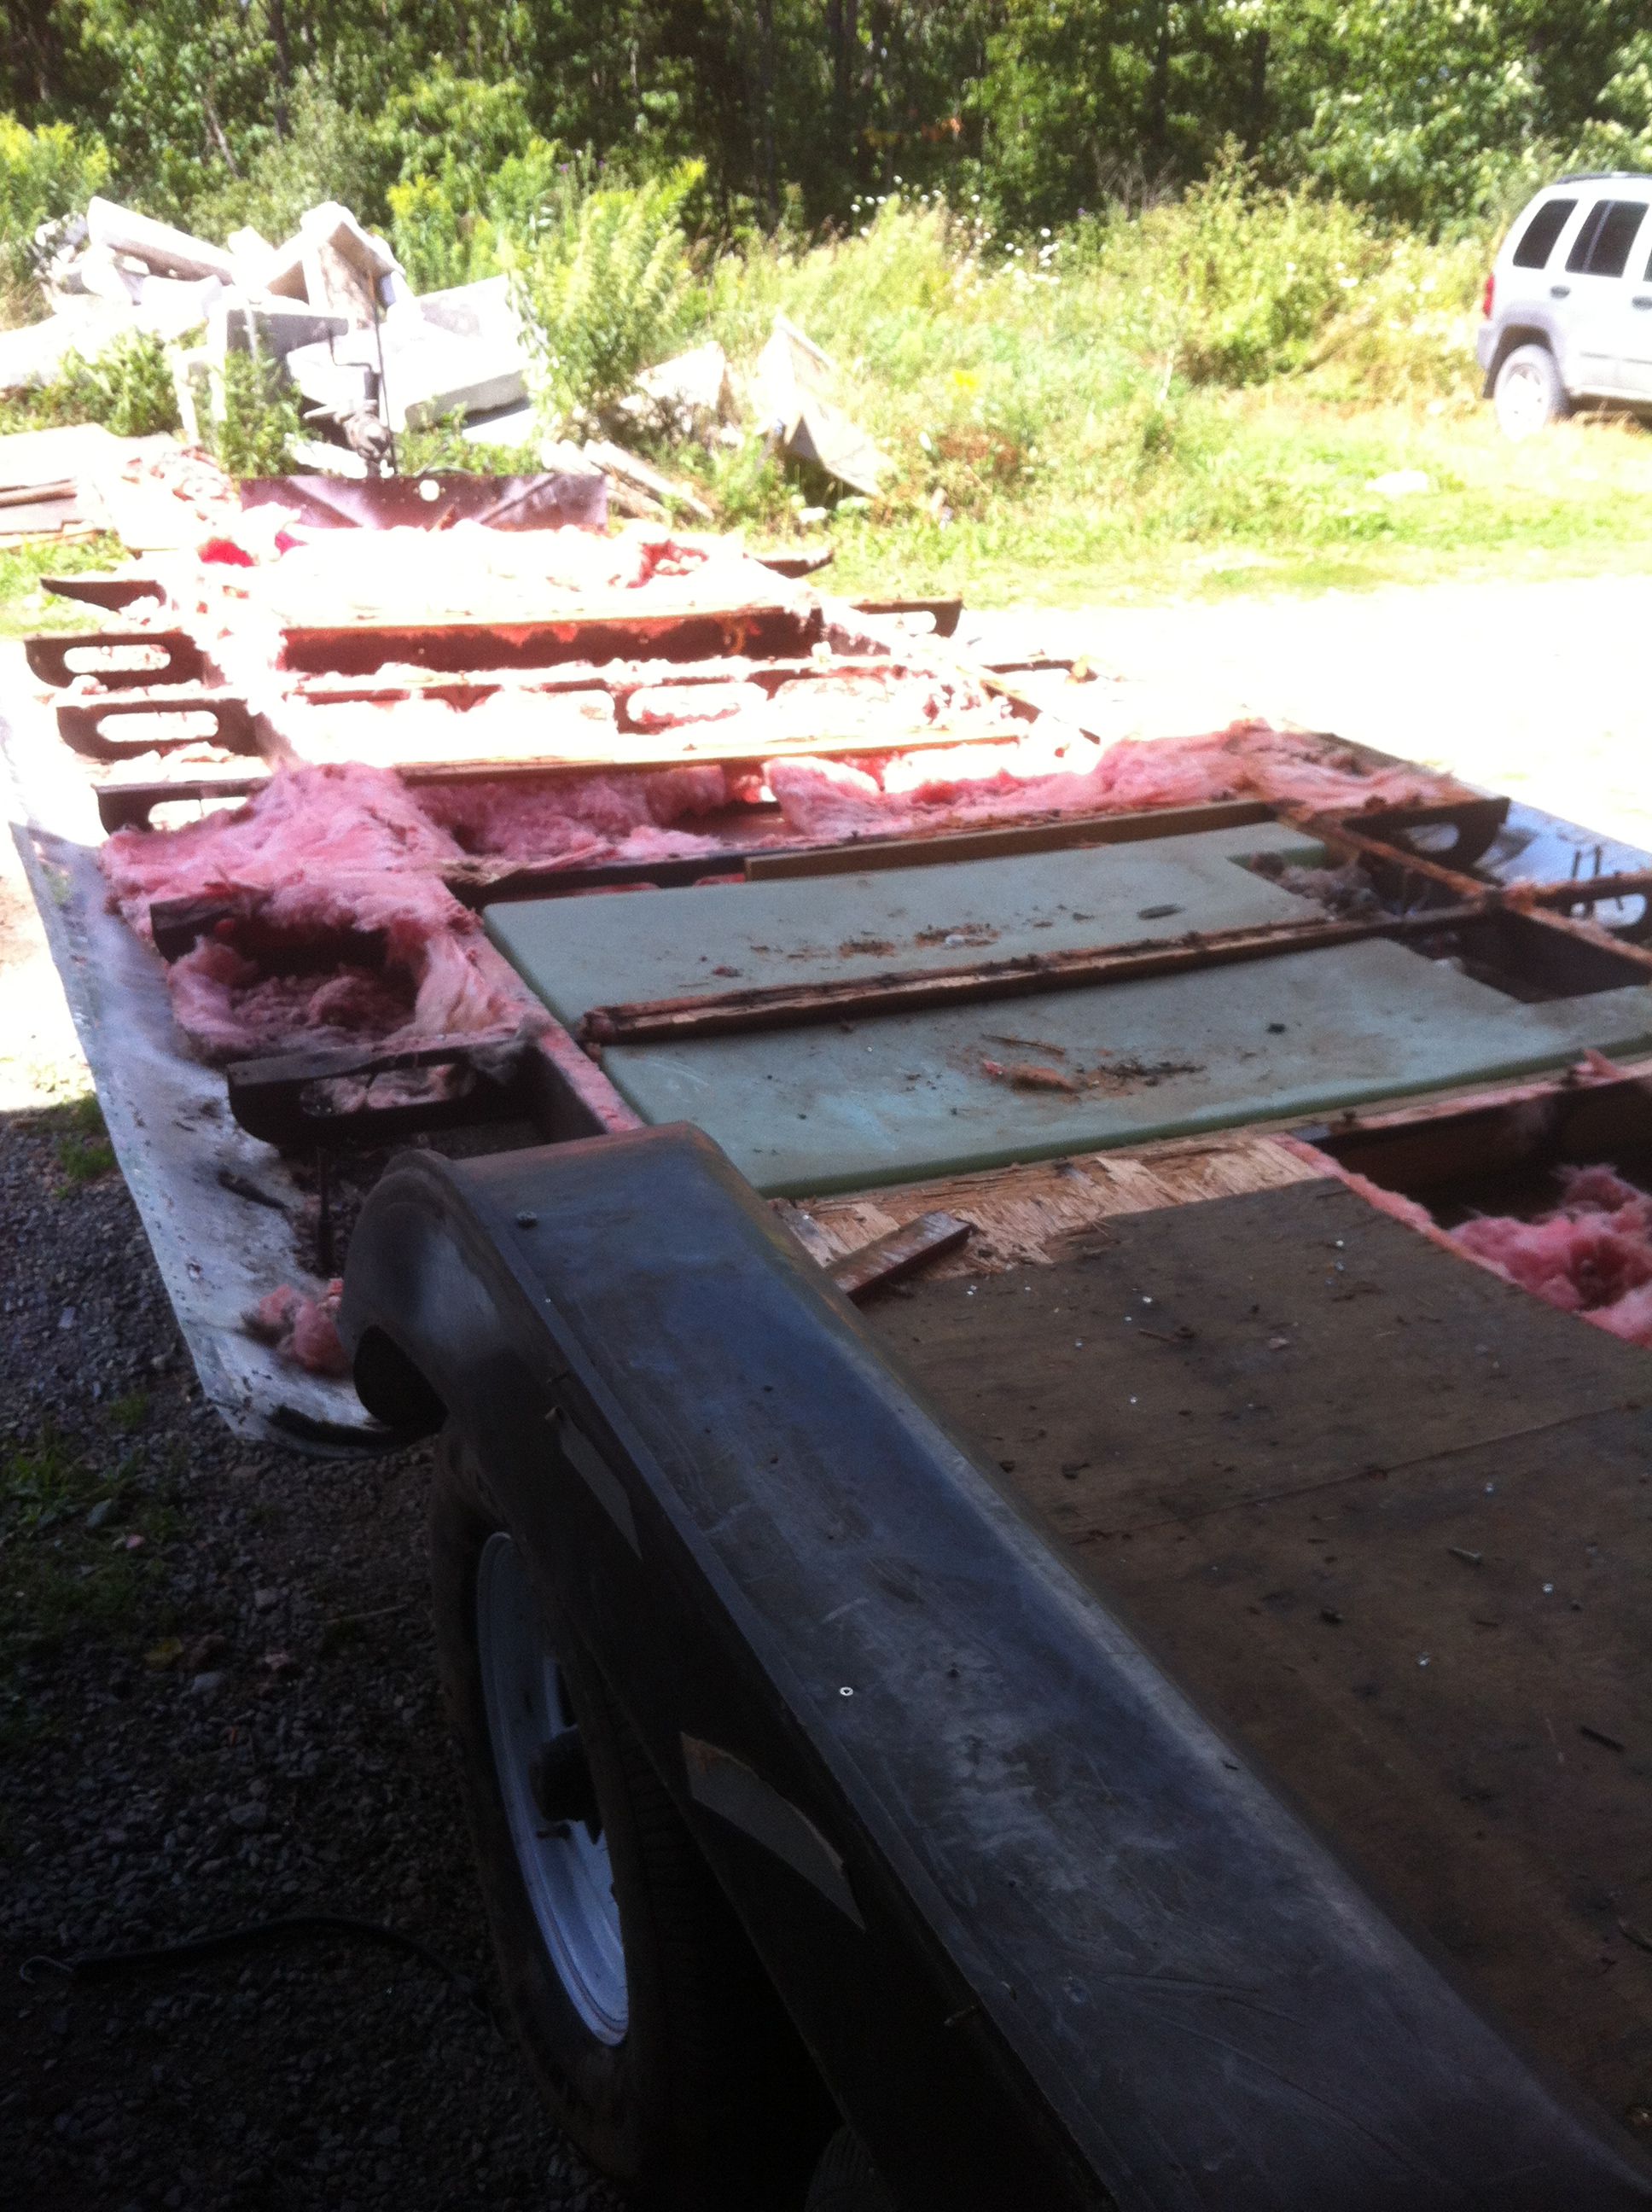 Here are the holding tanks. The wheel wells also had to be removed, the bolts had to be ground off. The underbelly was in good shape except for the parts that were in contact with the steel chassis so unfortunately all of it has to be replaced. The original is .032 aluminum but I am replacing it with .040 which will add about 10lbs to the trailer but .040 is easier to find. Make sure to get 5X12 sheets as the 4 foot sheets do not fit properly and will require more cutting and riveting. I was able to order 2 5X12 sheets for $140 each. 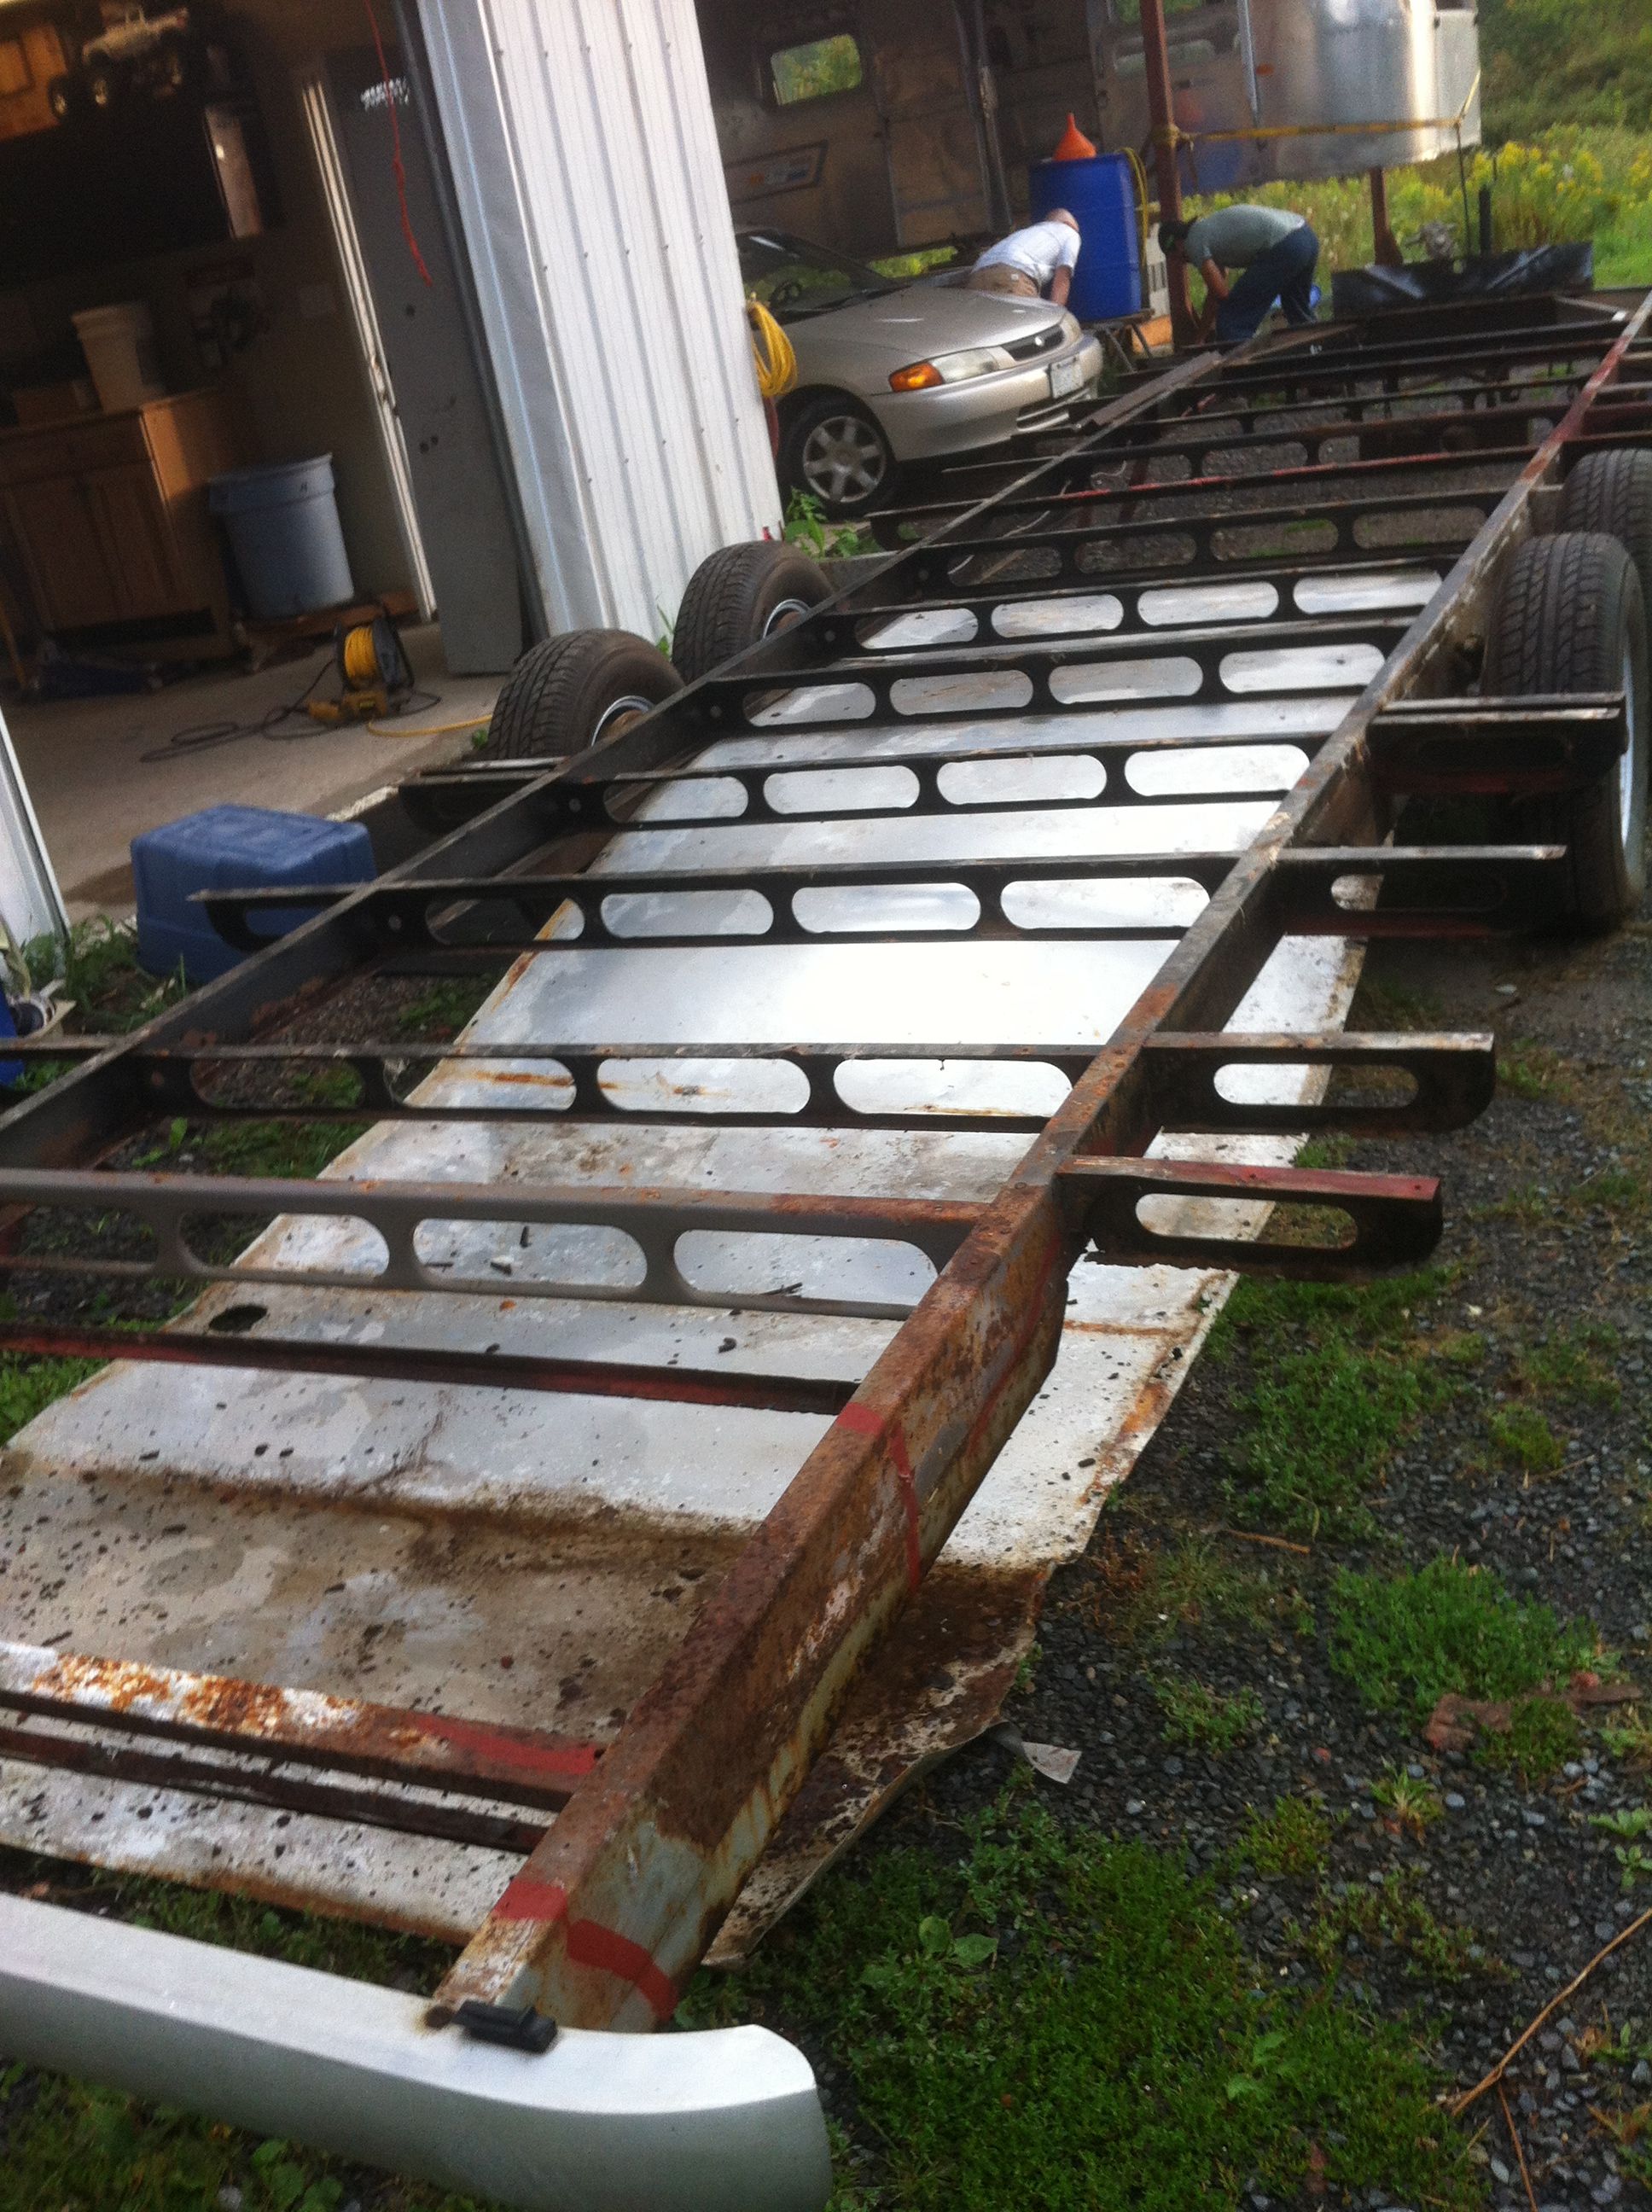 The axles were removed and the chassis was flipped over in order to take off the old aluminum underbelly so that cutting out the rotted steel from the chassis could begin. New steel was re-welded and extra pieces added to certain areas giving the chassis improved stability and durability. We sandblasted the remainder that was salvageable and then applied a rust proofing product to the entire thing. Por15 is commonly used, however the Canadian equivalent to that product is Dom16. It works great and although still quite expensive, it is less so than Por15. A quart of Dom16 is approximately 35-40 dollars and we required 6 quarts (1.5 gallons) for this size of project. Best to apply it with a brush so as to not clog up your gun. Once the Dom16 cures, it is not coming off.  The Dom16 adheres well to rust and actually strengthens it so it is best to leave a light surface layer of rust before applying. It is not difficult to apply. Next, the new aluminum underbelly panels were put on and the shocks replaced. We are getting close to putting the shell back on the chassis but first must insulate with 4 inches of spray foam, bolt down the new plywood sub floor and instal the wheel wells. The plywood subfloor has been weather proofed so as to prevent any future rot if in contact with moisture.  So the chassis is in great condition, the brand new aluminum is on the bottom and side pieces have been cut, its time to insulate the floor. There are many choices for insulation but given that this trailer is going to be used in extreme temperatures and that we want to keep any rodents completely out, we are going with four inches of spray foam through the floor. We’ve also built special insulated compartments for all the holding tanks and plumbing. Each of those will get at least 2 inches of spray foam.  Spray foam is a great product if done correctly so make sure you get a reputable company to do it. Every inch of spray foam gives you an R value of 6 so with our 4 inches we get R24 in the floors and R12 around the tanks and plumbing. . The curved sides needed to be held up while spraying. This is a two person job. The foam expands and sets within seconds and it sticks to everything so it will fit the curve and help hold its shape perfectly. It also adds a lot of structural integrity, something that traditional insulation does not do. We also pray foamed the wheel wells not just for climate control but for sound proofing also.  The spray foam needs to be applied in 2 separate 2 inch passes. The above photo shows the first. Below is the second and finished product. All of our electrical and plumbing has been run through there. 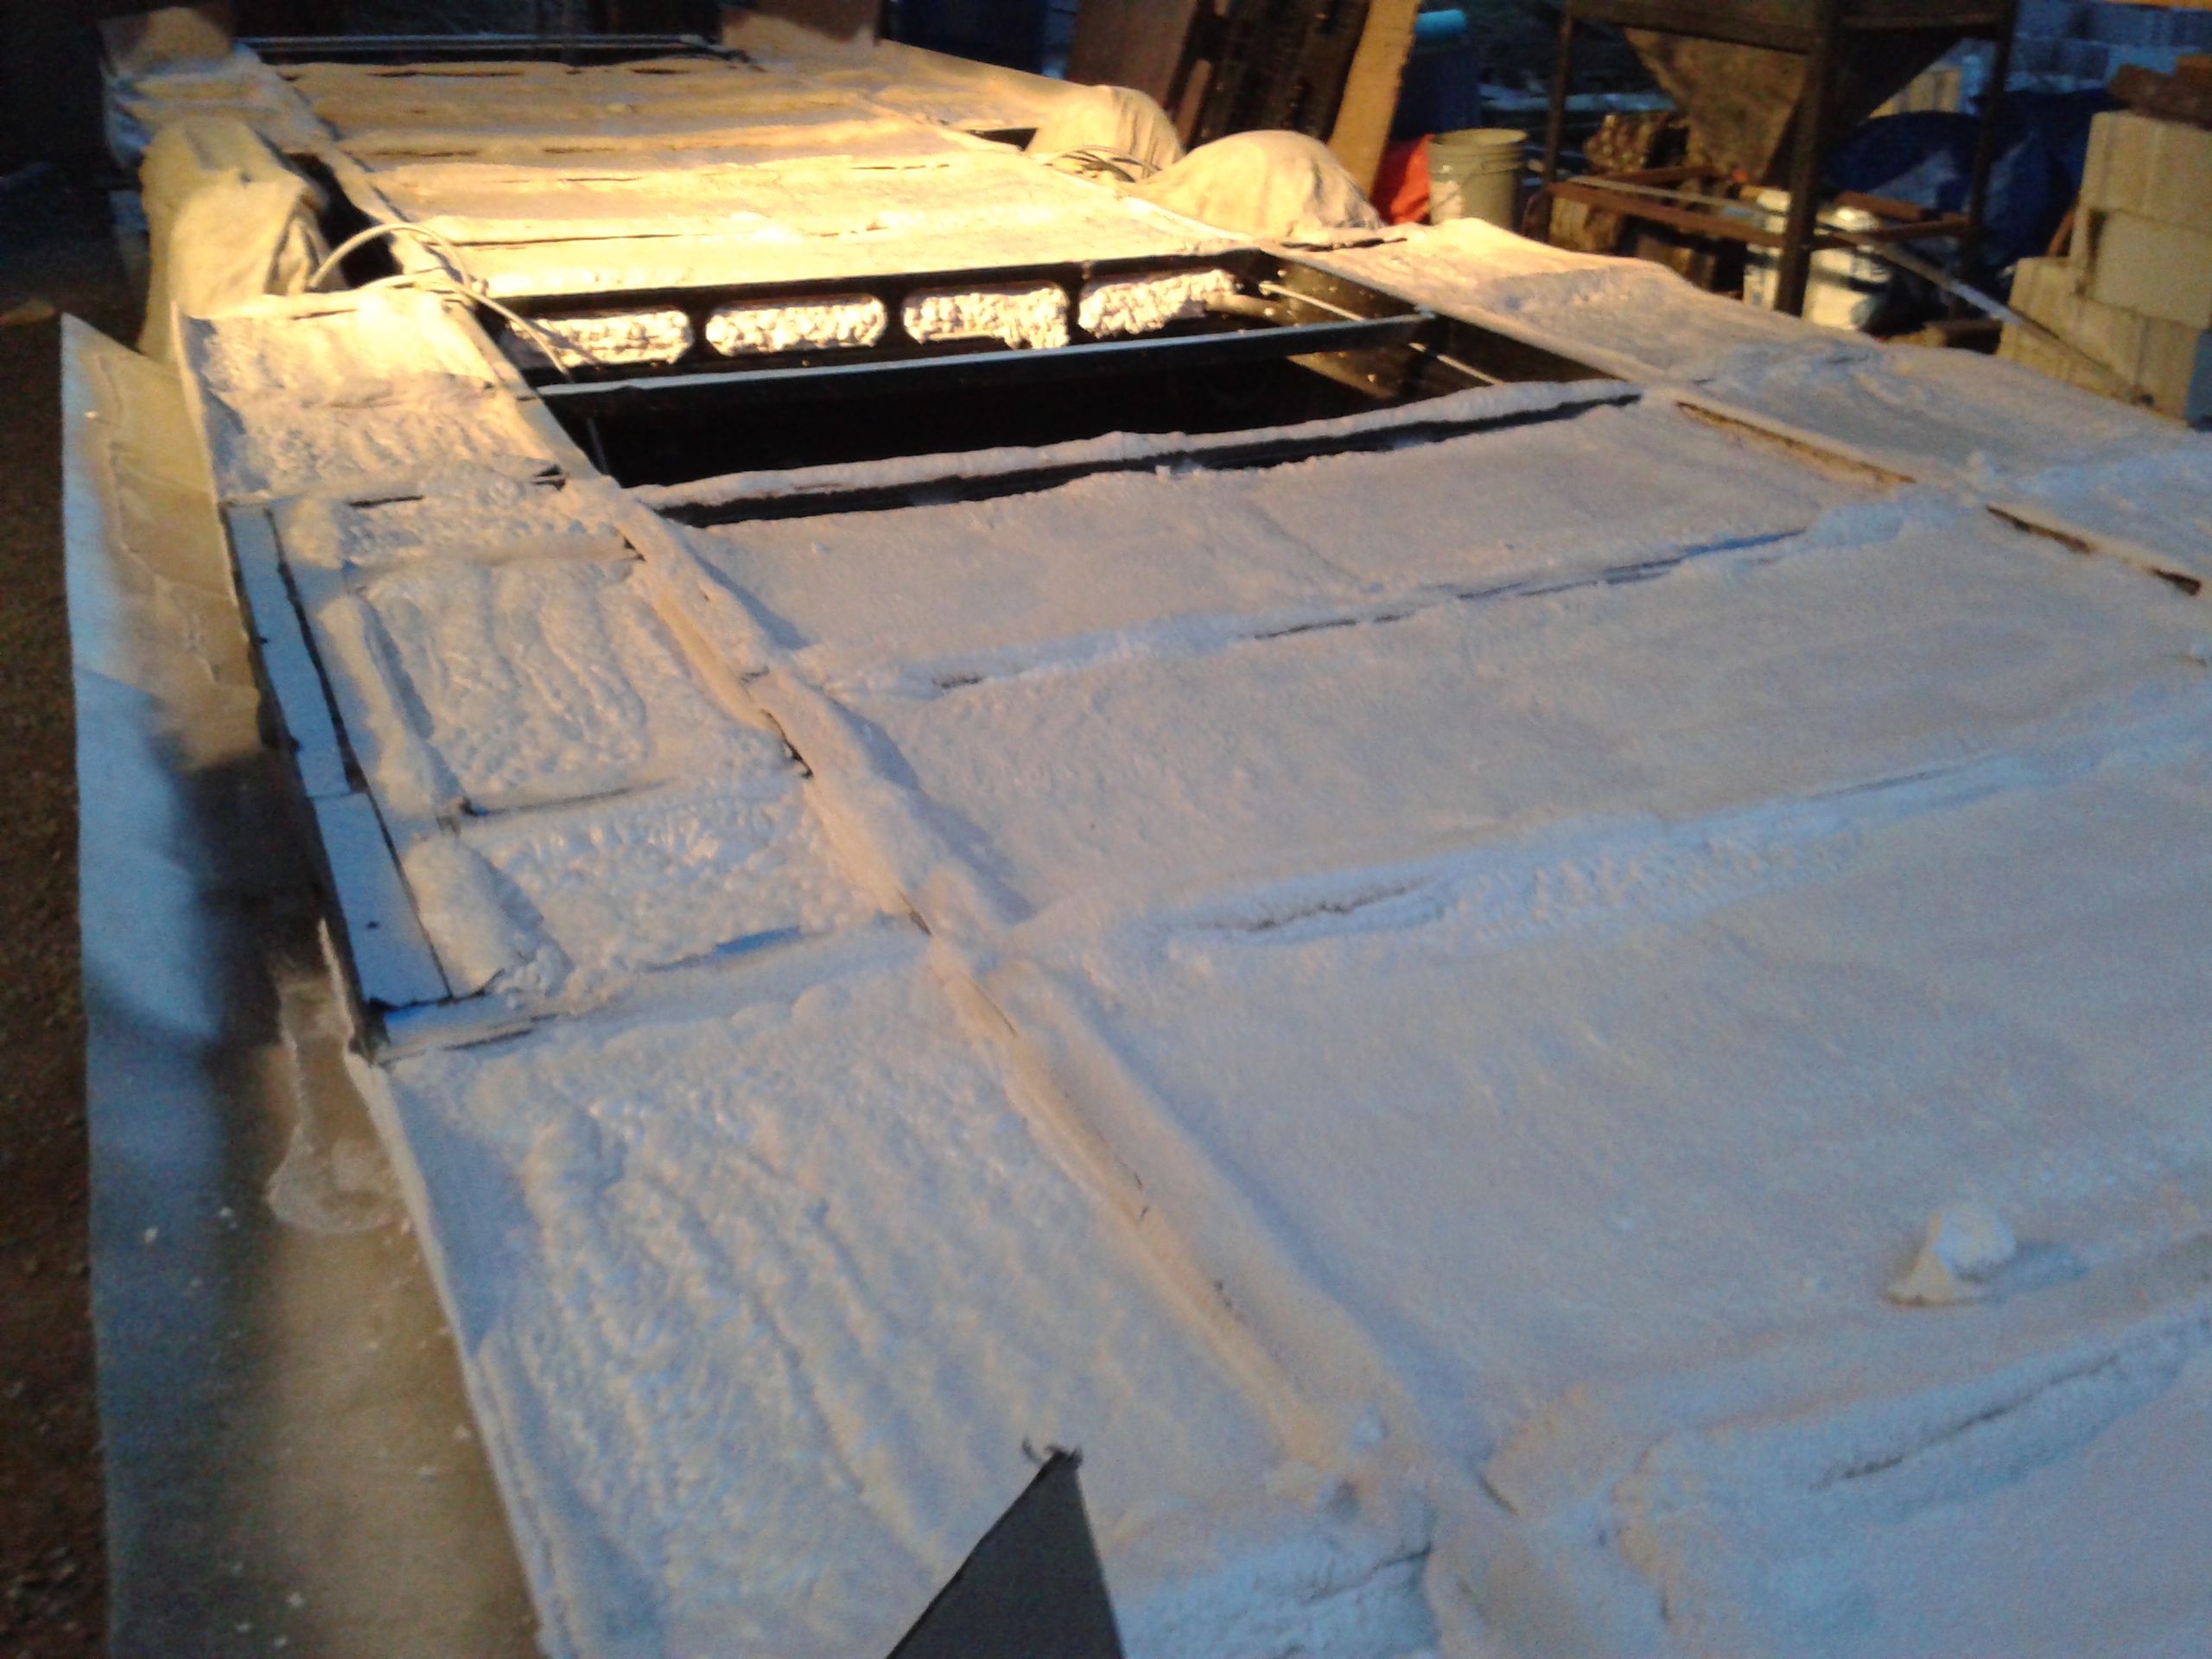 The opening in the centre is to allow access to the fresh water tank should it need to be removed or replaced for any reason. It is accessible from underneath via a thick removable aluminum sheet.  I used a SeeLevel 2 tank monitoring system which requires a circuit board be adhered to each water tank and wired in to give you accurate percentage based readings on all your tanks. It also reads your battery and propane levels. NOTE: it will not work on a metal tank. If you are installing something similar, do it at this point as to access this area again will not be easy in the future. After spray foaming the chassis and even the wheel wells, we’ve used the original, wrecked plywood floor as a template to cut all new plywood pieces. We bolted them down, installed the wheel wells and carefully positioned the chassis under the trailer to finalize a few important details before putting the shell back in place.  Any overhanging parts of the plywood or spray foam need to be trimmed so that the aluminum curved part will fit flush to the shell without any bumps. 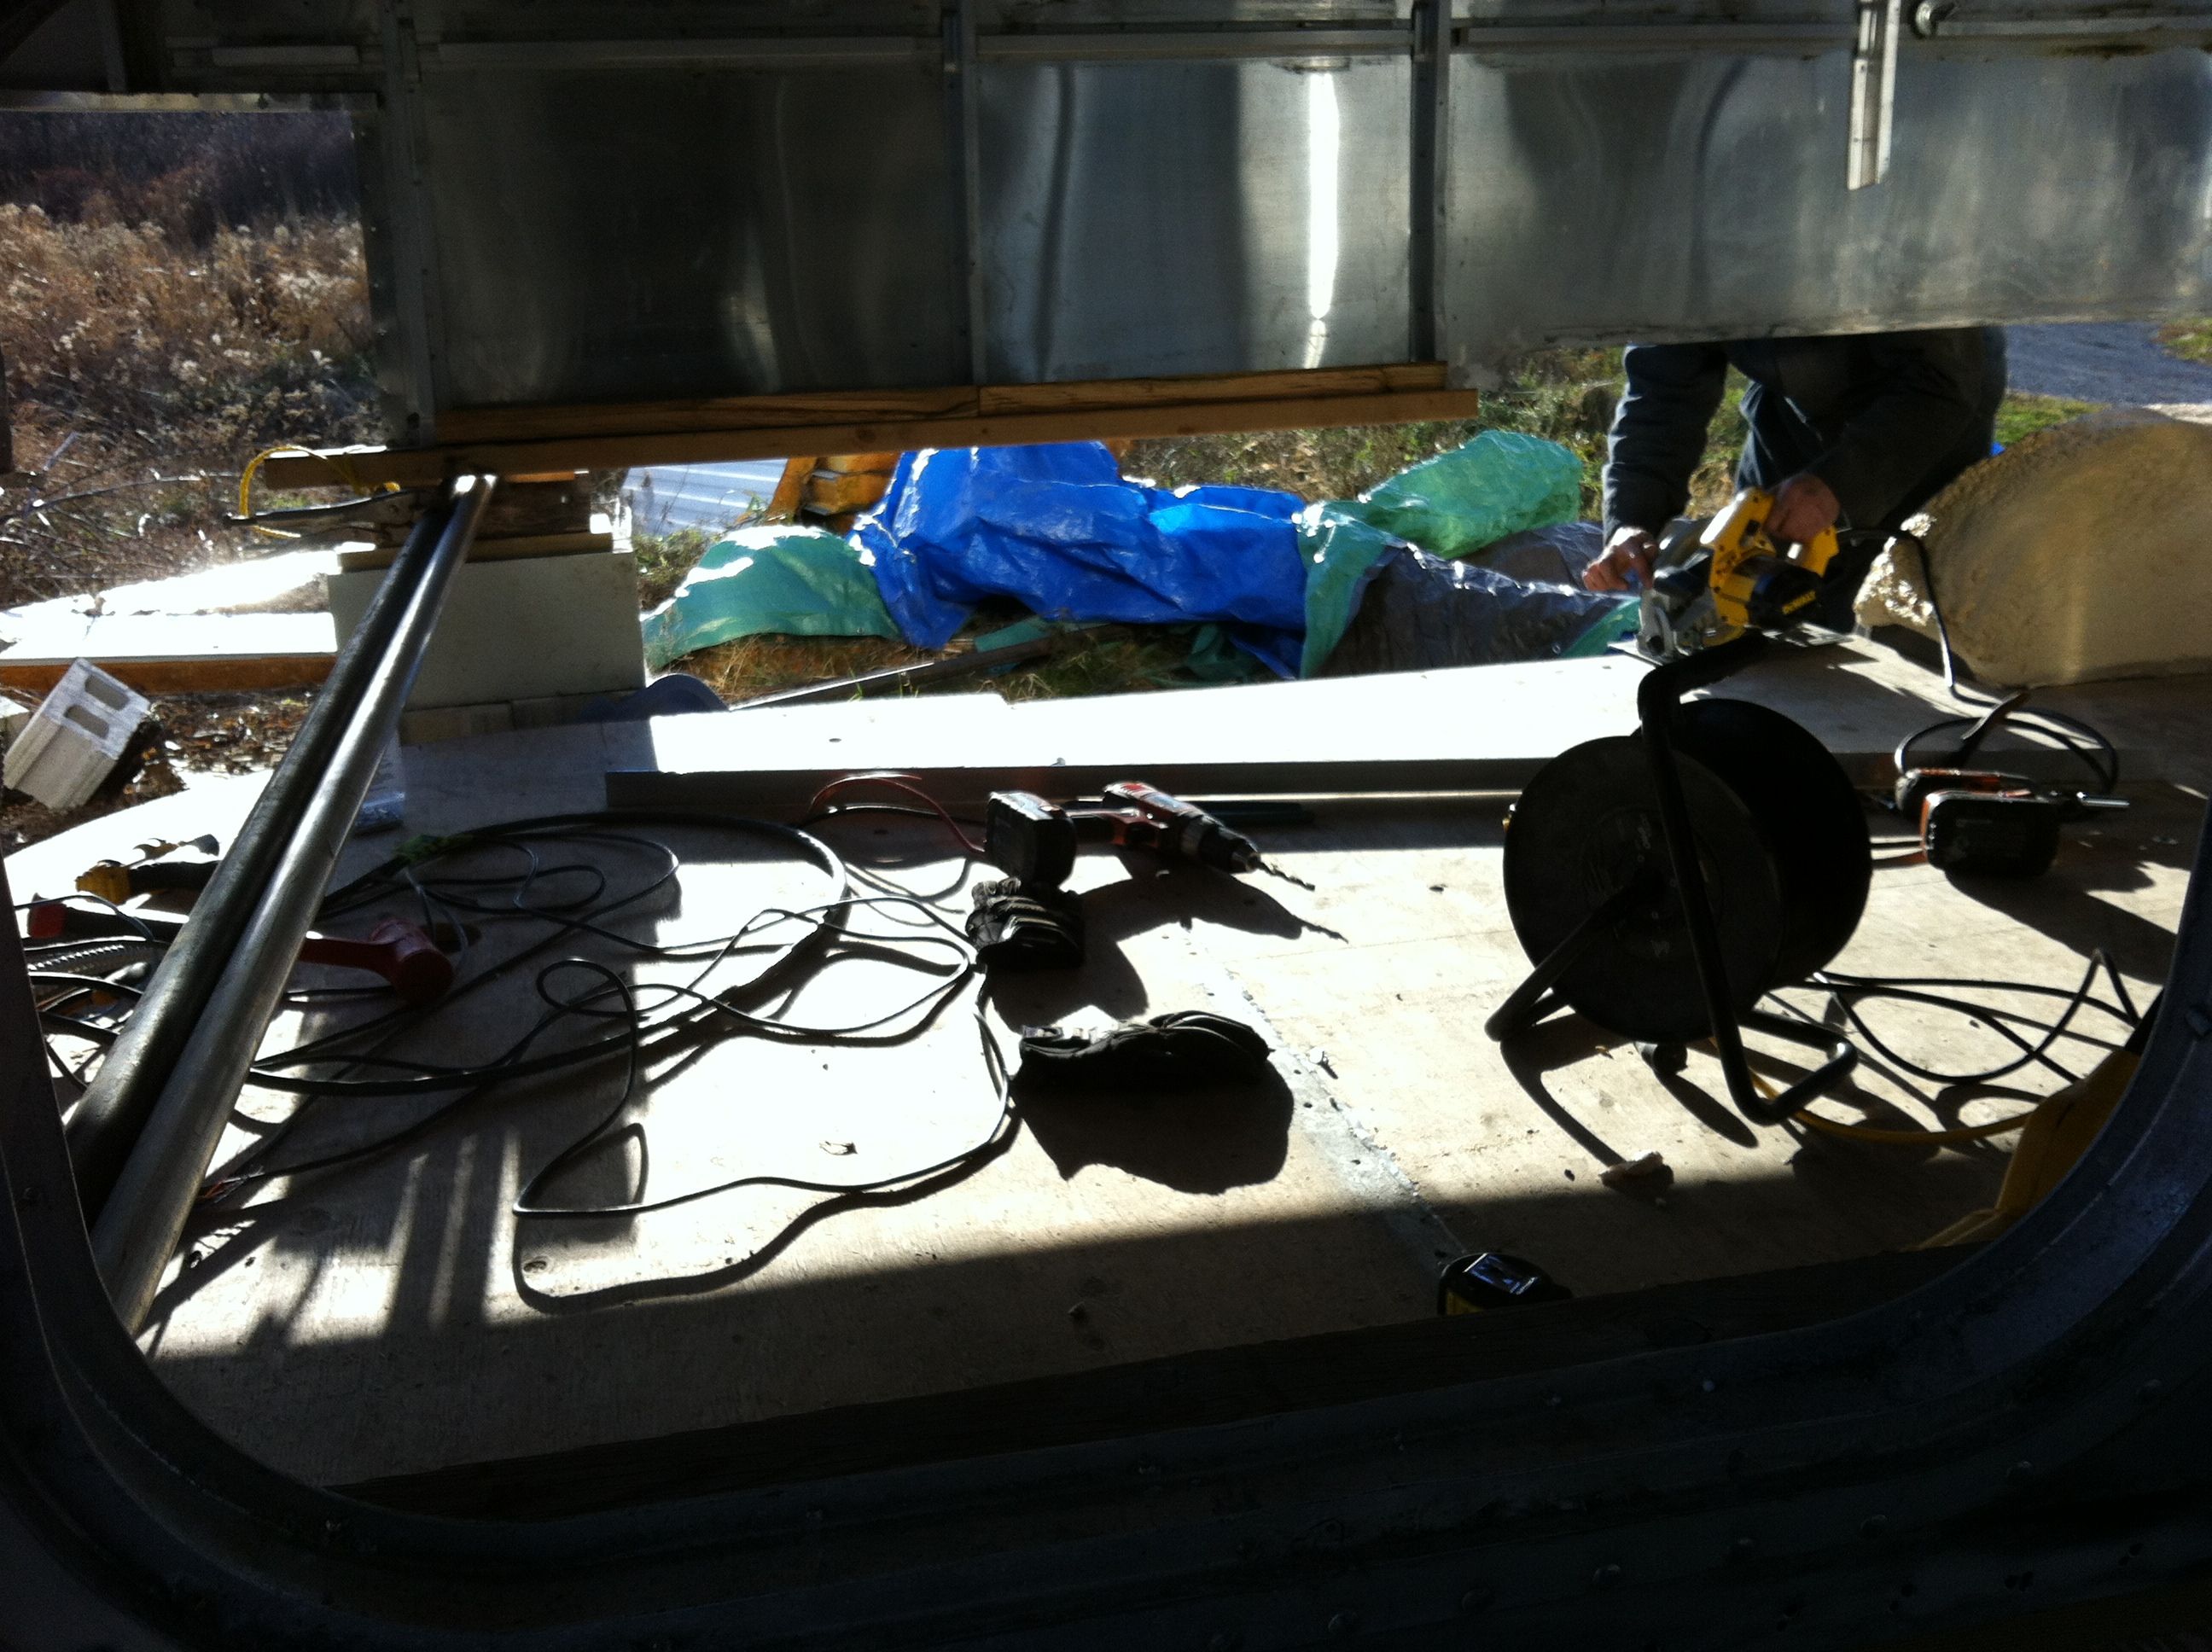 An air hose is helpful in blowing out any smaller pieces that might still cause blemishes in the aluminum. 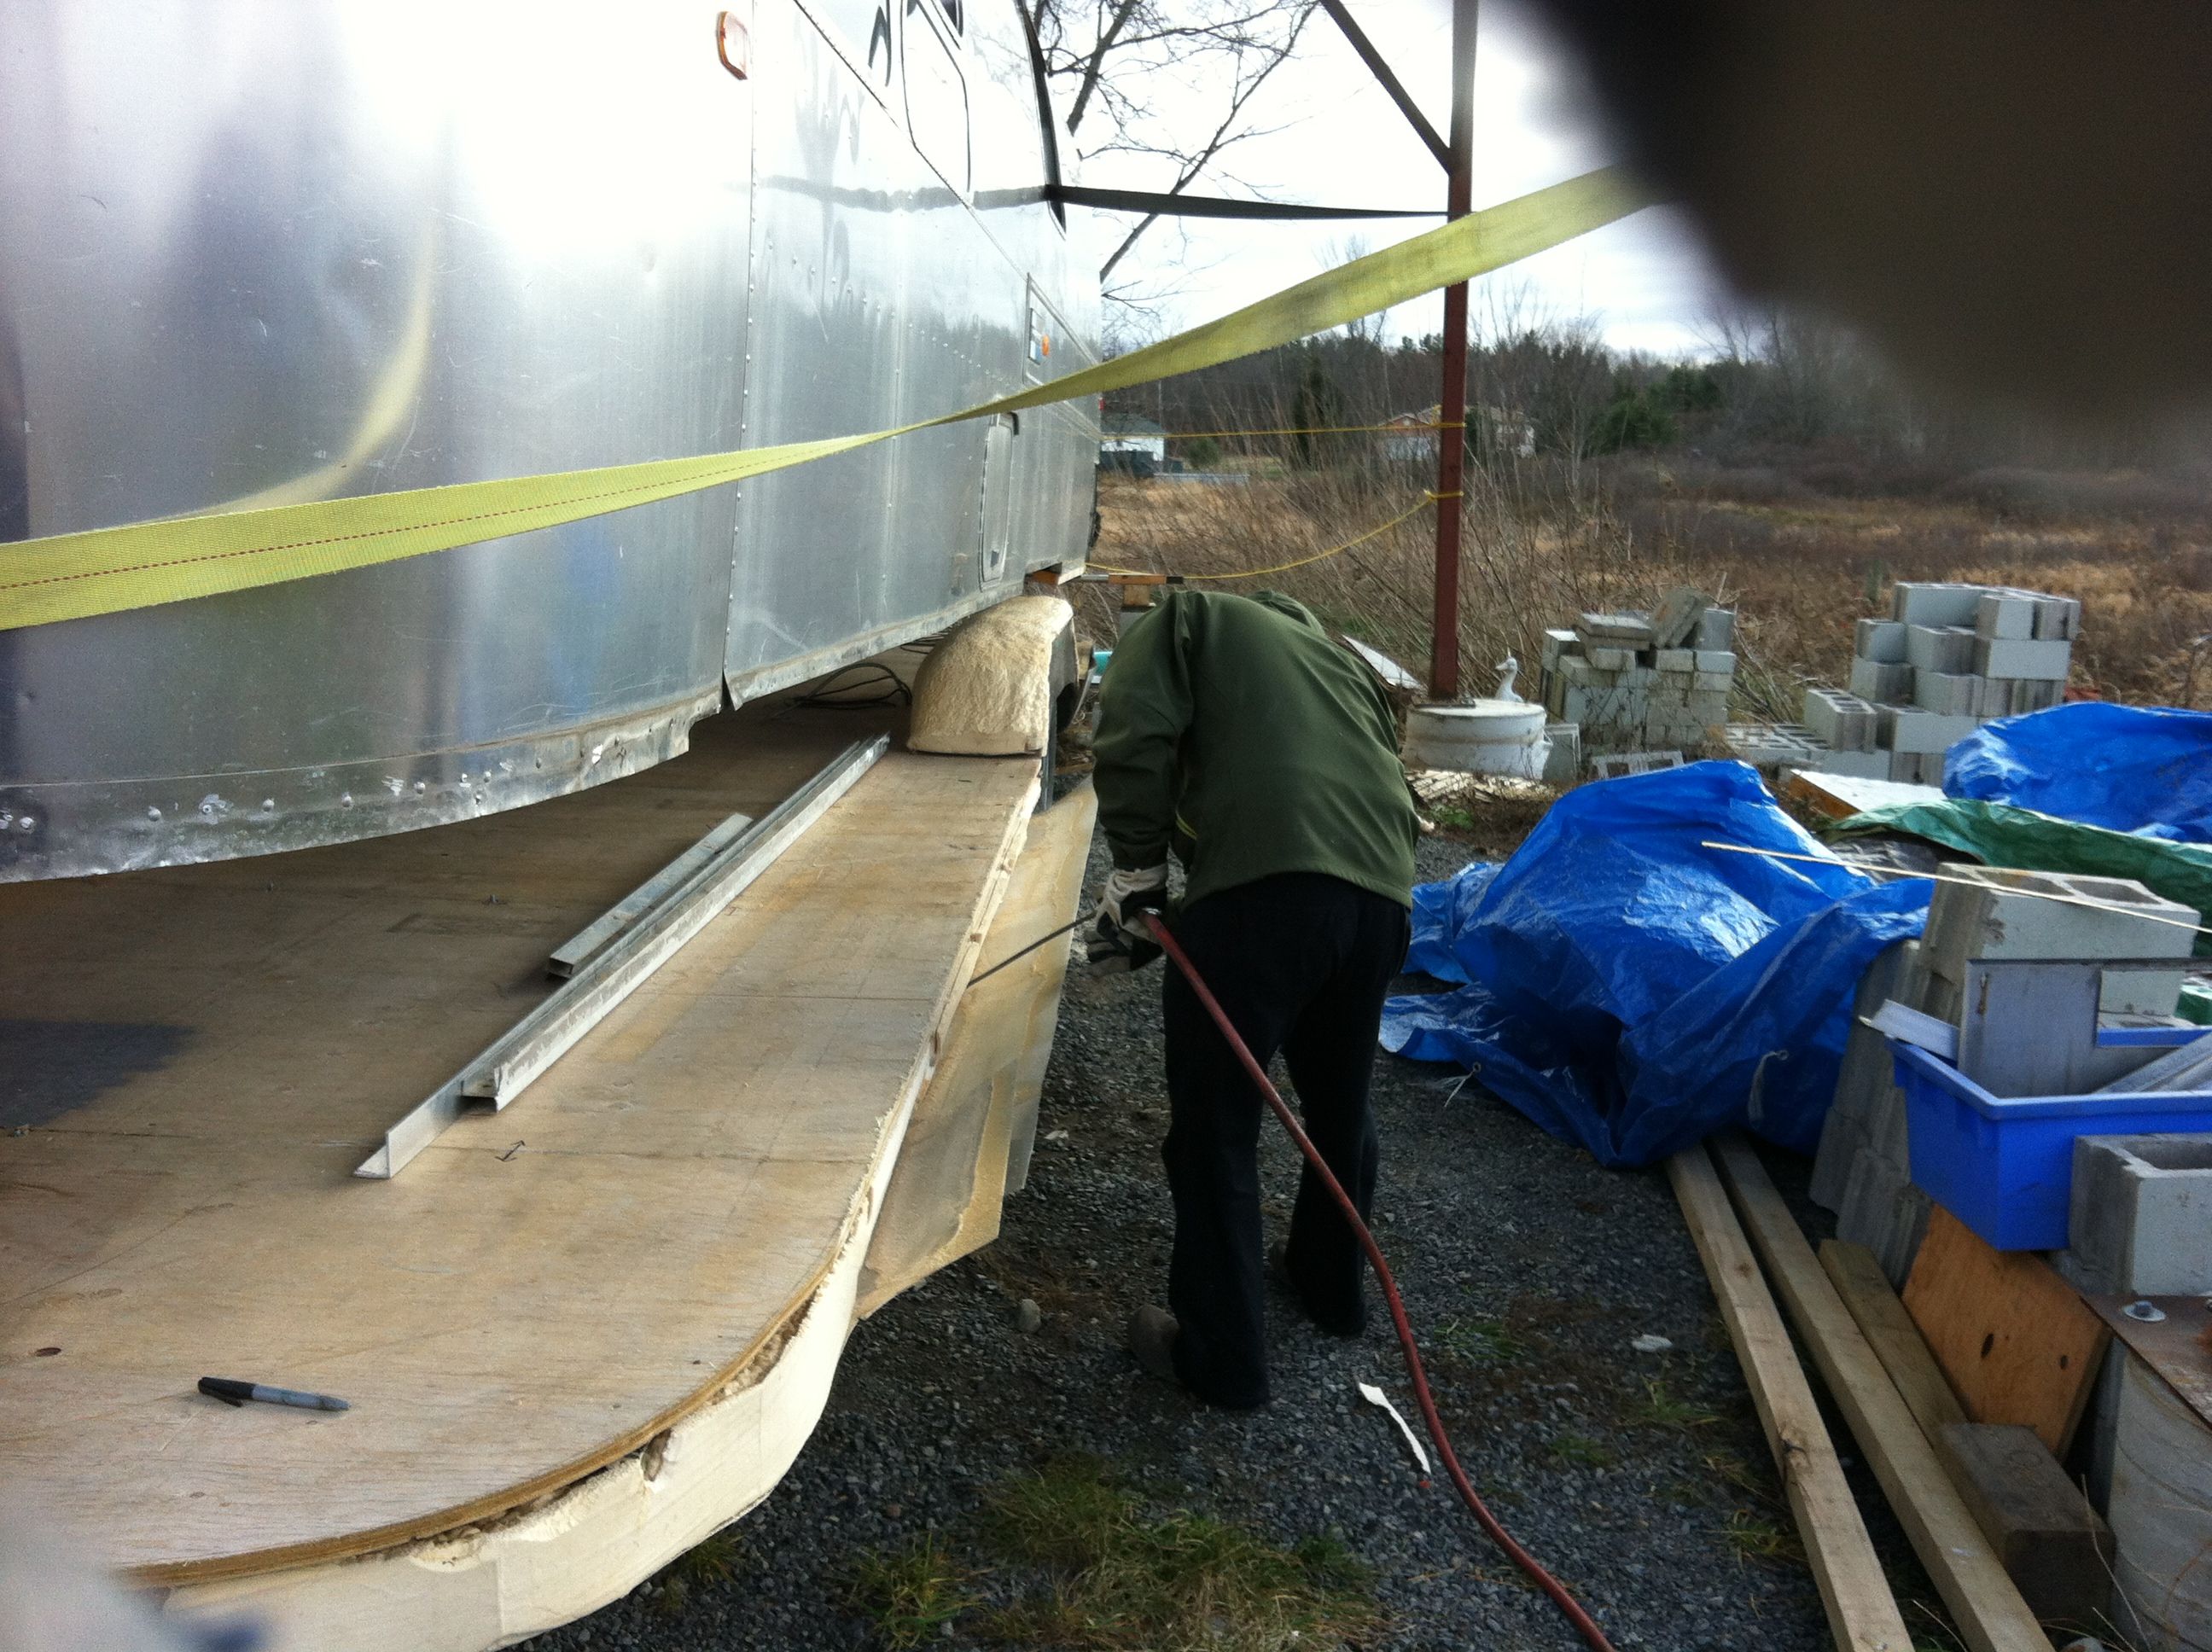 Fold the aluminum up (if it did not adhere perfectly when the spray foam was applied) and rivet it into place. 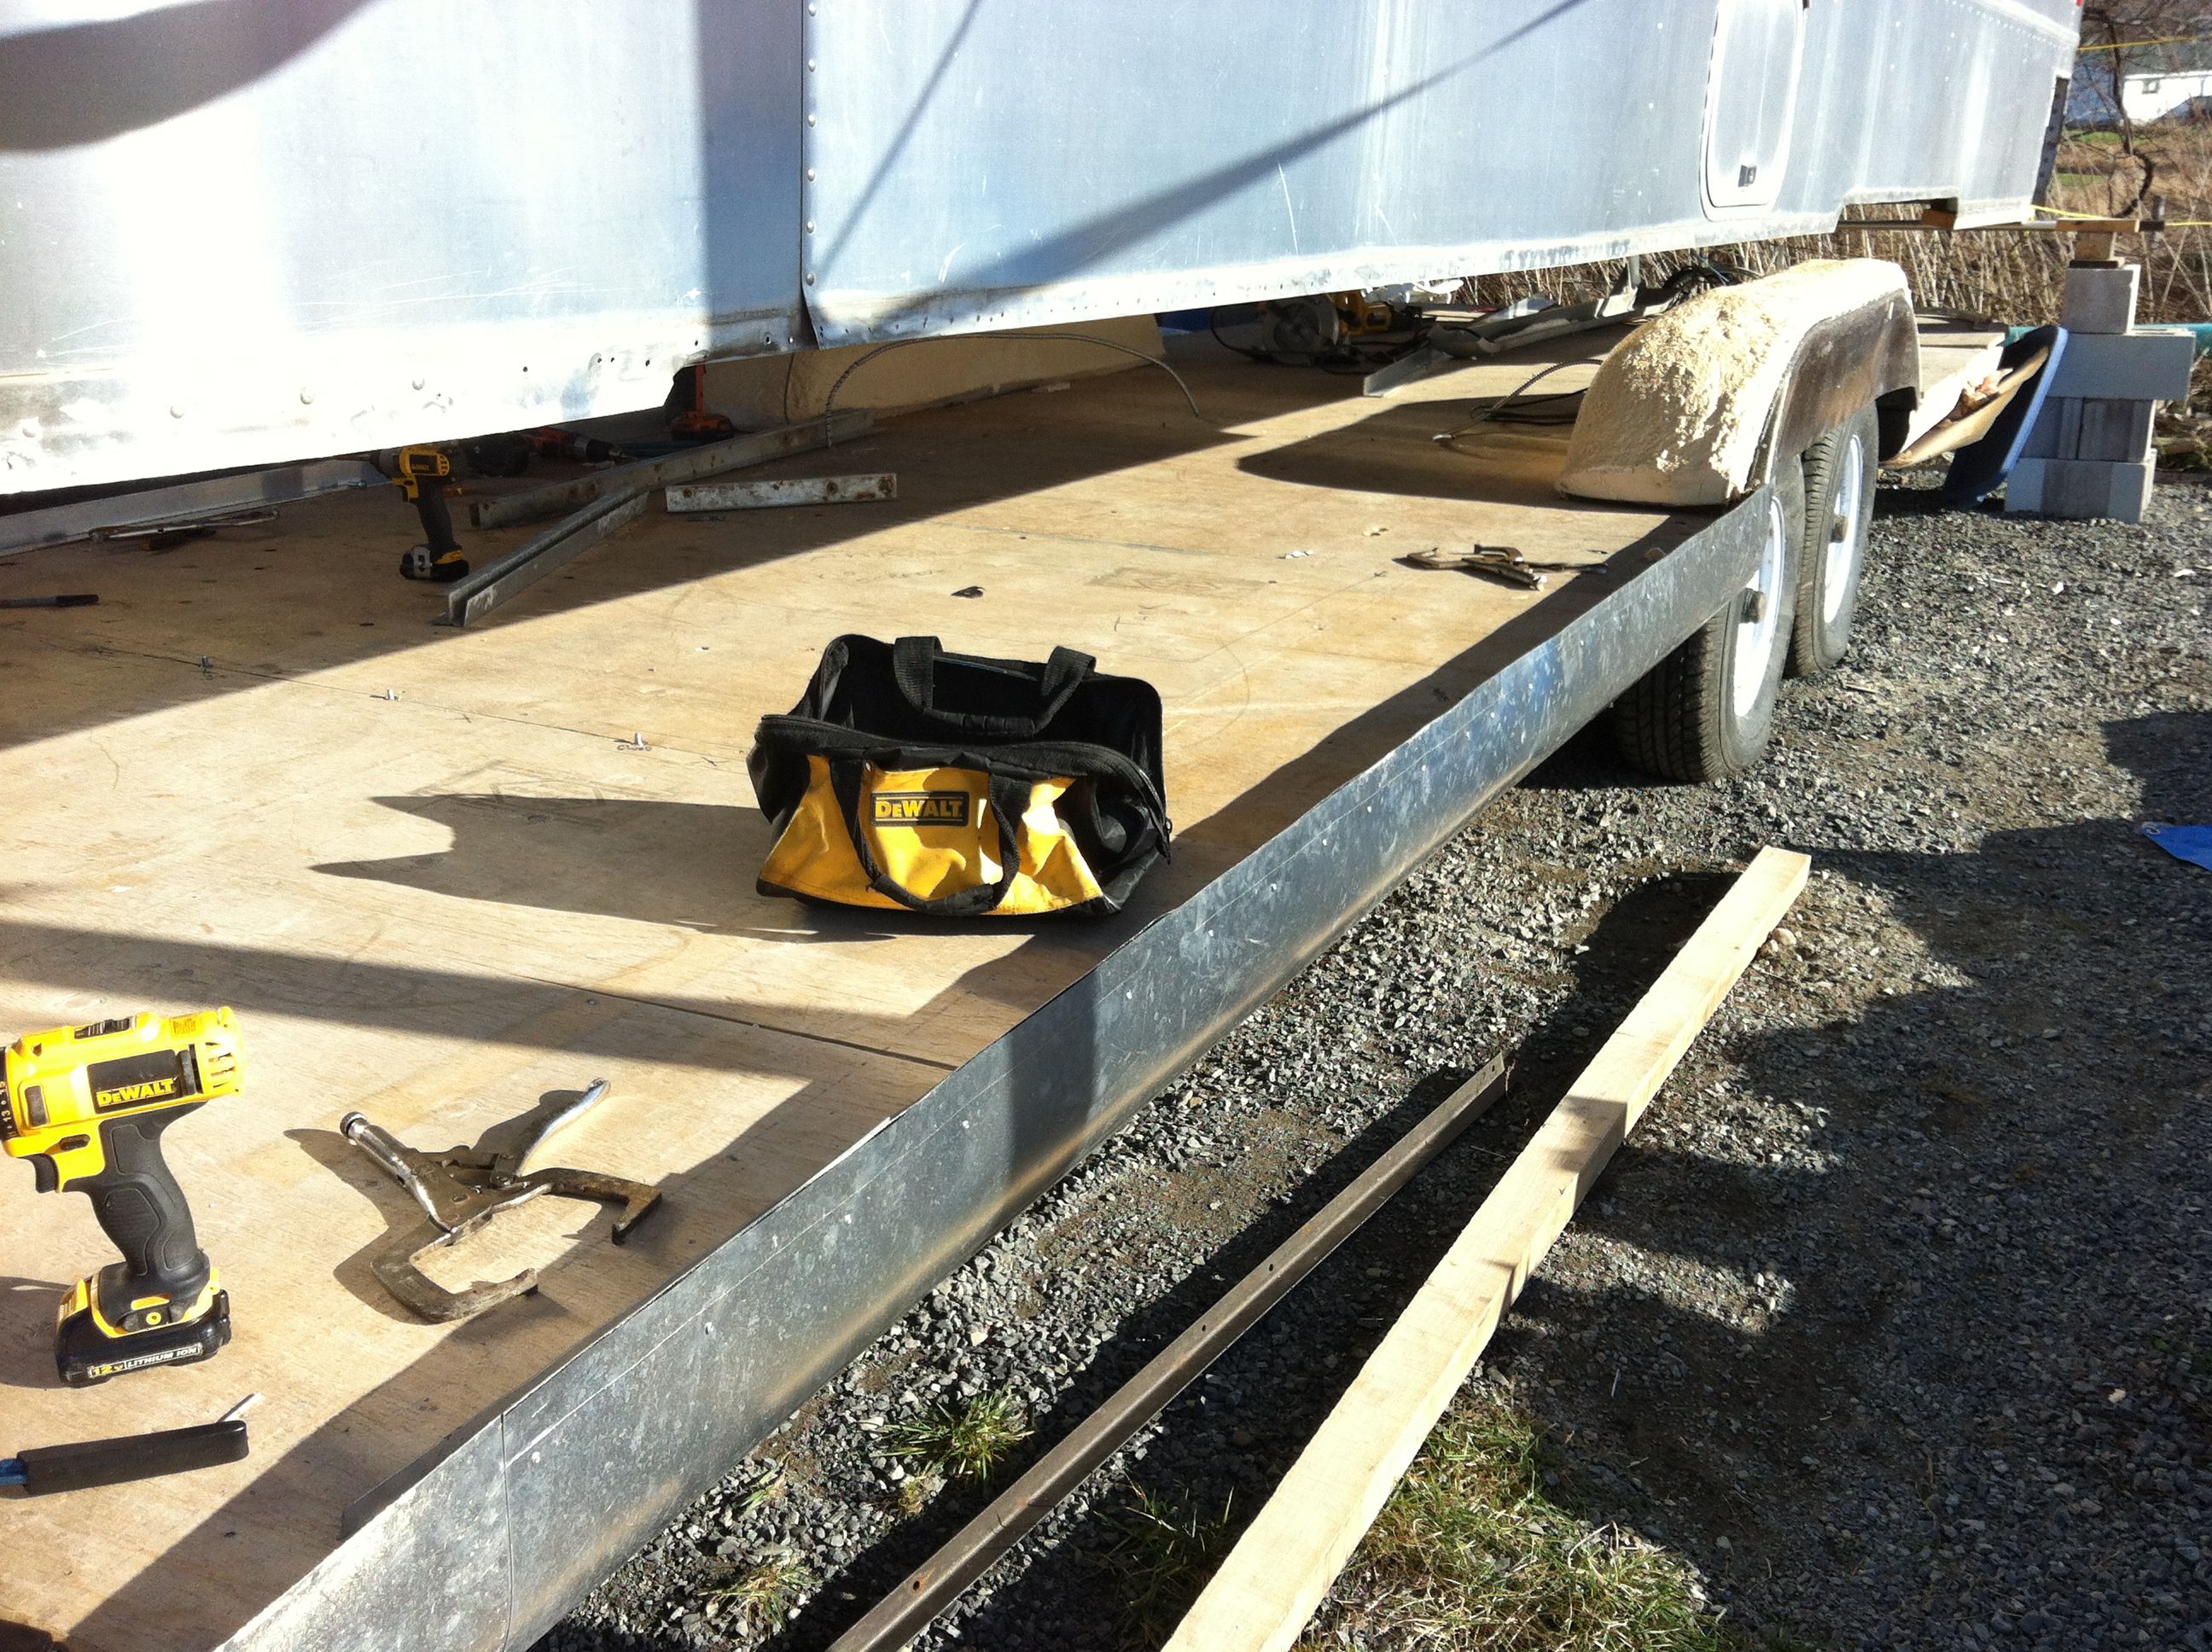 Next, we need to bolt our aluminum channel, that holds the shell, all the way around the perimeter and through the plywood floor and the steel chassis. The original channel was flimsy and corroded so we replaced it with brand new, thicker 1/8 aluminum. Your best bet is to buy 1/8 aluminum cube lengths and cut them in half diagonally to double the amount of area you can cover. For example, our 10 foot length gave us 20 feet of usable channel. Because of the rounded curves, we had to cut and use the original corner pieces but they were in pretty good shape still.  Last step, cut out the aluminum siding where the stairs are located and cut the channel inside to allow access to the door frame.  The shell is now ready to slowly lower into place! Making sure it lines up properly is essential for a good re-fit.  To re-rivet the shell back to the chassis we upgraded the regular 1/8 rivets for 3/16 aluminum rivets that are 1/2 inch long in order to improve stability, strength and to accommodate our thicker aluminum channel piece that actually holds the shell down. We used the original rivet holes but had to go through the tedious job of drilling each hole larger to fit the 3/16 rivets and then instal each one with a hand rivet tool.  Below shows two finished rows at the front. You also have to rivet the gussets to the channel inside the trailer.  It starts to get pretty cold in Ontario at the end of November so we installed the windows to allow us to work on the interior throughout the winter. The windows come out very easily but can be a bit of a challenge to get back in. The hinges supposedly just slide into place in the frame if you angle them correctly, but if the frame is at all bent (which can happen when you have the shell suspended for 3 months) you must work it back to exactly the correct position, this can be done with a flat head screwdriver. Even if the window frame has not been manipulated, it is very tricky. 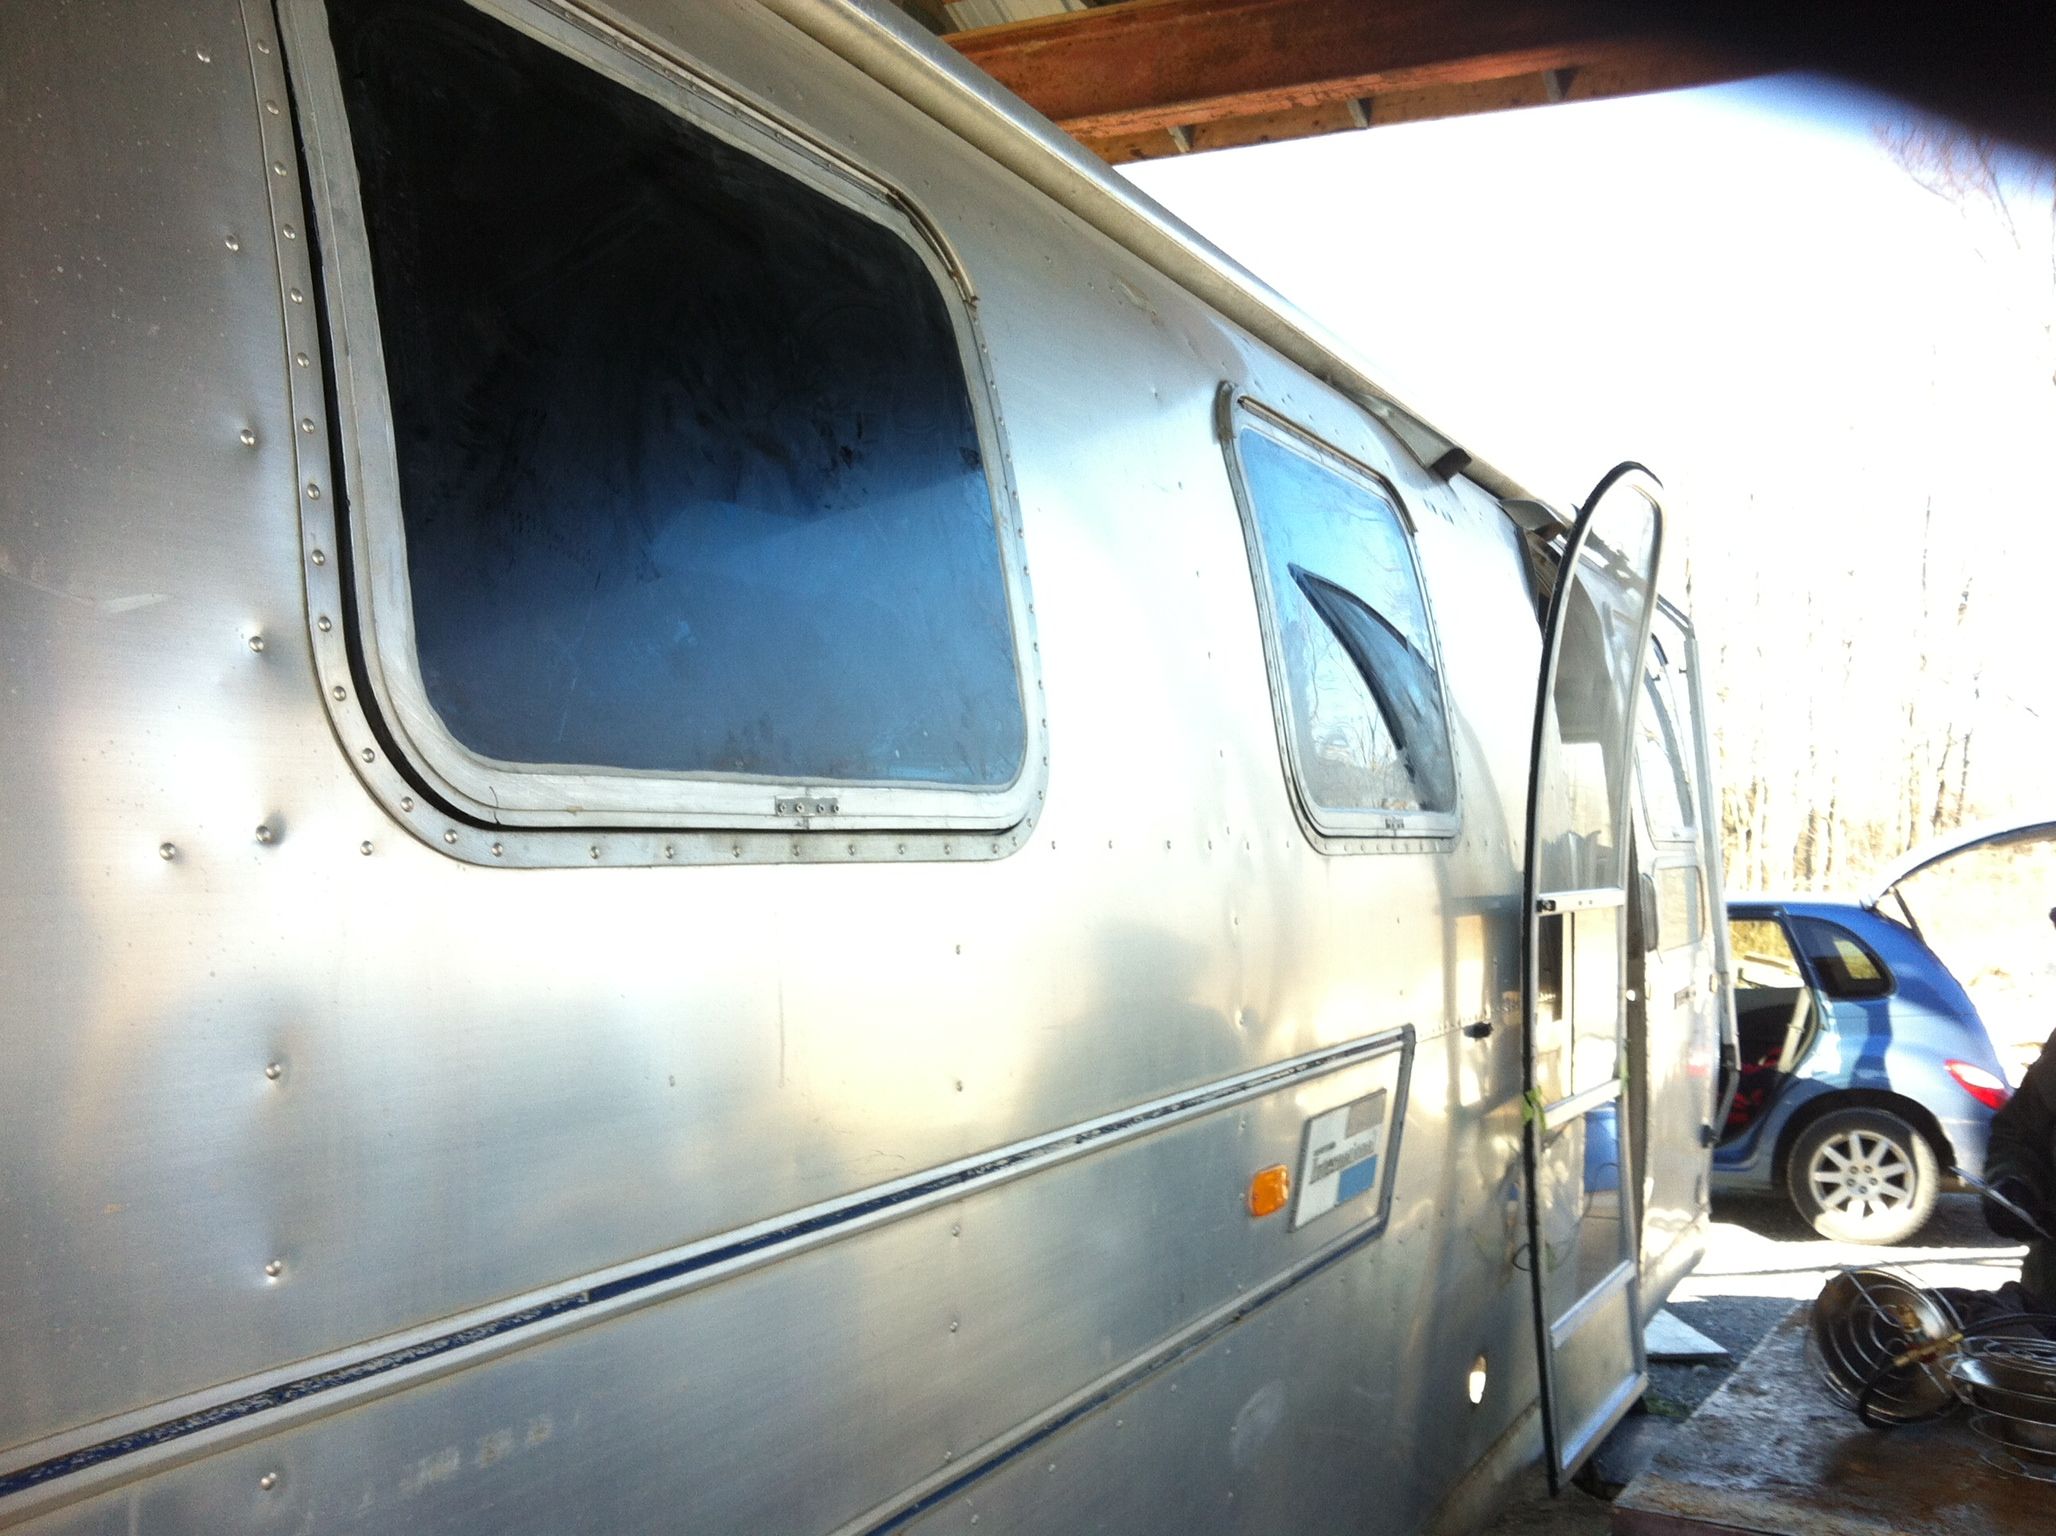 Ideally we should have used Trempro on the inside and Parbond on the exterior seams to really prevent any leaks but the weather this time of year will not let it set properly so we will cover the seams as best we can for the winter, keep the trailer covered and do a proper sealing job with those products in the spring. 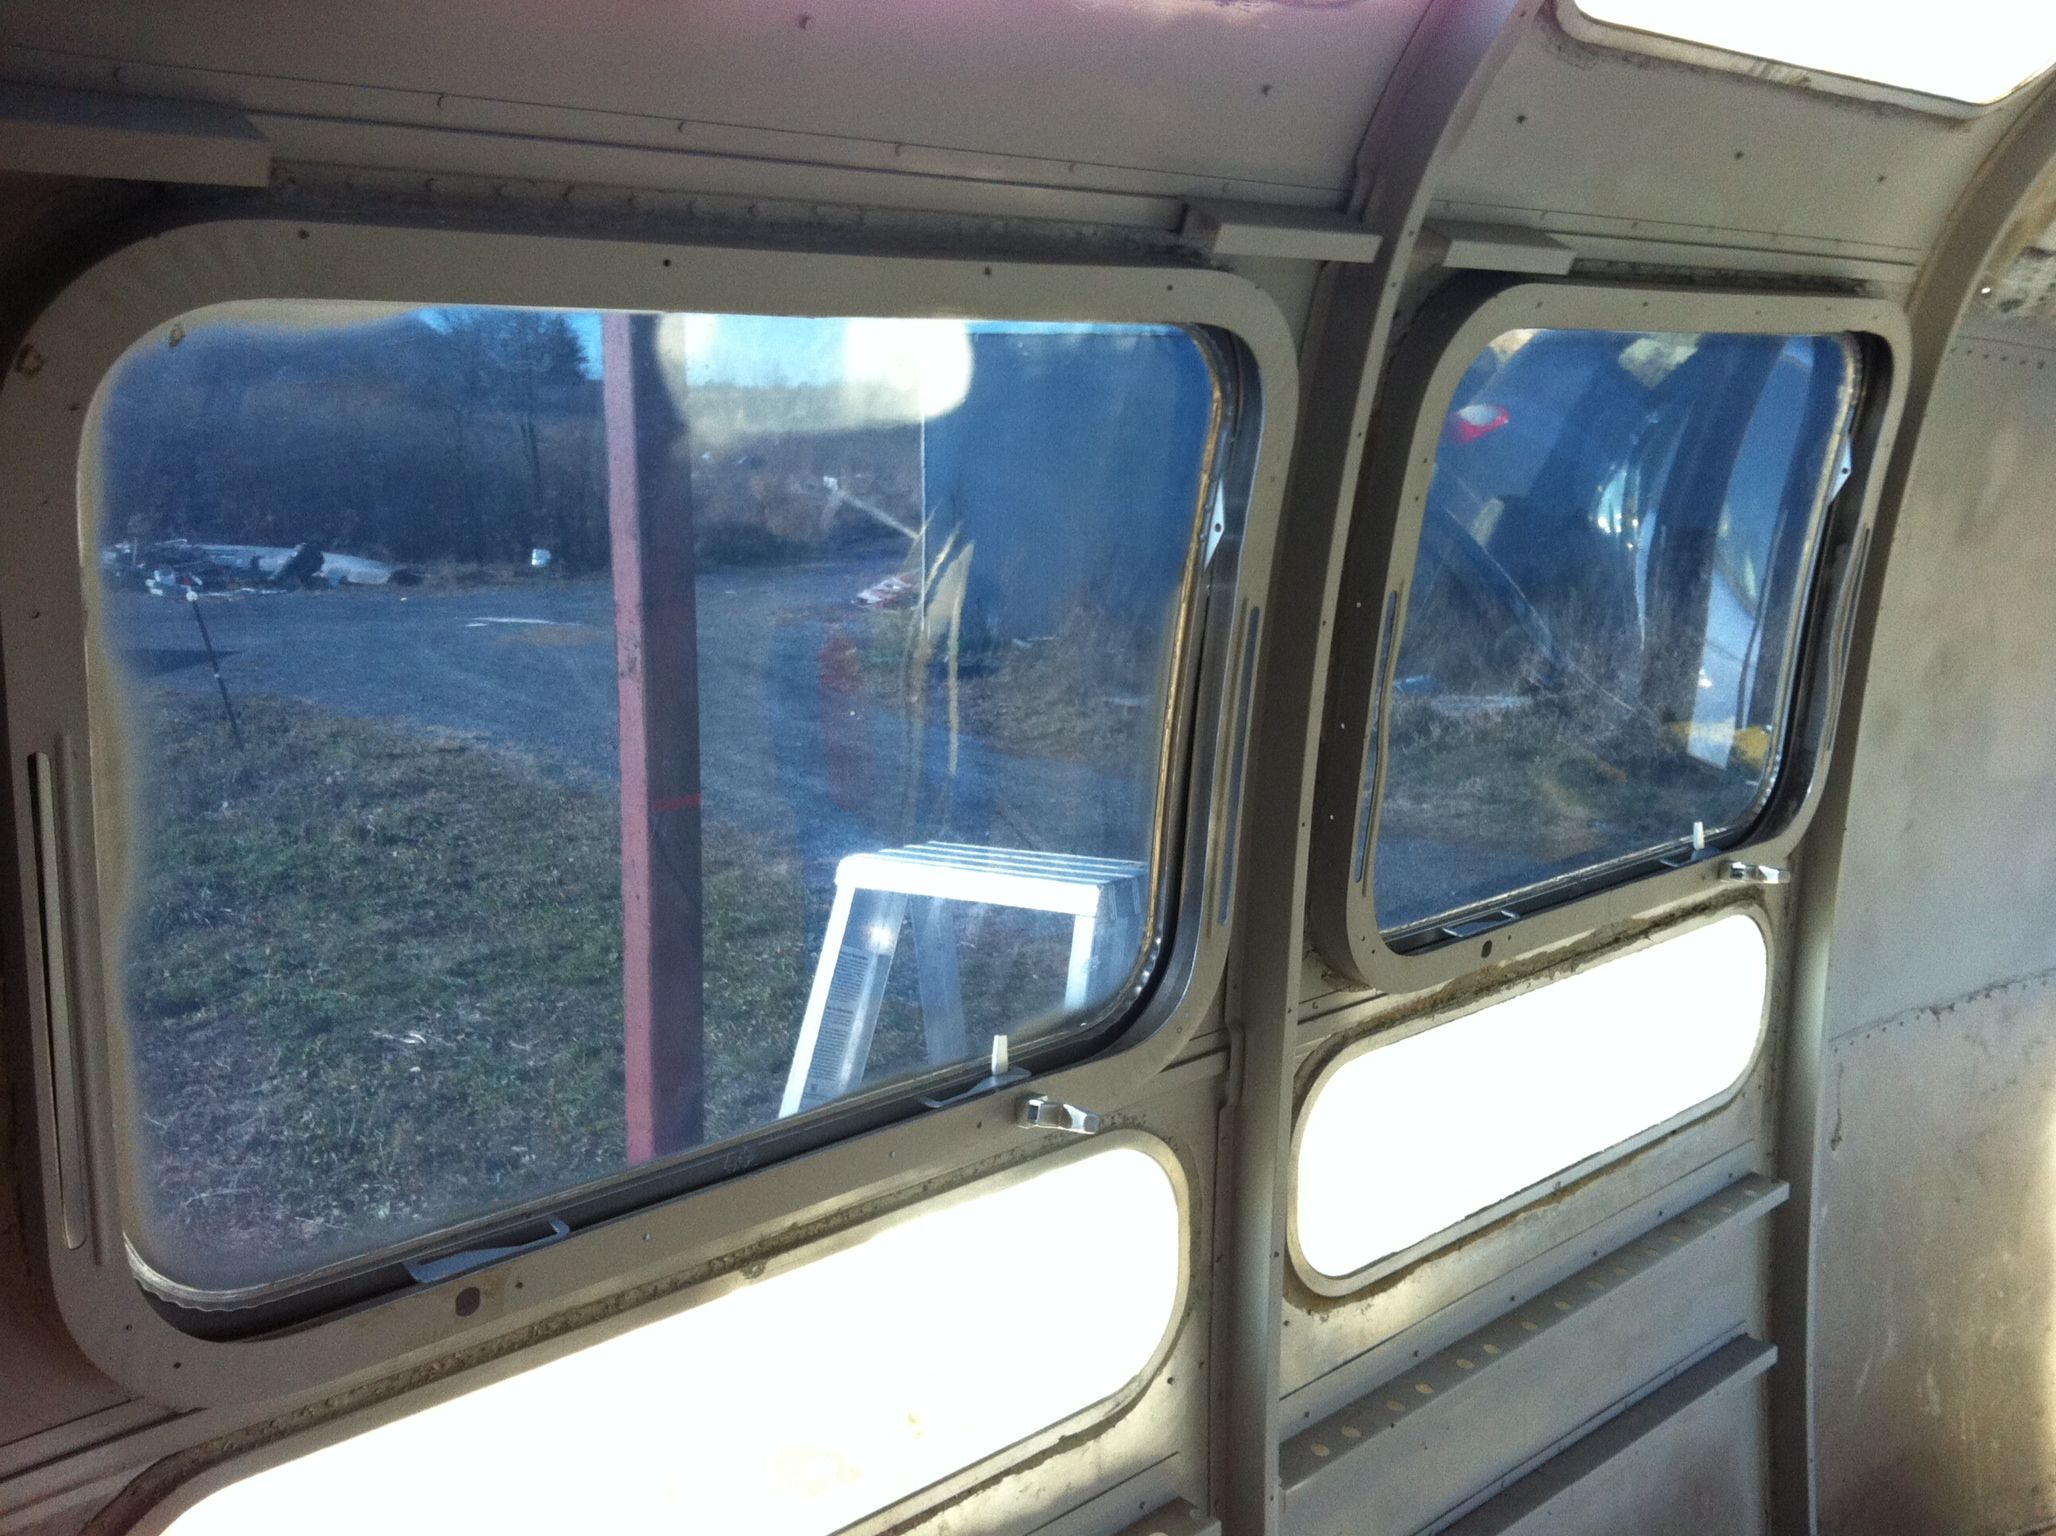 At this stage we are ready to install the wiring, switches, LED’s both interior and exterior, replace the taillights and connect everything. We also have to replace the roof vents, fan, hatches and cover all the exposed holes in the shell for the winter. The access panel where the old hot water heater was, is wide open and will have to be covered with an aluminum piece as we are going with a tankless hot water heater. To my knowledge, the Precision Temp 550NSP is the only one on the market that can withstand use in extreme temperatures. It is vented through the floor so we wont need any more holes in our shell. Here is the link to where you can purchase it: http://www.vintagetrailersupply.com/PrecisionTemp_RV_550NSP_p/vts-943.htm  |
| json metadata | {"tags":["airstream","trailer","shell","insulation","renovation"],"image":["https://steemitimages.com/DQmbbotQbZAhVKTXCBZGq3oX1ops94NExiQEcrFnJupPaCm/3.jpg","https://steemitimages.com/DQmNy47zumYGjj1Mezue9vCBHMTBMW5yM33anssN9tkjdkP/2.jpg","https://steemitimages.com/DQmRWpPkfUMGYivksZvnDCvkmDjH5G2TFU2dSHjP3REFyKZ/1.jpg","https://steemitimages.com/DQmTH3mPGGxX36PqzUSbxYVD7rUpwYk5P9KSSqpdAMJVb4s/4.jpg","https://steemitimages.com/DQmbhjiXhsL29rcuaJALZwrATUrSVuNjbc171bSGCMbsBFw/2013-08-11_-632.jpg","https://steemitimages.com/DQmfM2kSmfL8oxbHT5UoVCbYc2UctykFkSPpYgWmGzv5cxB/2013-08-11_-644.jpg","https://steemitimages.com/DQmdwgMG7cXanm79HSaWeYEzLkzpyWWrWSadoaS8Nfjf9ic/2013-08-11_-652.jpg","https://steemitimages.com/DQmSRGFNxVeoMLFux5id9LJZzEZkb315vuSXE8xWsyK3SW5/photo-copy-31.jpg","https://steemitimages.com/DQmWVgUkLWir2qSZDJahJ9a7Cf8koeDrRK1xHrG7r8hPbFU/2013-09-15_03.jpg","https://steemitimages.com/DQmejCWHcng43Ue2R8zA3t8rrYtLDihFZmb6AgnMjdRFBWw/2013-09-15_01.jpg","https://steemitimages.com/DQmeZaymURrPVMKKad1daT9WmnsFxugkEg1tii52tCx6qaX/2013-11-15_02.jpg","https://steemitimages.com/DQmVHFYazaTyJ9GXjmcVvLj1TCp9cFunUinzutyChL39DnX/2013-11-15_07.jpg","https://steemitimages.com/DQmVjXrBHcgQKXT3Xm5GReutWEehSUQr1MPVeykxBxCALMC/2013-11-15_09.jpg","https://steemitimages.com/DQmaxHmJMWMGBwztMxDiotCYrzghMQgxVhaK1Ds3GY8MsoT/2013-11-15_10.jpg","https://steemitimages.com/DQmVztdk7HWJAcAtYC59To13y3XFVEux8xyUJqyKCwu9UVa/709-1003-2.jpg","https://steemitimages.com/DQmPDN75mwFM9GUYP4726VP31nVr1xUc62fi7nNLxfENHZi/2013-11-19_02.jpg","https://steemitimages.com/DQmX9A7u1q2J8SWNPZXCfcQZk1Y78ptD4MQqwiw8KPjdHfb/2013-11-19_03.jpg","https://steemitimages.com/DQmeoKyUT1rSgqD1X4drYnxLawFB1ZGsu5y3rro8LmHBCTs/2013-11-19_04.jpg","https://steemitimages.com/DQmVr2mA6FDBAFB4gT7Bg288AF3TDsQv8vKNxvXAd7aFrMi/2013-11-19_05.jpg","https://steemitimages.com/DQmeKEwvgeFgsMXVHXULDePUAWMyAotTrbHfPVtYrtWBvc3/2013-11-19_06.jpg","https://steemitimages.com/DQmUGFsBRrj4BBK3nvw5fmLtwFHq3ffb9kKKtiJd5qEcyht/2013-11-19_07.jpg","https://steemitimages.com/DQmY3EeCWvhud1szR7DEfdzMyVipeuFZ1vx8qmx23qqGWUP/2013-11-29_08.jpg","https://steemitimages.com/DQmVuXQKRw13JPrkqyjTHNu8izX6PE5UjduiAVovrBe7wwR/2013-11-24_07.jpg","https://steemitimages.com/DQmX6JpzoxFfDBRLzxXrRTdW5NqLRKo38M2o1Myffjwaurb/2013-11-24_02.jpg","https://steemitimages.com/DQmShpPgkUyb8hzHrGAydgrrL9urNmm9k2sWVbt2mcC9Hun/2013-11-24_04.jpg","https://steemitimages.com/DQmfKdv3j56v4CMUyKtPSjheDQX9Pf6c1pCCwPEw4ar4Gbj/2013-11-24_05.jpg","https://steemitimages.com/DQmeZy5KtCx7rbsGXci4z8BSpdeJUDctnwmW6WAA6cmvWn4/precision-temp-550nsp.png"],"links":["http://www.vintagetrailersupply.com/PrecisionTemp_RV_550NSP_p/vts-943.htm"],"app":"steemit/0.1","format":"markdown"} |
| Transaction Info | Block #12140541/Trx e14775dbedc4fe2bb5d2f8c832670f40af618cd7 |
View Raw JSON Data
{
"trx_id": "e14775dbedc4fe2bb5d2f8c832670f40af618cd7",
"block": 12140541,
"trx_in_block": 0,
"op_in_trx": 0,
"virtual_op": 0,
"timestamp": "2017-05-22T03:17:27",
"op": [
"comment",
{
"parent_author": "",
"parent_permlink": "airstream",
"author": "mistahlee",
"permlink": "vintage-airstream-travel-trailer-renovation-post-3-removing-the-shell-and-putting-it-back-together",
"title": "Vintage Airstream Travel Trailer Renovation: Post 3 - Removing the Shell, insulating and Putting Back Together",
"body": "Removing the shell requires some preliminary work: You will first need to remove the windows and you will need somewhere to suspend the entire structure. Fortunately we had a pre-existing shelter to hang from, however I have seen some other people have created a frame out of 2x4's. Its also a good idea to stabilize it with some cinder blocks or lumber so the entire shell does not sway while suspended. You will also need to remove the decorative strip around the base where the shell meets the chassis and then remove all the exterior rivets. There is a metal plate at the front behind the propane tanks that will need to have all of the rivets removed to release the shell.\n\nRemoving the windows is quite simple. Un-attach the locking mechanisms from inside and remove the window arms. Its a good idea to remove the interior window frames too if you plan on cleaning or painting them. They are riveted in so removal can be done with the 1/8 drill bit. From outside the trailer (you will need a step ladder) open the windows and lift them up on a 45 degree angle. From this position gently pull out and the entire window should just slide right out from its position. Handle these carefully, they are fairly durable but extremely expensive to replace if dropped.\n\nOnce the windows are removed, you can place a 2x4 or in our case steel cylinders through the windows and secure them to your suspension harness. Use a towel to pad around the window frames as they can bend easily when lifting the shell off.\n\nWhen you have removed all of the rivets around the perimeter of the base and the rivets from the front metal place, hoist the shell up and it should lift up fairly easily. From there, have your tow vehicle pull the base and chassis leaving the shell suspended and easy to work on.\n\nHere are some photos of the shell suspended, the chassis and all the interesting things we found in there…\n\n\n\n\n\n\n\n\n\nYou can see the obviously poor condition of the 42 year old insulation underneath the plywood floor. Surprisingly the chassis was not too bad. A few spots had to be sandblasted and re-welded and then everything epoxied to prevent future rust.\n\nThe floor will be insulated with 4 inches of spray foam that will give an R value of 24.\n\nWe cut the plywood floor into sections to remove it a piece at a time, but be careful not to cut too deep as the fresh water and grey tank are side by side about half way up and the black tank is right at the rear but they all sit directly under the plywood.\n\n\n\n\n\nThis is what it looked like under the floor. Those brown coloured objects are nut shells, some squirrels and most likely other rodents had made a home in the floor. We also found one of their skeletons in there.\n\n\n\nHere are the holding tanks. The wheel wells also had to be removed, the bolts had to be ground off.\n\nThe underbelly was in good shape except for the parts that were in contact with the steel chassis so unfortunately all of it has to be replaced. The original is .032 aluminum but I am replacing it with .040 which will add about 10lbs to the trailer but .040 is easier to find. Make sure to get 5X12 sheets as the 4 foot sheets do not fit properly and will require more cutting and riveting. I was able to order 2 5X12 sheets for $140 each.\n\n\n\nThe axles were removed and the chassis was flipped over in order to take off the old aluminum underbelly so that cutting out the rotted steel from the chassis could begin. New steel was re-welded and extra pieces added to certain areas giving the chassis improved stability and durability. We sandblasted the remainder that was salvageable and then applied a rust proofing product to the entire thing.\n\nPor15 is commonly used, however the Canadian equivalent to that product is Dom16. It works great and although still quite expensive, it is less so than Por15. A quart of Dom16 is approximately 35-40 dollars and we required 6 quarts (1.5 gallons) for this size of project. Best to apply it with a brush so as to not clog up your gun. Once the Dom16 cures, it is not coming off.\n\n\n\nThe Dom16 adheres well to rust and actually strengthens it so it is best to leave a light surface layer of rust before applying. It is not difficult to apply. Next, the new aluminum underbelly panels were put on and the shocks replaced.\n\nWe are getting close to putting the shell back on the chassis but first must insulate with 4 inches of spray foam, bolt down the new plywood sub floor and instal the wheel wells. The plywood subfloor has been weather proofed so as to prevent any future rot if in contact with moisture.\n\n\n\nSo the chassis is in great condition, the brand new aluminum is on the bottom and side pieces have been cut, its time to insulate the floor. There are many choices for insulation but given that this trailer is going to be used in extreme temperatures and that we want to keep any rodents completely out, we are going with four inches of spray foam through the floor. We’ve also built special insulated compartments for all the holding tanks and plumbing. Each of those will get at least 2 inches of spray foam.\n\n\n\nSpray foam is a great product if done correctly so make sure you get a reputable company to do it. Every inch of spray foam gives you an R value of 6 so with our 4 inches we get R24 in the floors and R12 around the tanks and plumbing.\n\n.\n\nThe curved sides needed to be held up while spraying. This is a two person job. The foam expands and sets within seconds and it sticks to everything so it will fit the curve and help hold its shape perfectly. It also adds a lot of structural integrity, something that traditional insulation does not do. We also pray foamed the wheel wells not just for climate control but for sound proofing also.\n\n\n\nThe spray foam needs to be applied in 2 separate 2 inch passes. The above photo shows the first. Below is the second and finished product. All of our electrical and plumbing has been run through there.\n\n\n\nThe opening in the centre is to allow access to the fresh water tank should it need to be removed or replaced for any reason. It is accessible from underneath via a thick removable aluminum sheet.\n\n\n\nI used a SeeLevel 2 tank monitoring system which requires a circuit board be adhered to each water tank and wired in to give you accurate percentage based readings on all your tanks. It also reads your battery and propane levels. NOTE: it will not work on a metal tank. If you are installing something similar, do it at this point as to access this area again will not be easy in the future.\n\nAfter spray foaming the chassis and even the wheel wells, we’ve used the original, wrecked plywood floor as a template to cut all new plywood pieces. We bolted them down, installed the wheel wells and carefully positioned the chassis under the trailer to finalize a few important details before putting the shell back in place.\n\n\n\nAny overhanging parts of the plywood or spray foam need to be trimmed so that the aluminum curved part will fit flush to the shell without any bumps.\n\n\n\nAn air hose is helpful in blowing out any smaller pieces that might still cause blemishes in the aluminum.\n\n\n\nFold the aluminum up (if it did not adhere perfectly when the spray foam was applied) and rivet it into place.\n\n\n\nNext, we need to bolt our aluminum channel, that holds the shell, all the way around the perimeter and through the plywood floor and the steel chassis. The original channel was flimsy and corroded so we replaced it with brand new, thicker 1/8 aluminum. Your best bet is to buy 1/8 aluminum cube lengths and cut them in half diagonally to double the amount of area you can cover. For example, our 10 foot length gave us 20 feet of usable channel. Because of the rounded curves, we had to cut and use the original corner pieces but they were in pretty good shape still.\n\n\n\nLast step, cut out the aluminum siding where the stairs are located and cut the channel inside to allow access to the door frame.\n\n\n\nThe shell is now ready to slowly lower into place! Making sure it lines up properly is essential for a good re-fit.\n\n\n\nTo re-rivet the shell back to the chassis we upgraded the regular 1/8 rivets for 3/16 aluminum rivets that are 1/2 inch long in order to improve stability, strength and to accommodate our thicker aluminum channel piece that actually holds the shell down. We used the original rivet holes but had to go through the tedious job of drilling each hole larger to fit the 3/16 rivets and then instal each one with a hand rivet tool.\n\n\n\nBelow shows two finished rows at the front. You also have to rivet the gussets to the channel inside the trailer.\n\n\n\nIt starts to get pretty cold in Ontario at the end of November so we installed the windows to allow us to work on the interior throughout the winter. The windows come out very easily but can be a bit of a challenge to get back in. The hinges supposedly just slide into place in the frame if you angle them correctly, but if the frame is at all bent (which can happen when you have the shell suspended for 3 months) you must work it back to exactly the correct position, this can be done with a flat head screwdriver. Even if the window frame has not been manipulated, it is very tricky.\n\n\n\nIdeally we should have used Trempro on the inside and Parbond on the exterior seams to really prevent any leaks but the weather this time of year will not let it set properly so we will cover the seams as best we can for the winter, keep the trailer covered and do a proper sealing job with those products in the spring.\n\n\n\nAt this stage we are ready to install the wiring, switches, LED’s both interior and exterior, replace the taillights and connect everything.\n\nWe also have to replace the roof vents, fan, hatches and cover all the exposed holes in the shell for the winter.\n\nThe access panel where the old hot water heater was, is wide open and will have to be covered with an aluminum piece as we are going with a tankless hot water heater. To my knowledge, the Precision Temp 550NSP is the only one on the market that can withstand use in extreme temperatures. It is vented through the floor so we wont need any more holes in our shell. Here is the link to where you can purchase it:\n\nhttp://www.vintagetrailersupply.com/PrecisionTemp_RV_550NSP_p/vts-943.htm\n\n",
"json_metadata": "{\"tags\":[\"airstream\",\"trailer\",\"shell\",\"insulation\",\"renovation\"],\"image\":[\"https://steemitimages.com/DQmbbotQbZAhVKTXCBZGq3oX1ops94NExiQEcrFnJupPaCm/3.jpg\",\"https://steemitimages.com/DQmNy47zumYGjj1Mezue9vCBHMTBMW5yM33anssN9tkjdkP/2.jpg\",\"https://steemitimages.com/DQmRWpPkfUMGYivksZvnDCvkmDjH5G2TFU2dSHjP3REFyKZ/1.jpg\",\"https://steemitimages.com/DQmTH3mPGGxX36PqzUSbxYVD7rUpwYk5P9KSSqpdAMJVb4s/4.jpg\",\"https://steemitimages.com/DQmbhjiXhsL29rcuaJALZwrATUrSVuNjbc171bSGCMbsBFw/2013-08-11_-632.jpg\",\"https://steemitimages.com/DQmfM2kSmfL8oxbHT5UoVCbYc2UctykFkSPpYgWmGzv5cxB/2013-08-11_-644.jpg\",\"https://steemitimages.com/DQmdwgMG7cXanm79HSaWeYEzLkzpyWWrWSadoaS8Nfjf9ic/2013-08-11_-652.jpg\",\"https://steemitimages.com/DQmSRGFNxVeoMLFux5id9LJZzEZkb315vuSXE8xWsyK3SW5/photo-copy-31.jpg\",\"https://steemitimages.com/DQmWVgUkLWir2qSZDJahJ9a7Cf8koeDrRK1xHrG7r8hPbFU/2013-09-15_03.jpg\",\"https://steemitimages.com/DQmejCWHcng43Ue2R8zA3t8rrYtLDihFZmb6AgnMjdRFBWw/2013-09-15_01.jpg\",\"https://steemitimages.com/DQmeZaymURrPVMKKad1daT9WmnsFxugkEg1tii52tCx6qaX/2013-11-15_02.jpg\",\"https://steemitimages.com/DQmVHFYazaTyJ9GXjmcVvLj1TCp9cFunUinzutyChL39DnX/2013-11-15_07.jpg\",\"https://steemitimages.com/DQmVjXrBHcgQKXT3Xm5GReutWEehSUQr1MPVeykxBxCALMC/2013-11-15_09.jpg\",\"https://steemitimages.com/DQmaxHmJMWMGBwztMxDiotCYrzghMQgxVhaK1Ds3GY8MsoT/2013-11-15_10.jpg\",\"https://steemitimages.com/DQmVztdk7HWJAcAtYC59To13y3XFVEux8xyUJqyKCwu9UVa/709-1003-2.jpg\",\"https://steemitimages.com/DQmPDN75mwFM9GUYP4726VP31nVr1xUc62fi7nNLxfENHZi/2013-11-19_02.jpg\",\"https://steemitimages.com/DQmX9A7u1q2J8SWNPZXCfcQZk1Y78ptD4MQqwiw8KPjdHfb/2013-11-19_03.jpg\",\"https://steemitimages.com/DQmeoKyUT1rSgqD1X4drYnxLawFB1ZGsu5y3rro8LmHBCTs/2013-11-19_04.jpg\",\"https://steemitimages.com/DQmVr2mA6FDBAFB4gT7Bg288AF3TDsQv8vKNxvXAd7aFrMi/2013-11-19_05.jpg\",\"https://steemitimages.com/DQmeKEwvgeFgsMXVHXULDePUAWMyAotTrbHfPVtYrtWBvc3/2013-11-19_06.jpg\",\"https://steemitimages.com/DQmUGFsBRrj4BBK3nvw5fmLtwFHq3ffb9kKKtiJd5qEcyht/2013-11-19_07.jpg\",\"https://steemitimages.com/DQmY3EeCWvhud1szR7DEfdzMyVipeuFZ1vx8qmx23qqGWUP/2013-11-29_08.jpg\",\"https://steemitimages.com/DQmVuXQKRw13JPrkqyjTHNu8izX6PE5UjduiAVovrBe7wwR/2013-11-24_07.jpg\",\"https://steemitimages.com/DQmX6JpzoxFfDBRLzxXrRTdW5NqLRKo38M2o1Myffjwaurb/2013-11-24_02.jpg\",\"https://steemitimages.com/DQmShpPgkUyb8hzHrGAydgrrL9urNmm9k2sWVbt2mcC9Hun/2013-11-24_04.jpg\",\"https://steemitimages.com/DQmfKdv3j56v4CMUyKtPSjheDQX9Pf6c1pCCwPEw4ar4Gbj/2013-11-24_05.jpg\",\"https://steemitimages.com/DQmeZy5KtCx7rbsGXci4z8BSpdeJUDctnwmW6WAA6cmvWn4/precision-temp-550nsp.png\"],\"links\":[\"http://www.vintagetrailersupply.com/PrecisionTemp_RV_550NSP_p/vts-943.htm\"],\"app\":\"steemit/0.1\",\"format\":\"markdown\"}"
}
]
}2017/05/22 03:16:15
2017/05/22 03:16:15
| voter | elpato |
| author | mistahlee |
| permlink | vintage-airstream-travel-trailer-renovation-post-3-removing-the-shell-and-putting-it-back-together |
| weight | 10000 (100.00%) |
| Transaction Info | Block #12140517/Trx 09747901410f6ada48e605d46bc1d47e45a6308a |
View Raw JSON Data
{
  "trx_id": "09747901410f6ada48e605d46bc1d47e45a6308a",
  "block": 12140517,
  "trx_in_block": 2,
  "op_in_trx": 0,
  "virtual_op": 0,
  "timestamp": "2017-05-22T03:16:15",
  "op": [
    "vote",
    {
      "voter": "elpato",
      "author": "mistahlee",
      "permlink": "vintage-airstream-travel-trailer-renovation-post-3-removing-the-shell-and-putting-it-back-together",
      "weight": 10000
    }
  ]
}2017/05/22 03:15:39
2017/05/22 03:15:39
| voter | mistahlee |
| author | mistahlee |
| permlink | vintage-airstream-travel-trailer-renovation-post-3-removing-the-shell-and-putting-it-back-together |
| weight | 10000 (100.00%) |
| Transaction Info | Block #12140505/Trx 166fea674ae20e3a9bac11783e817437f1fe0285 |
View Raw JSON Data
{
  "trx_id": "166fea674ae20e3a9bac11783e817437f1fe0285",
  "block": 12140505,
  "trx_in_block": 1,
  "op_in_trx": 0,
  "virtual_op": 0,
  "timestamp": "2017-05-22T03:15:39",
  "op": [
    "vote",
    {
      "voter": "mistahlee",
      "author": "mistahlee",
      "permlink": "vintage-airstream-travel-trailer-renovation-post-3-removing-the-shell-and-putting-it-back-together",
      "weight": 10000
    }
  ]
}2017/05/22 03:15:39
2017/05/22 03:15:39
| parent author | |
| parent permlink | airstream |
| author | mistahlee |
| permlink | vintage-airstream-travel-trailer-renovation-post-3-removing-the-shell-and-putting-it-back-together |
| title | Vintage Airstream Travel Trailer Renovation: Post 3 - Removing the Shell and Putting it Back Together |
| body | Removing the shell requires some preliminary work: You will first need to remove the windows and you will need somewhere to suspend the entire structure. Fortunately we had a pre-existing shelter to hang from, however I have seen some other people have created a frame out of 2x4's. Its also a good idea to stabilize it with some cinder blocks or lumber so the entire shell does not sway while suspended. You will also need to remove the decorative strip around the base where the shell meets the chassis and then remove all the exterior rivets. There is a metal plate at the front behind the propane tanks that will need to have all of the rivets removed to release the shell. Removing the windows is quite simple. Un-attach the locking mechanisms from inside and remove the window arms. Its a good idea to remove the interior window frames too if you plan on cleaning or painting them. They are riveted in so removal can be done with the 1/8 drill bit. From outside the trailer (you will need a step ladder) open the windows and lift them up on a 45 degree angle. From this position gently pull out and the entire window should just slide right out from its position. Handle these carefully, they are fairly durable but extremely expensive to replace if dropped. Once the windows are removed, you can place a 2x4 or in our case steel cylinders through the windows and secure them to your suspension harness. Use a towel to pad around the window frames as they can bend easily when lifting the shell off. When you have removed all of the rivets around the perimeter of the base and the rivets from the front metal place, hoist the shell up and it should lift up fairly easily. From there, have your tow vehicle pull the base and chassis leaving the shell suspended and easy to work on. Here are some photos of the shell suspended, the chassis and all the interesting things we found in there…     You can see the obviously poor condition of the 42 year old insulation underneath the plywood floor. Surprisingly the chassis was not too bad. A few spots had to be sandblasted and re-welded and then everything epoxied to prevent future rust. The floor will be insulated with 4 inches of spray foam that will give an R value of 24. We cut the plywood floor into sections to remove it a piece at a time, but be careful not to cut too deep as the fresh water and grey tank are side by side about half way up and the black tank is right at the rear but they all sit directly under the plywood.   This is what it looked like under the floor. Those brown coloured objects are nut shells, some squirrels and most likely other rodents had made a home in the floor. We also found one of their skeletons in there.  Here are the holding tanks. The wheel wells also had to be removed, the bolts had to be ground off. The underbelly was in good shape except for the parts that were in contact with the steel chassis so unfortunately all of it has to be replaced. The original is .032 aluminum but I am replacing it with .040 which will add about 10lbs to the trailer but .040 is easier to find. Make sure to get 5X12 sheets as the 4 foot sheets do not fit properly and will require more cutting and riveting. I was able to order 2 5X12 sheets for $140 each.  The axles were removed and the chassis was flipped over in order to take off the old aluminum underbelly so that cutting out the rotted steel from the chassis could begin. New steel was re-welded and extra pieces added to certain areas giving the chassis improved stability and durability. We sandblasted the remainder that was salvageable and then applied a rust proofing product to the entire thing. Por15 is commonly used, however the Canadian equivalent to that product is Dom16. It works great and although still quite expensive, it is less so than Por15. A quart of Dom16 is approximately 35-40 dollars and we required 6 quarts (1.5 gallons) for this size of project. Best to apply it with a brush so as to not clog up your gun. Once the Dom16 cures, it is not coming off.  The Dom16 adheres well to rust and actually strengthens it so it is best to leave a light surface layer of rust before applying. It is not difficult to apply. Next, the new aluminum underbelly panels were put on and the shocks replaced. We are getting close to putting the shell back on the chassis but first must insulate with 4 inches of spray foam, bolt down the new plywood sub floor and instal the wheel wells. The plywood subfloor has been weather proofed so as to prevent any future rot if in contact with moisture.  So the chassis is in great condition, the brand new aluminum is on the bottom and side pieces have been cut, its time to insulate the floor. There are many choices for insulation but given that this trailer is going to be used in extreme temperatures and that we want to keep any rodents completely out, we are going with four inches of spray foam through the floor. We’ve also built special insulated compartments for all the holding tanks and plumbing. Each of those will get at least 2 inches of spray foam.  Spray foam is a great product if done correctly so make sure you get a reputable company to do it. Every inch of spray foam gives you an R value of 6 so with our 4 inches we get R24 in the floors and R12 around the tanks and plumbing. . The curved sides needed to be held up while spraying. This is a two person job. The foam expands and sets within seconds and it sticks to everything so it will fit the curve and help hold its shape perfectly. It also adds a lot of structural integrity, something that traditional insulation does not do. We also pray foamed the wheel wells not just for climate control but for sound proofing also.  The spray foam needs to be applied in 2 separate 2 inch passes. The above photo shows the first. Below is the second and finished product. All of our electrical and plumbing has been run through there.  The opening in the centre is to allow access to the fresh water tank should it need to be removed or replaced for any reason. It is accessible from underneath via a thick removable aluminum sheet.  I used a SeeLevel 2 tank monitoring system which requires a circuit board be adhered to each water tank and wired in to give you accurate percentage based readings on all your tanks. It also reads your battery and propane levels. NOTE: it will not work on a metal tank. If you are installing something similar, do it at this point as to access this area again will not be easy in the future. After spray foaming the chassis and even the wheel wells, we’ve used the original, wrecked plywood floor as a template to cut all new plywood pieces. We bolted them down, installed the wheel wells and carefully positioned the chassis under the trailer to finalize a few important details before putting the shell back in place.  Any overhanging parts of the plywood or spray foam need to be trimmed so that the aluminum curved part will fit flush to the shell without any bumps.  An air hose is helpful in blowing out any smaller pieces that might still cause blemishes in the aluminum.  Fold the aluminum up (if it did not adhere perfectly when the spray foam was applied) and rivet it into place.  Next, we need to bolt our aluminum channel, that holds the shell, all the way around the perimeter and through the plywood floor and the steel chassis. The original channel was flimsy and corroded so we replaced it with brand new, thicker 1/8 aluminum. Your best bet is to buy 1/8 aluminum cube lengths and cut them in half diagonally to double the amount of area you can cover. For example, our 10 foot length gave us 20 feet of usable channel. Because of the rounded curves, we had to cut and use the original corner pieces but they were in pretty good shape still.  Last step, cut out the aluminum siding where the stairs are located and cut the channel inside to allow access to the door frame.  The shell is now ready to slowly lower into place! Making sure it lines up properly is essential for a good re-fit.  To re-rivet the shell back to the chassis we upgraded the regular 1/8 rivets for 3/16 aluminum rivets that are 1/2 inch long in order to improve stability, strength and to accommodate our thicker aluminum channel piece that actually holds the shell down. We used the original rivet holes but had to go through the tedious job of drilling each hole larger to fit the 3/16 rivets and then instal each one with a hand rivet tool.  Below shows two finished rows at the front. You also have to rivet the gussets to the channel inside the trailer.  It starts to get pretty cold in Ontario at the end of November so we installed the windows to allow us to work on the interior throughout the winter. The windows come out very easily but can be a bit of a challenge to get back in. The hinges supposedly just slide into place in the frame if you angle them correctly, but if the frame is at all bent (which can happen when you have the shell suspended for 3 months) you must work it back to exactly the correct position, this can be done with a flat head screwdriver. Even if the window frame has not been manipulated, it is very tricky.  Ideally we should have used Trempro on the inside and Parbond on the exterior seams to really prevent any leaks but the weather this time of year will not let it set properly so we will cover the seams as best we can for the winter, keep the trailer covered and do a proper sealing job with those products in the spring.  At this stage we are ready to install the wiring, switches, LED’s both interior and exterior, replace the taillights and connect everything. We also have to replace the roof vents, fan, hatches and cover all the exposed holes in the shell for the winter. The access panel where the old hot water heater was, is wide open and will have to be covered with an aluminum piece as we are going with a tankless hot water heater. To my knowledge, the Precision Temp 550NSP is the only one on the market that can withstand use in extreme temperatures. It is vented through the floor so we wont need any more holes in our shell. Here is the link to where you can purchase it: http://www.vintagetrailersupply.com/PrecisionTemp_RV_550NSP_p/vts-943.htm  |
| json metadata | {"tags":["airstream","trailer","shell","insulation","renovation"],"image":["https://steemitimages.com/DQmbbotQbZAhVKTXCBZGq3oX1ops94NExiQEcrFnJupPaCm/3.jpg","https://steemitimages.com/DQmNy47zumYGjj1Mezue9vCBHMTBMW5yM33anssN9tkjdkP/2.jpg","https://steemitimages.com/DQmRWpPkfUMGYivksZvnDCvkmDjH5G2TFU2dSHjP3REFyKZ/1.jpg","https://steemitimages.com/DQmTH3mPGGxX36PqzUSbxYVD7rUpwYk5P9KSSqpdAMJVb4s/4.jpg","https://steemitimages.com/DQmbhjiXhsL29rcuaJALZwrATUrSVuNjbc171bSGCMbsBFw/2013-08-11_-632.jpg","https://steemitimages.com/DQmfM2kSmfL8oxbHT5UoVCbYc2UctykFkSPpYgWmGzv5cxB/2013-08-11_-644.jpg","https://steemitimages.com/DQmdwgMG7cXanm79HSaWeYEzLkzpyWWrWSadoaS8Nfjf9ic/2013-08-11_-652.jpg","https://steemitimages.com/DQmSRGFNxVeoMLFux5id9LJZzEZkb315vuSXE8xWsyK3SW5/photo-copy-31.jpg","https://steemitimages.com/DQmWVgUkLWir2qSZDJahJ9a7Cf8koeDrRK1xHrG7r8hPbFU/2013-09-15_03.jpg","https://steemitimages.com/DQmejCWHcng43Ue2R8zA3t8rrYtLDihFZmb6AgnMjdRFBWw/2013-09-15_01.jpg","https://steemitimages.com/DQmeZaymURrPVMKKad1daT9WmnsFxugkEg1tii52tCx6qaX/2013-11-15_02.jpg","https://steemitimages.com/DQmVHFYazaTyJ9GXjmcVvLj1TCp9cFunUinzutyChL39DnX/2013-11-15_07.jpg","https://steemitimages.com/DQmVjXrBHcgQKXT3Xm5GReutWEehSUQr1MPVeykxBxCALMC/2013-11-15_09.jpg","https://steemitimages.com/DQmaxHmJMWMGBwztMxDiotCYrzghMQgxVhaK1Ds3GY8MsoT/2013-11-15_10.jpg","https://steemitimages.com/DQmVztdk7HWJAcAtYC59To13y3XFVEux8xyUJqyKCwu9UVa/709-1003-2.jpg","https://steemitimages.com/DQmPDN75mwFM9GUYP4726VP31nVr1xUc62fi7nNLxfENHZi/2013-11-19_02.jpg","https://steemitimages.com/DQmX9A7u1q2J8SWNPZXCfcQZk1Y78ptD4MQqwiw8KPjdHfb/2013-11-19_03.jpg","https://steemitimages.com/DQmeoKyUT1rSgqD1X4drYnxLawFB1ZGsu5y3rro8LmHBCTs/2013-11-19_04.jpg","https://steemitimages.com/DQmVr2mA6FDBAFB4gT7Bg288AF3TDsQv8vKNxvXAd7aFrMi/2013-11-19_05.jpg","https://steemitimages.com/DQmeKEwvgeFgsMXVHXULDePUAWMyAotTrbHfPVtYrtWBvc3/2013-11-19_06.jpg","https://steemitimages.com/DQmUGFsBRrj4BBK3nvw5fmLtwFHq3ffb9kKKtiJd5qEcyht/2013-11-19_07.jpg","https://steemitimages.com/DQmY3EeCWvhud1szR7DEfdzMyVipeuFZ1vx8qmx23qqGWUP/2013-11-29_08.jpg","https://steemitimages.com/DQmVuXQKRw13JPrkqyjTHNu8izX6PE5UjduiAVovrBe7wwR/2013-11-24_07.jpg","https://steemitimages.com/DQmX6JpzoxFfDBRLzxXrRTdW5NqLRKo38M2o1Myffjwaurb/2013-11-24_02.jpg","https://steemitimages.com/DQmShpPgkUyb8hzHrGAydgrrL9urNmm9k2sWVbt2mcC9Hun/2013-11-24_04.jpg","https://steemitimages.com/DQmfKdv3j56v4CMUyKtPSjheDQX9Pf6c1pCCwPEw4ar4Gbj/2013-11-24_05.jpg","https://steemitimages.com/DQmeZy5KtCx7rbsGXci4z8BSpdeJUDctnwmW6WAA6cmvWn4/precision-temp-550nsp.png"],"links":["http://www.vintagetrailersupply.com/PrecisionTemp_RV_550NSP_p/vts-943.htm"],"app":"steemit/0.1","format":"markdown"} |
| Transaction Info | Block #12140505/Trx 166fea674ae20e3a9bac11783e817437f1fe0285 |
View Raw JSON Data
{
"trx_id": "166fea674ae20e3a9bac11783e817437f1fe0285",
"block": 12140505,
"trx_in_block": 1,
"op_in_trx": 0,
"virtual_op": 0,
"timestamp": "2017-05-22T03:15:39",
"op": [
"comment",
{
"parent_author": "",
"parent_permlink": "airstream",
"author": "mistahlee",
"permlink": "vintage-airstream-travel-trailer-renovation-post-3-removing-the-shell-and-putting-it-back-together",
"title": "Vintage Airstream Travel Trailer Renovation: Post 3 - Removing the Shell and Putting it Back Together",
"body": "Removing the shell requires some preliminary work: You will first need to remove the windows and you will need somewhere to suspend the entire structure. Fortunately we had a pre-existing shelter to hang from, however I have seen some other people have created a frame out of 2x4's. Its also a good idea to stabilize it with some cinder blocks or lumber so the entire shell does not sway while suspended. You will also need to remove the decorative strip around the base where the shell meets the chassis and then remove all the exterior rivets. There is a metal plate at the front behind the propane tanks that will need to have all of the rivets removed to release the shell.\n\nRemoving the windows is quite simple. Un-attach the locking mechanisms from inside and remove the window arms. Its a good idea to remove the interior window frames too if you plan on cleaning or painting them. They are riveted in so removal can be done with the 1/8 drill bit. From outside the trailer (you will need a step ladder) open the windows and lift them up on a 45 degree angle. From this position gently pull out and the entire window should just slide right out from its position. Handle these carefully, they are fairly durable but extremely expensive to replace if dropped.\n\nOnce the windows are removed, you can place a 2x4 or in our case steel cylinders through the windows and secure them to your suspension harness. Use a towel to pad around the window frames as they can bend easily when lifting the shell off.\n\nWhen you have removed all of the rivets around the perimeter of the base and the rivets from the front metal place, hoist the shell up and it should lift up fairly easily. From there, have your tow vehicle pull the base and chassis leaving the shell suspended and easy to work on.\n\nHere are some photos of the shell suspended, the chassis and all the interesting things we found in there…\n\n\n\n\n\n\n\n\n\nYou can see the obviously poor condition of the 42 year old insulation underneath the plywood floor. Surprisingly the chassis was not too bad. A few spots had to be sandblasted and re-welded and then everything epoxied to prevent future rust.\n\nThe floor will be insulated with 4 inches of spray foam that will give an R value of 24.\n\nWe cut the plywood floor into sections to remove it a piece at a time, but be careful not to cut too deep as the fresh water and grey tank are side by side about half way up and the black tank is right at the rear but they all sit directly under the plywood.\n\n\n\n\n\nThis is what it looked like under the floor. Those brown coloured objects are nut shells, some squirrels and most likely other rodents had made a home in the floor. We also found one of their skeletons in there.\n\n\n\nHere are the holding tanks. The wheel wells also had to be removed, the bolts had to be ground off.\n\nThe underbelly was in good shape except for the parts that were in contact with the steel chassis so unfortunately all of it has to be replaced. The original is .032 aluminum but I am replacing it with .040 which will add about 10lbs to the trailer but .040 is easier to find. Make sure to get 5X12 sheets as the 4 foot sheets do not fit properly and will require more cutting and riveting. I was able to order 2 5X12 sheets for $140 each.\n\n\n\nThe axles were removed and the chassis was flipped over in order to take off the old aluminum underbelly so that cutting out the rotted steel from the chassis could begin. New steel was re-welded and extra pieces added to certain areas giving the chassis improved stability and durability. We sandblasted the remainder that was salvageable and then applied a rust proofing product to the entire thing.\n\nPor15 is commonly used, however the Canadian equivalent to that product is Dom16. It works great and although still quite expensive, it is less so than Por15. A quart of Dom16 is approximately 35-40 dollars and we required 6 quarts (1.5 gallons) for this size of project. Best to apply it with a brush so as to not clog up your gun. Once the Dom16 cures, it is not coming off.\n\n\n\nThe Dom16 adheres well to rust and actually strengthens it so it is best to leave a light surface layer of rust before applying. It is not difficult to apply. Next, the new aluminum underbelly panels were put on and the shocks replaced.\n\nWe are getting close to putting the shell back on the chassis but first must insulate with 4 inches of spray foam, bolt down the new plywood sub floor and instal the wheel wells. The plywood subfloor has been weather proofed so as to prevent any future rot if in contact with moisture.\n\n\n\nSo the chassis is in great condition, the brand new aluminum is on the bottom and side pieces have been cut, its time to insulate the floor. There are many choices for insulation but given that this trailer is going to be used in extreme temperatures and that we want to keep any rodents completely out, we are going with four inches of spray foam through the floor. We’ve also built special insulated compartments for all the holding tanks and plumbing. Each of those will get at least 2 inches of spray foam.\n\n\n\nSpray foam is a great product if done correctly so make sure you get a reputable company to do it. Every inch of spray foam gives you an R value of 6 so with our 4 inches we get R24 in the floors and R12 around the tanks and plumbing.\n\n.\n\nThe curved sides needed to be held up while spraying. This is a two person job. The foam expands and sets within seconds and it sticks to everything so it will fit the curve and help hold its shape perfectly. It also adds a lot of structural integrity, something that traditional insulation does not do. We also pray foamed the wheel wells not just for climate control but for sound proofing also.\n\n\n\nThe spray foam needs to be applied in 2 separate 2 inch passes. The above photo shows the first. Below is the second and finished product. All of our electrical and plumbing has been run through there.\n\n\n\nThe opening in the centre is to allow access to the fresh water tank should it need to be removed or replaced for any reason. It is accessible from underneath via a thick removable aluminum sheet.\n\n\n\nI used a SeeLevel 2 tank monitoring system which requires a circuit board be adhered to each water tank and wired in to give you accurate percentage based readings on all your tanks. It also reads your battery and propane levels. NOTE: it will not work on a metal tank. If you are installing something similar, do it at this point as to access this area again will not be easy in the future.\n\nAfter spray foaming the chassis and even the wheel wells, we’ve used the original, wrecked plywood floor as a template to cut all new plywood pieces. We bolted them down, installed the wheel wells and carefully positioned the chassis under the trailer to finalize a few important details before putting the shell back in place.\n\n\n\nAny overhanging parts of the plywood or spray foam need to be trimmed so that the aluminum curved part will fit flush to the shell without any bumps.\n\n\n\nAn air hose is helpful in blowing out any smaller pieces that might still cause blemishes in the aluminum.\n\n\n\nFold the aluminum up (if it did not adhere perfectly when the spray foam was applied) and rivet it into place.\n\n\n\nNext, we need to bolt our aluminum channel, that holds the shell, all the way around the perimeter and through the plywood floor and the steel chassis. The original channel was flimsy and corroded so we replaced it with brand new, thicker 1/8 aluminum. Your best bet is to buy 1/8 aluminum cube lengths and cut them in half diagonally to double the amount of area you can cover. For example, our 10 foot length gave us 20 feet of usable channel. Because of the rounded curves, we had to cut and use the original corner pieces but they were in pretty good shape still.\n\n\n\nLast step, cut out the aluminum siding where the stairs are located and cut the channel inside to allow access to the door frame.\n\n\n\nThe shell is now ready to slowly lower into place! Making sure it lines up properly is essential for a good re-fit.\n\n\n\nTo re-rivet the shell back to the chassis we upgraded the regular 1/8 rivets for 3/16 aluminum rivets that are 1/2 inch long in order to improve stability, strength and to accommodate our thicker aluminum channel piece that actually holds the shell down. We used the original rivet holes but had to go through the tedious job of drilling each hole larger to fit the 3/16 rivets and then instal each one with a hand rivet tool.\n\n\n\nBelow shows two finished rows at the front. You also have to rivet the gussets to the channel inside the trailer.\n\n\n\nIt starts to get pretty cold in Ontario at the end of November so we installed the windows to allow us to work on the interior throughout the winter. The windows come out very easily but can be a bit of a challenge to get back in. The hinges supposedly just slide into place in the frame if you angle them correctly, but if the frame is at all bent (which can happen when you have the shell suspended for 3 months) you must work it back to exactly the correct position, this can be done with a flat head screwdriver. Even if the window frame has not been manipulated, it is very tricky.\n\n\n\nIdeally we should have used Trempro on the inside and Parbond on the exterior seams to really prevent any leaks but the weather this time of year will not let it set properly so we will cover the seams as best we can for the winter, keep the trailer covered and do a proper sealing job with those products in the spring.\n\n\n\nAt this stage we are ready to install the wiring, switches, LED’s both interior and exterior, replace the taillights and connect everything.\n\nWe also have to replace the roof vents, fan, hatches and cover all the exposed holes in the shell for the winter.\n\nThe access panel where the old hot water heater was, is wide open and will have to be covered with an aluminum piece as we are going with a tankless hot water heater. To my knowledge, the Precision Temp 550NSP is the only one on the market that can withstand use in extreme temperatures. It is vented through the floor so we wont need any more holes in our shell. Here is the link to where you can purchase it:\n\nhttp://www.vintagetrailersupply.com/PrecisionTemp_RV_550NSP_p/vts-943.htm\n\n",
"json_metadata": "{\"tags\":[\"airstream\",\"trailer\",\"shell\",\"insulation\",\"renovation\"],\"image\":[\"https://steemitimages.com/DQmbbotQbZAhVKTXCBZGq3oX1ops94NExiQEcrFnJupPaCm/3.jpg\",\"https://steemitimages.com/DQmNy47zumYGjj1Mezue9vCBHMTBMW5yM33anssN9tkjdkP/2.jpg\",\"https://steemitimages.com/DQmRWpPkfUMGYivksZvnDCvkmDjH5G2TFU2dSHjP3REFyKZ/1.jpg\",\"https://steemitimages.com/DQmTH3mPGGxX36PqzUSbxYVD7rUpwYk5P9KSSqpdAMJVb4s/4.jpg\",\"https://steemitimages.com/DQmbhjiXhsL29rcuaJALZwrATUrSVuNjbc171bSGCMbsBFw/2013-08-11_-632.jpg\",\"https://steemitimages.com/DQmfM2kSmfL8oxbHT5UoVCbYc2UctykFkSPpYgWmGzv5cxB/2013-08-11_-644.jpg\",\"https://steemitimages.com/DQmdwgMG7cXanm79HSaWeYEzLkzpyWWrWSadoaS8Nfjf9ic/2013-08-11_-652.jpg\",\"https://steemitimages.com/DQmSRGFNxVeoMLFux5id9LJZzEZkb315vuSXE8xWsyK3SW5/photo-copy-31.jpg\",\"https://steemitimages.com/DQmWVgUkLWir2qSZDJahJ9a7Cf8koeDrRK1xHrG7r8hPbFU/2013-09-15_03.jpg\",\"https://steemitimages.com/DQmejCWHcng43Ue2R8zA3t8rrYtLDihFZmb6AgnMjdRFBWw/2013-09-15_01.jpg\",\"https://steemitimages.com/DQmeZaymURrPVMKKad1daT9WmnsFxugkEg1tii52tCx6qaX/2013-11-15_02.jpg\",\"https://steemitimages.com/DQmVHFYazaTyJ9GXjmcVvLj1TCp9cFunUinzutyChL39DnX/2013-11-15_07.jpg\",\"https://steemitimages.com/DQmVjXrBHcgQKXT3Xm5GReutWEehSUQr1MPVeykxBxCALMC/2013-11-15_09.jpg\",\"https://steemitimages.com/DQmaxHmJMWMGBwztMxDiotCYrzghMQgxVhaK1Ds3GY8MsoT/2013-11-15_10.jpg\",\"https://steemitimages.com/DQmVztdk7HWJAcAtYC59To13y3XFVEux8xyUJqyKCwu9UVa/709-1003-2.jpg\",\"https://steemitimages.com/DQmPDN75mwFM9GUYP4726VP31nVr1xUc62fi7nNLxfENHZi/2013-11-19_02.jpg\",\"https://steemitimages.com/DQmX9A7u1q2J8SWNPZXCfcQZk1Y78ptD4MQqwiw8KPjdHfb/2013-11-19_03.jpg\",\"https://steemitimages.com/DQmeoKyUT1rSgqD1X4drYnxLawFB1ZGsu5y3rro8LmHBCTs/2013-11-19_04.jpg\",\"https://steemitimages.com/DQmVr2mA6FDBAFB4gT7Bg288AF3TDsQv8vKNxvXAd7aFrMi/2013-11-19_05.jpg\",\"https://steemitimages.com/DQmeKEwvgeFgsMXVHXULDePUAWMyAotTrbHfPVtYrtWBvc3/2013-11-19_06.jpg\",\"https://steemitimages.com/DQmUGFsBRrj4BBK3nvw5fmLtwFHq3ffb9kKKtiJd5qEcyht/2013-11-19_07.jpg\",\"https://steemitimages.com/DQmY3EeCWvhud1szR7DEfdzMyVipeuFZ1vx8qmx23qqGWUP/2013-11-29_08.jpg\",\"https://steemitimages.com/DQmVuXQKRw13JPrkqyjTHNu8izX6PE5UjduiAVovrBe7wwR/2013-11-24_07.jpg\",\"https://steemitimages.com/DQmX6JpzoxFfDBRLzxXrRTdW5NqLRKo38M2o1Myffjwaurb/2013-11-24_02.jpg\",\"https://steemitimages.com/DQmShpPgkUyb8hzHrGAydgrrL9urNmm9k2sWVbt2mcC9Hun/2013-11-24_04.jpg\",\"https://steemitimages.com/DQmfKdv3j56v4CMUyKtPSjheDQX9Pf6c1pCCwPEw4ar4Gbj/2013-11-24_05.jpg\",\"https://steemitimages.com/DQmeZy5KtCx7rbsGXci4z8BSpdeJUDctnwmW6WAA6cmvWn4/precision-temp-550nsp.png\"],\"links\":[\"http://www.vintagetrailersupply.com/PrecisionTemp_RV_550NSP_p/vts-943.htm\"],\"app\":\"steemit/0.1\",\"format\":\"markdown\"}"
}
]
}2017/05/21 04:09:27
2017/05/21 04:09:27
| voter | glitterfart |
| author | mistahlee |
| permlink | vintage-airstream-travel-trailer-renovation-post-2-preparing-a-vintage-trailer-for-transport-and-gutting-the-interior |
| weight | 10000 (100.00%) |
| Transaction Info | Block #12112784/Trx ddff8c406c60712f2ca25017e45c347ba673f6d5 |
View Raw JSON Data
{
  "trx_id": "ddff8c406c60712f2ca25017e45c347ba673f6d5",
  "block": 12112784,
  "trx_in_block": 2,
  "op_in_trx": 0,
  "virtual_op": 0,
  "timestamp": "2017-05-21T04:09:27",
  "op": [
    "vote",
    {
      "voter": "glitterfart",
      "author": "mistahlee",
      "permlink": "vintage-airstream-travel-trailer-renovation-post-2-preparing-a-vintage-trailer-for-transport-and-gutting-the-interior",
      "weight": 10000
    }
  ]
}2017/05/21 03:36:00
2017/05/21 03:36:00
| voter | mistahlee |
| author | mistahlee |
| permlink | vintage-airstream-travel-trailer-renovation-post-2-preparing-a-vintage-trailer-for-transport-and-gutting-the-interior |
| weight | 10000 (100.00%) |
| Transaction Info | Block #12112116/Trx 158d9cb74d170330c29902937fd0ae0cc0de327d |
View Raw JSON Data
{
  "trx_id": "158d9cb74d170330c29902937fd0ae0cc0de327d",
  "block": 12112116,
  "trx_in_block": 0,
  "op_in_trx": 0,
  "virtual_op": 0,
  "timestamp": "2017-05-21T03:36:00",
  "op": [
    "vote",
    {
      "voter": "mistahlee",
      "author": "mistahlee",
      "permlink": "vintage-airstream-travel-trailer-renovation-post-2-preparing-a-vintage-trailer-for-transport-and-gutting-the-interior",
      "weight": 10000
    }
  ]
}2017/05/21 03:36:00
2017/05/21 03:36:00
| parent author | |
| parent permlink | airstream |
| author | mistahlee |
| permlink | vintage-airstream-travel-trailer-renovation-post-2-preparing-a-vintage-trailer-for-transport-and-gutting-the-interior |
| title | Vintage Airstream Travel Trailer Renovation: Post 2 - Preparing a Vintage Trailer for Transport & Gutting the Interior |
| body | A large scale project like this is best broken down into manageable chunks so as to not seem too overwhelming both physically and financially. Since my trailer was purchased online and located in a city about 4 and a half hours away, some preliminary work had to be done in order to make it transportable especially on the major highways that I had to travel on to get it home. This trailer had been sitting for about six years prior to me purchasing it and hadn’t done much traveling before that either so the tires were completely shot. In fact the tires that were on it were the original 7.00x15LT tires that have been discontinued. To replace these tires you will need to get ST22575R15 Load range D 6 bolt with a 5 1/2 off centre pattern. In most cases it is a better deal if you get the rims with them too. I was able to purchase each tire and rim for $189.95, but order ahead of time as these are not tires that many places usually keep in stock. Bearings may also have to be replaced, however in my case, just repacked. If your trailer has been sitting for long periods of time, axle replacement may be necessary too. I plan on doing that, but mine were in better than expected condition so I will leave that until next spring and will cover it in the blog then. Below is a photo of the cracked, worn old tire with a rusted rim just prior to replacing it with the new ones. 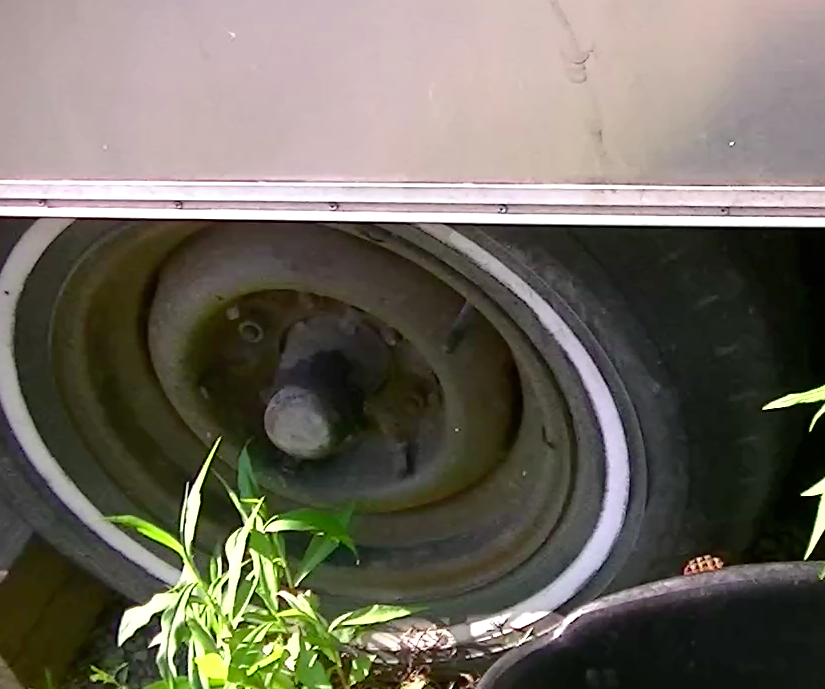 Make sure to check the dry weight of your trailer and have a tow vehicle that is capable of that. My car is a Honda Civic and the trailer weight was 4800lbs so there was no way that was going to happen. Fortunately, my friends dad had an F-150 capable of towing over 10,000lbs and he was very generous in lending his time and truck to help me out. That same friends uncle was a mechanic and gave me a great deal on actually accompanying us on the trip to pick it up in order to repack the bearings and replace the tires for the safe trip back. Sometimes these large scale projects require all available resources! 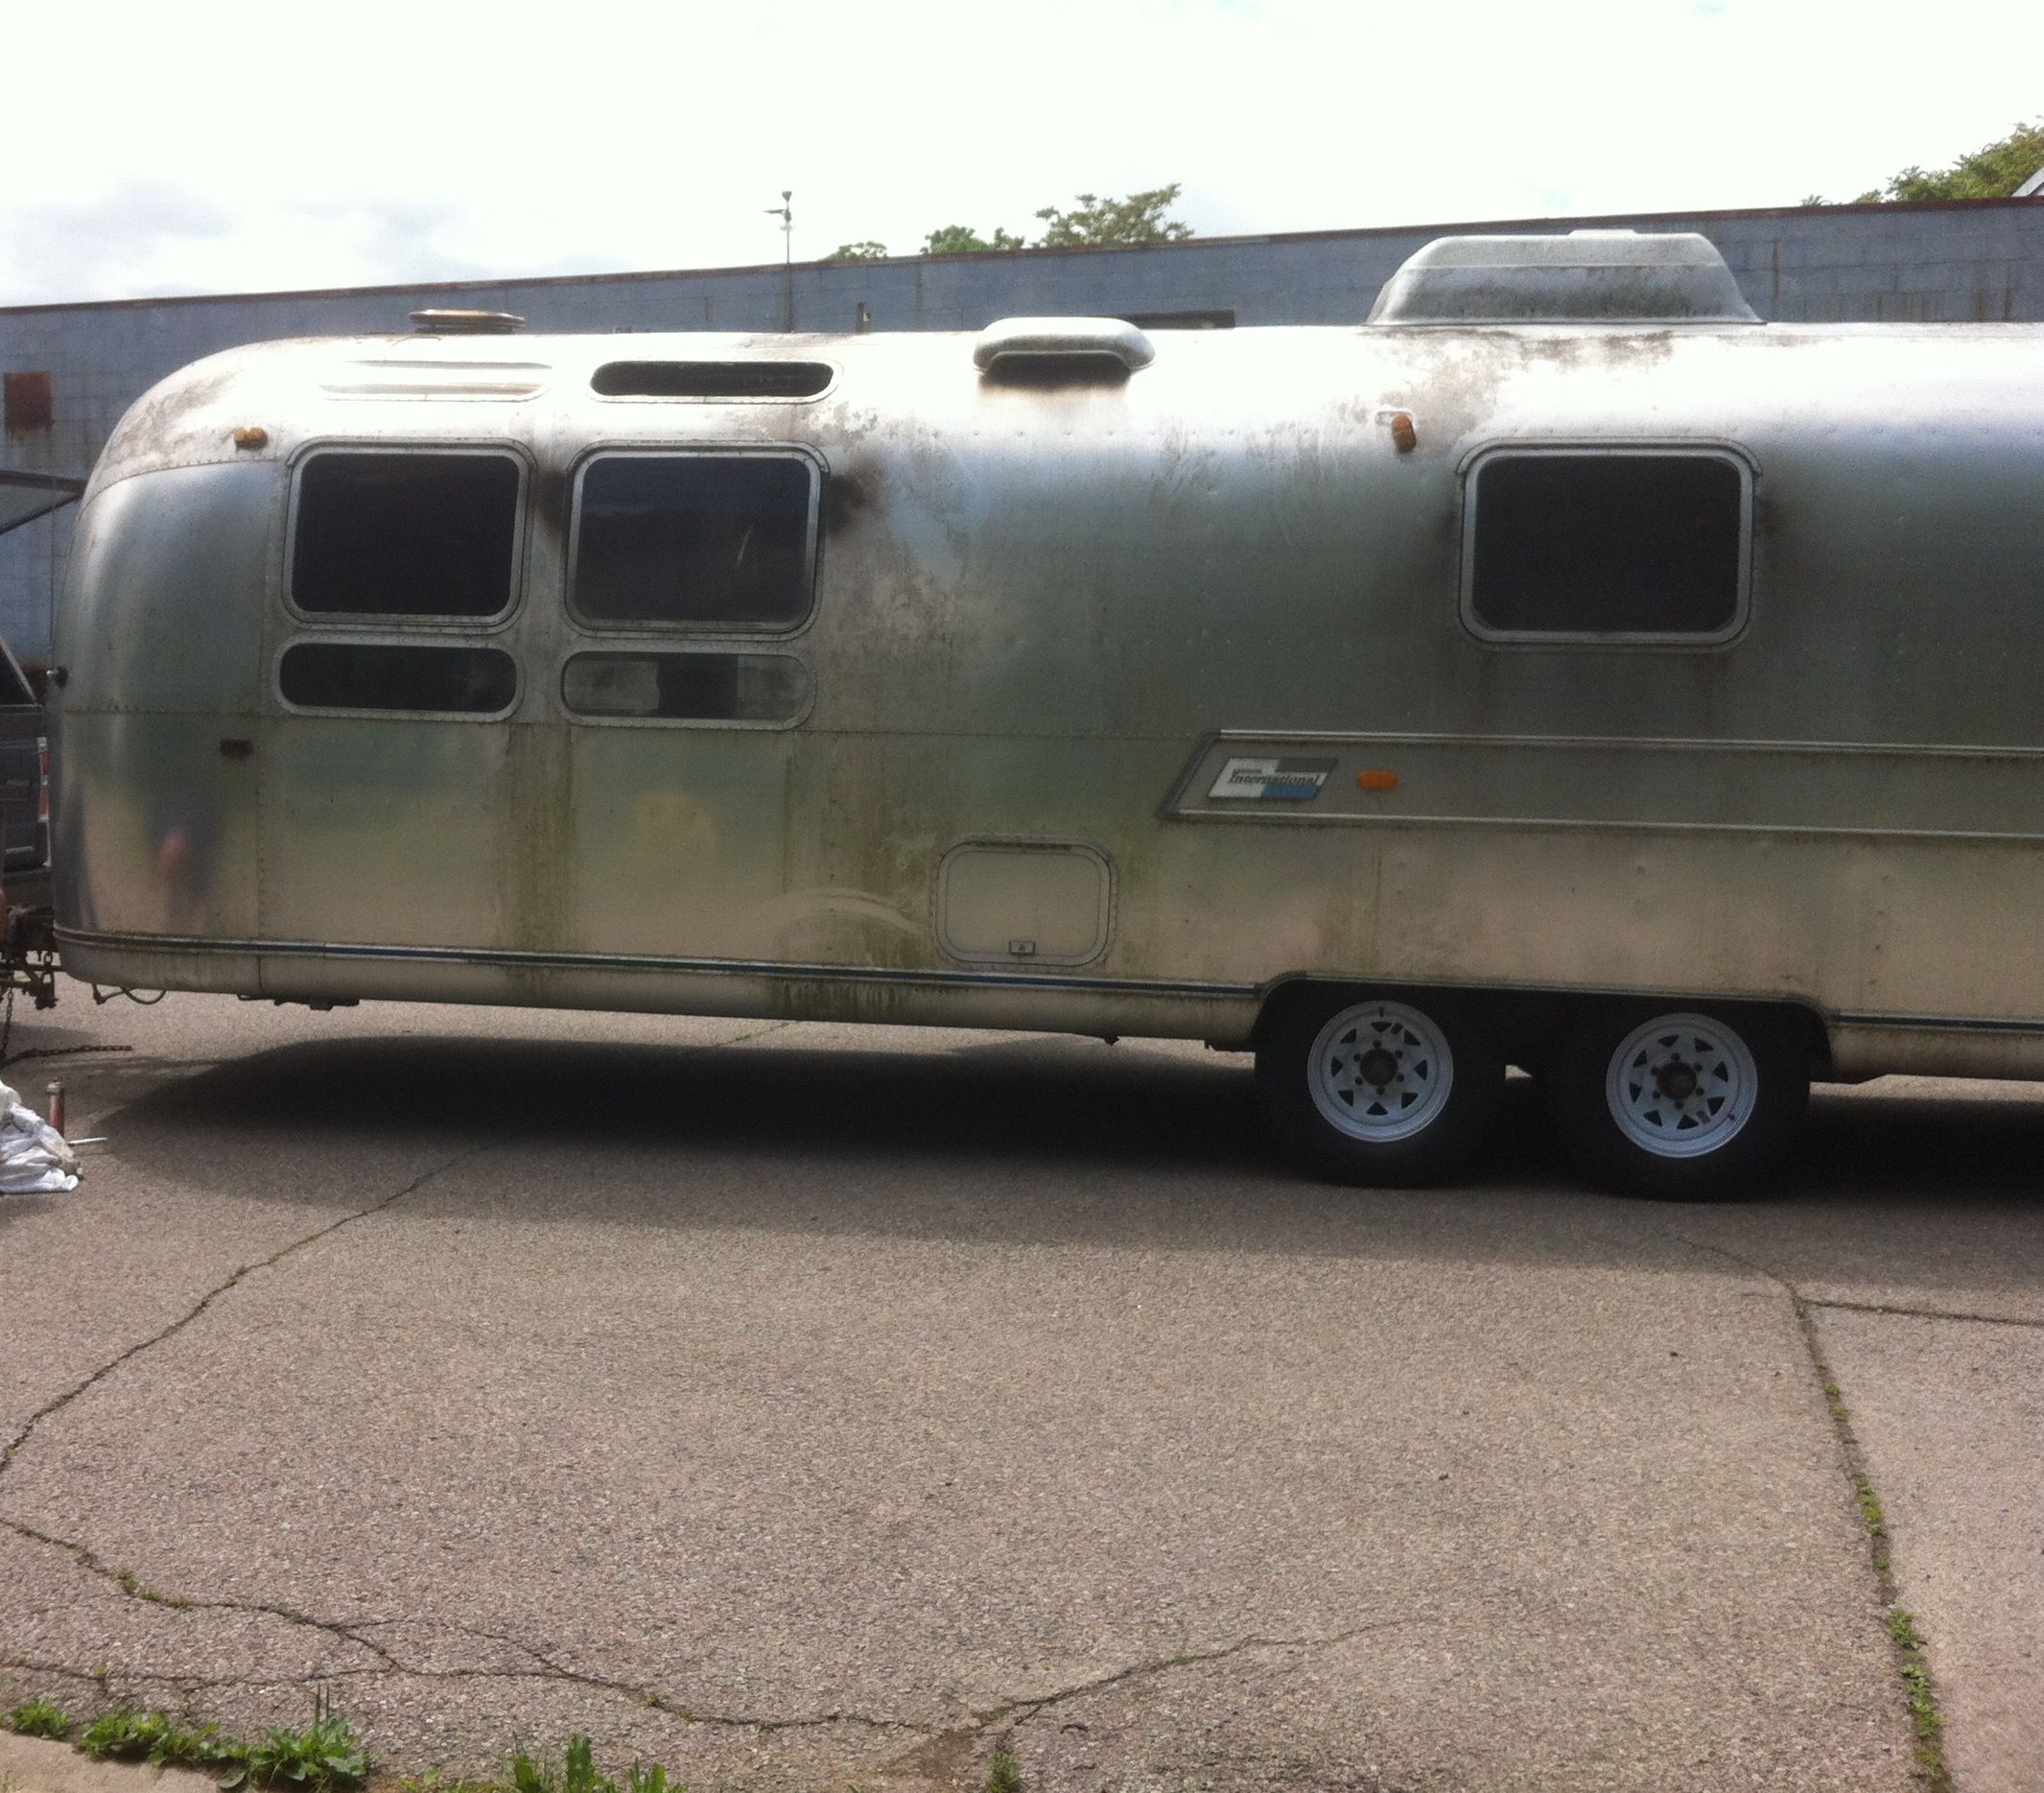 New tires & rims on. Check your hitch, make sure the welds are secure. The hitch size is 2 5/16 requiring a 2 inch receiver.  Above, the trailer is ready to transport. In our case, all the wires to the taillights were fried so we had to use a set of external tail lights on the back of the trailer and run a very long wire to the F-150. We also had to clear a lot of loose antenna, metal, etc…from the top of the trailer so it didn’t come off on the highway. If your windows are damaged like mine were, remove all the broken glass shards so they too do not hit others on the road when transporting. Make sure all the remaining windows or empty frames are locked so they do not swing loose on the road. After successfully transporting the Airstream home we are ready to begin removing the old interior. We are going to strip it right down to the exterior aluminum walls and rebuild to our custom specifications.  The glass will clean up easily enough, however there are some surface smoke marks that escaped an open window. That will be removed with the exterior clearcoat, which will allow us to restore a mirror like shine to the aluminum. Luckily, there is no structural damage or damage to the exterior skin. If there were, that would be an expensive repair as entire panels would have to be replaced.  After giving the exterior a quick hose down and cleaning the interior windows, it already looks better. The interior is another story...  Those interior door panels will come off and the frame will come up flawlessly with some steel wool. 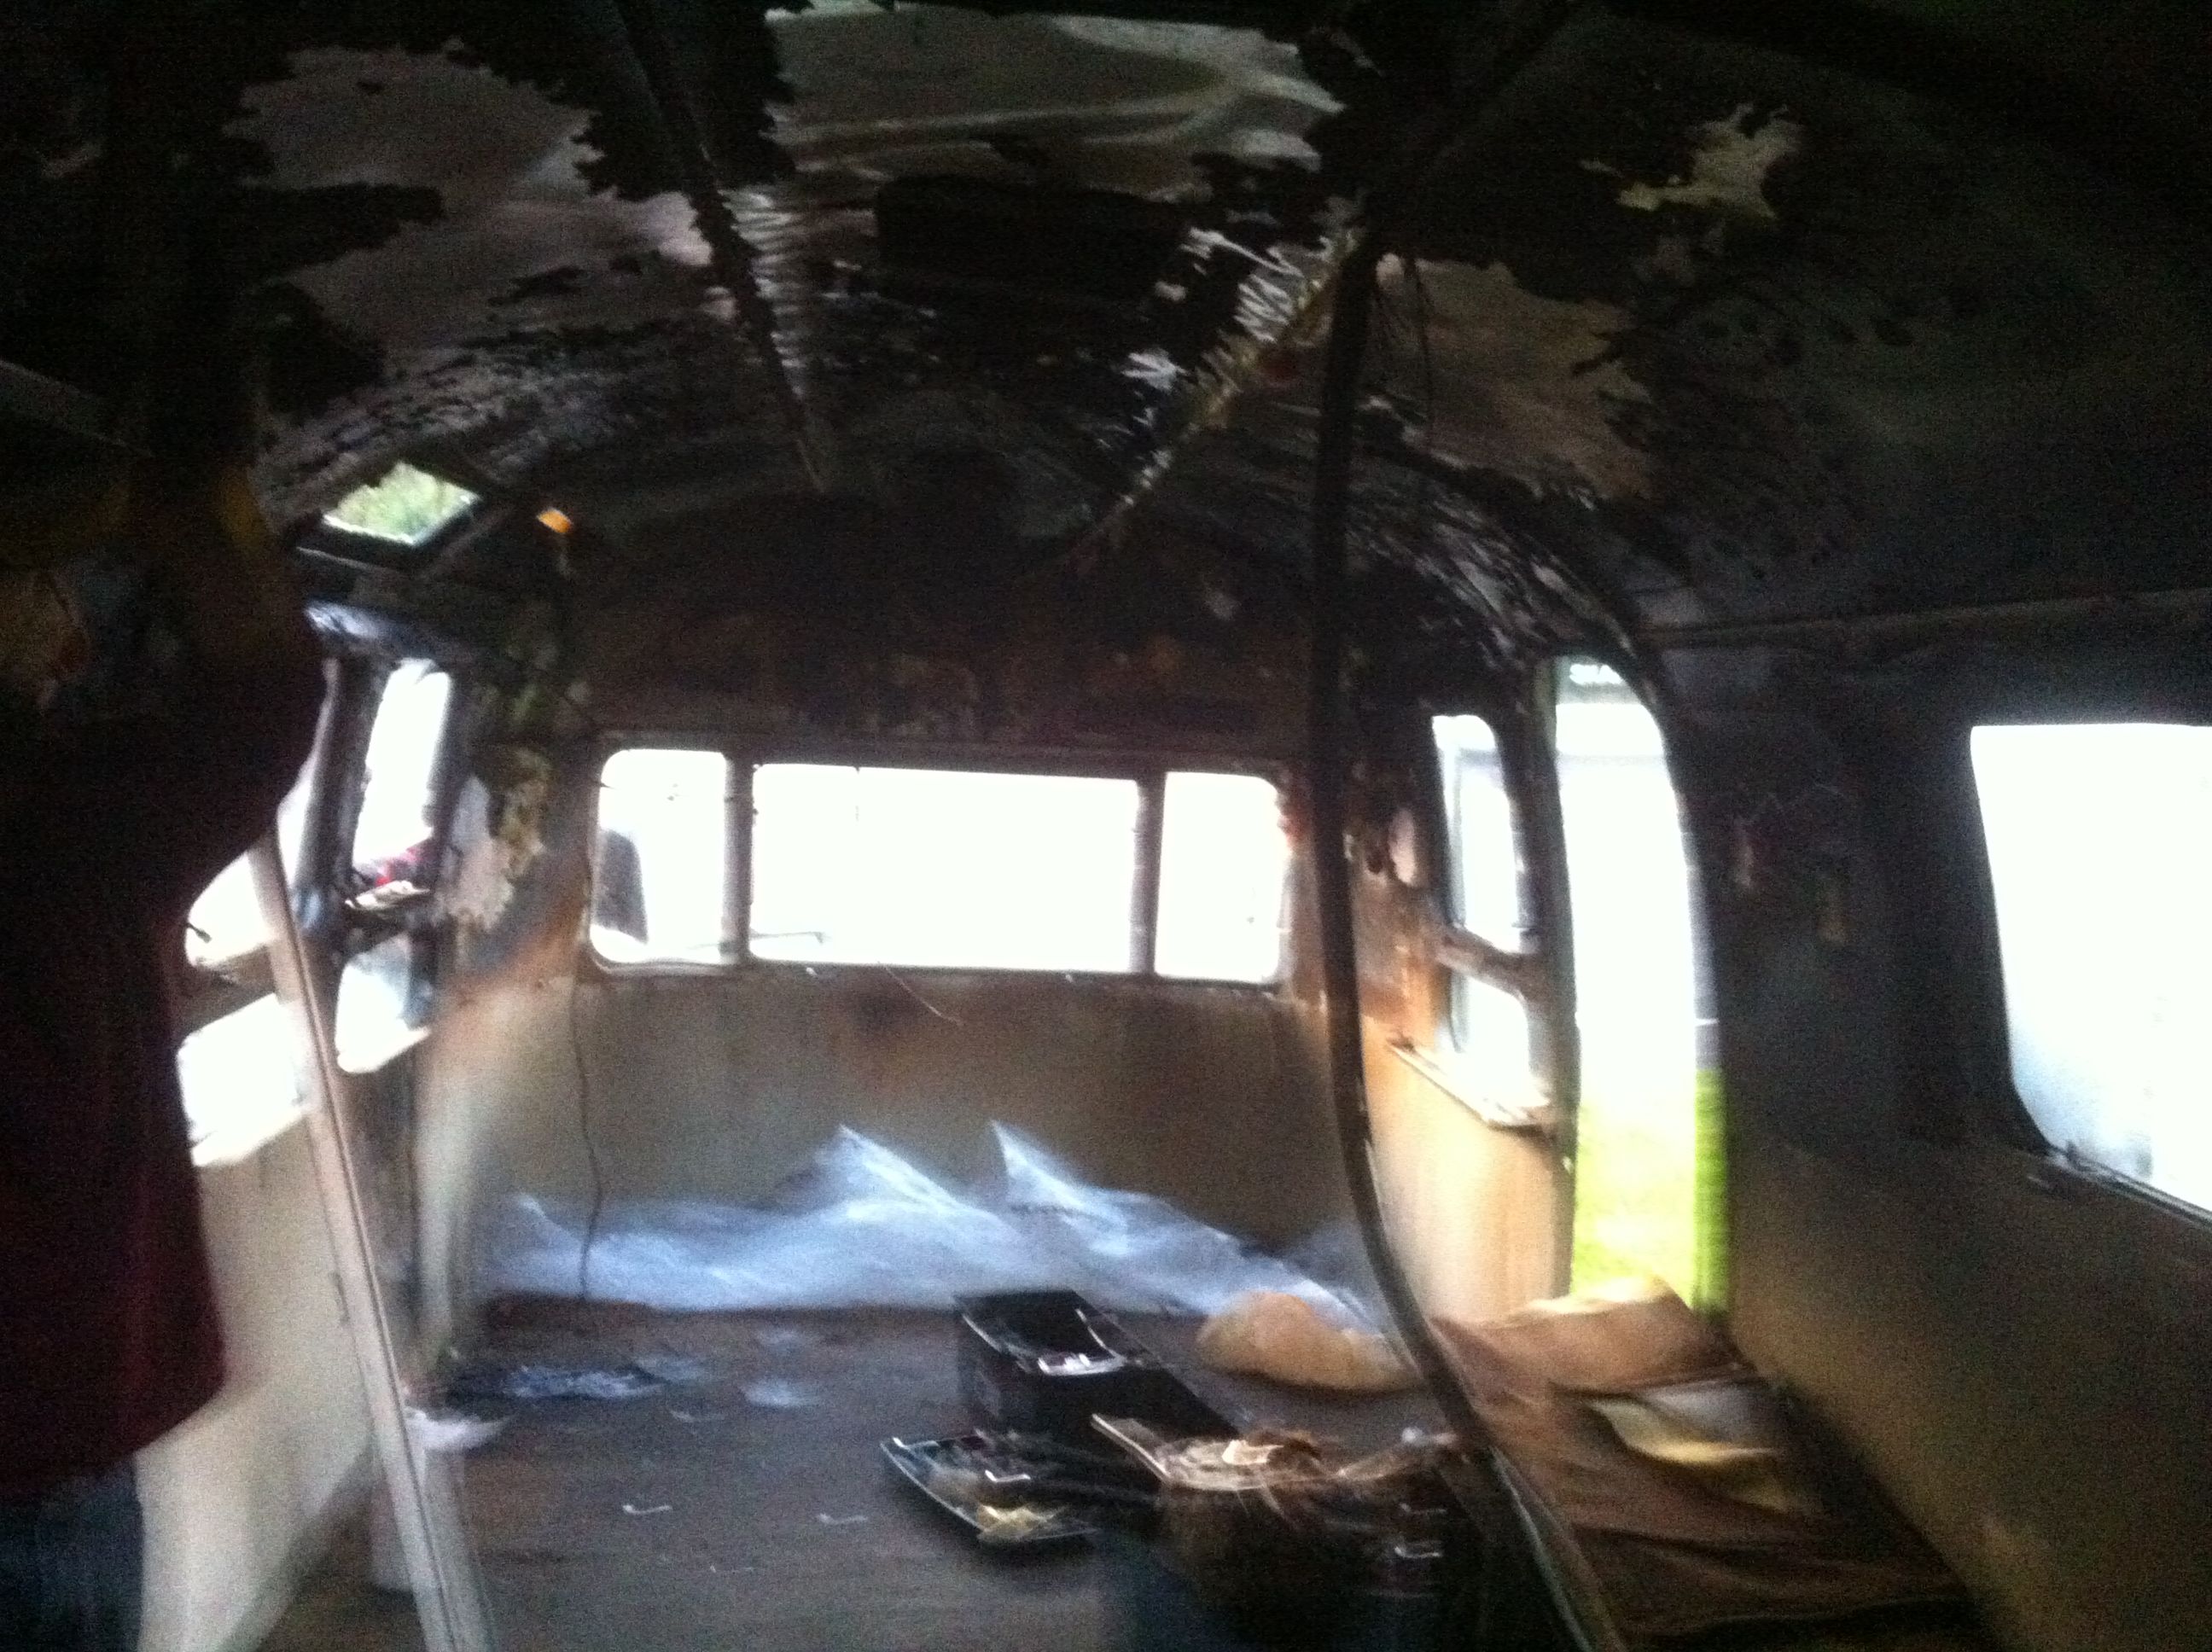 Start removing all the loose items. Surprisingly you may not need to rent a disposal bin. I just posted ads on kijiji for free junk pickup, scrap removal etc…and people came within the day to take it away. Note: Your old tires and rims might actually be worth some money! I put a “for free” ad up and had many replies, one person came within 15 minutes and before I could even delete the ad, I had a phone call offering $200 dollars for them despite the unusable condition. 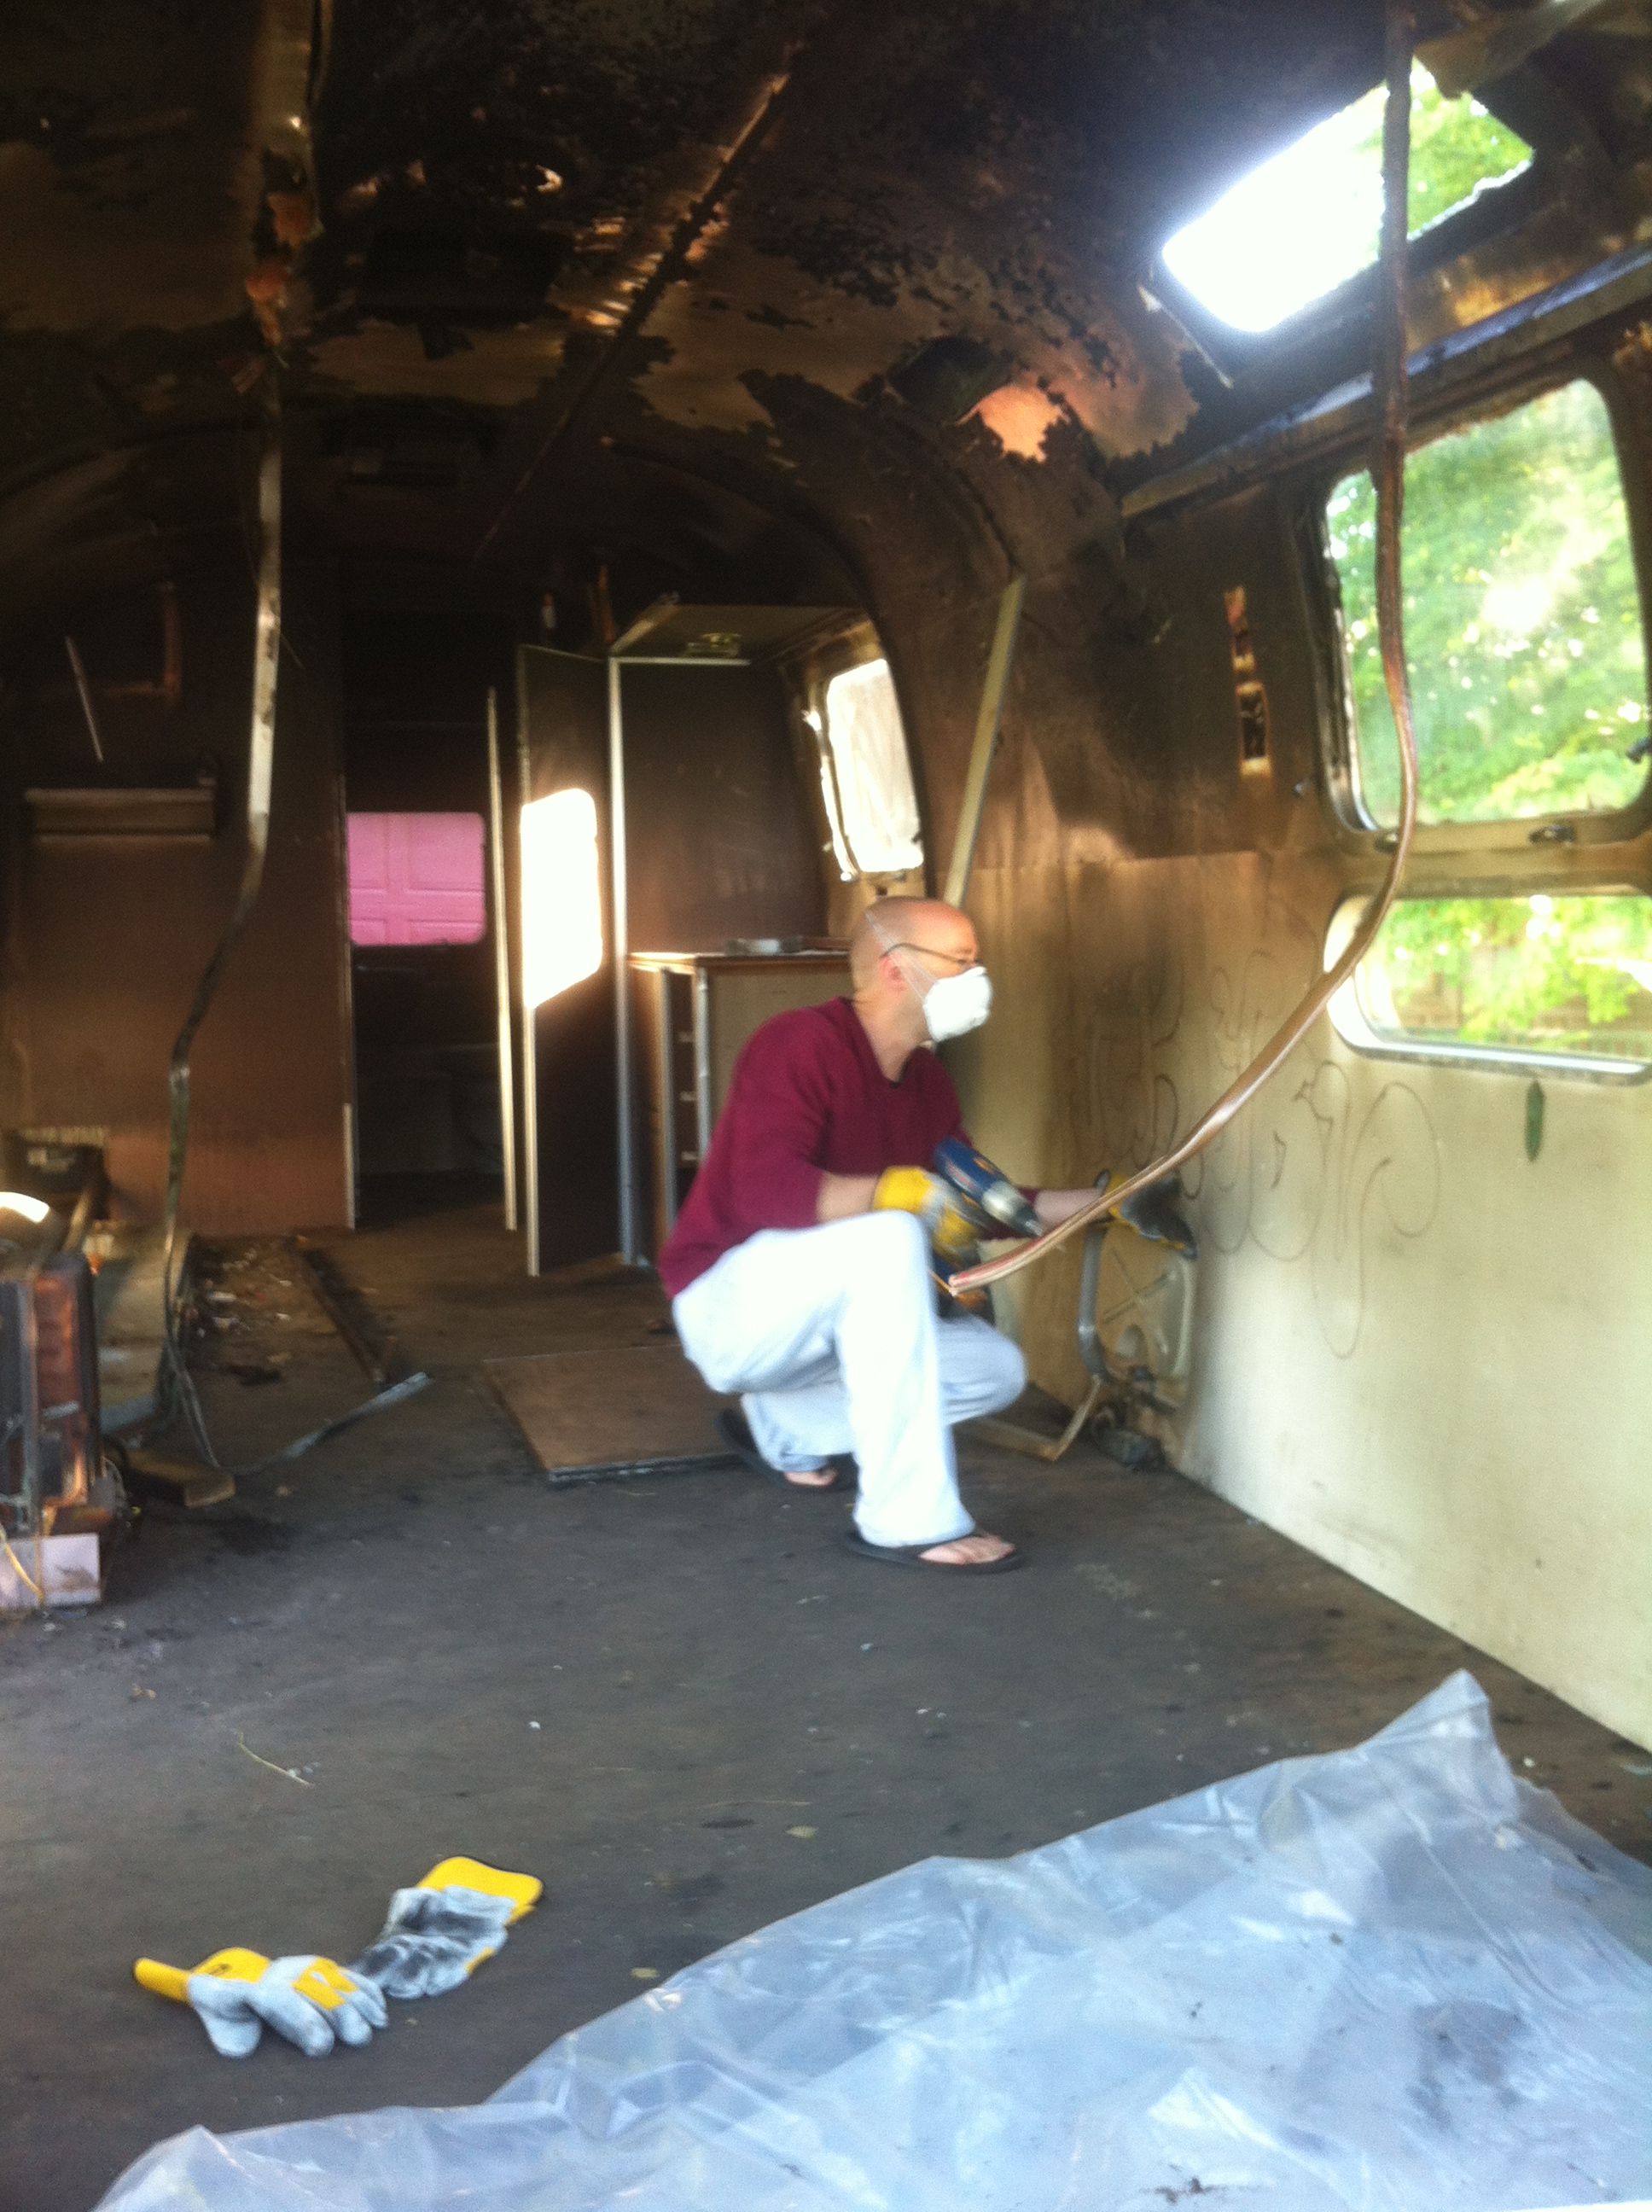 Start the long process of taking out each rivet with a 1/8 drill bit. Remove sections of the wall but remember, prior to the mid 80’s asbestos was commonly used so wear proper ventilation equipment or better yet, have a professional remove it.  Keep this stuff off your skin too. Hard to believe this was common in houses, offices, etc… 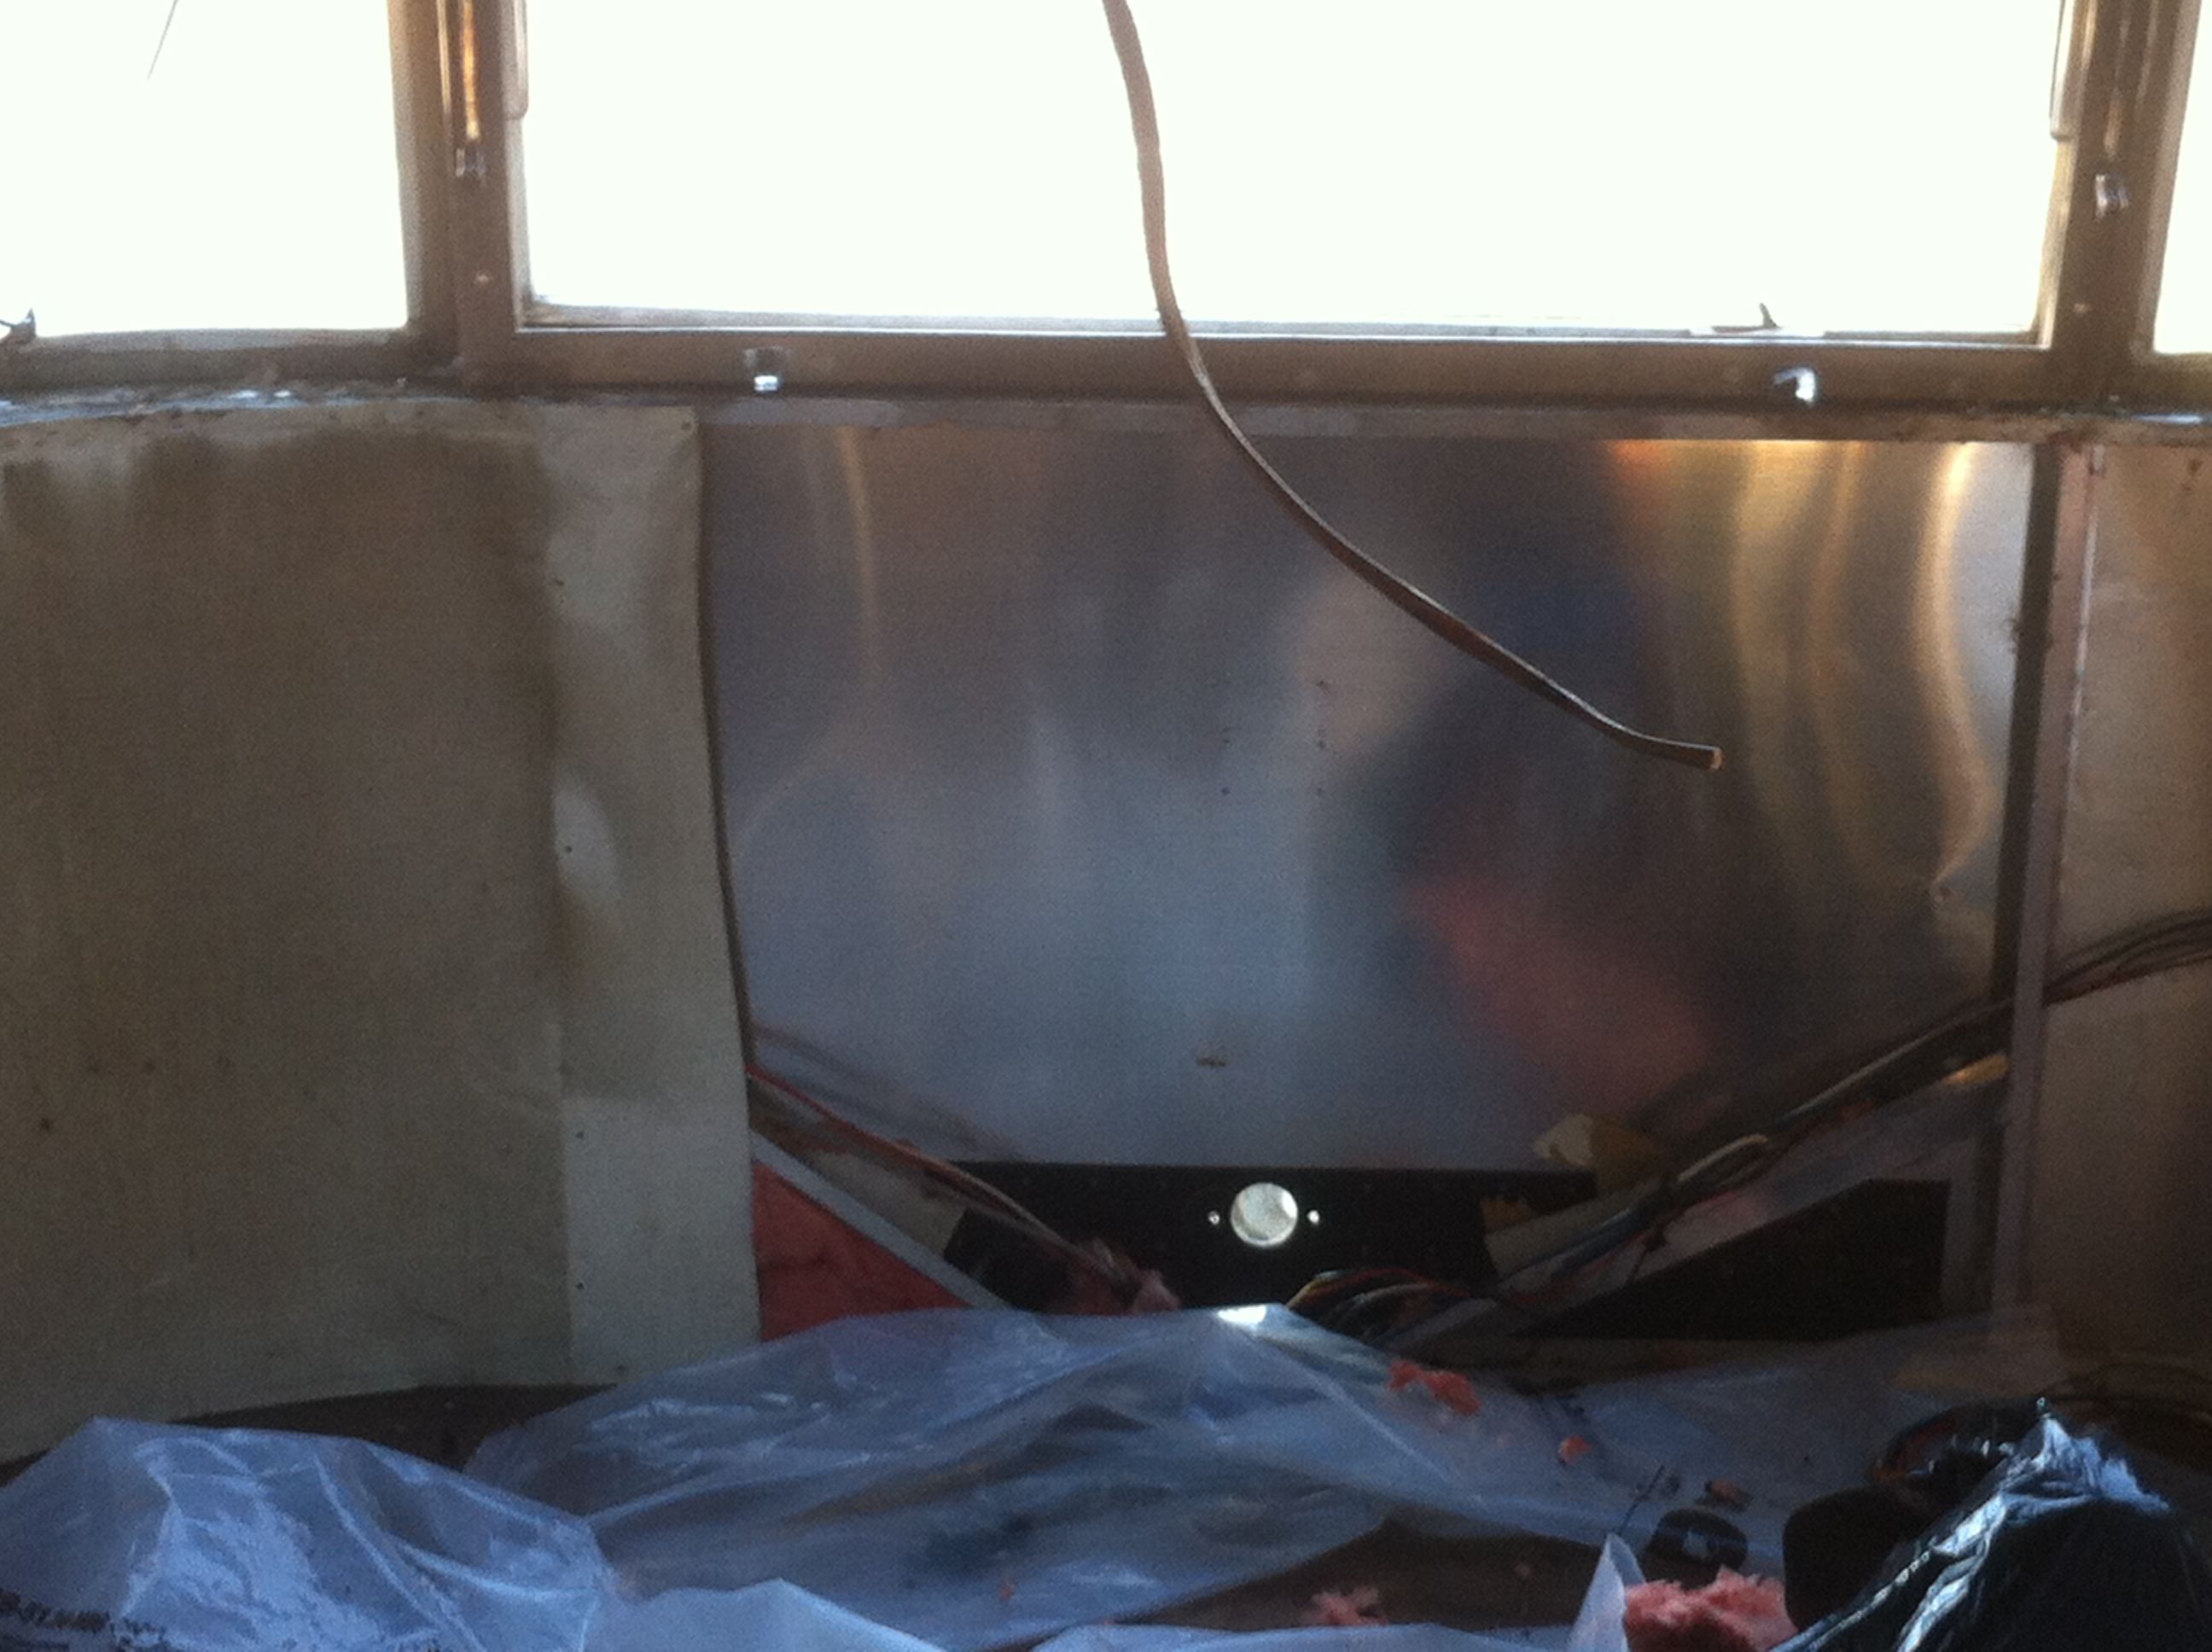 There is our first interior wall panel and insulation removed to expose the exterior shell. That aluminum is in mint condition even after 42 years! 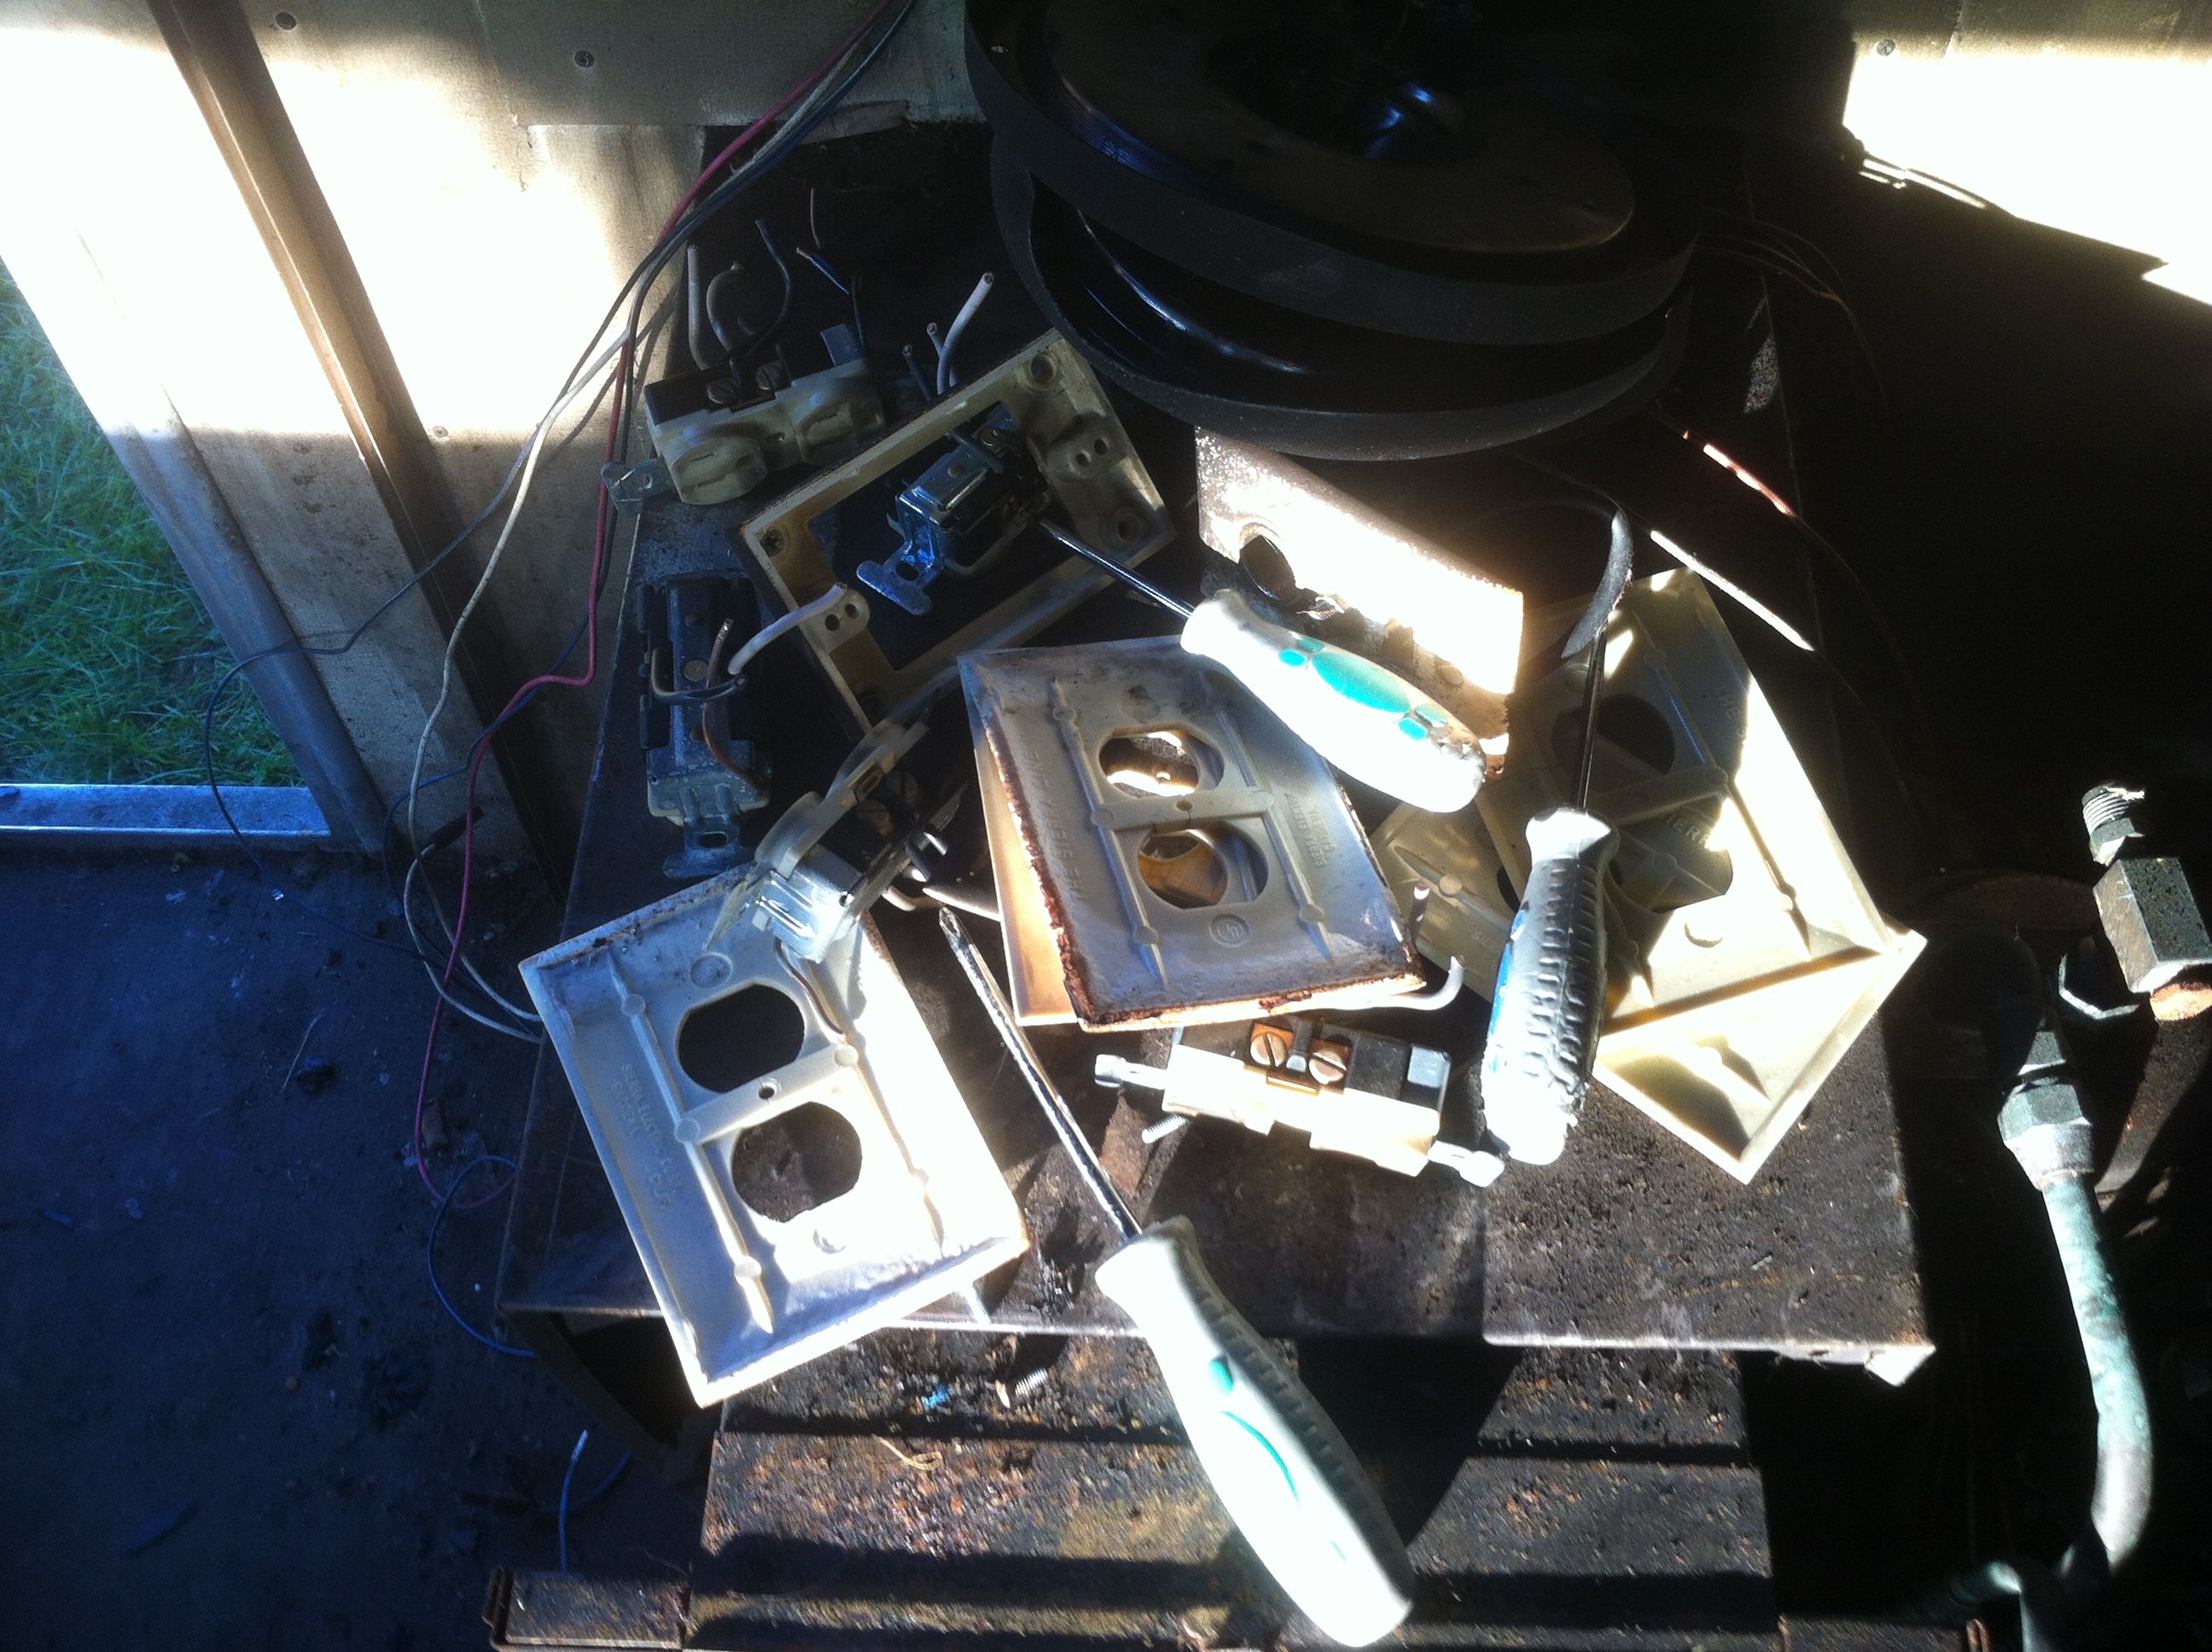 Underneath all of those outlets and covers, is the rusty old heater. It is tricky to get out as there are vents connected to the exterior. Remove them carefully so as to not damage anything and make sure propane is safely disconnected before removing. The heater is screwed into the plywood floor in several places and connected to a few hoses too. If you don’t plan on using it again, just cut them out. 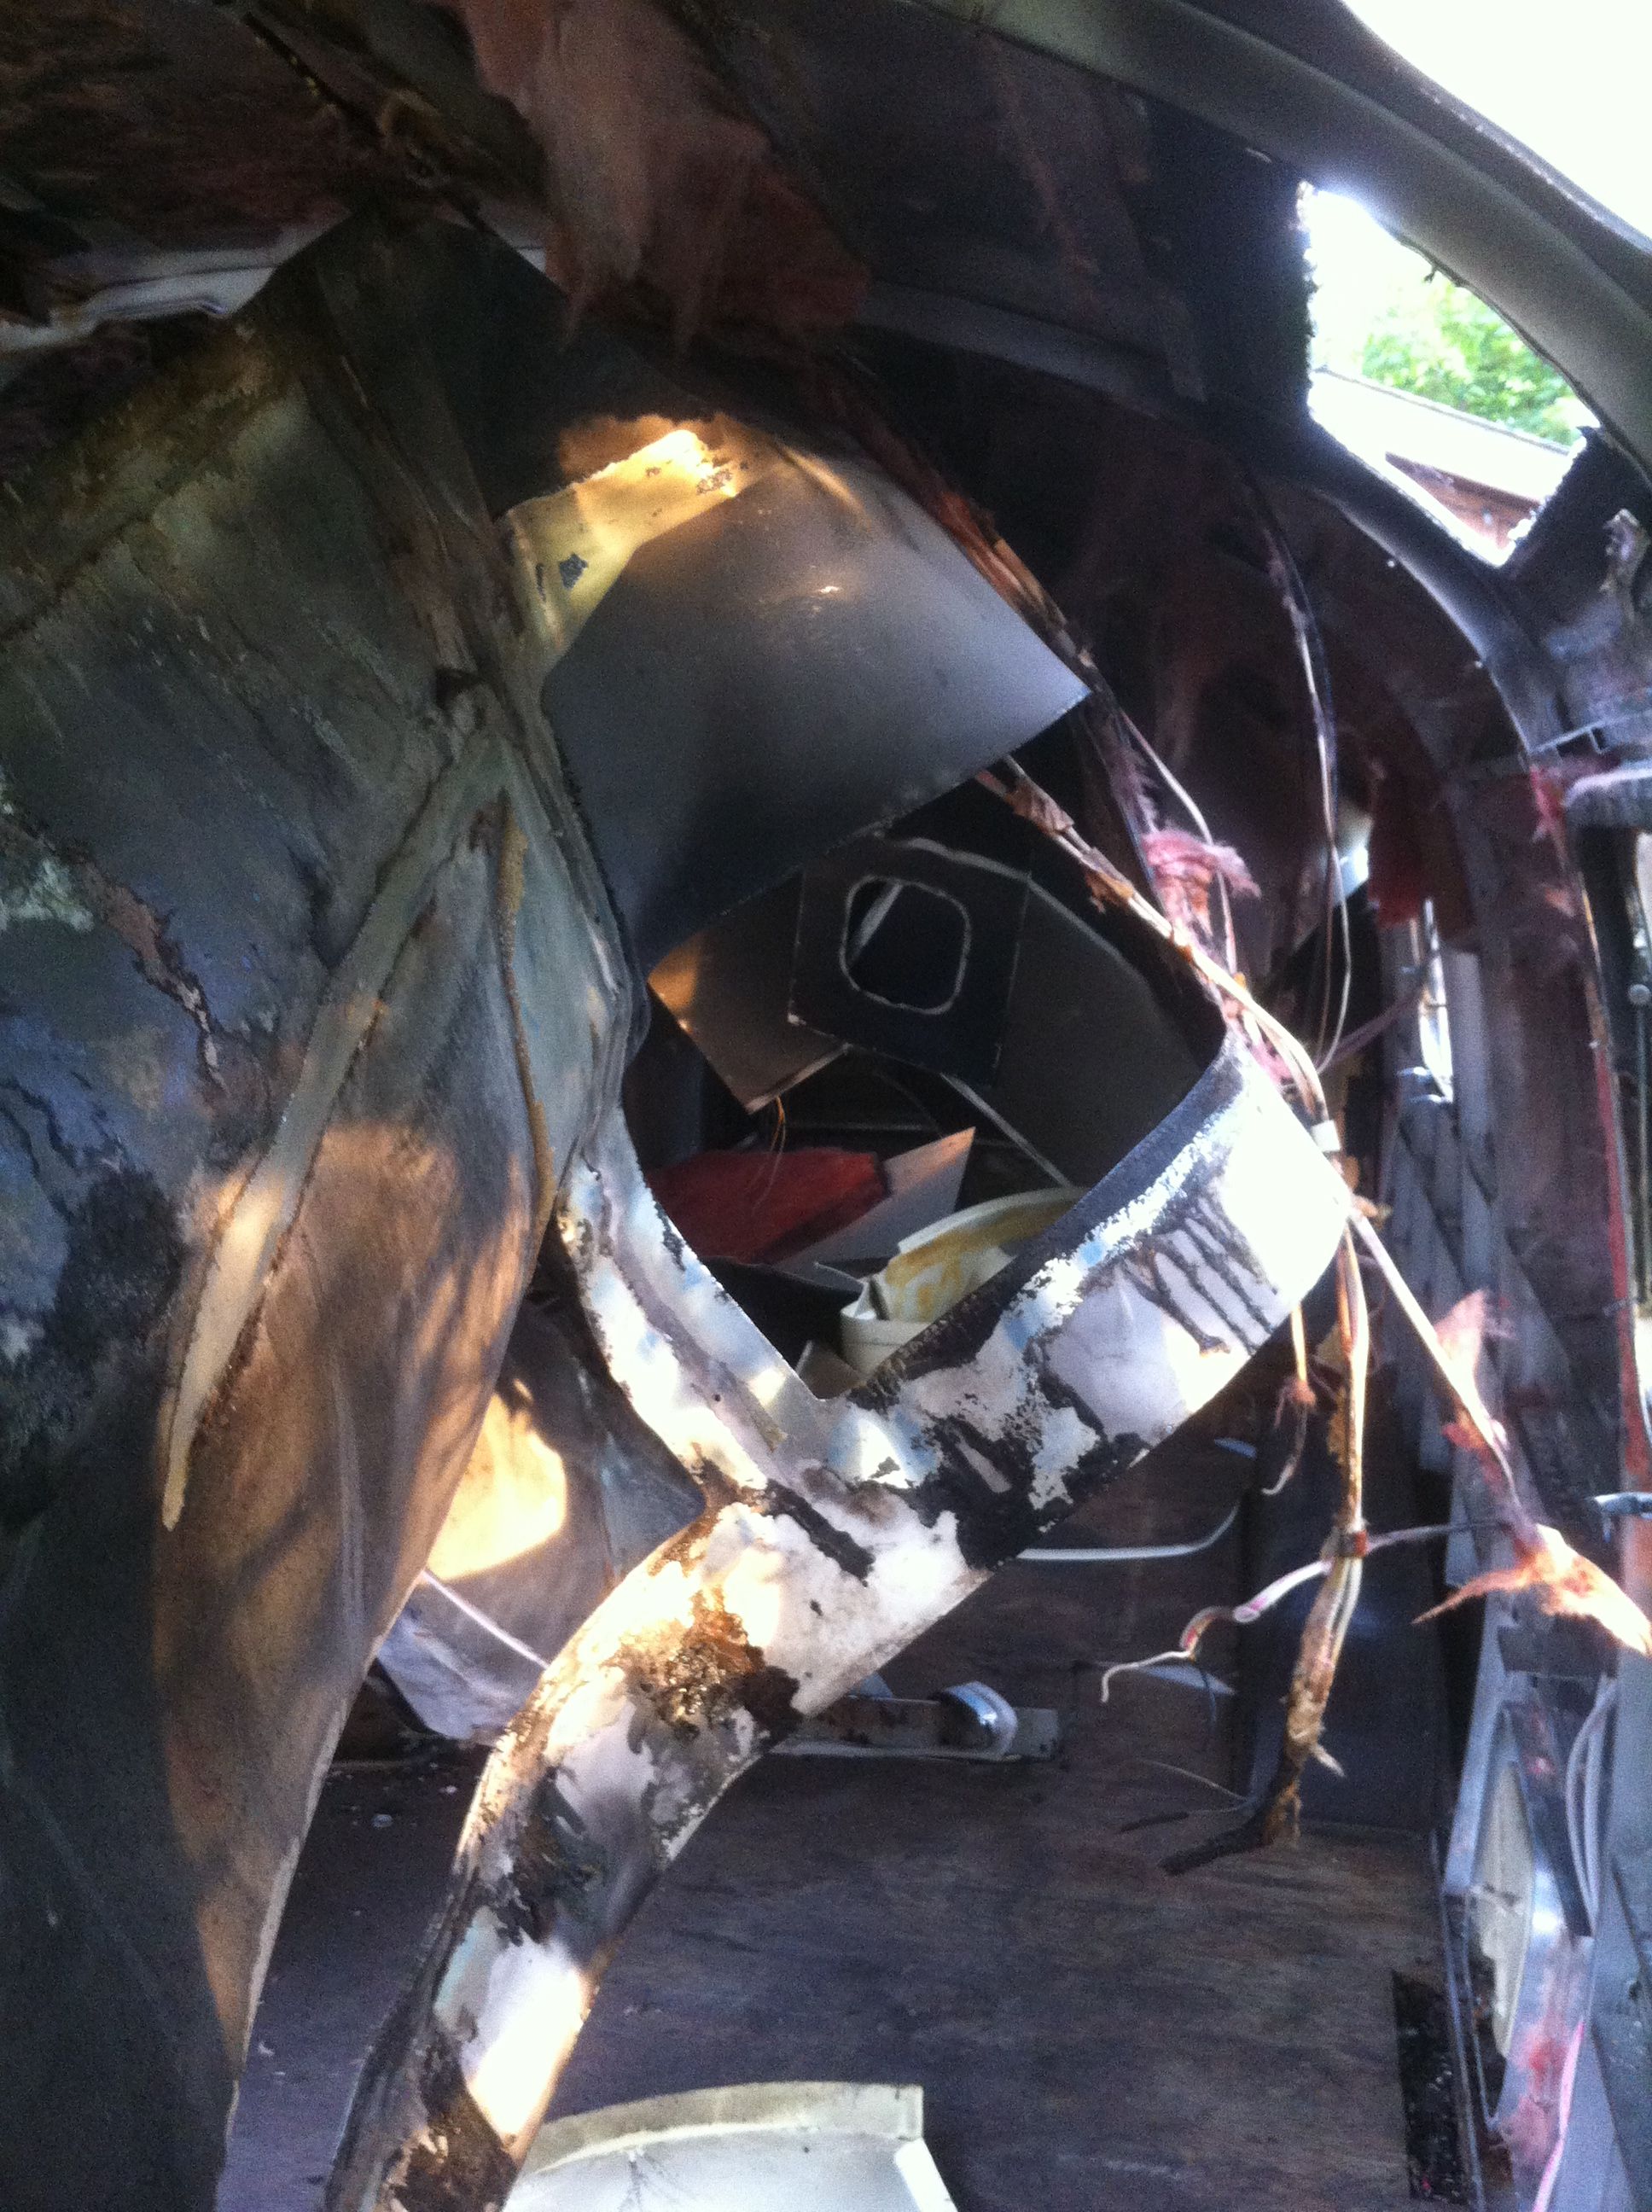 This part was difficult and I should have planned it out better. There is a center strip of interior wall material running the length of the trailer on the ceiling around the fans, AC unit, etc. It is only about 18 inches wide but on either side there is a very narrow strip of metal that covers all the rivets you need to drill in order to remove that piece. It is very hard to peel back but if you start with that piece instead of the lower walls like I did, I think it would be easier and far less cluttered in your working space. Use a small crowbar or flat screwdriver to create enough space to get your drill bit in there.  By removing that one centrepiece I could have avoided having the surrounding ceiling falling on me all the time and having to work around it. That stuff looks pretty flimsy but its actually metal. 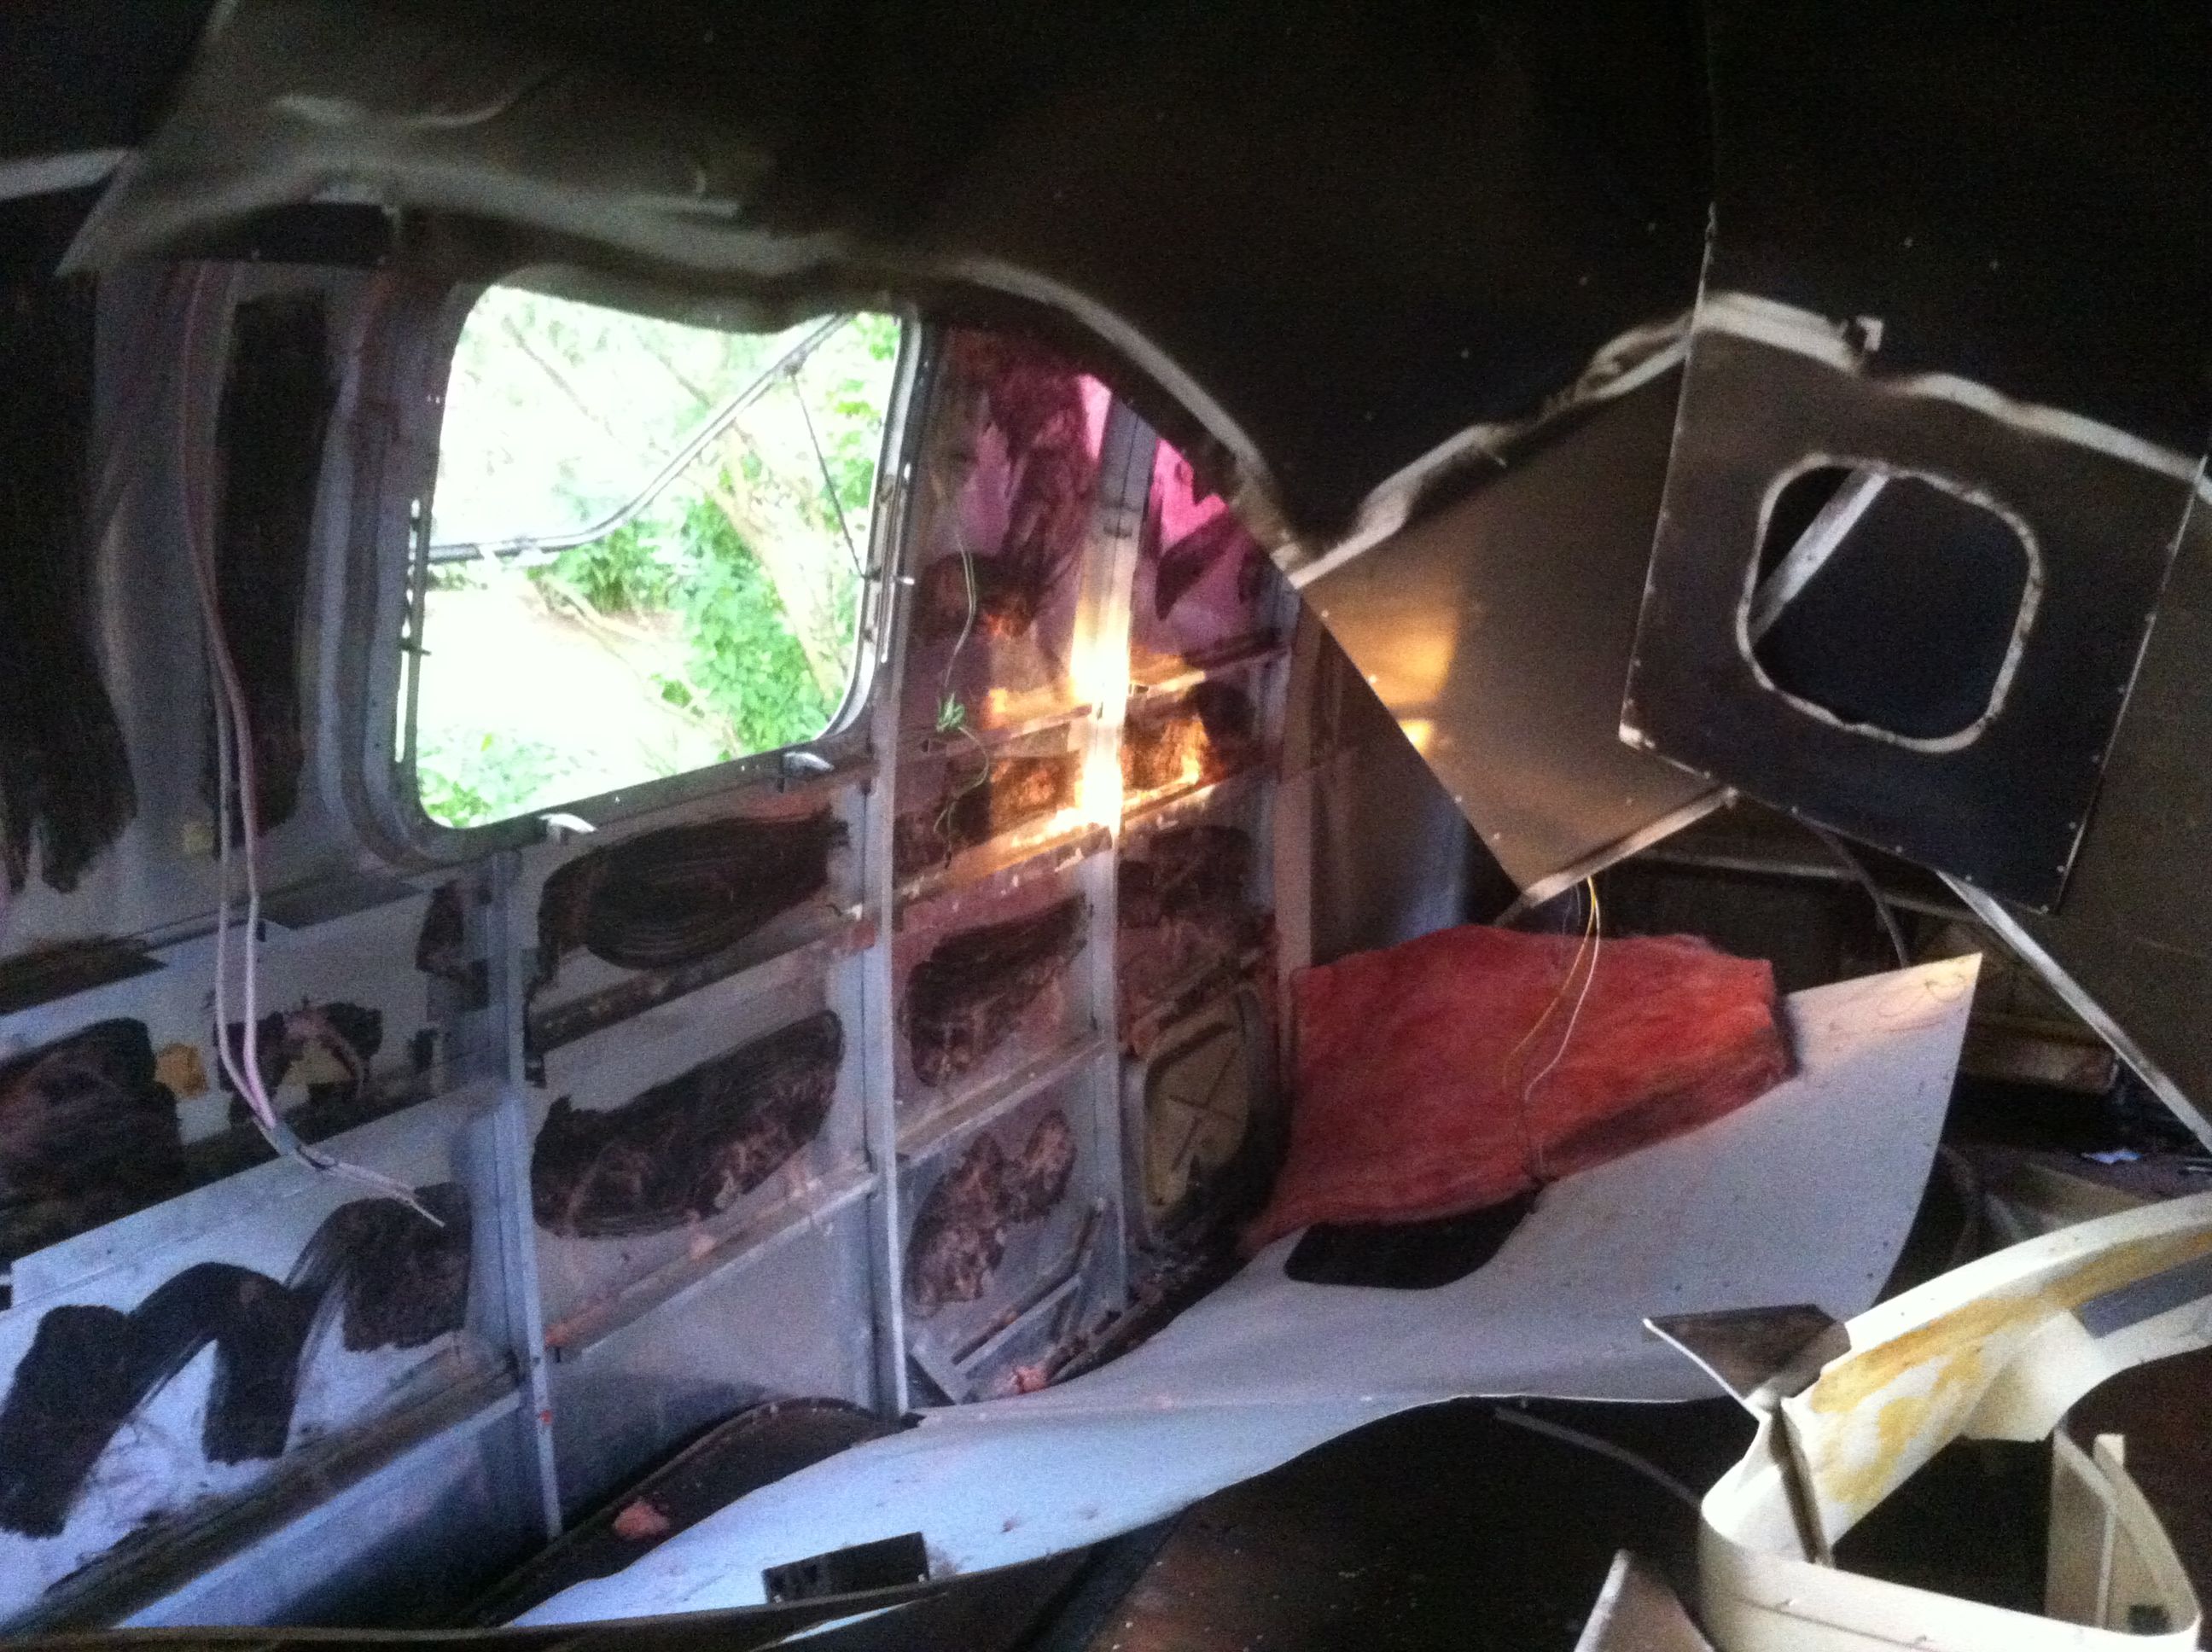 That black stuff on the walls is glue that held the old insulation in place. Not sure exactly what kind but I’m guessing its pretty bad to breathe even now. Try to remove it. 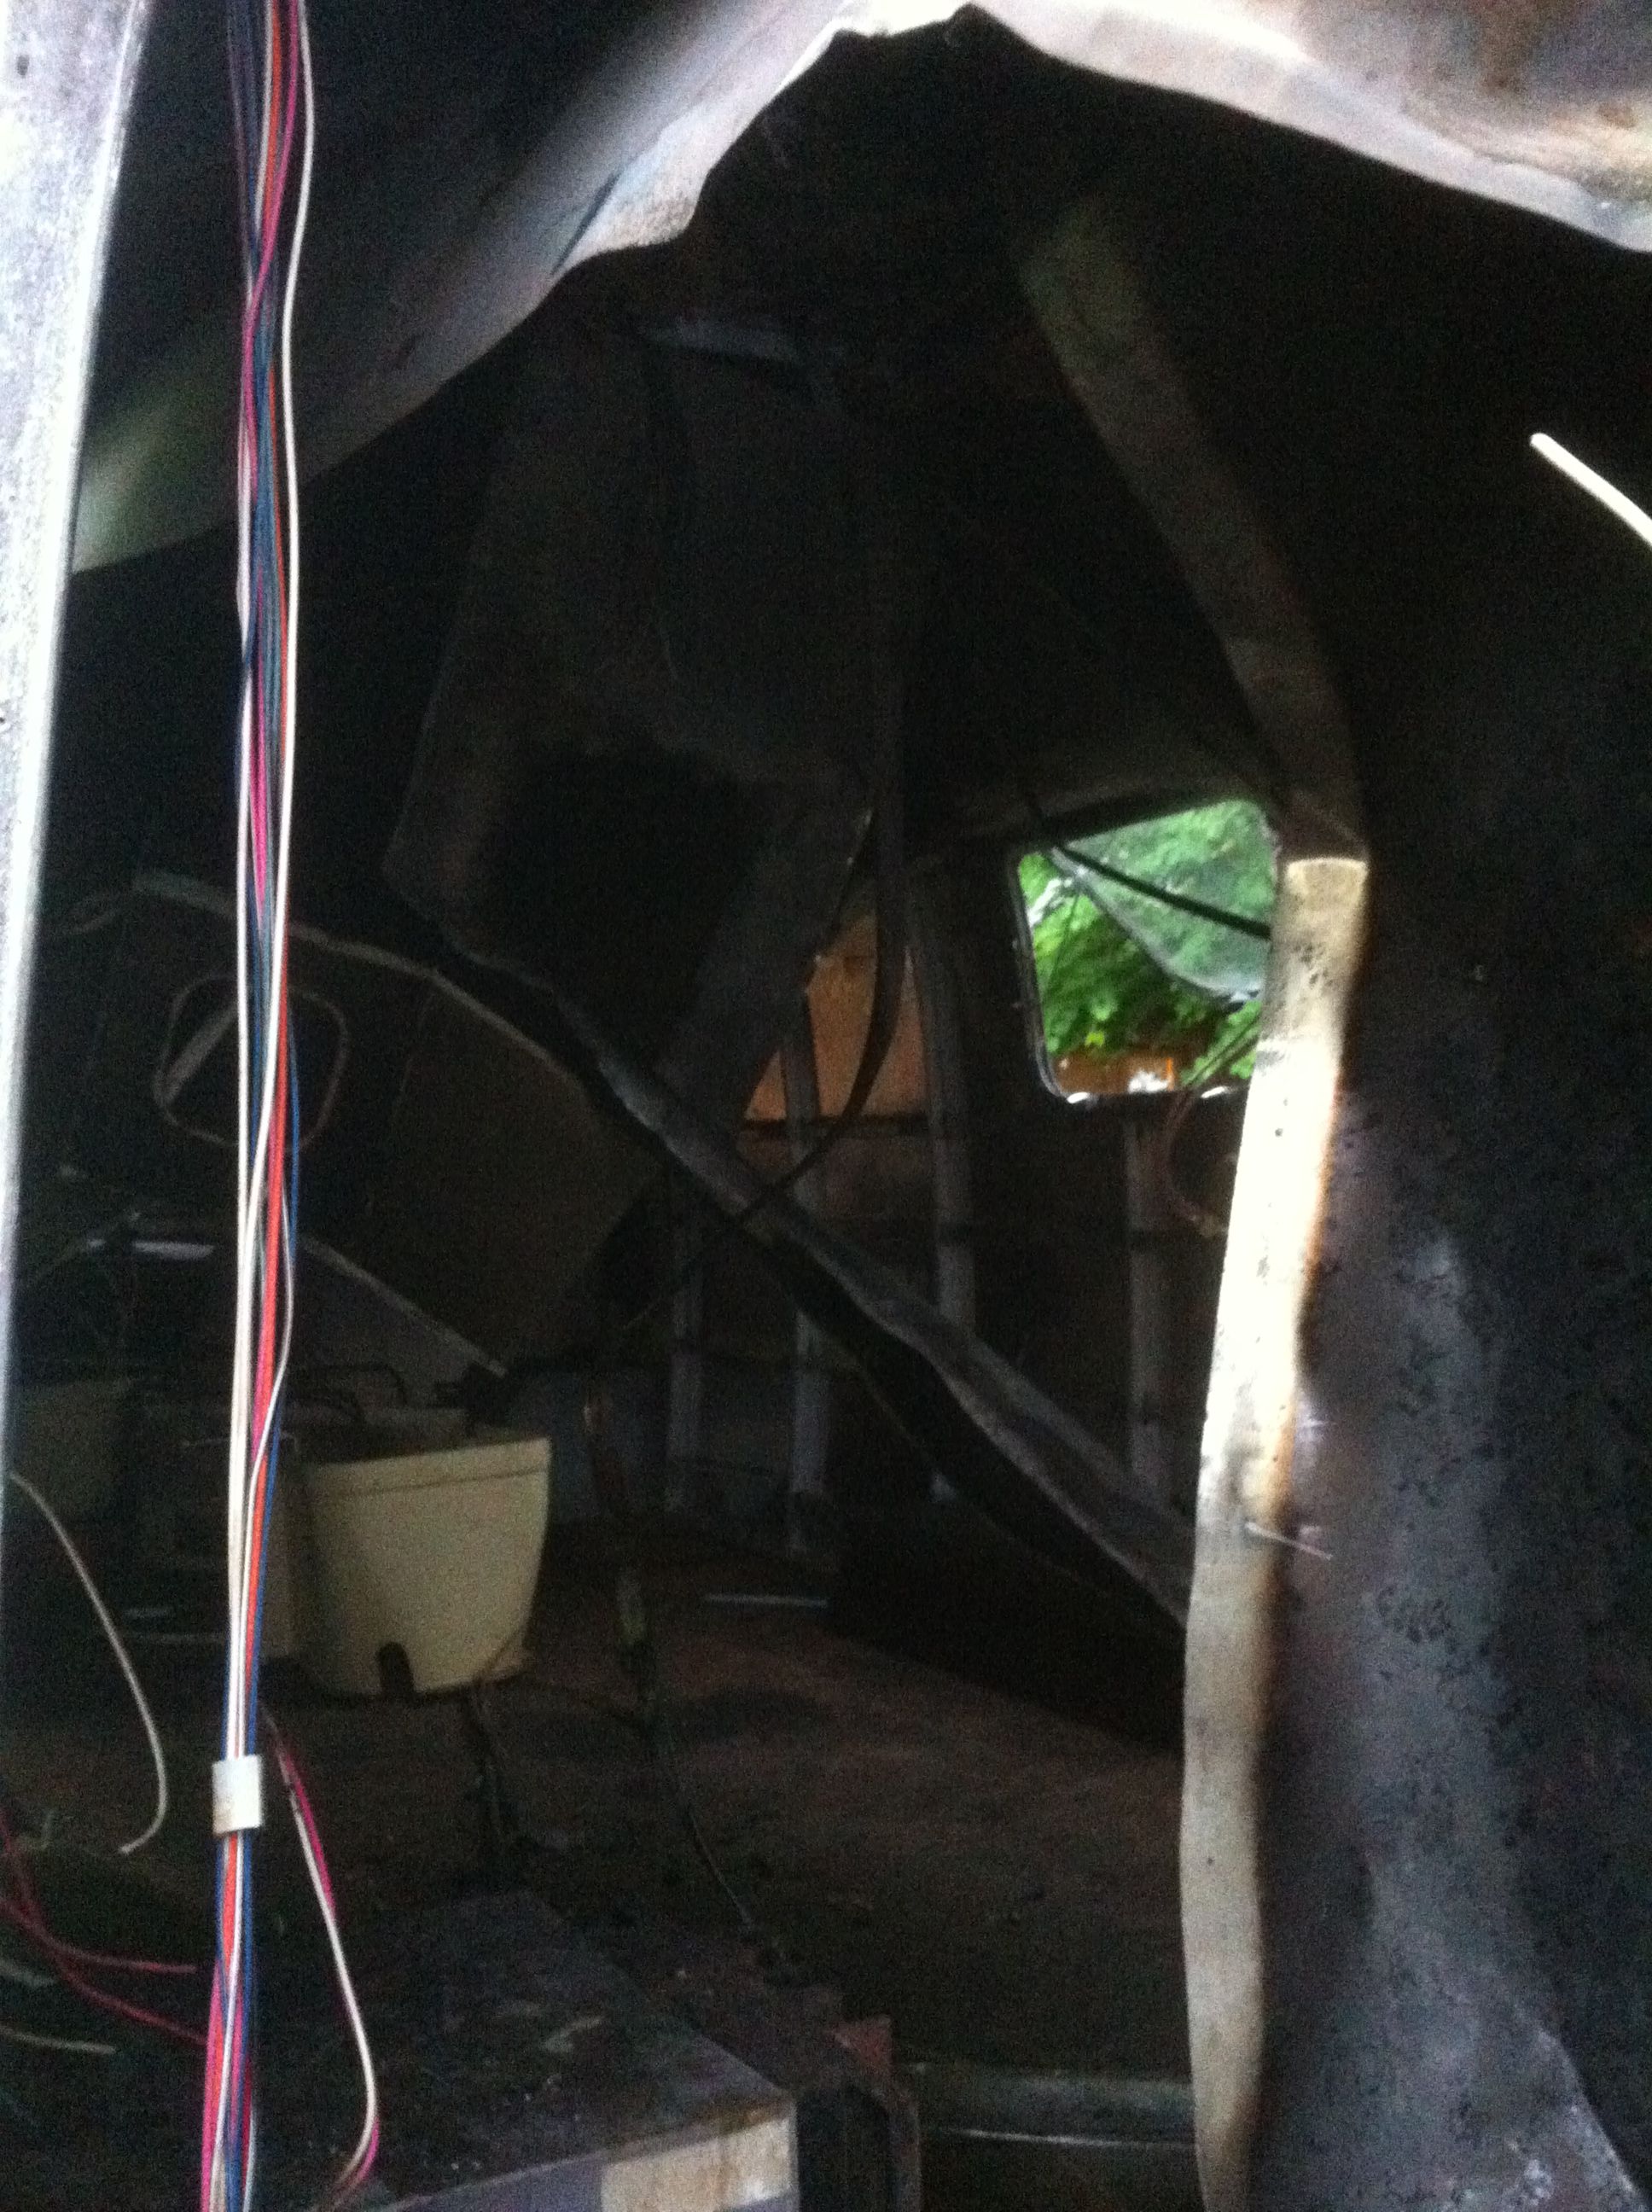 Sometimes your project might look worse before it looks better.  All the large pieces are gone but all of the remaining little insulation particles must be removed too. 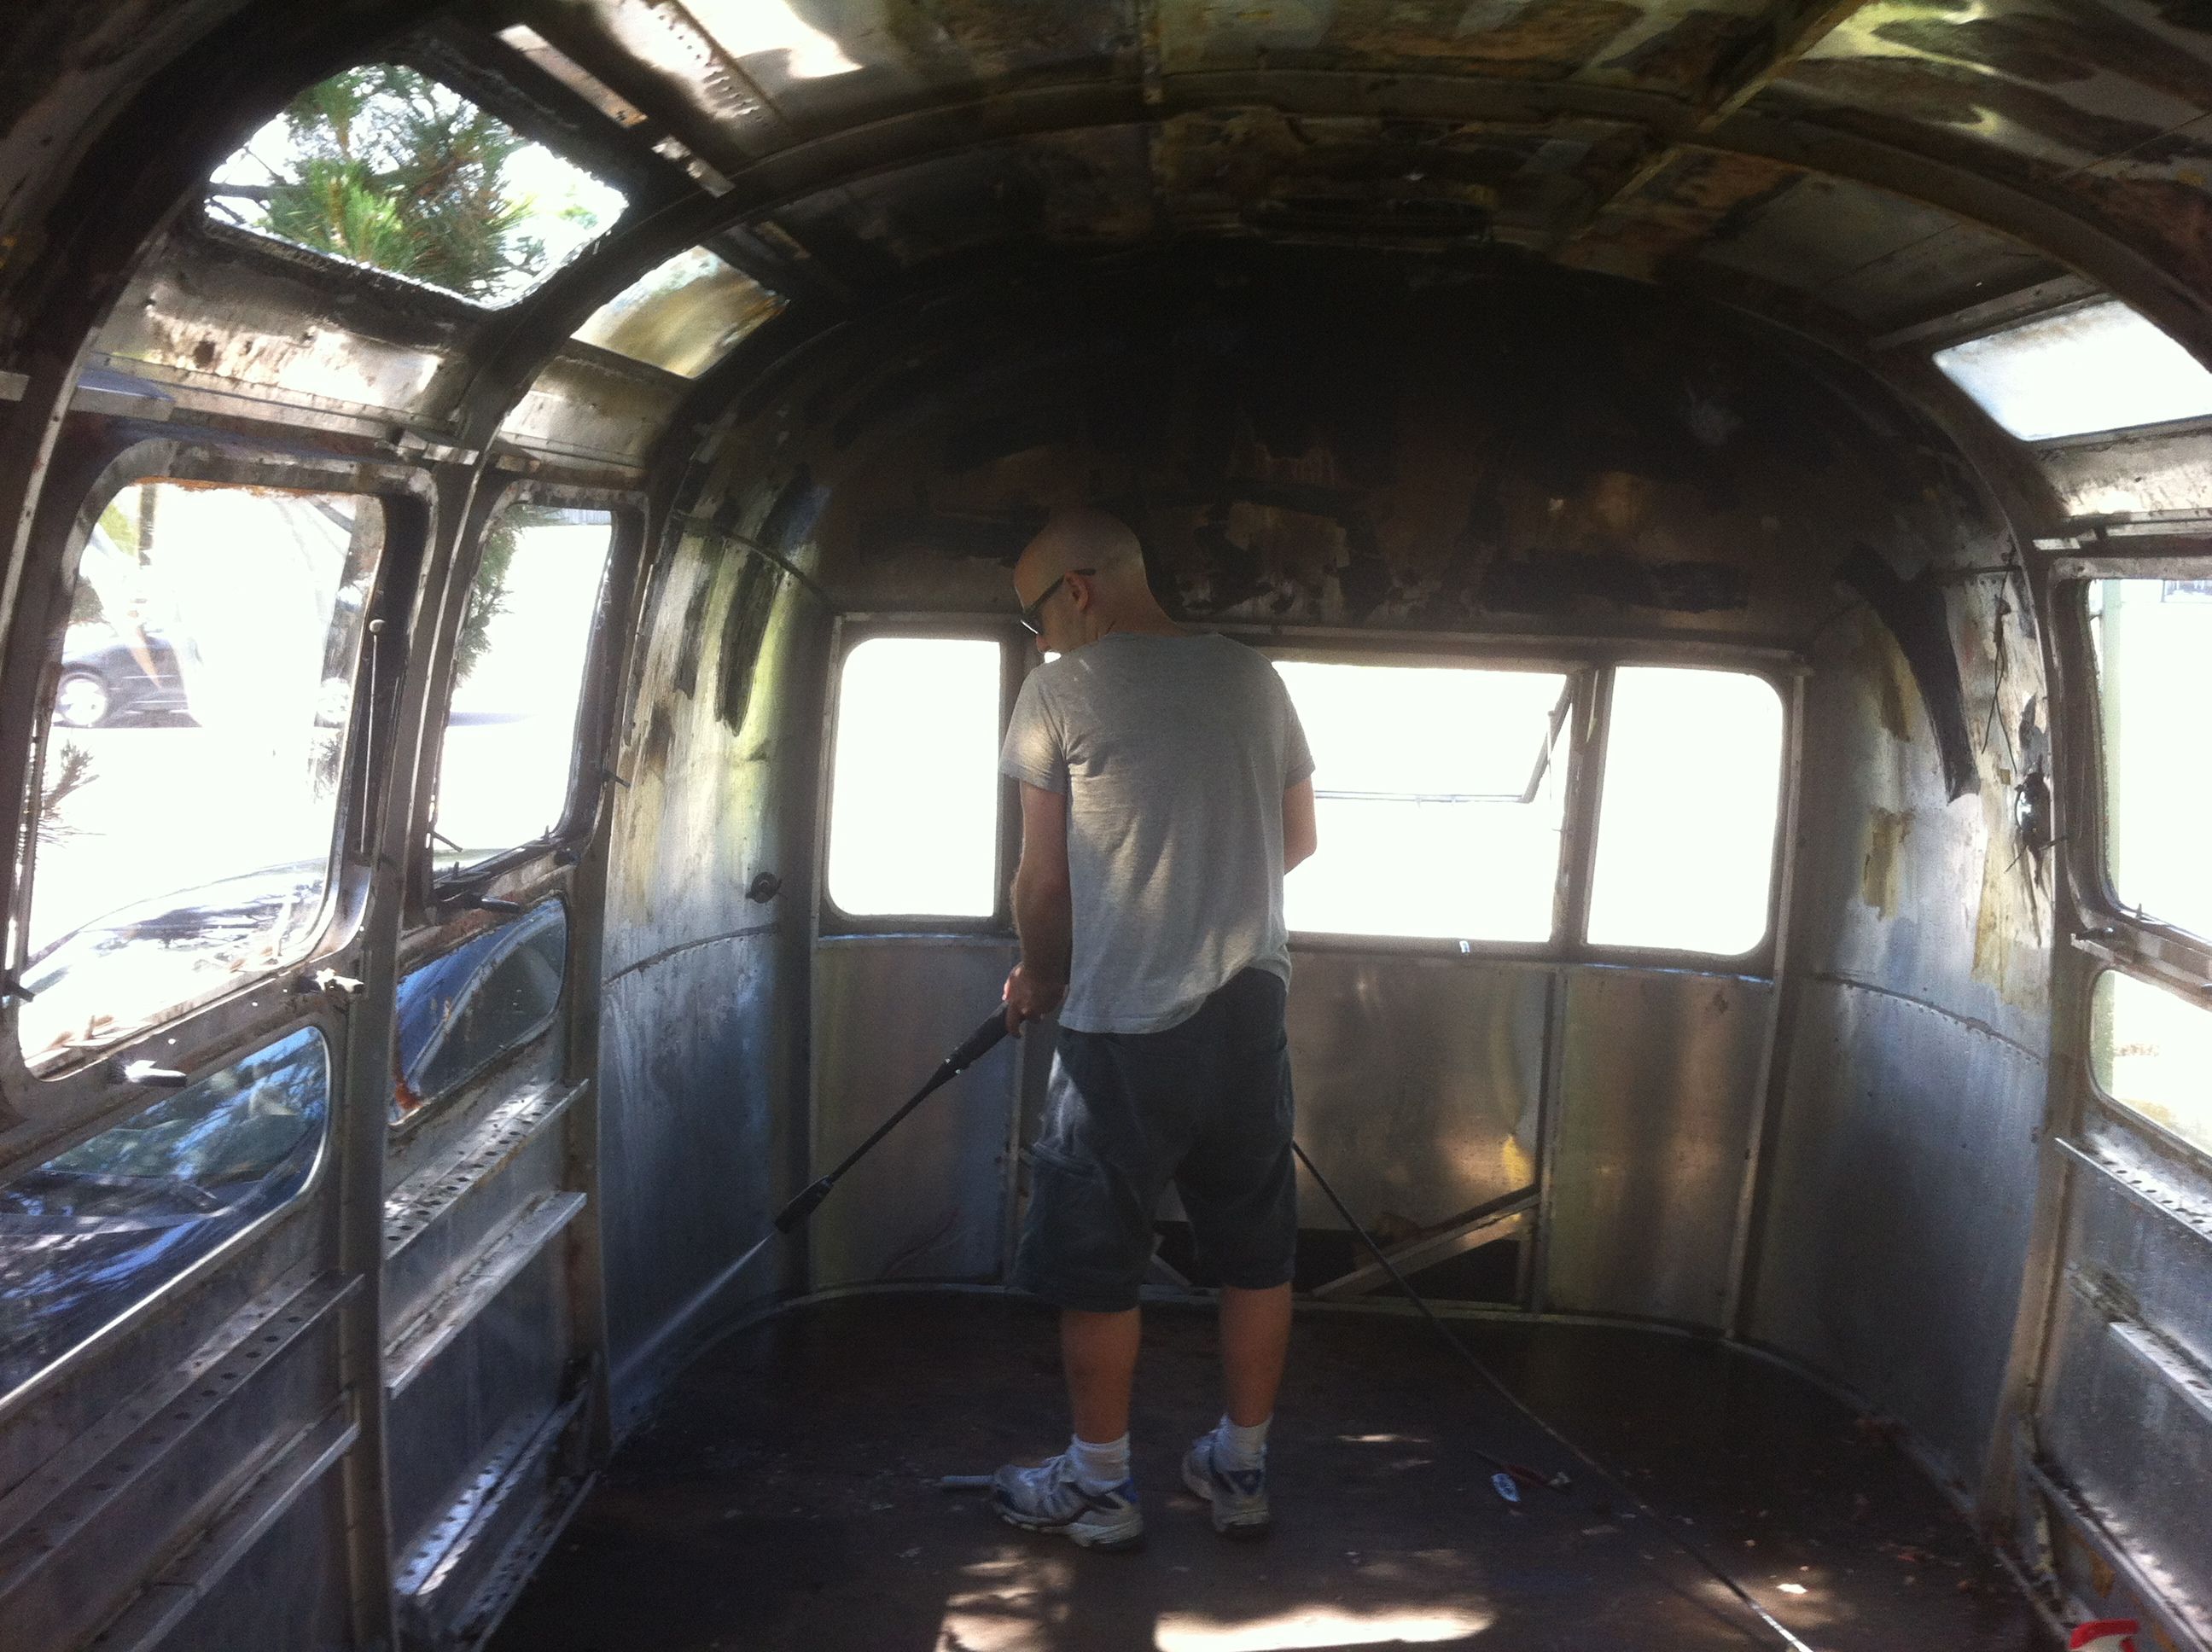 I drilled several holes in the subfloor and removed the belly panels before placing a basin down to collect all the water and insulation and then pressure washed and scrubbed by hand every inch of the interior. Wire brushes work well in hard to reach places but make sure to get every bit of the old insulation out. The entire process of gutting and cleaning took about a week at 4 hours a day and full weekend days. |
| json metadata | {"tags":["airstream","trailer","transporting","vintage","travel"],"image":["https://steemitimages.com/DQmTWnA4gFu6exRV4RFpbs18XJcSzoJGzffXjLu8viUtXDB/screen-shot-2013-07-23-at-2-21-28-pm1.png","https://steemitimages.com/DQmSbp8uXBiqtbcKqkmXURhpJpX2GcPYaKbcGcx5j2xT7pn/june-11-2013-pickup-day-2.jpg","https://steemitimages.com/DQmZ6wARtZ5MgAY1DNrD9bFHbfMV97SCuySTpm3mj6HPBs7/june-11-2013-pickup-day-1.jpg","https://steemitimages.com/DQmTChJkut1xw5HmDTNfGoguq8aNfFMFaekJaFRGjCSEhJV/june-14-2013-3.jpg","https://steemitimages.com/DQmZa1woc47cCN5g6FFtd778iA47UEt8jHP5YRcQJBdQwD2/june-14-2013-2.jpg","https://steemitimages.com/DQmWZw715gpvhZPKxezzGrsKRGCVRBWaCDBVcuiFntPeFXg/june-14-2013-1.jpg","https://steemitimages.com/DQmZXaE9C1nbk1tpyMWVRjE9He1g3swBXky7Gpjoqd6bsuw/june-14-2013.jpg","https://steemitimages.com/DQmSK5hoEnmc1nR7VBnvMXAJZ7WhFfLWdr6yRThWMnqbh91/june-16-2013-1.jpg","https://steemitimages.com/DQmNwErStjiYQmrt27ydGNKd5V7peFjVfnhQF744UfbjycC/june-16-2013-3.jpg","https://steemitimages.com/DQmXFqVczQebxjLi4hyE1idyGFCRBtkkjwrG8qniCY7b343/june-16-2013-4.jpg","https://steemitimages.com/DQmeCqoPtRAjju7fyWSk7ybtUGHYyTKdwJoggVJRP32uE3y/june-16-2013.jpg","https://steemitimages.com/DQmdamz4BTvdgDELeatFHfykKJzf8qhCJJWzBpZYXH4B4gi/img_0533.jpg","https://steemitimages.com/DQmPLJGZRtUmtdyWgJdS3CXfYmTcgpTSPfjt4iEzdDyMaSo/img_0534.jpg","https://steemitimages.com/DQmfMLBqjj6igkRC7gV5Xea2kwPyBuw6nbfdgZs9XHeYVHD/img_0535.jpg","https://steemitimages.com/DQmexVwbnW5ruAEmtexdDuRh7eaaw7m2VhooNHqVFeCKRC9/img_0542.jpg","https://steemitimages.com/DQmbV7jBXmbH85CBhQ2f9hVJZG4i1ADTUyRR3LdQ8Xnnoqz/img_0556.jpg","https://steemitimages.com/DQmT2NhzUBixEsBcoYmVU1ag6PA4GNPJQqiombKgXkcFi4o/img_0560.jpg"],"app":"steemit/0.1","format":"markdown"} |
| Transaction Info | Block #12112116/Trx 158d9cb74d170330c29902937fd0ae0cc0de327d |
View Raw JSON Data
{
"trx_id": "158d9cb74d170330c29902937fd0ae0cc0de327d",
"block": 12112116,
"trx_in_block": 0,
"op_in_trx": 0,
"virtual_op": 0,
"timestamp": "2017-05-21T03:36:00",
"op": [
"comment",
{
"parent_author": "",
"parent_permlink": "airstream",
"author": "mistahlee",
"permlink": "vintage-airstream-travel-trailer-renovation-post-2-preparing-a-vintage-trailer-for-transport-and-gutting-the-interior",
"title": "Vintage Airstream Travel Trailer Renovation: Post 2 - Preparing a Vintage Trailer for Transport & Gutting the Interior",
"body": "A large scale project like this is best broken down into manageable chunks so as to not seem too overwhelming both physically and financially. Since my trailer was purchased online and located in a city about 4 and a half hours away, some preliminary work had to be done in order to make it transportable especially on the major highways that I had to travel on to get it home.\n\nThis trailer had been sitting for about six years prior to me purchasing it and hadn’t done much traveling before that either so the tires were completely shot. In fact the tires that were on it were the original 7.00x15LT tires that have been discontinued. To replace these tires you will need to get ST22575R15 Load range D 6 bolt with a 5 1/2 off centre pattern. In most cases it is a better deal if you get the rims with them too. I was able to purchase each tire and rim for $189.95, but order ahead of time as these are not tires that many places usually keep in stock. Bearings may also have to be replaced, however in my case, just repacked. If your trailer has been sitting for long periods of time, axle replacement may be necessary too. I plan on doing that, but mine were in better than expected condition so I will leave that until next spring and will cover it in the blog then. Below is a photo of the cracked, worn old tire with a rusted rim just prior to replacing it with the new ones.\n\n\n\nMake sure to check the dry weight of your trailer and have a tow vehicle that is capable of that. My car is a Honda Civic and the trailer weight was 4800lbs so there was no way that was going to happen. Fortunately, my friends dad had an F-150 capable of towing over 10,000lbs and he was very generous in lending his time and truck to help me out. That same friends uncle was a mechanic and gave me a great deal on actually accompanying us on the trip to pick it up in order to repack the bearings and replace the tires for the safe trip back. Sometimes these large scale projects require all available resources!\n\n\n\nNew tires & rims on. Check your hitch, make sure the welds are secure. The hitch size is 2 5/16 requiring a 2 inch receiver.\n\n\n\nAbove, the trailer is ready to transport. In our case, all the wires to the taillights were fried so we had to use a set of external tail lights on the back of the trailer and run a very long wire to the F-150. We also had to clear a lot of loose antenna, metal, etc…from the top of the trailer so it didn’t come off on the highway. If your windows are damaged like mine were, remove all the broken glass shards so they too do not hit others on the road when transporting. Make sure all the remaining windows or empty frames are locked so they do not swing loose on the road.\n\nAfter successfully transporting the Airstream home we are ready to begin removing the old interior. We are going to strip it right down to the exterior aluminum walls and rebuild to our custom specifications.\n\n\n\nThe glass will clean up easily enough, however there are some surface smoke marks that escaped an open window. That will be removed with the exterior clearcoat, which will allow us to restore a mirror like shine to the aluminum. Luckily, there is no structural damage or damage to the exterior skin. If there were, that would be an expensive repair as entire panels would have to be replaced.\n\n\n\nAfter giving the exterior a quick hose down and cleaning the interior windows, it already looks better. The interior is another story...\n\n\n\nThose interior door panels will come off and the frame will come up flawlessly with some steel wool.\n\n\n\nStart removing all the loose items. Surprisingly you may not need to rent a disposal bin. I just posted ads on kijiji for free junk pickup, scrap removal etc…and people came within the day to take it away. Note: Your old tires and rims might actually be worth some money! I put a “for free” ad up and had many replies, one person came within 15 minutes and before I could even delete the ad, I had a phone call offering $200 dollars for them despite the unusable condition.\n\n\n\nStart the long process of taking out each rivet with a 1/8 drill bit. Remove sections of the wall but remember, prior to the mid 80’s asbestos was commonly used so wear proper ventilation equipment or better yet, have a professional remove it.\n\n\n\nKeep this stuff off your skin too. Hard to believe this was common in houses, offices, etc…\n\n\n\nThere is our first interior wall panel and insulation removed to expose the exterior shell. That aluminum is in mint condition even after 42 years!\n\n\n\nUnderneath all of those outlets and covers, is the rusty old heater. It is tricky to get out as there are vents connected to the exterior. Remove them carefully so as to not damage anything and make sure propane is safely disconnected before removing. The heater is screwed into the plywood floor in several places and connected to a few hoses too. If you don’t plan on using it again, just cut them out.\n\n\n\nThis part was difficult and I should have planned it out better. There is a center strip of interior wall material running the length of the trailer on the ceiling around the fans, AC unit, etc. It is only about 18 inches wide but on either side there is a very narrow strip of metal that covers all the rivets you need to drill in order to remove that piece. It is very hard to peel back but if you start with that piece instead of the lower walls like I did, I think it would be easier and far less cluttered in your working space. Use a small crowbar or flat screwdriver to create enough space to get your drill bit in there.\n\n\n\nBy removing that one centrepiece I could have avoided having the surrounding ceiling falling on me all the time and having to work around it. That stuff looks pretty flimsy but its actually metal.\n\n\n\nThat black stuff on the walls is glue that held the old insulation in place. Not sure exactly what kind but I’m guessing its pretty bad to breathe even now. Try to remove it.\n\n\n\nSometimes your project might look worse before it looks better.\n\n\n\nAll the large pieces are gone but all of the remaining little insulation particles must be removed too.\n\n\n\nI drilled several holes in the subfloor and removed the belly panels before placing a basin down to collect all the water and insulation and then pressure washed and scrubbed by hand every inch of the interior. Wire brushes work well in hard to reach places but make sure to get every bit of the old insulation out. The entire process of gutting and cleaning took about a week at 4 hours a day and full weekend days.",
"json_metadata": "{\"tags\":[\"airstream\",\"trailer\",\"transporting\",\"vintage\",\"travel\"],\"image\":[\"https://steemitimages.com/DQmTWnA4gFu6exRV4RFpbs18XJcSzoJGzffXjLu8viUtXDB/screen-shot-2013-07-23-at-2-21-28-pm1.png\",\"https://steemitimages.com/DQmSbp8uXBiqtbcKqkmXURhpJpX2GcPYaKbcGcx5j2xT7pn/june-11-2013-pickup-day-2.jpg\",\"https://steemitimages.com/DQmZ6wARtZ5MgAY1DNrD9bFHbfMV97SCuySTpm3mj6HPBs7/june-11-2013-pickup-day-1.jpg\",\"https://steemitimages.com/DQmTChJkut1xw5HmDTNfGoguq8aNfFMFaekJaFRGjCSEhJV/june-14-2013-3.jpg\",\"https://steemitimages.com/DQmZa1woc47cCN5g6FFtd778iA47UEt8jHP5YRcQJBdQwD2/june-14-2013-2.jpg\",\"https://steemitimages.com/DQmWZw715gpvhZPKxezzGrsKRGCVRBWaCDBVcuiFntPeFXg/june-14-2013-1.jpg\",\"https://steemitimages.com/DQmZXaE9C1nbk1tpyMWVRjE9He1g3swBXky7Gpjoqd6bsuw/june-14-2013.jpg\",\"https://steemitimages.com/DQmSK5hoEnmc1nR7VBnvMXAJZ7WhFfLWdr6yRThWMnqbh91/june-16-2013-1.jpg\",\"https://steemitimages.com/DQmNwErStjiYQmrt27ydGNKd5V7peFjVfnhQF744UfbjycC/june-16-2013-3.jpg\",\"https://steemitimages.com/DQmXFqVczQebxjLi4hyE1idyGFCRBtkkjwrG8qniCY7b343/june-16-2013-4.jpg\",\"https://steemitimages.com/DQmeCqoPtRAjju7fyWSk7ybtUGHYyTKdwJoggVJRP32uE3y/june-16-2013.jpg\",\"https://steemitimages.com/DQmdamz4BTvdgDELeatFHfykKJzf8qhCJJWzBpZYXH4B4gi/img_0533.jpg\",\"https://steemitimages.com/DQmPLJGZRtUmtdyWgJdS3CXfYmTcgpTSPfjt4iEzdDyMaSo/img_0534.jpg\",\"https://steemitimages.com/DQmfMLBqjj6igkRC7gV5Xea2kwPyBuw6nbfdgZs9XHeYVHD/img_0535.jpg\",\"https://steemitimages.com/DQmexVwbnW5ruAEmtexdDuRh7eaaw7m2VhooNHqVFeCKRC9/img_0542.jpg\",\"https://steemitimages.com/DQmbV7jBXmbH85CBhQ2f9hVJZG4i1ADTUyRR3LdQ8Xnnoqz/img_0556.jpg\",\"https://steemitimages.com/DQmT2NhzUBixEsBcoYmVU1ag6PA4GNPJQqiombKgXkcFi4o/img_0560.jpg\"],\"app\":\"steemit/0.1\",\"format\":\"markdown\"}"
}
]
}2017/05/16 05:08:42
2017/05/16 05:08:42
| voter | fernandam |
| author | mistahlee |
| permlink | vintage-airstream-travel-trailer-renovation-post-1-before-and-after-pics |
| weight | 10000 (100.00%) |
| Transaction Info | Block #11970027/Trx fabf8fb23ca4143f4bcf958d341ce283bec2b665 |
View Raw JSON Data
{
  "trx_id": "fabf8fb23ca4143f4bcf958d341ce283bec2b665",
  "block": 11970027,
  "trx_in_block": 2,
  "op_in_trx": 0,
  "virtual_op": 0,
  "timestamp": "2017-05-16T05:08:42",
  "op": [
    "vote",
    {
      "voter": "fernandam",
      "author": "mistahlee",
      "permlink": "vintage-airstream-travel-trailer-renovation-post-1-before-and-after-pics",
      "weight": 10000
    }
  ]
}mistahleefollowed @larkenrose2017/05/16 04:55:42
mistahleefollowed @larkenrose
2017/05/16 04:55:42
| required auths | [] |
| required posting auths | ["mistahlee"] |
| id | follow |
| json | ["follow",{"follower":"mistahlee","following":"larkenrose","what":["blog"]}] |
| Transaction Info | Block #11969767/Trx 4dd4c167e58286fc5d07c3bd6f53b32122d0d7de |
View Raw JSON Data
{
  "trx_id": "4dd4c167e58286fc5d07c3bd6f53b32122d0d7de",
  "block": 11969767,
  "trx_in_block": 1,
  "op_in_trx": 0,
  "virtual_op": 0,
  "timestamp": "2017-05-16T04:55:42",
  "op": [
    "custom_json",
    {
      "required_auths": [],
      "required_posting_auths": [
        "mistahlee"
      ],
      "id": "follow",
      "json": "[\"follow\",{\"follower\":\"mistahlee\",\"following\":\"larkenrose\",\"what\":[\"blog\"]}]"
    }
  ]
}2017/05/16 04:53:42
2017/05/16 04:53:42
| voter | sqube |
| author | mistahlee |
| permlink | vintage-airstream-travel-trailer-renovation-post-1-before-and-after-pics |
| weight | 10000 (100.00%) |
| Transaction Info | Block #11969727/Trx 97ab8c55acd00fefc176d614307a3ba9fa099269 |
View Raw JSON Data
{
  "trx_id": "97ab8c55acd00fefc176d614307a3ba9fa099269",
  "block": 11969727,
  "trx_in_block": 6,
  "op_in_trx": 0,
  "virtual_op": 0,
  "timestamp": "2017-05-16T04:53:42",
  "op": [
    "vote",
    {
      "voter": "sqube",
      "author": "mistahlee",
      "permlink": "vintage-airstream-travel-trailer-renovation-post-1-before-and-after-pics",
      "weight": 10000
    }
  ]
}2017/05/16 04:42:42
2017/05/16 04:42:42
| parent author | mistahlee |
| parent permlink | vintage-airstream-travel-trailer-renovation-post-1-before-and-after-pics |
| author | steemitboard |
| permlink | steemitboard-notify-mistahlee-20170516t064226000z |
| title | |
| body | Congratulations @mistahlee! You have completed some achievement on Steemit and have been rewarded with new badge(s) : [](http://steemitboard.com/@mistahlee) You published your First Post [](http://steemitboard.com/@mistahlee) You made your First Vote [](http://steemitboard.com/@mistahlee) You got a First Vote Click on any badge to view your own Board of Honnor on SteemitBoard. For more information about SteemitBoard, click [here](https://steemit.com/steemitboard/@arcange/steemitboard-com-introducing-the-first-steemit-game-experience) If you no longer want to receive notifications, reply to this comment with the word `STOP` If you want to support the SteemitBoard project, your upvote for this notification is welcome! |
| json metadata | {"image":["https://steemitboard.com/img/notifications.png"]} |
| Transaction Info | Block #11969507/Trx 7b4c6090872f8ca406707be337f50de748a94150 |
View Raw JSON Data
{
"trx_id": "7b4c6090872f8ca406707be337f50de748a94150",
"block": 11969507,
"trx_in_block": 2,
"op_in_trx": 0,
"virtual_op": 0,
"timestamp": "2017-05-16T04:42:42",
"op": [
"comment",
{
"parent_author": "mistahlee",
"parent_permlink": "vintage-airstream-travel-trailer-renovation-post-1-before-and-after-pics",
"author": "steemitboard",
"permlink": "steemitboard-notify-mistahlee-20170516t064226000z",
"title": "",
"body": "Congratulations @mistahlee! You have completed some achievement on Steemit and have been rewarded with new badge(s) :\n\n[](http://steemitboard.com/@mistahlee) You published your First Post\n[](http://steemitboard.com/@mistahlee) You made your First Vote\n[](http://steemitboard.com/@mistahlee) You got a First Vote\n\nClick on any badge to view your own Board of Honnor on SteemitBoard.\nFor more information about SteemitBoard, click [here](https://steemit.com/steemitboard/@arcange/steemitboard-com-introducing-the-first-steemit-game-experience)\n\nIf you no longer want to receive notifications, reply to this comment with the word `STOP`\n\nIf you want to support the SteemitBoard project, your upvote for this notification is welcome!",
"json_metadata": "{\"image\":[\"https://steemitboard.com/img/notifications.png\"]}"
}
]
}2017/05/16 04:37:57
2017/05/16 04:37:57
| voter | birrulibmc |
| author | mistahlee |
| permlink | vintage-airstream-travel-trailer-renovation-post-1-before-and-after-pics |
| weight | 10000 (100.00%) |
| Transaction Info | Block #11969412/Trx 48dbb6d88ac2902d1f532e5b44aa46d6f1da9154 |
View Raw JSON Data
{
  "trx_id": "48dbb6d88ac2902d1f532e5b44aa46d6f1da9154",
  "block": 11969412,
  "trx_in_block": 1,
  "op_in_trx": 0,
  "virtual_op": 0,
  "timestamp": "2017-05-16T04:37:57",
  "op": [
    "vote",
    {
      "voter": "birrulibmc",
      "author": "mistahlee",
      "permlink": "vintage-airstream-travel-trailer-renovation-post-1-before-and-after-pics",
      "weight": 10000
    }
  ]
}2017/05/16 04:36:33
2017/05/16 04:36:33
| voter | michelnilles |
| author | mistahlee |
| permlink | vintage-airstream-travel-trailer-renovation-post-1-before-and-after-pics |
| weight | 10000 (100.00%) |
| Transaction Info | Block #11969384/Trx f53cf5ccd2ef25bdaffa58df5625027c1fe1468e |
View Raw JSON Data
{
  "trx_id": "f53cf5ccd2ef25bdaffa58df5625027c1fe1468e",
  "block": 11969384,
  "trx_in_block": 2,
  "op_in_trx": 0,
  "virtual_op": 0,
  "timestamp": "2017-05-16T04:36:33",
  "op": [
    "vote",
    {
      "voter": "michelnilles",
      "author": "mistahlee",
      "permlink": "vintage-airstream-travel-trailer-renovation-post-1-before-and-after-pics",
      "weight": 10000
    }
  ]
}Manabar
Voting Power100.00%
Downvote Power100.00%
Resource Credits100.00%
Reputation Progress36.74%
{
  "voting_manabar": {
    "current_mana": "11406850384",
    "last_update_time": 1741002351
  },
  "downvote_manabar": {
    "current_mana": 2851712596,
    "last_update_time": 1741002351
  },
  "rc_account": {
    "account": "mistahlee",
    "rc_manabar": {
      "current_mana": "13595777469",
      "last_update_time": 1741002351
    },
    "max_rc_creation_adjustment": {
      "amount": "2020748973",
      "precision": 6,
      "nai": "@@000000037"
    },
    "max_rc": "13427599357"
  }
}
Account Metadata
| POSTING JSON METADATA | |
| profile | {"name":"mistah lee"} |
| JSON METADATA | |
| profile | {"name":"mistah lee"} |
{
  "posting_json_metadata": {
    "profile": {
      "name": "mistah lee"
    }
  },
  "json_metadata": {
    "profile": {
      "name": "mistah lee"
    }
  }
}
Auth Keys
Owner
Single Signature
Public Keys
STM8XCH3LnnwKgytk4LPQGaGFqMjJwJphAgm6VQt6MiT2Jqe4dPum1/1
Active
Single Signature
Public Keys
STM6yLE8mQLrAVxzrj53wtWxc6dZrqxtpPs1ftC2VtdWhxuit9hic1/1
Posting
Single Signature
Public Keys
STM7ceaCbZfWqbUkRwCkbrZie7jF6a4fVXQjRdFxGPTAViKGZV2Md1/1
Memo
STM5uHVDHdWpF3mPDn7oC9yagSxqSA6vmc3ooWaFMTCHQQJYg1u8U
{
  "owner": {
    "weight_threshold": 1,
    "account_auths": [],
    "key_auths": [
      [
        "STM8XCH3LnnwKgytk4LPQGaGFqMjJwJphAgm6VQt6MiT2Jqe4dPum",
        1
      ]
    ]
  },
  "active": {
    "weight_threshold": 1,
    "account_auths": [],
    "key_auths": [
      [
        "STM6yLE8mQLrAVxzrj53wtWxc6dZrqxtpPs1ftC2VtdWhxuit9hic",
        1
      ]
    ]
  },
  "posting": {
    "weight_threshold": 1,
    "account_auths": [],
    "key_auths": [
      [
        "STM7ceaCbZfWqbUkRwCkbrZie7jF6a4fVXQjRdFxGPTAViKGZV2Md",
        1
      ]
    ]
  },
  "memo": "STM5uHVDHdWpF3mPDn7oC9yagSxqSA6vmc3ooWaFMTCHQQJYg1u8U"
}
Witness Votes
0 / 30
No active witness votes.
[]