@diyhometalk
42We are creators and you are, too. Join our community of 8 million DIYers and create the home you love.
steemit.com/@diyhometalkVOTING POWER100.00%
DOWNVOTE POWER100.00%
RESOURCE CREDITS100.00%
REPUTATION PROGRESS20.59%
Net Worth
3.488USD
STEEM
0.018STEEM
SBD
6.697SBD
Effective Power
5.779SP
├── Own SP
4.704SP
└── Incoming DelegationsDeleg
+1.075SP
Detailed Balance
| STEEM | ||
| balance | 0.000STEEM | STEEM |
| market_balance | 0.000STEEM | STEEM |
| savings_balance | 0.018STEEM | STEEM |
| reward_steem_balance | 0.000STEEM | STEEM |
| STEEM POWER | ||
| Own SP | 4.704SP | SP |
| Delegated Out | 0.000SP | SP |
| Delegation In | 1.075SP | SP |
| Effective Power | 5.779SP | SP |
| Reward SP (pending) | 0.000SP | SP |
| SBD | ||
| sbd_balance | 0.000SBD | SBD |
| sbd_conversions | 0.000SBD | SBD |
| sbd_market_balance | 0.000SBD | SBD |
| savings_sbd_balance | 6.697SBD | SBD |
| reward_sbd_balance | 0.000SBD | SBD |
{
  "balance": "0.000 STEEM",
  "savings_balance": "0.018 STEEM",
  "reward_steem_balance": "0.000 STEEM",
  "vesting_shares": "7651.308222 VESTS",
  "delegated_vesting_shares": "0.000000 VESTS",
  "received_vesting_shares": "1748.725547 VESTS",
  "sbd_balance": "0.000 SBD",
  "savings_sbd_balance": "6.697 SBD",
  "reward_sbd_balance": "0.000 SBD",
  "conversions": []
}
Account Info
| name | diyhometalk |
| id | 642674 |
| rank | 209,160 |
| reputation | 81613879162 |
| created | 2018-01-23T15:20:42 |
| recovery_account | steem |
| proxy | None |
| post_count | 35 |
| comment_count | 0 |
| lifetime_vote_count | 0 |
| witnesses_voted_for | 0 |
| last_post | 2019-04-11T15:46:39 |
| last_root_post | 2019-04-11T15:46:39 |
| last_vote_time | 2018-04-14T22:06:00 |
| proxied_vsf_votes | 0, 0, 0, 0 |
| can_vote | 1 |
| voting_power | 0 |
| delayed_votes | 0 |
| balance | 0.000 STEEM |
| savings_balance | 0.018 STEEM |
| sbd_balance | 0.000 SBD |
| savings_sbd_balance | 6.697 SBD |
| vesting_shares | 7651.308222 VESTS |
| delegated_vesting_shares | 0.000000 VESTS |
| received_vesting_shares | 1748.725547 VESTS |
| reward_vesting_balance | 0.000000 VESTS |
| vesting_balance | 0.000 STEEM |
| vesting_withdraw_rate | 0.000000 VESTS |
| next_vesting_withdrawal | 1969-12-31T23:59:59 |
| withdrawn | 0 |
| to_withdraw | 0 |
| withdraw_routes | 0 |
| savings_withdraw_requests | 0 |
| last_account_recovery | 1970-01-01T00:00:00 |
| reset_account | null |
| last_owner_update | 1970-01-01T00:00:00 |
| last_account_update | 2018-01-24T06:09:30 |
| mined | No |
| sbd_seconds | 0 |
| sbd_last_interest_payment | 2019-09-08T19:47:39 |
| savings_sbd_last_interest_payment | 1970-01-01T00:00:00 |
{
  "id": 642674,
  "name": "diyhometalk",
  "owner": {
    "weight_threshold": 1,
    "account_auths": [],
    "key_auths": [
      [
        "STM5o7oHDpND6T7yNYrRaxZ638JdeTQe7udzmDvg3vn84f48U9wPm",
        1
      ]
    ]
  },
  "active": {
    "weight_threshold": 1,
    "account_auths": [],
    "key_auths": [
      [
        "STM7cWkRnxLdLAPYKN6e9Wfd4doagsuWRsME9u8A7wiAU3sNRvve6",
        1
      ]
    ]
  },
  "posting": {
    "weight_threshold": 1,
    "account_auths": [
      [
        "dtube.app",
        1
      ]
    ],
    "key_auths": [
      [
        "STM5MTTPuWKqA6xCVZaLdCrs6azT8e8Pb8ecRdbNJQQjxkkj6w8GY",
        1
      ]
    ]
  },
  "memo_key": "STM8EfdzD6e2U52nvDJBDZ96ERt2yF1YADxy9VBQdp5Q75SF1zM1q",
  "json_metadata": "{\"profile\":{\"name\":\"DIY Hometalk\",\"about\":\"We are creators and you are, too. Join our community of 8 million DIYers and create the home you love.\",\"location\":\"USA\",\"website\":\"http://diyhometalk.com/\",\"profile_image\":\"https://instagram.fisb5-1.fna.fbcdn.net/t51.2885-19/s150x150/24332125_507675762923335_5738292606303993856_n.jpg\",\"cover_image\":\"https://www.instagram.com/p/BeUkjizFCl2\"}}",
  "posting_json_metadata": "{\"profile\":{\"name\":\"DIY Hometalk\",\"about\":\"We are creators and you are, too. Join our community of 8 million DIYers and create the home you love.\",\"location\":\"USA\",\"website\":\"http://diyhometalk.com/\",\"profile_image\":\"https://instagram.fisb5-1.fna.fbcdn.net/t51.2885-19/s150x150/24332125_507675762923335_5738292606303993856_n.jpg\",\"cover_image\":\"https://www.instagram.com/p/BeUkjizFCl2\"}}",
  "proxy": "",
  "last_owner_update": "1970-01-01T00:00:00",
  "last_account_update": "2018-01-24T06:09:30",
  "created": "2018-01-23T15:20:42",
  "mined": false,
  "recovery_account": "steem",
  "last_account_recovery": "1970-01-01T00:00:00",
  "reset_account": "null",
  "comment_count": 0,
  "lifetime_vote_count": 0,
  "post_count": 35,
  "can_vote": true,
  "voting_manabar": {
    "current_mana": "9400033769",
    "last_update_time": 1695330018
  },
  "downvote_manabar": {
    "current_mana": 2350008442,
    "last_update_time": 1695330018
  },
  "voting_power": 0,
  "balance": "0.000 STEEM",
  "savings_balance": "0.018 STEEM",
  "sbd_balance": "0.000 SBD",
  "sbd_seconds": "0",
  "sbd_seconds_last_update": "2019-09-08T19:47:39",
  "sbd_last_interest_payment": "2019-09-08T19:47:39",
  "savings_sbd_balance": "6.697 SBD",
  "savings_sbd_seconds": "0",
  "savings_sbd_seconds_last_update": "2019-09-08T19:47:39",
  "savings_sbd_last_interest_payment": "1970-01-01T00:00:00",
  "savings_withdraw_requests": 0,
  "reward_sbd_balance": "0.000 SBD",
  "reward_steem_balance": "0.000 STEEM",
  "reward_vesting_balance": "0.000000 VESTS",
  "reward_vesting_steem": "0.000 STEEM",
  "vesting_shares": "7651.308222 VESTS",
  "delegated_vesting_shares": "0.000000 VESTS",
  "received_vesting_shares": "1748.725547 VESTS",
  "vesting_withdraw_rate": "0.000000 VESTS",
  "next_vesting_withdrawal": "1969-12-31T23:59:59",
  "withdrawn": 0,
  "to_withdraw": 0,
  "withdraw_routes": 0,
  "curation_rewards": 0,
  "posting_rewards": 6488,
  "proxied_vsf_votes": [
    0,
    0,
    0,
    0
  ],
  "witnesses_voted_for": 0,
  "last_post": "2019-04-11T15:46:39",
  "last_root_post": "2019-04-11T15:46:39",
  "last_vote_time": "2018-04-14T22:06:00",
  "post_bandwidth": 0,
  "pending_claimed_accounts": 0,
  "vesting_balance": "0.000 STEEM",
  "reputation": "81613879162",
  "transfer_history": [],
  "market_history": [],
  "post_history": [],
  "vote_history": [],
  "other_history": [],
  "witness_votes": [],
  "tags_usage": [],
  "guest_bloggers": [],
  "rank": 209160
}
Withdraw Routes
| Incoming | Outgoing |
|---|---|
Empty | Empty |
{
  "incoming": [],
  "outgoing": []
}From Date
To Date
southcidereplied to @diyhometalk / s2n1a02023/10/16 20:08:27
southcidereplied to @diyhometalk / s2n1a0
2023/10/16 20:08:27
| parent author | diyhometalk |
| parent permlink | diy-farmhouse-kitchen-makeover-for-usd5000-including-appliances |
| author | southcide |
| permlink | s2n1a0 |
| title | |
| body | Howdy! From washing machines to refrigerators and microwave ovens, home appliances make our daily work easier and contribute to a more efficient lifestyle. Among the large number of companies that provide household appliances, LG Electronics is the undoubted leader due to its reliability. When you use their devices, you can be sure of their long-term performance, and if any device breaks down, you can call [lg electronics customer service number](https://lg-electronics.pissedconsumer.com/customer-service.html) and they will definitely help with its repair. |
| json metadata | {"links":["https://lg-electronics.pissedconsumer.com/customer-service.html"],"app":"steemit/0.2"} |
| Transaction Info | Block #79054869/Trx c954de3236c6a2263f2a8f4ce0d05e47506b97c1 |
View Raw JSON Data
{
  "trx_id": "c954de3236c6a2263f2a8f4ce0d05e47506b97c1",
  "block": 79054869,
  "trx_in_block": 0,
  "op_in_trx": 0,
  "virtual_op": 0,
  "timestamp": "2023-10-16T20:08:27",
  "op": [
    "comment",
    {
      "parent_author": "diyhometalk",
      "parent_permlink": "diy-farmhouse-kitchen-makeover-for-usd5000-including-appliances",
      "author": "southcide",
      "permlink": "s2n1a0",
      "title": "",
      "body": "Howdy! From washing machines to refrigerators and microwave ovens, home appliances make our daily work easier and contribute to a more efficient lifestyle. Among the large number of companies that provide household appliances, LG Electronics is the undoubted leader due to its reliability. When you use their devices, you can be sure of their long-term performance, and if any device breaks down, you can call [lg electronics customer service number](https://lg-electronics.pissedconsumer.com/customer-service.html) and they will definitely help with its repair.",
      "json_metadata": "{\"links\":[\"https://lg-electronics.pissedconsumer.com/customer-service.html\"],\"app\":\"steemit/0.2\"}"
    }
  ]
}steemdelegated 1.075 SP to @diyhometalk2023/09/21 21:00:18
steemdelegated 1.075 SP to @diyhometalk
2023/09/21 21:00:18
| delegator | steem |
| delegatee | diyhometalk |
| vesting shares | 1748.725547 VESTS |
| Transaction Info | Block #78346840/Trx b27a43750013b39b63afb20caf9d681fd34b3bfd |
View Raw JSON Data
{
  "trx_id": "b27a43750013b39b63afb20caf9d681fd34b3bfd",
  "block": 78346840,
  "trx_in_block": 2,
  "op_in_trx": 0,
  "virtual_op": 0,
  "timestamp": "2023-09-21T21:00:18",
  "op": [
    "delegate_vesting_shares",
    {
      "delegator": "steem",
      "delegatee": "diyhometalk",
      "vesting_shares": "1748.725547 VESTS"
    }
  ]
}steemdelegated 1.201 SP to @diyhometalk2020/05/08 08:35:00
steemdelegated 1.201 SP to @diyhometalk
2020/05/08 08:35:00
| delegator | steem |
| delegatee | diyhometalk |
| vesting shares | 1953.311140 VESTS |
| Transaction Info | Block #43192245/Trx ae03dac2d739ecb36bc5a49b3a4958665c4ec776 |
View Raw JSON Data
{
  "trx_id": "ae03dac2d739ecb36bc5a49b3a4958665c4ec776",
  "block": 43192245,
  "trx_in_block": 12,
  "op_in_trx": 0,
  "virtual_op": 0,
  "timestamp": "2020-05-08T08:35:00",
  "op": [
    "delegate_vesting_shares",
    {
      "delegator": "steem",
      "delegatee": "diyhometalk",
      "vesting_shares": "1953.311140 VESTS"
    }
  ]
}2020/01/23 16:53:51
2020/01/23 16:53:51
| parent author | diyhometalk |
| parent permlink | diy-marbled-resin-coffee-table |
| author | steemitboard |
| permlink | steemitboard-notify-diyhometalk-20200123t165350000z |
| title | |
| body | Congratulations @diyhometalk! You received a personal award! <table><tr><td>https://steemitimages.com/70x70/http://steemitboard.com/@diyhometalk/birthday2.png</td><td>Happy Birthday! - You are on the Steem blockchain for 2 years!</td></tr></table> <sub>_You can view [your badges on your Steem Board](https://steemitboard.com/@diyhometalk) and compare to others on the [Steem Ranking](https://steemitboard.com/ranking/index.php?name=diyhometalk)_</sub> ###### [Vote for @Steemitboard as a witness](https://v2.steemconnect.com/sign/account-witness-vote?witness=steemitboard&approve=1) to get one more award and increased upvotes! |
| json metadata | {"image":["https://steemitboard.com/img/notify.png"]} |
| Transaction Info | Block #40184947/Trx 689fea7e301cb66013cfeb159d2966cc6935d361 |
View Raw JSON Data
{
  "trx_id": "689fea7e301cb66013cfeb159d2966cc6935d361",
  "block": 40184947,
  "trx_in_block": 8,
  "op_in_trx": 0,
  "virtual_op": 0,
  "timestamp": "2020-01-23T16:53:51",
  "op": [
    "comment",
    {
      "parent_author": "diyhometalk",
      "parent_permlink": "diy-marbled-resin-coffee-table",
      "author": "steemitboard",
      "permlink": "steemitboard-notify-diyhometalk-20200123t165350000z",
      "title": "",
      "body": "Congratulations @diyhometalk! You received a personal award!\n\n<table><tr><td>https://steemitimages.com/70x70/http://steemitboard.com/@diyhometalk/birthday2.png</td><td>Happy Birthday! - You are on the Steem blockchain for 2 years!</td></tr></table>\n\n<sub>_You can view [your badges on your Steem Board](https://steemitboard.com/@diyhometalk) and compare to others on the [Steem Ranking](https://steemitboard.com/ranking/index.php?name=diyhometalk)_</sub>\n\n\n###### [Vote for @Steemitboard as a witness](https://v2.steemconnect.com/sign/account-witness-vote?witness=steemitboard&approve=1) to get one more award and increased upvotes!",
      "json_metadata": "{\"image\":[\"https://steemitboard.com/img/notify.png\"]}"
    }
  ]
}diyhometalkblockchain operation: transfer to savings2019/09/08 19:48:15
diyhometalkblockchain operation: transfer to savings
2019/09/08 19:48:15
| from | diyhometalk |
| to | diyhometalk |
| amount | 0.018 STEEM |
| memo | |
| Transaction Info | Block #36250751/Trx ea6eff22838487654f9d03c03d855da1f3ff8ef5 |
View Raw JSON Data
{
  "trx_id": "ea6eff22838487654f9d03c03d855da1f3ff8ef5",
  "block": 36250751,
  "trx_in_block": 0,
  "op_in_trx": 0,
  "virtual_op": 0,
  "timestamp": "2019-09-08T19:48:15",
  "op": [
    "transfer_to_savings",
    {
      "from": "diyhometalk",
      "to": "diyhometalk",
      "amount": "0.018 STEEM",
      "memo": ""
    }
  ]
}diyhometalkblockchain operation: transfer to savings2019/09/08 19:47:39
diyhometalkblockchain operation: transfer to savings
2019/09/08 19:47:39
| from | diyhometalk |
| to | diyhometalk |
| amount | 6.697 SBD |
| memo | |
| Transaction Info | Block #36250739/Trx e22e0e56c32a4ecbe3acc58119bf660a65f7a491 |
View Raw JSON Data
{
  "trx_id": "e22e0e56c32a4ecbe3acc58119bf660a65f7a491",
  "block": 36250739,
  "trx_in_block": 52,
  "op_in_trx": 0,
  "virtual_op": 0,
  "timestamp": "2019-09-08T19:47:39",
  "op": [
    "transfer_to_savings",
    {
      "from": "diyhometalk",
      "to": "diyhometalk",
      "amount": "6.697 SBD",
      "memo": ""
    }
  ]
}steemdelegated 1.407 SP to @diyhometalk2019/07/11 17:37:06
steemdelegated 1.407 SP to @diyhometalk
2019/07/11 17:37:06
| delegator | steem |
| delegatee | diyhometalk |
| vesting shares | 2288.384586 VESTS |
| Transaction Info | Block #34574663/Trx b408c7b6516b509bf02fdfdcfcc294a191840bb9 |
View Raw JSON Data
{
  "trx_id": "b408c7b6516b509bf02fdfdcfcc294a191840bb9",
  "block": 34574663,
  "trx_in_block": 25,
  "op_in_trx": 0,
  "virtual_op": 0,
  "timestamp": "2019-07-11T17:37:06",
  "op": [
    "delegate_vesting_shares",
    {
      "delegator": "steem",
      "delegatee": "diyhometalk",
      "vesting_shares": "2288.384586 VESTS"
    }
  ]
}steemdelegated 13.727 SP to @diyhometalk2019/04/11 16:31:51
steemdelegated 13.727 SP to @diyhometalk
2019/04/11 16:31:51
| delegator | steem |
| delegatee | diyhometalk |
| vesting shares | 22326.582639 VESTS |
| Transaction Info | Block #31956346/Trx 090004de503395957b790be12c1ae6de51234f58 |
View Raw JSON Data
{
  "trx_id": "090004de503395957b790be12c1ae6de51234f58",
  "block": 31956346,
  "trx_in_block": 28,
  "op_in_trx": 0,
  "virtual_op": 0,
  "timestamp": "2019-04-11T16:31:51",
  "op": [
    "delegate_vesting_shares",
    {
      "delegator": "steem",
      "delegatee": "diyhometalk",
      "vesting_shares": "22326.582639 VESTS"
    }
  ]
}2019/04/11 15:46:54
2019/04/11 15:46:54
| parent author | diyhometalk |
| parent permlink | diy-marbled-resin-coffee-table |
| author | cheetah |
| permlink | cheetah-re-diyhometalkdiy-marbled-resin-coffee-table |
| title | |
| body | Hi! I am a robot. I just upvoted you! I found similar content that readers might be interested in: https://www.deliciousanddiy.com/diy-marbled-resin-coffee-table/ |
| json metadata | |
| Transaction Info | Block #31955448/Trx 276b9f79244b9bbb631fe4e2f58454462440b16e |
View Raw JSON Data
{
  "trx_id": "276b9f79244b9bbb631fe4e2f58454462440b16e",
  "block": 31955448,
  "trx_in_block": 24,
  "op_in_trx": 0,
  "virtual_op": 0,
  "timestamp": "2019-04-11T15:46:54",
  "op": [
    "comment",
    {
      "parent_author": "diyhometalk",
      "parent_permlink": "diy-marbled-resin-coffee-table",
      "author": "cheetah",
      "permlink": "cheetah-re-diyhometalkdiy-marbled-resin-coffee-table",
      "title": "",
      "body": "Hi! I am a robot. I just upvoted you! I found similar content that readers might be interested in:\nhttps://www.deliciousanddiy.com/diy-marbled-resin-coffee-table/",
      "json_metadata": ""
    }
  ]
}cheetahupvoted (0.08%) @diyhometalk / diy-marbled-resin-coffee-table2019/04/11 15:46:51
cheetahupvoted (0.08%) @diyhometalk / diy-marbled-resin-coffee-table
2019/04/11 15:46:51
| voter | cheetah |
| author | diyhometalk |
| permlink | diy-marbled-resin-coffee-table |
| weight | 8 (0.08%) |
| Transaction Info | Block #31955447/Trx 5b9902869d815c7bb9458fc4ca52369cd00f58ee |
View Raw JSON Data
{
  "trx_id": "5b9902869d815c7bb9458fc4ca52369cd00f58ee",
  "block": 31955447,
  "trx_in_block": 28,
  "op_in_trx": 0,
  "virtual_op": 0,
  "timestamp": "2019-04-11T15:46:51",
  "op": [
    "vote",
    {
      "voter": "cheetah",
      "author": "diyhometalk",
      "permlink": "diy-marbled-resin-coffee-table",
      "weight": 8
    }
  ]
}diyhometalkpublished a new post: diy-marbled-resin-coffee-table2019/04/11 15:46:39
diyhometalkpublished a new post: diy-marbled-resin-coffee-table
2019/04/11 15:46:39
| parent author | |
| parent permlink | coffee |
| author | diyhometalk |
| permlink | diy-marbled-resin-coffee-table |
| title | DIY Marbled Resin Coffee Table |
| body | You guys I have been waiting to share with you my Coffee Table which I made with my own Two Hands okay not really Two maybe Four as I needed a little help from the husband.I still can’t believe it is completed, not because it was complicated to make or anything but it had a lot of steps that had to be done before I could move onto the next. A lot of waiting games had to be played.  I ordered a wooden pieces in the size 2ft by 4ft, 3/4 inch thickness as I knew I would make it into a coffee table. .jpg) I stumbled upon these beautiful Agate Crystal Slices and from that point onwards I knew I had to incorporate it in my design someway somehow. .jpg) So I decided on a creating a Marbled Pattern. The top of the table was going to be split in three parts. Two of the sides would have the Marbled Patten and in the middle I would showcase the Agate Slices. I taped off the middle completely with masking tape so I could work on the Marbling without having to worry about the paint staining the centre. Then I poured each paint one by one and moved the wood panel around to create the Marbled design. .jpg) When the paint had dried, I glued on the Agate Slices and topped off the entire table with Resin. I had to wait In between adding the resin layers as it needed about three coats in total. .jpg) To finish off the sides of the table I attached wood pieces on all four sides of 3/4 inch thickness.I stained the wood pieces first using a dark wood coloured stain. When it was dry I screwed it into the sides of the coffee table. .jpg) The last step was to attach the hairpin legs which is really easy to do as you just flip the table and screw in the legs. Here is the final result. .jpg) .jpg) |
| json metadata | {"tags":["coffee","tables","living","room","furnish"],"image":["https://cdn.steemitimages.com/DQmeuRckvVA47ghb58VgigHMFoVYeA1SAhuhR2tVgYKsLuc/diy-marbled-resin-coffee-table.jpg","https://cdn.steemitimages.com/DQmct89SRqexmksnEorgusrRPisB1MfkekgkaZ3DJPxpB1o/diy-marbled-resin-coffee-table%20(2).jpg","https://cdn.steemitimages.com/DQmVgtUDmqzcsbHzaya6M7FbfdXGJtw3nNjbPj151oz1Vye/diy-marbled-resin-coffee-table%20(3).jpg","https://cdn.steemitimages.com/DQme5ykSUpKWmanF2A1E7WGPfhh8UXewXWLMshKkwfpXrAC/diy-marbled-resin-coffee-table%20(4).jpg","https://cdn.steemitimages.com/DQmR5dvMMCVBBS78kzng3GqEfyd1eW4cJzcJjLjaVKP77YH/diy-marbled-resin-coffee-table%20(5).jpg","https://cdn.steemitimages.com/DQmV2nESEoHNFLA4X9FzeQG5k7uxuZKzw2FPKBapVbcHyq2/diy-marbled-resin-coffee-table%20(6).jpg","https://cdn.steemitimages.com/DQmUW8N3DYdTwNnRqk6wjdQ2Sa82n9Dejwtzqf2i2erGAZc/diy-marbled-resin-coffee-table%20(7).jpg","https://cdn.steemitimages.com/DQmUW8N3DYdTwNnRqk6wjdQ2Sa82n9Dejwtzqf2i2erGAZc/diy-marbled-resin-coffee-table%20(8).jpg"],"app":"steemit/0.1","format":"markdown"} |
| Transaction Info | Block #31955443/Trx 20afe665605d1aeb7c260d5c275a51607df502bb |
View Raw JSON Data
{
"trx_id": "20afe665605d1aeb7c260d5c275a51607df502bb",
"block": 31955443,
"trx_in_block": 0,
"op_in_trx": 0,
"virtual_op": 0,
"timestamp": "2019-04-11T15:46:39",
"op": [
"comment",
{
"parent_author": "",
"parent_permlink": "coffee",
"author": "diyhometalk",
"permlink": "diy-marbled-resin-coffee-table",
"title": "DIY Marbled Resin Coffee Table",
"body": "You guys I have been waiting to share with you my Coffee Table which I made with my own Two Hands okay not really Two maybe Four as I needed a little help from the husband.I still can’t believe it is completed, not because it was complicated to make or anything but it had a lot of steps that had to be done before I could move onto the next. A lot of waiting games had to be played.\n\nI ordered a wooden pieces in the size 2ft by 4ft, 3/4 inch thickness as I knew I would make it into a coffee table.\n.jpg)\nI stumbled upon these beautiful Agate Crystal Slices and from that point onwards I knew I had to incorporate it in my design someway somehow.\n.jpg)\nSo I decided on a creating a Marbled Pattern. The top of the table was going to be split in three parts. Two of the sides would have the Marbled Patten and in the middle I would showcase the Agate Slices.\n\nI taped off the middle completely with masking tape so I could work on the Marbling without having to worry about the paint staining the centre.\n\nThen I poured each paint one by one and moved the wood panel around to create the Marbled design.\n.jpg)\nWhen the paint had dried, I glued on the Agate Slices and topped off the entire table with Resin.\n\nI had to wait In between adding the resin layers as it needed about three coats in total.\n.jpg)\nTo finish off the sides of the table I attached wood pieces on all four sides of 3/4 inch thickness.I stained the wood pieces first using a dark wood coloured stain. When it was dry I screwed it into the sides of the coffee table.\n.jpg)\nThe last step was to attach the hairpin legs which is really easy to do as you just flip the table and screw in the legs.\n\nHere is the final result.\n.jpg)\n.jpg)",
"json_metadata": "{\"tags\":[\"coffee\",\"tables\",\"living\",\"room\",\"furnish\"],\"image\":[\"https://cdn.steemitimages.com/DQmeuRckvVA47ghb58VgigHMFoVYeA1SAhuhR2tVgYKsLuc/diy-marbled-resin-coffee-table.jpg\",\"https://cdn.steemitimages.com/DQmct89SRqexmksnEorgusrRPisB1MfkekgkaZ3DJPxpB1o/diy-marbled-resin-coffee-table%20(2).jpg\",\"https://cdn.steemitimages.com/DQmVgtUDmqzcsbHzaya6M7FbfdXGJtw3nNjbPj151oz1Vye/diy-marbled-resin-coffee-table%20(3).jpg\",\"https://cdn.steemitimages.com/DQme5ykSUpKWmanF2A1E7WGPfhh8UXewXWLMshKkwfpXrAC/diy-marbled-resin-coffee-table%20(4).jpg\",\"https://cdn.steemitimages.com/DQmR5dvMMCVBBS78kzng3GqEfyd1eW4cJzcJjLjaVKP77YH/diy-marbled-resin-coffee-table%20(5).jpg\",\"https://cdn.steemitimages.com/DQmV2nESEoHNFLA4X9FzeQG5k7uxuZKzw2FPKBapVbcHyq2/diy-marbled-resin-coffee-table%20(6).jpg\",\"https://cdn.steemitimages.com/DQmUW8N3DYdTwNnRqk6wjdQ2Sa82n9Dejwtzqf2i2erGAZc/diy-marbled-resin-coffee-table%20(7).jpg\",\"https://cdn.steemitimages.com/DQmUW8N3DYdTwNnRqk6wjdQ2Sa82n9Dejwtzqf2i2erGAZc/diy-marbled-resin-coffee-table%20(8).jpg\"],\"app\":\"steemit/0.1\",\"format\":\"markdown\"}"
}
]
}2019/02/01 03:51:48
2019/02/01 03:51:48
| parent author | diyhometalk |
| parent permlink | diy-farmhouse-kitchen-makeover-for-usd5000-including-appliances |
| author | darkstyrm |
| permlink | re-diyhometalk-diy-farmhouse-kitchen-makeover-for-usd5000-including-appliances-20190201t035148493z |
| title | |
| body | That is a very nice make over.. I love the way it turned out! |
| json metadata | {"tags":["diy"],"app":"steemit/0.1"} |
| Transaction Info | Block #29955742/Trx ecace7ace88ecf93d5e13dc4a1b5aeb0338091f9 |
View Raw JSON Data
{
  "trx_id": "ecace7ace88ecf93d5e13dc4a1b5aeb0338091f9",
  "block": 29955742,
  "trx_in_block": 11,
  "op_in_trx": 0,
  "virtual_op": 0,
  "timestamp": "2019-02-01T03:51:48",
  "op": [
    "comment",
    {
      "parent_author": "diyhometalk",
      "parent_permlink": "diy-farmhouse-kitchen-makeover-for-usd5000-including-appliances",
      "author": "darkstyrm",
      "permlink": "re-diyhometalk-diy-farmhouse-kitchen-makeover-for-usd5000-including-appliances-20190201t035148493z",
      "title": "",
      "body": "That is a very nice make over.. I love the way it turned out!",
      "json_metadata": "{\"tags\":[\"diy\"],\"app\":\"steemit/0.1\"}"
    }
  ]
}darkstyrmupvoted (100.00%) @diyhometalk / diy-farmhouse-kitchen-makeover-for-usd5000-including-appliances2019/02/01 03:51:15
darkstyrmupvoted (100.00%) @diyhometalk / diy-farmhouse-kitchen-makeover-for-usd5000-including-appliances
2019/02/01 03:51:15
| voter | darkstyrm |
| author | diyhometalk |
| permlink | diy-farmhouse-kitchen-makeover-for-usd5000-including-appliances |
| weight | 10000 (100.00%) |
| Transaction Info | Block #29955731/Trx 4492cb66a1502f71206f1d7caf88bdf2e72c990a |
View Raw JSON Data
{
  "trx_id": "4492cb66a1502f71206f1d7caf88bdf2e72c990a",
  "block": 29955731,
  "trx_in_block": 10,
  "op_in_trx": 0,
  "virtual_op": 0,
  "timestamp": "2019-02-01T03:51:15",
  "op": [
    "vote",
    {
      "voter": "darkstyrm",
      "author": "diyhometalk",
      "permlink": "diy-farmhouse-kitchen-makeover-for-usd5000-including-appliances",
      "weight": 10000
    }
  ]
}2019/01/23 17:31:33
2019/01/23 17:31:33
| parent author | diyhometalk |
| parent permlink | diy-farmhouse-style-photo-display-and-shelf |
| author | steemitboard |
| permlink | steemitboard-notify-diyhometalk-20190123t173132000z |
| title | |
| body | Congratulations @diyhometalk! You received a personal award! <table><tr><td>https://steemitimages.com/70x70/http://steemitboard.com/@diyhometalk/birthday1.png</td><td>Happy Birthday! - You are on the Steem blockchain for 1 year!</td></tr></table> <sub>_[Click here to view your Board](https://steemitboard.com/@diyhometalk)_</sub> > Support [SteemitBoard's project](https://steemit.com/@steemitboard)! **[Vote for its witness](https://v2.steemconnect.com/sign/account-witness-vote?witness=steemitboard&approve=1)** and **get one more award**! |
| json metadata | {"image":["https://steemitboard.com/img/notify.png"]} |
| Transaction Info | Block #29713193/Trx 9a8d86422f07a43a74346ac08852069158e08921 |
View Raw JSON Data
{
  "trx_id": "9a8d86422f07a43a74346ac08852069158e08921",
  "block": 29713193,
  "trx_in_block": 3,
  "op_in_trx": 0,
  "virtual_op": 0,
  "timestamp": "2019-01-23T17:31:33",
  "op": [
    "comment",
    {
      "parent_author": "diyhometalk",
      "parent_permlink": "diy-farmhouse-style-photo-display-and-shelf",
      "author": "steemitboard",
      "permlink": "steemitboard-notify-diyhometalk-20190123t173132000z",
      "title": "",
      "body": "Congratulations @diyhometalk! You received a personal award!\n\n<table><tr><td>https://steemitimages.com/70x70/http://steemitboard.com/@diyhometalk/birthday1.png</td><td>Happy Birthday! - You are on the Steem blockchain for 1 year!</td></tr></table>\n\n<sub>_[Click here to view your Board](https://steemitboard.com/@diyhometalk)_</sub>\n\n\n> Support [SteemitBoard's project](https://steemit.com/@steemitboard)! **[Vote for its witness](https://v2.steemconnect.com/sign/account-witness-vote?witness=steemitboard&approve=1)** and **get one more award**!",
      "json_metadata": "{\"image\":[\"https://steemitboard.com/img/notify.png\"]}"
    }
  ]
}steemdelegated 1.532 SP to @diyhometalk2018/07/14 22:29:00
steemdelegated 1.532 SP to @diyhometalk
2018/07/14 22:29:00
| delegator | steem |
| delegatee | diyhometalk |
| vesting shares | 2491.539236 VESTS |
| Transaction Info | Block #24180410/Trx 1f793f63647a63448a6be81836ae0e3d69ab90f3 |
View Raw JSON Data
{
  "trx_id": "1f793f63647a63448a6be81836ae0e3d69ab90f3",
  "block": 24180410,
  "trx_in_block": 6,
  "op_in_trx": 0,
  "virtual_op": 0,
  "timestamp": "2018-07-14T22:29:00",
  "op": [
    "delegate_vesting_shares",
    {
      "delegator": "steem",
      "delegatee": "diyhometalk",
      "vesting_shares": "2491.539236 VESTS"
    }
  ]
}brunomcdowelupvoted (100.00%) @diyhometalk / diy-farmhouse-style-photo-display-and-shelf2018/04/15 06:29:42
brunomcdowelupvoted (100.00%) @diyhometalk / diy-farmhouse-style-photo-display-and-shelf
2018/04/15 06:29:42
| voter | brunomcdowel |
| author | diyhometalk |
| permlink | diy-farmhouse-style-photo-display-and-shelf |
| weight | 10000 (100.00%) |
| Transaction Info | Block #21581311/Trx 6c481569283bd89955764eff97866aba62121637 |
View Raw JSON Data
{
  "trx_id": "6c481569283bd89955764eff97866aba62121637",
  "block": 21581311,
  "trx_in_block": 48,
  "op_in_trx": 0,
  "virtual_op": 0,
  "timestamp": "2018-04-15T06:29:42",
  "op": [
    "vote",
    {
      "voter": "brunomcdowel",
      "author": "diyhometalk",
      "permlink": "diy-farmhouse-style-photo-display-and-shelf",
      "weight": 10000
    }
  ]
}balizovvupvoted (100.00%) @diyhometalk / diy-farmhouse-style-photo-display-and-shelf2018/04/15 06:29:42
balizovvupvoted (100.00%) @diyhometalk / diy-farmhouse-style-photo-display-and-shelf
2018/04/15 06:29:42
| voter | balizovv |
| author | diyhometalk |
| permlink | diy-farmhouse-style-photo-display-and-shelf |
| weight | 10000 (100.00%) |
| Transaction Info | Block #21581311/Trx cb6b79011fd7dbdfa23f6f73e0b23c6e6551395f |
View Raw JSON Data
{
  "trx_id": "cb6b79011fd7dbdfa23f6f73e0b23c6e6551395f",
  "block": 21581311,
  "trx_in_block": 35,
  "op_in_trx": 0,
  "virtual_op": 0,
  "timestamp": "2018-04-15T06:29:42",
  "op": [
    "vote",
    {
      "voter": "balizovv",
      "author": "diyhometalk",
      "permlink": "diy-farmhouse-style-photo-display-and-shelf",
      "weight": 10000
    }
  ]
}sankovaupvoted (100.00%) @diyhometalk / diy-farmhouse-style-photo-display-and-shelf2018/04/15 06:29:36
sankovaupvoted (100.00%) @diyhometalk / diy-farmhouse-style-photo-display-and-shelf
2018/04/15 06:29:36
| voter | sankova |
| author | diyhometalk |
| permlink | diy-farmhouse-style-photo-display-and-shelf |
| weight | 10000 (100.00%) |
| Transaction Info | Block #21581309/Trx 78a44b9d4c93bab462f3611b013ba21adb687390 |
View Raw JSON Data
{
  "trx_id": "78a44b9d4c93bab462f3611b013ba21adb687390",
  "block": 21581309,
  "trx_in_block": 45,
  "op_in_trx": 0,
  "virtual_op": 0,
  "timestamp": "2018-04-15T06:29:36",
  "op": [
    "vote",
    {
      "voter": "sankova",
      "author": "diyhometalk",
      "permlink": "diy-farmhouse-style-photo-display-and-shelf",
      "weight": 10000
    }
  ]
}zoevaupvoted (100.00%) @diyhometalk / diy-farmhouse-style-photo-display-and-shelf2018/04/15 06:29:36
zoevaupvoted (100.00%) @diyhometalk / diy-farmhouse-style-photo-display-and-shelf
2018/04/15 06:29:36
| voter | zoeva |
| author | diyhometalk |
| permlink | diy-farmhouse-style-photo-display-and-shelf |
| weight | 10000 (100.00%) |
| Transaction Info | Block #21581309/Trx a111d856e691af0bc14b743b0a2f447698d67dc2 |
View Raw JSON Data
{
  "trx_id": "a111d856e691af0bc14b743b0a2f447698d67dc2",
  "block": 21581309,
  "trx_in_block": 0,
  "op_in_trx": 0,
  "virtual_op": 0,
  "timestamp": "2018-04-15T06:29:36",
  "op": [
    "vote",
    {
      "voter": "zoeva",
      "author": "diyhometalk",
      "permlink": "diy-farmhouse-style-photo-display-and-shelf",
      "weight": 10000
    }
  ]
}damirdolzupvoted (100.00%) @diyhometalk / diy-farmhouse-style-photo-display-and-shelf2018/04/15 06:29:03
damirdolzupvoted (100.00%) @diyhometalk / diy-farmhouse-style-photo-display-and-shelf
2018/04/15 06:29:03
| voter | damirdolz |
| author | diyhometalk |
| permlink | diy-farmhouse-style-photo-display-and-shelf |
| weight | 10000 (100.00%) |
| Transaction Info | Block #21581298/Trx 38fbb3a59a498acb2b06e3ef36d4554f975868c1 |
View Raw JSON Data
{
  "trx_id": "38fbb3a59a498acb2b06e3ef36d4554f975868c1",
  "block": 21581298,
  "trx_in_block": 35,
  "op_in_trx": 0,
  "virtual_op": 0,
  "timestamp": "2018-04-15T06:29:03",
  "op": [
    "vote",
    {
      "voter": "damirdolz",
      "author": "diyhometalk",
      "permlink": "diy-farmhouse-style-photo-display-and-shelf",
      "weight": 10000
    }
  ]
}diyhometalkupvoted (100.00%) @diyhometalk / diy-farmhouse-style-photo-display-and-shelf2018/04/14 22:06:00
diyhometalkupvoted (100.00%) @diyhometalk / diy-farmhouse-style-photo-display-and-shelf
2018/04/14 22:06:00
| voter | diyhometalk |
| author | diyhometalk |
| permlink | diy-farmhouse-style-photo-display-and-shelf |
| weight | 10000 (100.00%) |
| Transaction Info | Block #21571240/Trx dd87f3126206ec42e45373334b7b358090c31bc2 |
View Raw JSON Data
{
  "trx_id": "dd87f3126206ec42e45373334b7b358090c31bc2",
  "block": 21571240,
  "trx_in_block": 35,
  "op_in_trx": 0,
  "virtual_op": 0,
  "timestamp": "2018-04-14T22:06:00",
  "op": [
    "vote",
    {
      "voter": "diyhometalk",
      "author": "diyhometalk",
      "permlink": "diy-farmhouse-style-photo-display-and-shelf",
      "weight": 10000
    }
  ]
}diyhometalkpublished a new post: diy-farmhouse-style-photo-display-and-shelf2018/04/14 22:06:00
diyhometalkpublished a new post: diy-farmhouse-style-photo-display-and-shelf
2018/04/14 22:06:00
| parent author | |
| parent permlink | diy |
| author | diyhometalk |
| permlink | diy-farmhouse-style-photo-display-and-shelf |
| title | DIY Farmhouse-style Photo Display and Shelf |
| body | I have been wanting to create a cute DIY photo frame and shelf to display my daughter’s most recent school picture and since I am in between big projects, now was the perfect time to make one. This is a very quick and easy project that adds some farmhouse charm to your wall. Here are the abbreviated instructions for building this photo display frame and shelf. For a full tutorial, please visit my blog at the link at the bottom of this page. Time: 2 Hours Cost: $20 Difficulty: Easy  1. Paint the wood laser engraved frame white.  2. Cut the 1x3 boards to length and attach together with wood glue and pocket hole screws. 3. Cut the 1x3 shelf board to size and attach with wood glue and wood screws. 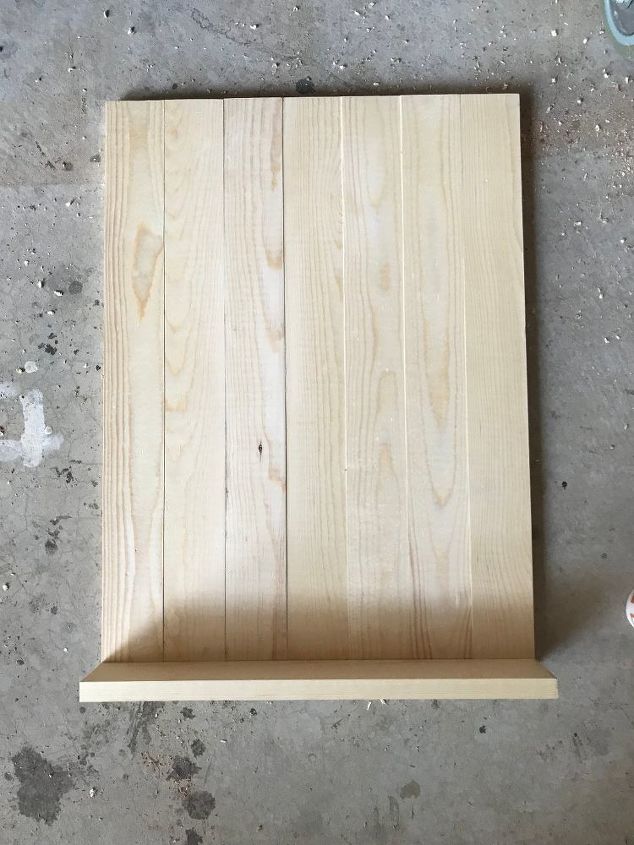 4. Use a gray stain or a wood weatherizer on the boards and let dry completely. 5. Attach the painted frame to the boards using wood glue. 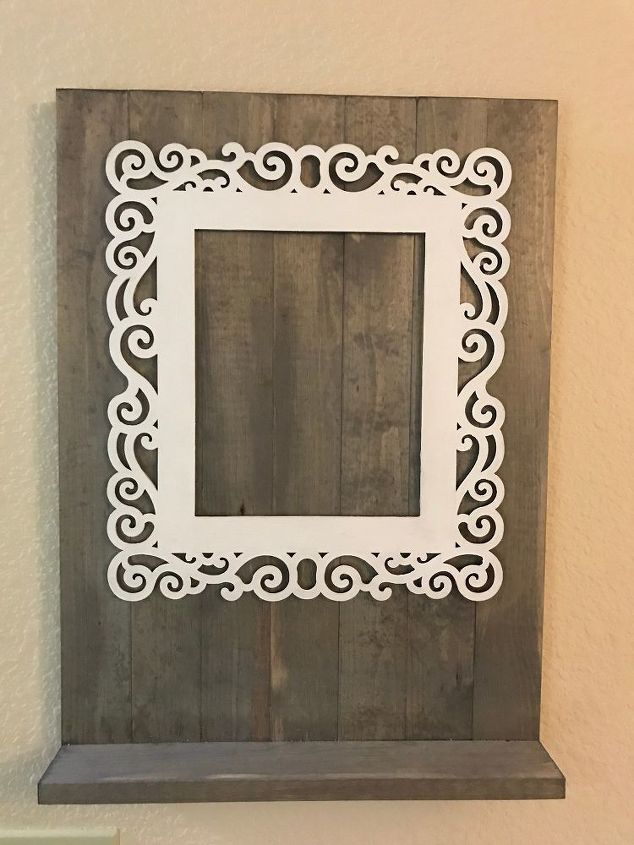 6. Add a picture hanger to the back of the wood. Add a picture to the frame and some colorful decor to the shelf and enjoy your new picture frame and shelf! 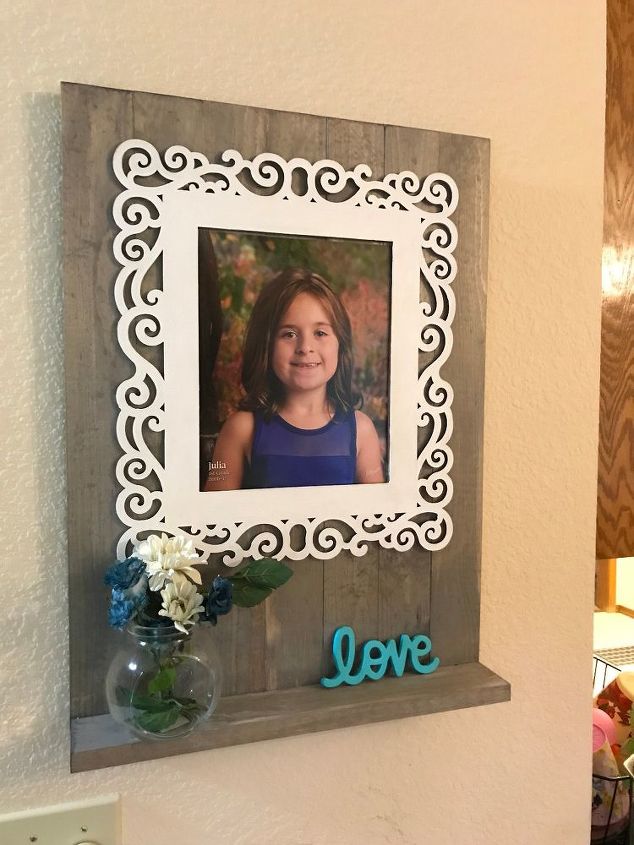 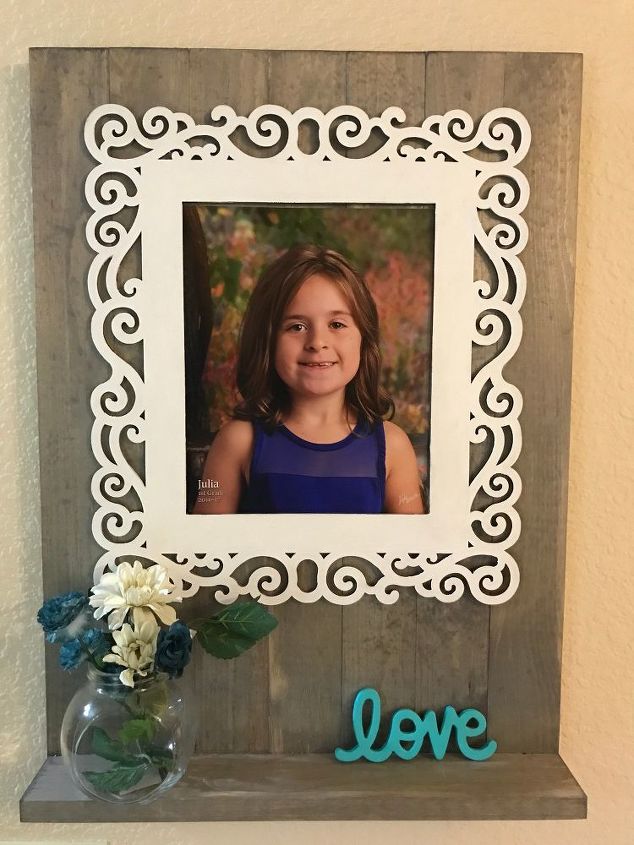 Suggested materials for this project: 1x3 boards (Home Depot) Laser cut wood frame (Hobby Lobby) #farmhouse#PhotoFrame#walldecor#homedecor To see more: https://www.pinspiredtodiy.com/diy-photo-frame-and-shelf/ |
| json metadata | {"tags":["diy","arts","crafts","decorate","homeinteriors"],"image":["https://steemitimages.com/DQmSGLAGCx3xfYfNygLLVeRTLr1sCYXLiJF9FCCgRfzUDpc/diy-farmhouse-style-photo-display-and-shelf.jpg","https://steemitimages.com/DQmUvDfPnmsfBa1Sr66cQotDtgsVQBRZwed9EpB5CPV5Dao/diy-farmhouse-style-photo-display-and-shelf2.jpg","https://steemitimages.com/DQmRJogG2XQoBefg9DkS3Z911hnmbw99TPxVHjN32ikSoq1/diy-farmhouse-style-photo-display-and-shelf3.jpg","https://steemitimages.com/DQmZXrYqS5AyT6HSvk9YpyP7uCXUjBbg8MxmGGjR6QuudLv/diy-farmhouse-style-photo-display-and-shelf4.jpg","https://steemitimages.com/DQmQrsdEkBSKVLYMbi5qhzYRmzhmdi4ZPeabeU7SuR4ABpU/diy-farmhouse-style-photo-display-and-shelf5.jpg","https://steemitimages.com/DQmYTbpAcX7FPDhTQszTHJ8xFZ1bpTe5vkPUyMzSQtYj5Nd/diy-farmhouse-style-photo-display-and-shelf6.jpg"],"links":["https://www.pinspiredtodiy.com/diy-photo-frame-and-shelf/"],"app":"steemit/0.1","format":"markdown"} |
| Transaction Info | Block #21571240/Trx dd87f3126206ec42e45373334b7b358090c31bc2 |
View Raw JSON Data
{
"trx_id": "dd87f3126206ec42e45373334b7b358090c31bc2",
"block": 21571240,
"trx_in_block": 35,
"op_in_trx": 0,
"virtual_op": 0,
"timestamp": "2018-04-14T22:06:00",
"op": [
"comment",
{
"parent_author": "",
"parent_permlink": "diy",
"author": "diyhometalk",
"permlink": "diy-farmhouse-style-photo-display-and-shelf",
"title": "DIY Farmhouse-style Photo Display and Shelf",
"body": "I have been wanting to create a cute DIY photo frame and shelf to display my daughter’s most recent school picture and since I am in between big projects, now was the perfect time to make one. This is a very quick and easy project that adds some farmhouse charm to your wall.\n\nHere are the abbreviated instructions for building this photo display frame and shelf. For a full tutorial, please visit my blog at the link at the bottom of this page.\nTime: 2 Hours\nCost: $20\nDifficulty: Easy\n\n1. Paint the wood laser engraved frame white.\n\n2. Cut the 1x3 boards to length and attach together with wood glue and pocket hole screws.\n3. Cut the 1x3 shelf board to size and attach with wood glue and wood screws.\n\n4. Use a gray stain or a wood weatherizer on the boards and let dry completely.\n5. Attach the painted frame to the boards using wood glue.\n\n6. Add a picture hanger to the back of the wood. Add a picture to the frame and some colorful decor to the shelf and enjoy your new picture frame and shelf!\n\n\nSuggested materials for this project:\n\n 1x3 boards (Home Depot)\n Laser cut wood frame (Hobby Lobby)\n\n#farmhouse#PhotoFrame#walldecor#homedecor\n\nTo see more: https://www.pinspiredtodiy.com/diy-photo-frame-and-shelf/",
"json_metadata": "{\"tags\":[\"diy\",\"arts\",\"crafts\",\"decorate\",\"homeinteriors\"],\"image\":[\"https://steemitimages.com/DQmSGLAGCx3xfYfNygLLVeRTLr1sCYXLiJF9FCCgRfzUDpc/diy-farmhouse-style-photo-display-and-shelf.jpg\",\"https://steemitimages.com/DQmUvDfPnmsfBa1Sr66cQotDtgsVQBRZwed9EpB5CPV5Dao/diy-farmhouse-style-photo-display-and-shelf2.jpg\",\"https://steemitimages.com/DQmRJogG2XQoBefg9DkS3Z911hnmbw99TPxVHjN32ikSoq1/diy-farmhouse-style-photo-display-and-shelf3.jpg\",\"https://steemitimages.com/DQmZXrYqS5AyT6HSvk9YpyP7uCXUjBbg8MxmGGjR6QuudLv/diy-farmhouse-style-photo-display-and-shelf4.jpg\",\"https://steemitimages.com/DQmQrsdEkBSKVLYMbi5qhzYRmzhmdi4ZPeabeU7SuR4ABpU/diy-farmhouse-style-photo-display-and-shelf5.jpg\",\"https://steemitimages.com/DQmYTbpAcX7FPDhTQszTHJ8xFZ1bpTe5vkPUyMzSQtYj5Nd/diy-farmhouse-style-photo-display-and-shelf6.jpg\"],\"links\":[\"https://www.pinspiredtodiy.com/diy-photo-frame-and-shelf/\"],\"app\":\"steemit/0.1\",\"format\":\"markdown\"}"
}
]
}varonskiyupvoted (100.00%) @diyhometalk / colorful-laundry-mud-room-makeover2018/04/13 10:48:06
varonskiyupvoted (100.00%) @diyhometalk / colorful-laundry-mud-room-makeover
2018/04/13 10:48:06
| voter | varonskiy |
| author | diyhometalk |
| permlink | colorful-laundry-mud-room-makeover |
| weight | 10000 (100.00%) |
| Transaction Info | Block #21528893/Trx 82e094fe4ca4ba6b4c65d1c7bfa71e59bcb9895e |
View Raw JSON Data
{
  "trx_id": "82e094fe4ca4ba6b4c65d1c7bfa71e59bcb9895e",
  "block": 21528893,
  "trx_in_block": 70,
  "op_in_trx": 0,
  "virtual_op": 0,
  "timestamp": "2018-04-13T10:48:06",
  "op": [
    "vote",
    {
      "voter": "varonskiy",
      "author": "diyhometalk",
      "permlink": "colorful-laundry-mud-room-makeover",
      "weight": 10000
    }
  ]
}sundukupvoted (100.00%) @diyhometalk / colorful-laundry-mud-room-makeover2018/04/13 10:48:00
sundukupvoted (100.00%) @diyhometalk / colorful-laundry-mud-room-makeover
2018/04/13 10:48:00
| voter | sunduk |
| author | diyhometalk |
| permlink | colorful-laundry-mud-room-makeover |
| weight | 10000 (100.00%) |
| Transaction Info | Block #21528891/Trx e5cbaadb79ec957c927432455c9152ffbd3e2119 |
View Raw JSON Data
{
  "trx_id": "e5cbaadb79ec957c927432455c9152ffbd3e2119",
  "block": 21528891,
  "trx_in_block": 44,
  "op_in_trx": 0,
  "virtual_op": 0,
  "timestamp": "2018-04-13T10:48:00",
  "op": [
    "vote",
    {
      "voter": "sunduk",
      "author": "diyhometalk",
      "permlink": "colorful-laundry-mud-room-makeover",
      "weight": 10000
    }
  ]
}steemdelegated 14.095 SP to @diyhometalk2018/04/13 03:10:33
steemdelegated 14.095 SP to @diyhometalk
2018/04/13 03:10:33
| delegator | steem |
| delegatee | diyhometalk |
| vesting shares | 22924.779786 VESTS |
| Transaction Info | Block #21519743/Trx d95fed7cf24e4966eac2aa30550a116b2d480a91 |
View Raw JSON Data
{
  "trx_id": "d95fed7cf24e4966eac2aa30550a116b2d480a91",
  "block": 21519743,
  "trx_in_block": 62,
  "op_in_trx": 0,
  "virtual_op": 0,
  "timestamp": "2018-04-13T03:10:33",
  "op": [
    "delegate_vesting_shares",
    {
      "delegator": "steem",
      "delegatee": "diyhometalk",
      "vesting_shares": "22924.779786 VESTS"
    }
  ]
}celioegugaupvoted (10.88%) @diyhometalk / colorful-laundry-mud-room-makeover2018/04/13 02:31:12
celioegugaupvoted (10.88%) @diyhometalk / colorful-laundry-mud-room-makeover
2018/04/13 02:31:12
| voter | celioeguga |
| author | diyhometalk |
| permlink | colorful-laundry-mud-room-makeover |
| weight | 1088 (10.88%) |
| Transaction Info | Block #21518956/Trx f2bd21d2f2a55fc80fff861c5f1d1c9ad2124ce7 |
View Raw JSON Data
{
  "trx_id": "f2bd21d2f2a55fc80fff861c5f1d1c9ad2124ce7",
  "block": 21518956,
  "trx_in_block": 38,
  "op_in_trx": 0,
  "virtual_op": 0,
  "timestamp": "2018-04-13T02:31:12",
  "op": [
    "vote",
    {
      "voter": "celioeguga",
      "author": "diyhometalk",
      "permlink": "colorful-laundry-mud-room-makeover",
      "weight": 1088
    }
  ]
}diyhometalkupvoted (100.00%) @diyhometalk / colorful-laundry-mud-room-makeover2018/04/13 02:24:33
diyhometalkupvoted (100.00%) @diyhometalk / colorful-laundry-mud-room-makeover
2018/04/13 02:24:33
| voter | diyhometalk |
| author | diyhometalk |
| permlink | colorful-laundry-mud-room-makeover |
| weight | 10000 (100.00%) |
| Transaction Info | Block #21518823/Trx 90977eda0519f95f6365b1c15eedca611704ec71 |
View Raw JSON Data
{
  "trx_id": "90977eda0519f95f6365b1c15eedca611704ec71",
  "block": 21518823,
  "trx_in_block": 41,
  "op_in_trx": 0,
  "virtual_op": 0,
  "timestamp": "2018-04-13T02:24:33",
  "op": [
    "vote",
    {
      "voter": "diyhometalk",
      "author": "diyhometalk",
      "permlink": "colorful-laundry-mud-room-makeover",
      "weight": 10000
    }
  ]
}diyhometalkpublished a new post: colorful-laundry-mud-room-makeover2018/04/13 02:24:33
diyhometalkpublished a new post: colorful-laundry-mud-room-makeover
2018/04/13 02:24:33
| parent author | |
| parent permlink | makeover |
| author | diyhometalk |
| permlink | colorful-laundry-mud-room-makeover |
| title | Colorful Laundry / Mud Room Makeover |
| body | After renovating our newly purchased home, we didn't have much funds left to make any major updates to the laundry room, so I came up with this budget-friendly, kid-friendly makeover instead! A previously blank wall has become the hardest working wall in our house thanks to the addition of hooks and storage cubbies at kids' height to hold their coats, hats, school bags, and everything else in between! 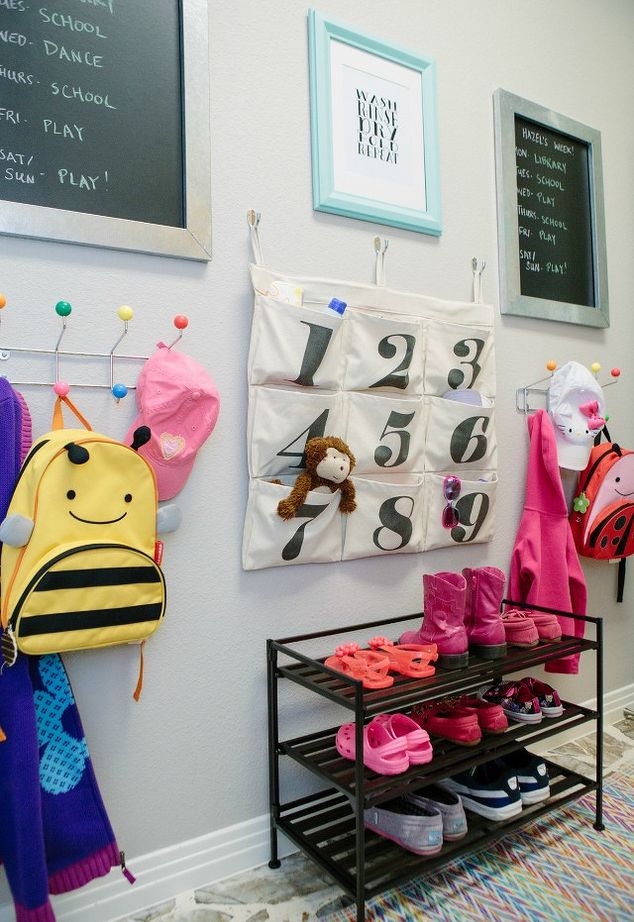 Our new mud-room "command center" for our two preschool age daughters.  The "before" photos of the laundry room 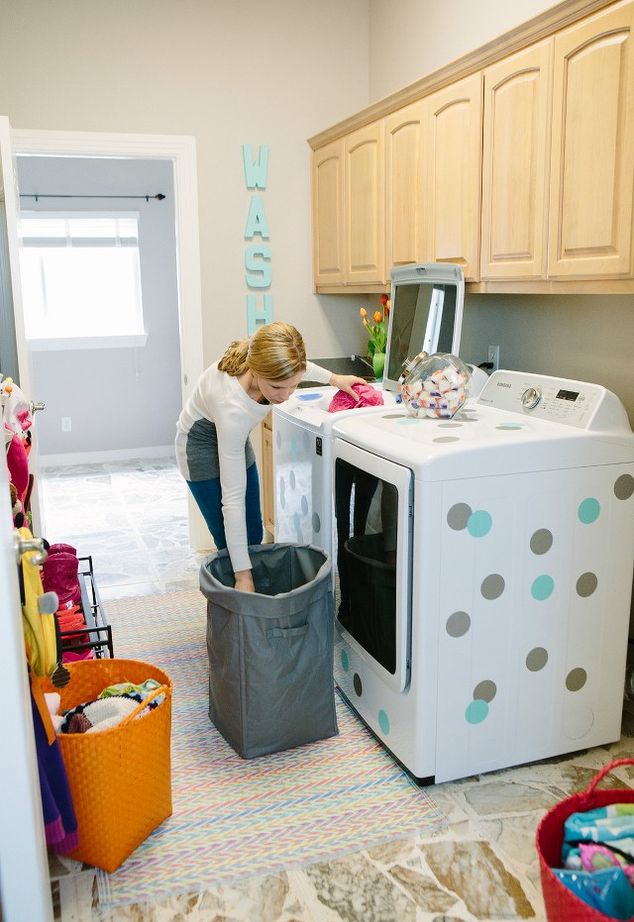 Polka dot decals and "WASH" spelled out in teal painted letters add some fun to the laundry room.  I hate doing laundry, but I love color (and organization!)…so this makes it a bit more palatable! For more photos and details on how I pulled the room together, head to my blog! To see more: http://www.designimprovised.com/2014/03/laundry-room-ideas.html |
| json metadata | {"tags":["makeover","roommakeover","diy","arts","crafts"],"image":["https://steemitimages.com/DQmUbwqnCk2iD55rvBN5DtMfZxR8ktsP96e4HV5LHDY7EUF/colorful-laundry-mud-room-makeover-foyer-laundry-rooms-organizing1.jpg","https://steemitimages.com/DQmahP4ePvqgo6bCEv3JteqvQrhW7EztGzMZKXFSWmfE4q5/colorful-laundry-mud-room-makeover-foyer-laundry-rooms-organizing2.jpg","https://steemitimages.com/DQmaaNWJ3VyJQJLokGXGVA6BBy9j6R4GTxWBRaZ3fQxZMDZ/colorful-laundry-mud-room-makeover-foyer-laundry-rooms-organizing3.jpg","https://steemitimages.com/DQmX6esZMUfUoifoohZnVjYorS1wMdVLUCPj76QcnSoLZMN/colorful-laundry-mud-room-makeover-foyer-laundry-rooms-organizing4.jpg"],"links":["http://www.designimprovised.com/2014/03/laundry-room-ideas.html"],"app":"steemit/0.1","format":"markdown"} |
| Transaction Info | Block #21518823/Trx 90977eda0519f95f6365b1c15eedca611704ec71 |
View Raw JSON Data
{
"trx_id": "90977eda0519f95f6365b1c15eedca611704ec71",
"block": 21518823,
"trx_in_block": 41,
"op_in_trx": 0,
"virtual_op": 0,
"timestamp": "2018-04-13T02:24:33",
"op": [
"comment",
{
"parent_author": "",
"parent_permlink": "makeover",
"author": "diyhometalk",
"permlink": "colorful-laundry-mud-room-makeover",
"title": "Colorful Laundry / Mud Room Makeover",
"body": "After renovating our newly purchased home, we didn't have much funds left to make any major updates to the laundry room, so I came up with this budget-friendly, kid-friendly makeover instead! A previously blank wall has become the hardest working wall in our house thanks to the addition of hooks and storage cubbies at kids' height to hold their coats, hats, school bags, and everything else in between!\n\nOur new mud-room \"command center\" for our two preschool age daughters.\n\nThe \"before\" photos of the laundry room\n\nPolka dot decals and \"WASH\" spelled out in teal painted letters add some fun to the laundry room.\n\nI hate doing laundry, but I love color (and organization!)…so this makes it a bit more palatable! For more photos and details on how I pulled the room together, head to my blog!\nTo see more: http://www.designimprovised.com/2014/03/laundry-room-ideas.html",
"json_metadata": "{\"tags\":[\"makeover\",\"roommakeover\",\"diy\",\"arts\",\"crafts\"],\"image\":[\"https://steemitimages.com/DQmUbwqnCk2iD55rvBN5DtMfZxR8ktsP96e4HV5LHDY7EUF/colorful-laundry-mud-room-makeover-foyer-laundry-rooms-organizing1.jpg\",\"https://steemitimages.com/DQmahP4ePvqgo6bCEv3JteqvQrhW7EztGzMZKXFSWmfE4q5/colorful-laundry-mud-room-makeover-foyer-laundry-rooms-organizing2.jpg\",\"https://steemitimages.com/DQmaaNWJ3VyJQJLokGXGVA6BBy9j6R4GTxWBRaZ3fQxZMDZ/colorful-laundry-mud-room-makeover-foyer-laundry-rooms-organizing3.jpg\",\"https://steemitimages.com/DQmX6esZMUfUoifoohZnVjYorS1wMdVLUCPj76QcnSoLZMN/colorful-laundry-mud-room-makeover-foyer-laundry-rooms-organizing4.jpg\"],\"links\":[\"http://www.designimprovised.com/2014/03/laundry-room-ideas.html\"],\"app\":\"steemit/0.1\",\"format\":\"markdown\"}"
}
]
}diyhometalkupvoted (100.00%) @diyhometalk / install-stair-runners-using-runner-rugs2018/04/13 02:10:33
diyhometalkupvoted (100.00%) @diyhometalk / install-stair-runners-using-runner-rugs
2018/04/13 02:10:33
| voter | diyhometalk |
| author | diyhometalk |
| permlink | install-stair-runners-using-runner-rugs |
| weight | 10000 (100.00%) |
| Transaction Info | Block #21518543/Trx fd037e4d19a8b58bb035c98dc8a90a335f5d0450 |
View Raw JSON Data
{
  "trx_id": "fd037e4d19a8b58bb035c98dc8a90a335f5d0450",
  "block": 21518543,
  "trx_in_block": 57,
  "op_in_trx": 0,
  "virtual_op": 0,
  "timestamp": "2018-04-13T02:10:33",
  "op": [
    "vote",
    {
      "voter": "diyhometalk",
      "author": "diyhometalk",
      "permlink": "install-stair-runners-using-runner-rugs",
      "weight": 10000
    }
  ]
}diyhometalkpublished a new post: install-stair-runners-using-runner-rugs2018/04/13 02:10:33
diyhometalkpublished a new post: install-stair-runners-using-runner-rugs
2018/04/13 02:10:33
| parent author | |
| parent permlink | makeover |
| author | diyhometalk |
| permlink | install-stair-runners-using-runner-rugs |
| title | Install Stair Runners Using Runner Rugs |
| body | Have you ever looked at runner options at your local hardware store? It's a real snooze-fest over there. Guess what? You can use regular runners for your stairs! Our stairs took 3 runners, but you will want to measure yours for accuracy. Please note: I bought my runners on sale and didn't open them for months. When I went to install them, I realized that I had 2 different patterns in the same color. The accident turned out to be a happy one and I love the quirkiness of it now. Time: 3 Hours Cost: $100 Difficulty: Medium 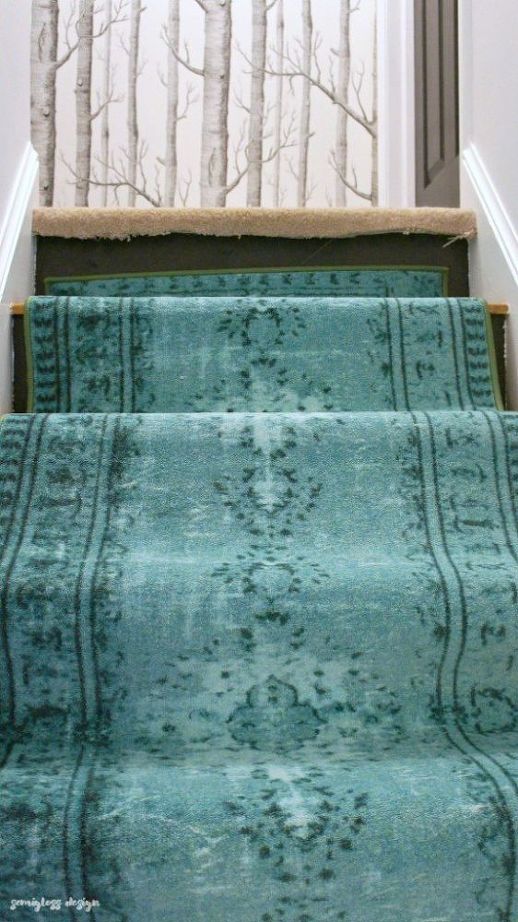 Lay out your first runner to figure out the spacing. You want it pretty evenly spaced on the sides. 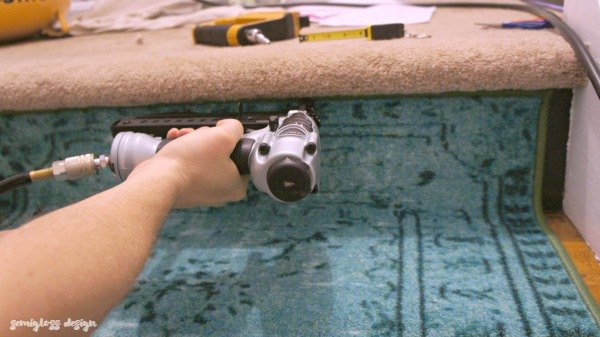 Use a staple gun to attach the rug right under the landing. Be generous with your staples. We love a pneumatic gun because it's much easier to use. 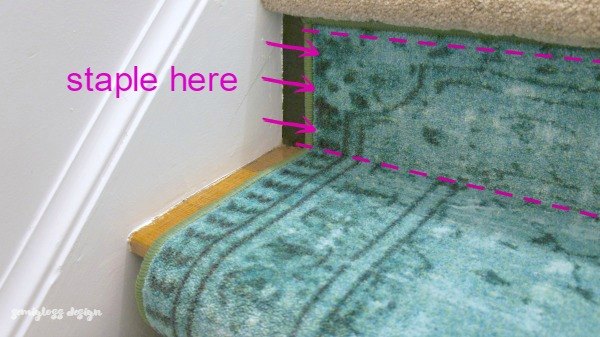 A staple on the edge of the stairs as well, keeping the spacing even on each step. 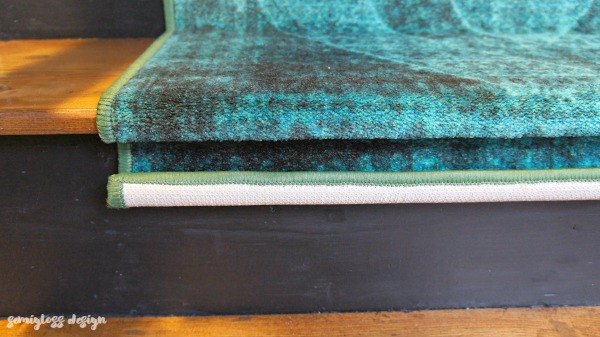 Keep going, stapling under the stairs and in the corners until you get to the end of a runner. Cut it under a stair tread, leaving about 1" to overlap with the next rug. 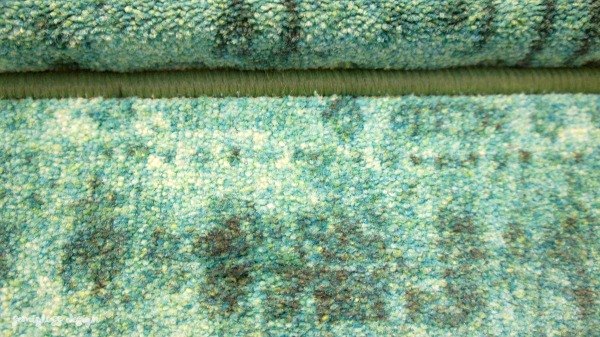 Attach the next runner, overlapping the edge you just cut. Keep going until the end. 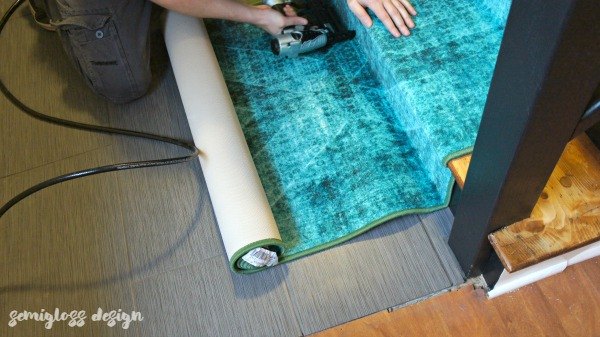 When you get to the end, cut the rug and staple it into the step. Then cover the edge with a piece of quarter round painted to blend with your floor or stairs. 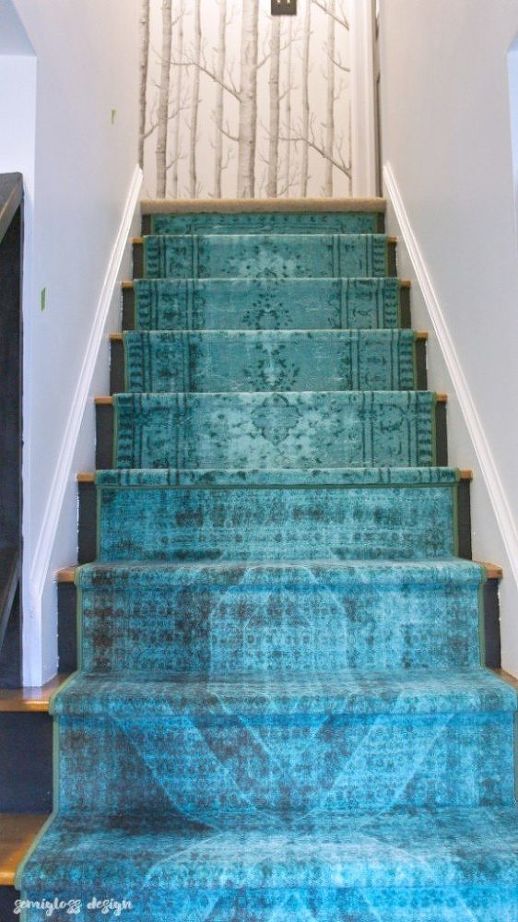 Enjoy your new runner! Totally not boring. For more details on this project, including how we stripped the carpet off, stained the stairs, added a new custom railing, copper hand rails or where we got that fabulous wallpaper, c lick here to check out my blog. All the details and more can be found there. Suggested materials for this project: 3 Runners Staple Gun Staples Utility knife #trendytopice #stairs #staircase To see more: https://www.semiglossdesign.com/install-stair-runners |
| json metadata | {"tags":["makeover","diy","arts","crafts","stairs"],"image":["https://steemitimages.com/DQmdXsxrwCkxfZXGFkkxSEHrM3q4EUuHqa2J98BHhbReaY2/install-stair-runners-using-runner-rugs1.jpg","https://steemitimages.com/DQmUiomiKzseEUyM8i2Pfs7s8oeompvWeBXDVvtn6xUzDnQ/install-stair-runners-using-runner-rugs2.jpg","https://steemitimages.com/DQmabvoTw1TCgsBiuyg73n3quhEH9CXZRYqDSvk3Eq4ZXS7/install-stair-runners-using-runner-rugs3.jpg","https://steemitimages.com/DQmUFVUd5MhMpE7hfK9Z7sthSQj5a7H7mh8fx8Lpt9Bzmxc/install-stair-runners-using-runner-rugs4.jpg","https://steemitimages.com/DQmU7YgjCGwenWSyd9ymbqRVE5gLukEC1G6pw98nkdVxqiZ/install-stair-runners-using-runner-rugs5.jpg","https://steemitimages.com/DQmZpvPsVkCS34WAVSUCveczXcJTtATwHx8HJCZJzLbRTCF/install-stair-runners-using-runner-rugs6.jpg","https://steemitimages.com/DQme8SjmWryRNcM983ktmXr9Wdq1TP4JJ7jgeFB6egfqQV1/install-stair-runners-using-runner-rugs7.jpg"],"links":["https://www.semiglossdesign.com/install-stair-runners"],"app":"steemit/0.1","format":"markdown"} |
| Transaction Info | Block #21518543/Trx fd037e4d19a8b58bb035c98dc8a90a335f5d0450 |
View Raw JSON Data
{
"trx_id": "fd037e4d19a8b58bb035c98dc8a90a335f5d0450",
"block": 21518543,
"trx_in_block": 57,
"op_in_trx": 0,
"virtual_op": 0,
"timestamp": "2018-04-13T02:10:33",
"op": [
"comment",
{
"parent_author": "",
"parent_permlink": "makeover",
"author": "diyhometalk",
"permlink": "install-stair-runners-using-runner-rugs",
"title": "Install Stair Runners Using Runner Rugs",
"body": "Have you ever looked at runner options at your local hardware store? It's a real snooze-fest over there. Guess what? You can use regular runners for your stairs!\n\nOur stairs took 3 runners, but you will want to measure yours for accuracy.\n\nPlease note: I bought my runners on sale and didn't open them for months. When I went to install them, I realized that I had 2 different patterns in the same color. The accident turned out to be a happy one and I love the quirkiness of it now.\nTime: 3 Hours\nCost: $100\nDifficulty: Medium\n\nLay out your first runner to figure out the spacing. You want it pretty evenly spaced on the sides. \n\nUse a staple gun to attach the rug right under the landing. Be generous with your staples. We love a pneumatic gun because it's much easier to use.\n\nA staple on the edge of the stairs as well, keeping the spacing even on each step.\n\nKeep going, stapling under the stairs and in the corners until you get to the end of a runner. Cut it under a stair tread, leaving about 1\" to overlap with the next rug. \n\nAttach the next runner, overlapping the edge you just cut.\nKeep going until the end. \n\nWhen you get to the end, cut the rug and staple it into the step. Then cover the edge with a piece of quarter round painted to blend with your floor or stairs.\n\nEnjoy your new runner! Totally not boring.\nFor more details on this project, including how we stripped the carpet off, stained the stairs, added a new custom railing, copper hand rails or where we got that fabulous wallpaper, c lick here to check out my blog. All the details and more can be found there. \nSuggested materials for this project:\n3 Runners \nStaple Gun\nStaples\nUtility knife\n#trendytopice #stairs #staircase\nTo see more: https://www.semiglossdesign.com/install-stair-runners",
"json_metadata": "{\"tags\":[\"makeover\",\"diy\",\"arts\",\"crafts\",\"stairs\"],\"image\":[\"https://steemitimages.com/DQmdXsxrwCkxfZXGFkkxSEHrM3q4EUuHqa2J98BHhbReaY2/install-stair-runners-using-runner-rugs1.jpg\",\"https://steemitimages.com/DQmUiomiKzseEUyM8i2Pfs7s8oeompvWeBXDVvtn6xUzDnQ/install-stair-runners-using-runner-rugs2.jpg\",\"https://steemitimages.com/DQmabvoTw1TCgsBiuyg73n3quhEH9CXZRYqDSvk3Eq4ZXS7/install-stair-runners-using-runner-rugs3.jpg\",\"https://steemitimages.com/DQmUFVUd5MhMpE7hfK9Z7sthSQj5a7H7mh8fx8Lpt9Bzmxc/install-stair-runners-using-runner-rugs4.jpg\",\"https://steemitimages.com/DQmU7YgjCGwenWSyd9ymbqRVE5gLukEC1G6pw98nkdVxqiZ/install-stair-runners-using-runner-rugs5.jpg\",\"https://steemitimages.com/DQmZpvPsVkCS34WAVSUCveczXcJTtATwHx8HJCZJzLbRTCF/install-stair-runners-using-runner-rugs6.jpg\",\"https://steemitimages.com/DQme8SjmWryRNcM983ktmXr9Wdq1TP4JJ7jgeFB6egfqQV1/install-stair-runners-using-runner-rugs7.jpg\"],\"links\":[\"https://www.semiglossdesign.com/install-stair-runners\"],\"app\":\"steemit/0.1\",\"format\":\"markdown\"}"
}
]
}diyhometalkclaimed reward balance: 0.016 STEEM, 0.157 SBD, 0.138 SP2018/04/13 01:58:27
diyhometalkclaimed reward balance: 0.016 STEEM, 0.157 SBD, 0.138 SP
2018/04/13 01:58:27
| account | diyhometalk |
| reward steem | 0.016 STEEM |
| reward sbd | 0.157 SBD |
| reward vests | 224.378759 VESTS |
| Transaction Info | Block #21518301/Trx e1f274173c23ca0b0f521a9d58c2dd1f844080dd |
View Raw JSON Data
{
  "trx_id": "e1f274173c23ca0b0f521a9d58c2dd1f844080dd",
  "block": 21518301,
  "trx_in_block": 5,
  "op_in_trx": 0,
  "virtual_op": 0,
  "timestamp": "2018-04-13T01:58:27",
  "op": [
    "claim_reward_balance",
    {
      "account": "diyhometalk",
      "reward_steem": "0.016 STEEM",
      "reward_sbd": "0.157 SBD",
      "reward_vests": "224.378759 VESTS"
    }
  ]
}diyhometalkreceived 0.016 STEEM, 0.157 SBD, 0.138 SP author reward for @diyhometalk / 1970-s-entertainment-makeover-finally2018/03/31 05:22:36
diyhometalkreceived 0.016 STEEM, 0.157 SBD, 0.138 SP author reward for @diyhometalk / 1970-s-entertainment-makeover-finally
2018/03/31 05:22:36
| author | diyhometalk |
| permlink | 1970-s-entertainment-makeover-finally |
| sbd payout | 0.157 SBD |
| steem payout | 0.016 STEEM |
| vesting payout | 224.378759 VESTS |
| Transaction Info | Block #21148034/Virtual Operation #7 |
View Raw JSON Data
{
  "trx_id": "0000000000000000000000000000000000000000",
  "block": 21148034,
  "trx_in_block": 4294967295,
  "op_in_trx": 0,
  "virtual_op": 7,
  "timestamp": "2018-03-31T05:22:36",
  "op": [
    "author_reward",
    {
      "author": "diyhometalk",
      "permlink": "1970-s-entertainment-makeover-finally",
      "sbd_payout": "0.157 SBD",
      "steem_payout": "0.016 STEEM",
      "vesting_payout": "224.378759 VESTS"
    }
  ]
}steemdelegated 14.246 SP to @diyhometalk2018/03/30 19:08:48
steemdelegated 14.246 SP to @diyhometalk
2018/03/30 19:08:48
| delegator | steem |
| delegatee | diyhometalk |
| vesting shares | 23170.679540 VESTS |
| Transaction Info | Block #21135762/Trx 3a3d8796dc80f3a732690d32f7f96650b6449519 |
View Raw JSON Data
{
  "trx_id": "3a3d8796dc80f3a732690d32f7f96650b6449519",
  "block": 21135762,
  "trx_in_block": 4,
  "op_in_trx": 0,
  "virtual_op": 0,
  "timestamp": "2018-03-30T19:08:48",
  "op": [
    "delegate_vesting_shares",
    {
      "delegator": "steem",
      "delegatee": "diyhometalk",
      "vesting_shares": "23170.679540 VESTS"
    }
  ]
}chandanae6upvoted (100.00%) @diyhometalk / how-to-texture-a-ceiling2018/03/25 18:18:18
chandanae6upvoted (100.00%) @diyhometalk / how-to-texture-a-ceiling
2018/03/25 18:18:18
| voter | chandanae6 |
| author | diyhometalk |
| permlink | how-to-texture-a-ceiling |
| weight | 10000 (100.00%) |
| Transaction Info | Block #20990806/Trx 06cbb550c4990080f99005bab6b94dbbd9d86c56 |
View Raw JSON Data
{
  "trx_id": "06cbb550c4990080f99005bab6b94dbbd9d86c56",
  "block": 20990806,
  "trx_in_block": 29,
  "op_in_trx": 0,
  "virtual_op": 0,
  "timestamp": "2018-03-25T18:18:18",
  "op": [
    "vote",
    {
      "voter": "chandanae6",
      "author": "diyhometalk",
      "permlink": "how-to-texture-a-ceiling",
      "weight": 10000
    }
  ]
}diyhometalkupvoted (100.00%) @diyhometalk / how-to-texture-a-ceiling2018/03/25 18:17:57
diyhometalkupvoted (100.00%) @diyhometalk / how-to-texture-a-ceiling
2018/03/25 18:17:57
| voter | diyhometalk |
| author | diyhometalk |
| permlink | how-to-texture-a-ceiling |
| weight | 10000 (100.00%) |
| Transaction Info | Block #20990799/Trx 00127b71be57e01a488a873a9ef268bb98c4432c |
View Raw JSON Data
{
  "trx_id": "00127b71be57e01a488a873a9ef268bb98c4432c",
  "block": 20990799,
  "trx_in_block": 29,
  "op_in_trx": 0,
  "virtual_op": 0,
  "timestamp": "2018-03-25T18:17:57",
  "op": [
    "vote",
    {
      "voter": "diyhometalk",
      "author": "diyhometalk",
      "permlink": "how-to-texture-a-ceiling",
      "weight": 10000
    }
  ]
}diyhometalkpublished a new post: how-to-texture-a-ceiling2018/03/25 18:17:57
diyhometalkpublished a new post: how-to-texture-a-ceiling
2018/03/25 18:17:57
| parent author | |
| parent permlink | makeover |
| author | diyhometalk |
| permlink | how-to-texture-a-ceiling |
| title | How to Texture a Ceiling |
| body | Do you live in an old house that has cracks in the ceiling that you'd like to cover up? Or do you have plans to remove that ugly popcorn ceiling but don't know what to do once it's gone? I've got a super easy technic to texture the ceiling to cover up imperfections and modernize your space all at the same time! Time: 2 Hours Cost: $10 Difficulty: Easy 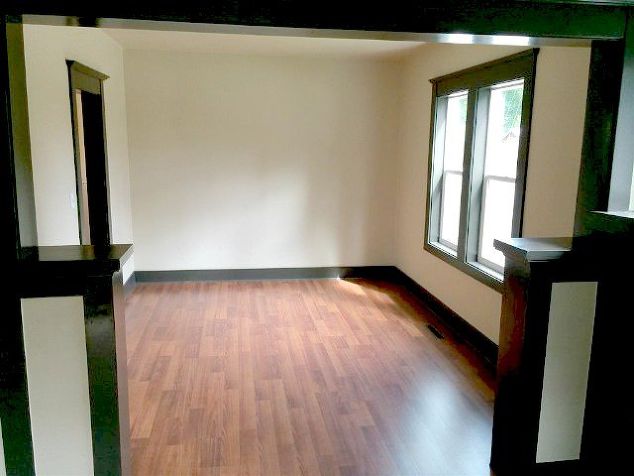 This is an original photo of what our dining room looked like when we first got our hands on it.  We had hairline cracks in the ceiling we wanted to cover-up without hurting the pocket book! The home is over 100 years old and there was nothing wrong structurally, just needed some cosmetic work and a little ♥. 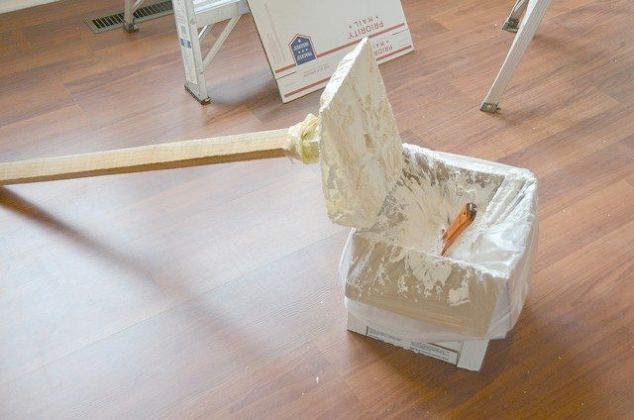 This is the coolest trick EVER! My dad actually told us about it. Just grab an old scrap of 1"x 3" wood (or something similar) and a 12" x 12" square piece of 1/4" plywood and attach the two together. You can screw in from the bottom into the handle and/or add 2 little blocks of wood on either side of the handle to keep it securely attached (that's what my husband does). Then all you have to do is wrap a plastic garbage sack around the flat 12" x 12" piece and tie it in a knot or duck tape it to keep it secure. It's a loose fit, you want the crinkles! We purchased a box of All-Purpose Pre-Mixed Joint Compound 3.5 Gallon. We spread the compound onto the plastic with a putty knife. Just slop it on, but you don't want it to be too thick. You want to be able to go back and easily just knock of the tips you leave behind on the ceiling after you apply the compound. Sometimes it takes a little practice. We were nervous the first time we used this method, but believe me YOU WILL LOVE IT!!! It's such a simple, inexpensive solution and looks like a Million Bucks when it's done! 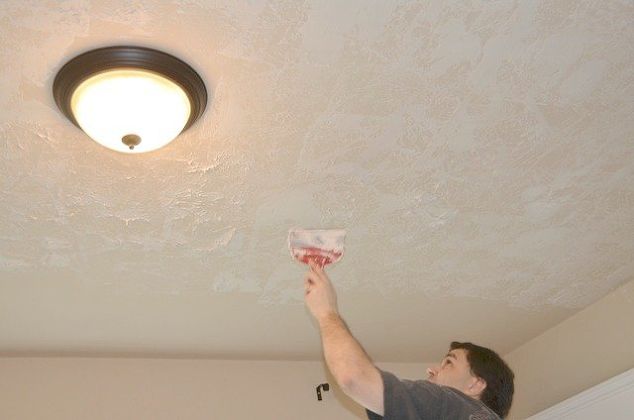 To apply the compound to the ceiling, just simply keep the plastic covered plywood flat to the ceiling and tap, tap, tap as you work your way around the ceiling in sections. Don't try to tackle the whole ceiling at once. Divide it up into sections by first applying the compound and then going back and lightly smoothing it out like shown in this photo. Can you see the peaks to the left in the photo? My hubs is just working his way across the ceiling and knocking them down as he goes. It's not suppose to look perfect at this stage, but once you paint it all...it will!!!  Here's another view right after the compound has been applied to the ceiling.  Here it is once it's been smoothed out. If you find you missed a spot, just add a little more. If you have more drastic imperfections to cover up, you may want to apply a heavier dose of compound and leave more texture. Just play with it and have fun! 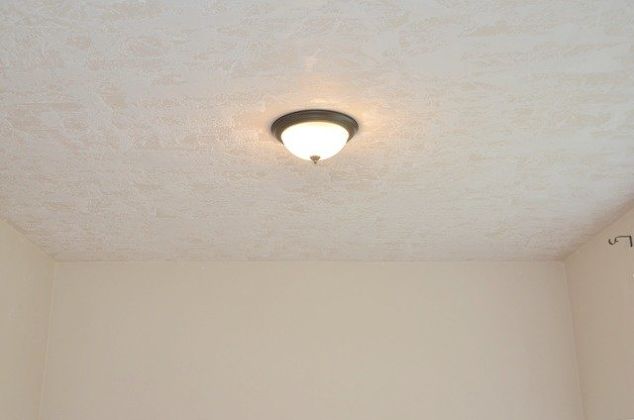 Here is a photo of the textured ceiling completed before paint (we still had the boring light fixture up so we could see). If it got damaged, we wouldn't have cared. Haha! 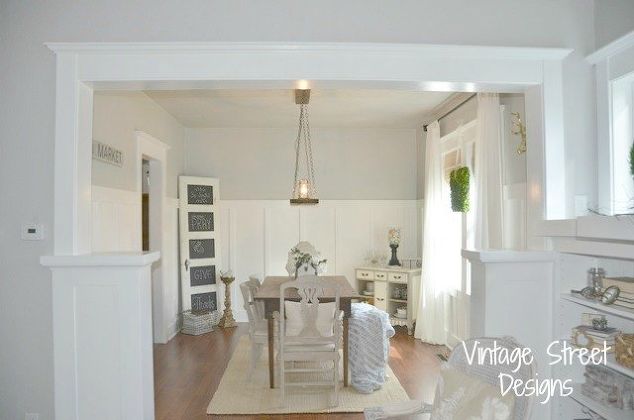 Here is what the space looks like now! This dining room transformation at The Craftsman on Park Rd was HUGE! You can see the entire final home tour of this 100 year old home on my blog! Also take note of the living room ceiling. We gave it the same treatment! 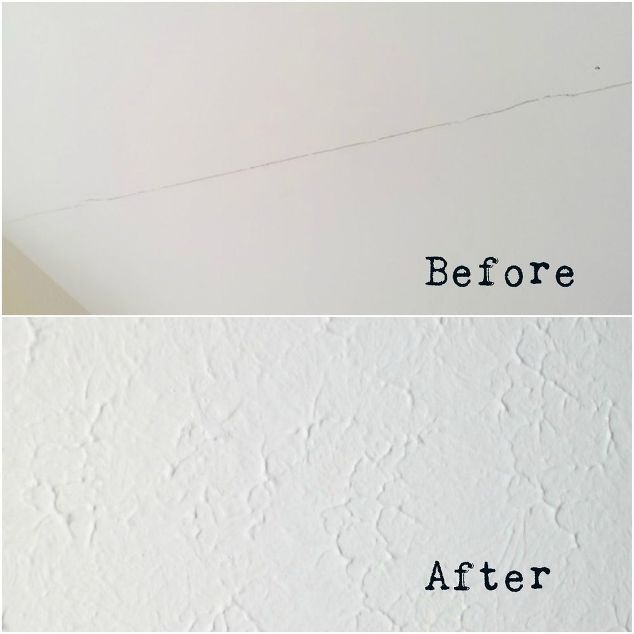 It's truly amazing what a difference a little joint compound and paint can do. You would never know this ceiling was 100 years old now!!! Please let me know if you decide to take on texturing your own ceiling. I would LOVE to hear all about it! If you have any questions, feel free to ask away. I'd be happy to help! Suggested materials for this project: Pre-Mixed Joint Compound (Home Depot) Putty Knife (Lowes) Applicator (DIY from Scrap Wood) Plastic Bag (Garbage Sack On Hand) #ceilingtexture #diningroomremodel #fixerupper #diningroomceiling To see more: http://www.vintagestreetdesigns.com/2018/02/how-to-texture-a-ceiling.html |
| json metadata | {"tags":["makeover","ceiling","diy","art","craft"],"image":["https://steemitimages.com/DQmXCJTzBMKJiyw9aaJ3wH6xf2k7ovBLWjk4Pvpywhe5Fa1/how-to-texture-a-ceiling.jpg","https://steemitimages.com/DQmZDX7fKJ82PrzoY6STmyM6w7hYJbS8BugfZGJqRE8c3xP/how-to-texture-a-ceiling2.jpg","https://steemitimages.com/DQmdD4VqLBiNSgovoxUPDvneFUru9T599MxboMPCF1CkGtD/how-to-texture-a-ceiling3.jpg","https://steemitimages.com/DQma3gg73wAvcbP9D1QBr6ymWLN7UHBzHGZDfnNxRmVJJ6z/how-to-texture-a-ceiling4.jpg","https://steemitimages.com/DQmSQmVgxd34QMJN6fXvLDVaDX8gC7jAYTxxUEwyPau55Ft/how-to-texture-a-ceiling5.jpg","https://steemitimages.com/DQmSAKcC7Bw4F3woFT6VHDbiECYo2H8kqKPDmwom1D8Y6WK/how-to-texture-a-ceiling6.jpg","https://steemitimages.com/DQmTDJv3CLMLvQJeQAbpBntkUuyPhEy7sr5RnSskYqzBxTw/how-to-texture-a-ceiling7.jpg","https://steemitimages.com/DQmVfjPTtDfnduAwXJytH4xFiEqEq78x5nDo9YZq5asv4Bj/how-to-texture-a-ceiling8.jpg","https://steemitimages.com/DQmXXXfZhQsBVzdyd7JbBMeUGbS2LZYRrH8Bs5aKTTaYoe8/how-to-texture-a-ceiling9.jpg"],"links":["http://www.vintagestreetdesigns.com/2018/02/how-to-texture-a-ceiling.html"],"app":"steemit/0.1","format":"markdown"} |
| Transaction Info | Block #20990799/Trx 00127b71be57e01a488a873a9ef268bb98c4432c |
View Raw JSON Data
{
"trx_id": "00127b71be57e01a488a873a9ef268bb98c4432c",
"block": 20990799,
"trx_in_block": 29,
"op_in_trx": 0,
"virtual_op": 0,
"timestamp": "2018-03-25T18:17:57",
"op": [
"comment",
{
"parent_author": "",
"parent_permlink": "makeover",
"author": "diyhometalk",
"permlink": "how-to-texture-a-ceiling",
"title": "How to Texture a Ceiling",
"body": "Do you live in an old house that has cracks in the ceiling that you'd like to cover up? Or do you have plans to remove that ugly popcorn ceiling but don't know what to do once it's gone? I've got a super easy technic to texture the ceiling to cover up imperfections and modernize your space all at the same time!\nTime: 2 Hours\nCost: $10\nDifficulty: Easy\n\nThis is an original photo of what our dining room looked like when we first got our hands on it.\n\nWe had hairline cracks in the ceiling we wanted to cover-up without hurting the pocket book! The home is over 100 years old and there was nothing wrong structurally, just needed some cosmetic work and a little ♥.\n\nThis is the coolest trick EVER! My dad actually told us about it. Just grab an old scrap of 1\"x 3\" wood (or something similar) and a 12\" x 12\" square piece of 1/4\" plywood and attach the two together. You can screw in from the bottom into the handle and/or add 2 little blocks of wood on either side of the handle to keep it securely attached (that's what my husband does). Then all you have to do is wrap a plastic garbage sack around the flat 12\" x 12\" piece and tie it in a knot or duck tape it to keep it secure. It's a loose fit, you want the crinkles!\n\nWe purchased a box of All-Purpose Pre-Mixed Joint Compound 3.5 Gallon. We spread the compound onto the plastic with a putty knife. Just slop it on, but you don't want it to be too thick. You want to be able to go back and easily just knock of the tips you leave behind on the ceiling after you apply the compound. Sometimes it takes a little practice. We were nervous the first time we used this method, but believe me YOU WILL LOVE IT!!! It's such a simple, inexpensive solution and looks like a Million Bucks when it's done!\n\nTo apply the compound to the ceiling, just simply keep the plastic covered plywood flat to the ceiling and tap, tap, tap as you work your way around the ceiling in sections. Don't try to tackle the whole ceiling at once. Divide it up into sections by first applying the compound and then going back and lightly smoothing it out like shown in this photo. Can you see the peaks to the left in the photo? My hubs is just working his way across the ceiling and knocking them down as he goes. It's not suppose to look perfect at this stage, but once you paint it all...it will!!!\n\nHere's another view right after the compound has been applied to the ceiling.\n\nHere it is once it's been smoothed out. If you find you missed a spot, just add a little more. If you have more drastic imperfections to cover up, you may want to apply a heavier dose of compound and leave more texture. Just play with it and have fun!\n\nHere is a photo of the textured ceiling completed before paint (we still had the boring light fixture up so we could see). If it got damaged, we wouldn't have cared. Haha!\n\nHere is what the space looks like now! This dining room transformation at The Craftsman on Park Rd was HUGE! You can see the entire final home tour of this 100 year old home on my blog! Also take note of the living room ceiling. We gave it the same treatment!\n\nIt's truly amazing what a difference a little joint compound and paint can do. You would never know this ceiling was 100 years old now!!!\n\nPlease let me know if you decide to take on texturing your own ceiling. I would LOVE to hear all about it! If you have any questions, feel free to ask away. I'd be happy to help!\n\nSuggested materials for this project:\n\n Pre-Mixed Joint Compound (Home Depot)\n Putty Knife (Lowes)\n Applicator (DIY from Scrap Wood)\n Plastic Bag (Garbage Sack On Hand)\n\n#ceilingtexture #diningroomremodel #fixerupper #diningroomceiling\n\nTo see more: http://www.vintagestreetdesigns.com/2018/02/how-to-texture-a-ceiling.html",
"json_metadata": "{\"tags\":[\"makeover\",\"ceiling\",\"diy\",\"art\",\"craft\"],\"image\":[\"https://steemitimages.com/DQmXCJTzBMKJiyw9aaJ3wH6xf2k7ovBLWjk4Pvpywhe5Fa1/how-to-texture-a-ceiling.jpg\",\"https://steemitimages.com/DQmZDX7fKJ82PrzoY6STmyM6w7hYJbS8BugfZGJqRE8c3xP/how-to-texture-a-ceiling2.jpg\",\"https://steemitimages.com/DQmdD4VqLBiNSgovoxUPDvneFUru9T599MxboMPCF1CkGtD/how-to-texture-a-ceiling3.jpg\",\"https://steemitimages.com/DQma3gg73wAvcbP9D1QBr6ymWLN7UHBzHGZDfnNxRmVJJ6z/how-to-texture-a-ceiling4.jpg\",\"https://steemitimages.com/DQmSQmVgxd34QMJN6fXvLDVaDX8gC7jAYTxxUEwyPau55Ft/how-to-texture-a-ceiling5.jpg\",\"https://steemitimages.com/DQmSAKcC7Bw4F3woFT6VHDbiECYo2H8kqKPDmwom1D8Y6WK/how-to-texture-a-ceiling6.jpg\",\"https://steemitimages.com/DQmTDJv3CLMLvQJeQAbpBntkUuyPhEy7sr5RnSskYqzBxTw/how-to-texture-a-ceiling7.jpg\",\"https://steemitimages.com/DQmVfjPTtDfnduAwXJytH4xFiEqEq78x5nDo9YZq5asv4Bj/how-to-texture-a-ceiling8.jpg\",\"https://steemitimages.com/DQmXXXfZhQsBVzdyd7JbBMeUGbS2LZYRrH8Bs5aKTTaYoe8/how-to-texture-a-ceiling9.jpg\"],\"links\":[\"http://www.vintagestreetdesigns.com/2018/02/how-to-texture-a-ceiling.html\"],\"app\":\"steemit/0.1\",\"format\":\"markdown\"}"
}
]
}diyhometalkclaimed reward balance: 0.281 SBD, 0.174 SP2018/03/25 17:41:15
diyhometalkclaimed reward balance: 0.281 SBD, 0.174 SP
2018/03/25 17:41:15
| account | diyhometalk |
| reward steem | 0.000 STEEM |
| reward sbd | 0.281 SBD |
| reward vests | 283.628260 VESTS |
| Transaction Info | Block #20990065/Trx 759aa99d660c1d68d190515e0a07a17d047cf9ab |
View Raw JSON Data
{
  "trx_id": "759aa99d660c1d68d190515e0a07a17d047cf9ab",
  "block": 20990065,
  "trx_in_block": 33,
  "op_in_trx": 0,
  "virtual_op": 0,
  "timestamp": "2018-03-25T17:41:15",
  "op": [
    "claim_reward_balance",
    {
      "account": "diyhometalk",
      "reward_steem": "0.000 STEEM",
      "reward_sbd": "0.281 SBD",
      "reward_vests": "283.628260 VESTS"
    }
  ]
}diyhometalkupvoted (100.00%) @diyhometalk / from-ordinary-to-fab2018/03/25 02:09:36
diyhometalkupvoted (100.00%) @diyhometalk / from-ordinary-to-fab
2018/03/25 02:09:36
| voter | diyhometalk |
| author | diyhometalk |
| permlink | from-ordinary-to-fab |
| weight | 10000 (100.00%) |
| Transaction Info | Block #20971437/Trx b3a305be819b50fbbe3201045da6c7ab7019dec8 |
View Raw JSON Data
{
  "trx_id": "b3a305be819b50fbbe3201045da6c7ab7019dec8",
  "block": 20971437,
  "trx_in_block": 29,
  "op_in_trx": 0,
  "virtual_op": 0,
  "timestamp": "2018-03-25T02:09:36",
  "op": [
    "vote",
    {
      "voter": "diyhometalk",
      "author": "diyhometalk",
      "permlink": "from-ordinary-to-fab",
      "weight": 10000
    }
  ]
}diyhometalkpublished a new post: from-ordinary-to-fab2018/03/25 02:09:36
diyhometalkpublished a new post: from-ordinary-to-fab
2018/03/25 02:09:36
| parent author | |
| parent permlink | diy |
| author | diyhometalk |
| permlink | from-ordinary-to-fab |
| title | From Ordinary to Fab! |
| body | I found this coffee table for $5 at a garage sale. I knew for $5 I could make it look fabulous! Time: 1 Days Cost: $5 Difficulty: Easy 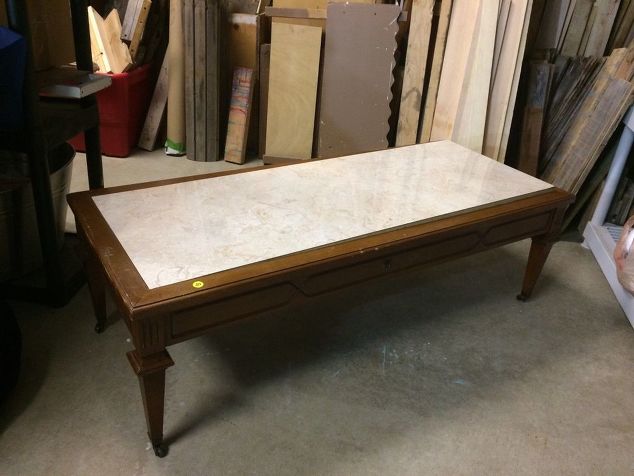 First thing to do was to dismantle this baby. I liked the inlay, so I decided to investigate how to take it off. It was attached underneath with many screws. I undid them all and expected the inlay to come out easily. It did not. I didn’t really want it to break but I attempted it again with a little more force this time. If it did break or chip, I thought I would just insert some type of wood into its spot. Luckily it came out this time. Whewww! One thing I did that saved me some time was mark the ends of the table and inlay with the same marking, matching A‘s at one end and B‘s at the other. This made putting it back in much easier by just matching up the letters. 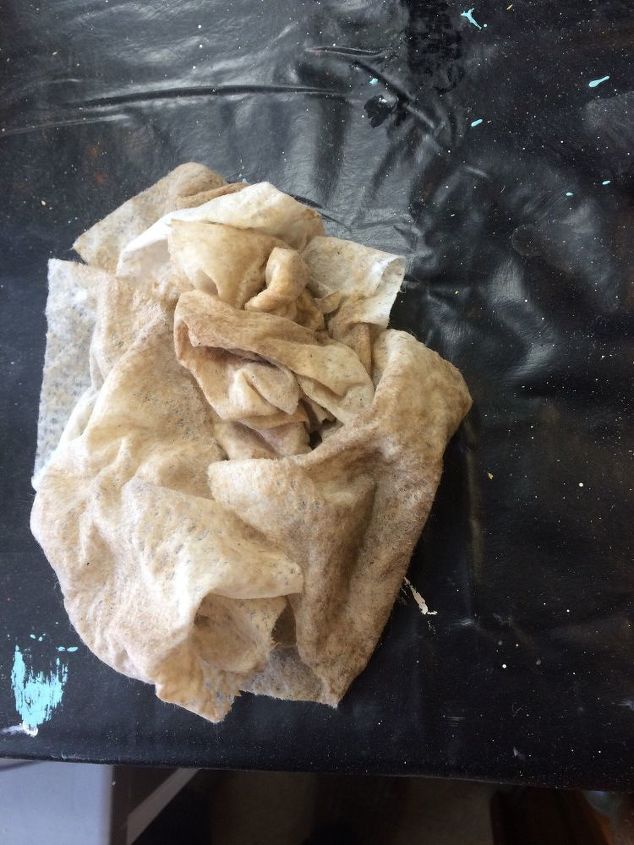 Next step, wiping it down! I think it lived with a smoker sometime in its life from looking at these! 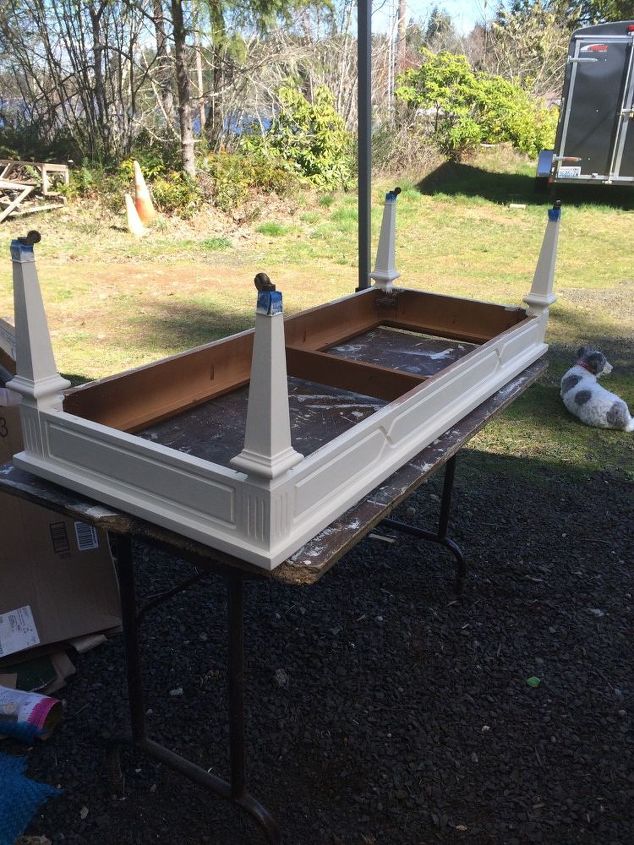 Next, I painted it with some homemade chalk paint using Behr Premium Plus Ultra paint and primer in one. The color is called Cottage White, interior matte finish. I put 3 coats on just to be sure it covered well.  I liked it like this, but I decided to distress it. 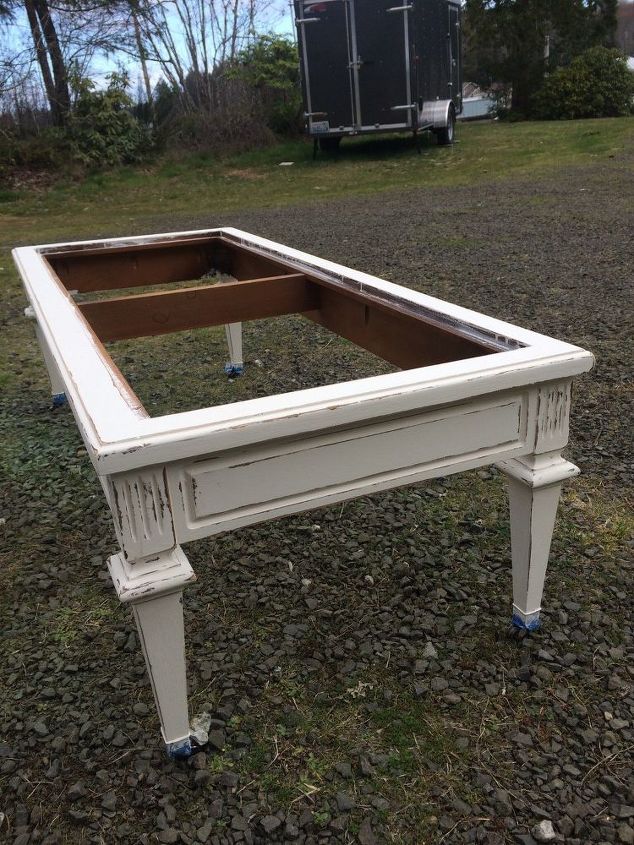 The distressing just brought it to life. 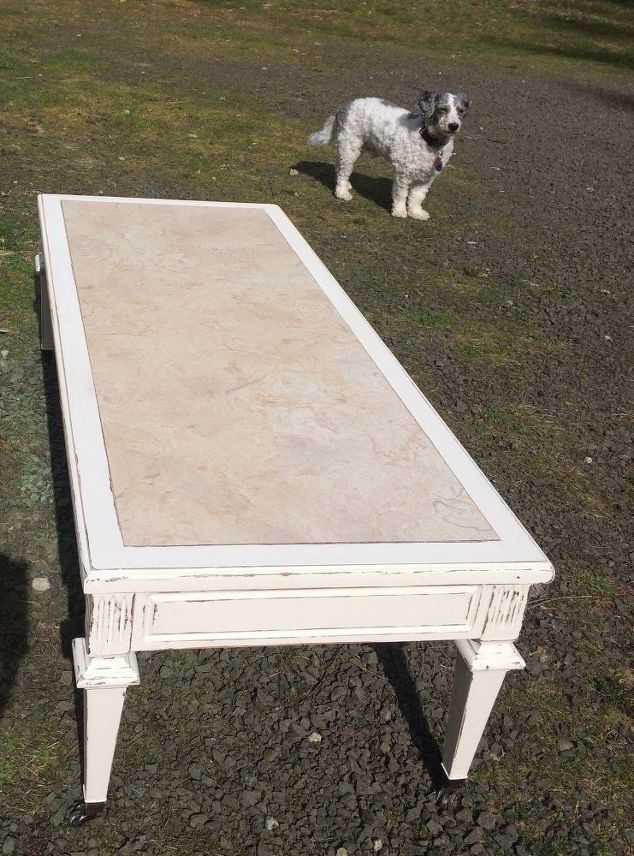 Inlay put back in! It looks a little darker in the photo than it does in person. There are strands of lighter white that help it flow together.  There were two holes that needed a handle. I found something in our stash. I almost forgot, it’s on rollers too! Suggested materials for this project: Coffee table (Garage sale) Behr Paint in Cottage White (Home Depot) Sander Paint brushes Cleaning rags Screw driver |
| json metadata | {"tags":["diy","livingroom","artscrafts","furnish","makeover"],"image":["https://steemitimages.com/DQmdiaTLTKoocukwgPXDwZSUhciuV6f1XScnKBRVVCesfKm/from-ordinary-to-fab.jpg","https://steemitimages.com/DQmc8qsfDrMhoy1EDk3KKfw2vbh9RPwhgZ2LHZnYdNCaatP/from-ordinary-to-fab2.jpg","https://steemitimages.com/DQmYStFsoZjWjLbeZXziQnV9KHAxwQW13vEptCyL5dVVdXA/from-ordinary-to-fab3.jpg","https://steemitimages.com/DQmYvkvKovVY71yu3AU3Pjuyu239z8f7Hj93YStzM7qjAp4/from-ordinary-to-fab4.jpg","https://steemitimages.com/DQmb94XMswSC6mq3xuDgKeJYMEyhwyNnbbajzPSTbs73o81/from-ordinary-to-fab5.jpg","https://steemitimages.com/DQmUFCbb4VpLPexHjXE8divMXcSVz6DRcMKA8GNFC7z4KSP/from-ordinary-to-fab6.jpg","https://steemitimages.com/DQmaTFoFaqKBbfNUU3Kh94ywWheromZYTsfUkJTCaPgEczz/from-ordinary-to-fab7.jpg"],"app":"steemit/0.1","format":"markdown"} |
| Transaction Info | Block #20971437/Trx b3a305be819b50fbbe3201045da6c7ab7019dec8 |
View Raw JSON Data
{
"trx_id": "b3a305be819b50fbbe3201045da6c7ab7019dec8",
"block": 20971437,
"trx_in_block": 29,
"op_in_trx": 0,
"virtual_op": 0,
"timestamp": "2018-03-25T02:09:36",
"op": [
"comment",
{
"parent_author": "",
"parent_permlink": "diy",
"author": "diyhometalk",
"permlink": "from-ordinary-to-fab",
"title": "From Ordinary to Fab!",
"body": "I found this coffee table for $5 at a garage sale. I knew for $5 I could make it look fabulous!\nTime: 1 Days\nCost: $5\nDifficulty: Easy\n\nFirst thing to do was to dismantle this baby. I liked the inlay, so I decided to investigate how to take it off. It was attached underneath with many screws. I undid them all and expected the inlay to come out easily. It did not. I didn’t really want it to break but I attempted it again with a little more force this time. If it did break or chip, I thought I would just insert some type of wood into its spot. Luckily it came out this time. Whewww! One thing I did that saved me some time was mark the ends of the table and inlay with the same marking, matching A‘s at one end and B‘s at the other. This made putting it back in much easier by just matching up the letters.\n\nNext step, wiping it down! I think it lived with a smoker sometime in its life from looking at these!\n\nNext, I painted it with some homemade chalk paint using Behr Premium Plus Ultra paint and primer in one. The color is called Cottage White, interior matte finish. I put 3 coats on just to be sure it covered well.\n\nI liked it like this, but I decided to distress it.\n\nThe distressing just brought it to life.\n\nInlay put back in! It looks a little darker in the photo than it does in person. There are strands of lighter white that help it flow together.\n\nThere were two holes that needed a handle. I found something in our stash. I almost forgot, it’s on rollers too! \nSuggested materials for this project:\n\n Coffee table (Garage sale)\n Behr Paint in Cottage White (Home Depot)\n Sander\n Paint brushes\n Cleaning rags\n Screw driver",
"json_metadata": "{\"tags\":[\"diy\",\"livingroom\",\"artscrafts\",\"furnish\",\"makeover\"],\"image\":[\"https://steemitimages.com/DQmdiaTLTKoocukwgPXDwZSUhciuV6f1XScnKBRVVCesfKm/from-ordinary-to-fab.jpg\",\"https://steemitimages.com/DQmc8qsfDrMhoy1EDk3KKfw2vbh9RPwhgZ2LHZnYdNCaatP/from-ordinary-to-fab2.jpg\",\"https://steemitimages.com/DQmYStFsoZjWjLbeZXziQnV9KHAxwQW13vEptCyL5dVVdXA/from-ordinary-to-fab3.jpg\",\"https://steemitimages.com/DQmYvkvKovVY71yu3AU3Pjuyu239z8f7Hj93YStzM7qjAp4/from-ordinary-to-fab4.jpg\",\"https://steemitimages.com/DQmb94XMswSC6mq3xuDgKeJYMEyhwyNnbbajzPSTbs73o81/from-ordinary-to-fab5.jpg\",\"https://steemitimages.com/DQmUFCbb4VpLPexHjXE8divMXcSVz6DRcMKA8GNFC7z4KSP/from-ordinary-to-fab6.jpg\",\"https://steemitimages.com/DQmaTFoFaqKBbfNUU3Kh94ywWheromZYTsfUkJTCaPgEczz/from-ordinary-to-fab7.jpg\"],\"app\":\"steemit/0.1\",\"format\":\"markdown\"}"
}
]
}diyhometalkreceived 0.281 SBD, 0.174 SP author reward for @diyhometalk / shrunken-sweater-chair-reupholster2018/03/24 20:31:42
diyhometalkreceived 0.281 SBD, 0.174 SP author reward for @diyhometalk / shrunken-sweater-chair-reupholster
2018/03/24 20:31:42
| author | diyhometalk |
| permlink | shrunken-sweater-chair-reupholster |
| sbd payout | 0.281 SBD |
| steem payout | 0.000 STEEM |
| vesting payout | 283.628260 VESTS |
| Transaction Info | Block #20964681/Virtual Operation #17 |
View Raw JSON Data
{
  "trx_id": "0000000000000000000000000000000000000000",
  "block": 20964681,
  "trx_in_block": 4294967295,
  "op_in_trx": 0,
  "virtual_op": 17,
  "timestamp": "2018-03-24T20:31:42",
  "op": [
    "author_reward",
    {
      "author": "diyhometalk",
      "permlink": "shrunken-sweater-chair-reupholster",
      "sbd_payout": "0.281 SBD",
      "steem_payout": "0.000 STEEM",
      "vesting_payout": "283.628260 VESTS"
    }
  ]
}mikeycinmountpupvoted (100.00%) @diyhometalk / 1970-s-entertainment-makeover-finally2018/03/24 14:47:18
mikeycinmountpupvoted (100.00%) @diyhometalk / 1970-s-entertainment-makeover-finally
2018/03/24 14:47:18
| voter | mikeycinmountp |
| author | diyhometalk |
| permlink | 1970-s-entertainment-makeover-finally |
| weight | 10000 (100.00%) |
| Transaction Info | Block #20957794/Trx 30c5cf07e9959d5136692a9cd19b0e1ff96ca75d |
View Raw JSON Data
{
  "trx_id": "30c5cf07e9959d5136692a9cd19b0e1ff96ca75d",
  "block": 20957794,
  "trx_in_block": 12,
  "op_in_trx": 0,
  "virtual_op": 0,
  "timestamp": "2018-03-24T14:47:18",
  "op": [
    "vote",
    {
      "voter": "mikeycinmountp",
      "author": "diyhometalk",
      "permlink": "1970-s-entertainment-makeover-finally",
      "weight": 10000
    }
  ]
}carlgnashupvoted (25.00%) @diyhometalk / 1970-s-entertainment-makeover-finally2018/03/24 07:58:30
carlgnashupvoted (25.00%) @diyhometalk / 1970-s-entertainment-makeover-finally
2018/03/24 07:58:30
| voter | carlgnash |
| author | diyhometalk |
| permlink | 1970-s-entertainment-makeover-finally |
| weight | 2500 (25.00%) |
| Transaction Info | Block #20949620/Trx 60c711727ec51034ae27b21ee86107cbfb1b9a5f |
View Raw JSON Data
{
  "trx_id": "60c711727ec51034ae27b21ee86107cbfb1b9a5f",
  "block": 20949620,
  "trx_in_block": 46,
  "op_in_trx": 0,
  "virtual_op": 0,
  "timestamp": "2018-03-24T07:58:30",
  "op": [
    "vote",
    {
      "voter": "carlgnash",
      "author": "diyhometalk",
      "permlink": "1970-s-entertainment-makeover-finally",
      "weight": 2500
    }
  ]
}dillemmaupvoted (5.00%) @diyhometalk / 1970-s-entertainment-makeover-finally2018/03/24 07:54:09
dillemmaupvoted (5.00%) @diyhometalk / 1970-s-entertainment-makeover-finally
2018/03/24 07:54:09
| voter | dillemma |
| author | diyhometalk |
| permlink | 1970-s-entertainment-makeover-finally |
| weight | 500 (5.00%) |
| Transaction Info | Block #20949533/Trx 1ab75d93369b40de41833d6481f1e5f4376c5014 |
View Raw JSON Data
{
  "trx_id": "1ab75d93369b40de41833d6481f1e5f4376c5014",
  "block": 20949533,
  "trx_in_block": 54,
  "op_in_trx": 0,
  "virtual_op": 0,
  "timestamp": "2018-03-24T07:54:09",
  "op": [
    "vote",
    {
      "voter": "dillemma",
      "author": "diyhometalk",
      "permlink": "1970-s-entertainment-makeover-finally",
      "weight": 500
    }
  ]
}tormiwahupvoted (1.25%) @diyhometalk / 1970-s-entertainment-makeover-finally2018/03/24 07:54:09
tormiwahupvoted (1.25%) @diyhometalk / 1970-s-entertainment-makeover-finally
2018/03/24 07:54:09
| voter | tormiwah |
| author | diyhometalk |
| permlink | 1970-s-entertainment-makeover-finally |
| weight | 125 (1.25%) |
| Transaction Info | Block #20949533/Trx dc30a446eefb4a5560a968d94d08514e061baab8 |
View Raw JSON Data
{
  "trx_id": "dc30a446eefb4a5560a968d94d08514e061baab8",
  "block": 20949533,
  "trx_in_block": 53,
  "op_in_trx": 0,
  "virtual_op": 0,
  "timestamp": "2018-03-24T07:54:09",
  "op": [
    "vote",
    {
      "voter": "tormiwah",
      "author": "diyhometalk",
      "permlink": "1970-s-entertainment-makeover-finally",
      "weight": 125
    }
  ]
}willywealthupvoted (100.00%) @diyhometalk / 1970-s-entertainment-makeover-finally2018/03/24 07:54:09
willywealthupvoted (100.00%) @diyhometalk / 1970-s-entertainment-makeover-finally
2018/03/24 07:54:09
| voter | willywealth |
| author | diyhometalk |
| permlink | 1970-s-entertainment-makeover-finally |
| weight | 10000 (100.00%) |
| Transaction Info | Block #20949533/Trx 12b9ca192fc18589c55bea8e4ef68d6071f19f64 |
View Raw JSON Data
{
  "trx_id": "12b9ca192fc18589c55bea8e4ef68d6071f19f64",
  "block": 20949533,
  "trx_in_block": 52,
  "op_in_trx": 0,
  "virtual_op": 0,
  "timestamp": "2018-03-24T07:54:09",
  "op": [
    "vote",
    {
      "voter": "willywealth",
      "author": "diyhometalk",
      "permlink": "1970-s-entertainment-makeover-finally",
      "weight": 10000
    }
  ]
}papaudemeupvoted (5.00%) @diyhometalk / 1970-s-entertainment-makeover-finally2018/03/24 07:54:09
papaudemeupvoted (5.00%) @diyhometalk / 1970-s-entertainment-makeover-finally
2018/03/24 07:54:09
| voter | papaudeme |
| author | diyhometalk |
| permlink | 1970-s-entertainment-makeover-finally |
| weight | 500 (5.00%) |
| Transaction Info | Block #20949533/Trx c26c91533cba2a3e6e9557c8a6123fe4e0af6452 |
View Raw JSON Data
{
  "trx_id": "c26c91533cba2a3e6e9557c8a6123fe4e0af6452",
  "block": 20949533,
  "trx_in_block": 51,
  "op_in_trx": 0,
  "virtual_op": 0,
  "timestamp": "2018-03-24T07:54:09",
  "op": [
    "vote",
    {
      "voter": "papaudeme",
      "author": "diyhometalk",
      "permlink": "1970-s-entertainment-makeover-finally",
      "weight": 500
    }
  ]
}steemfireupvoted (25.00%) @diyhometalk / 1970-s-entertainment-makeover-finally2018/03/24 07:54:03
steemfireupvoted (25.00%) @diyhometalk / 1970-s-entertainment-makeover-finally
2018/03/24 07:54:03
| voter | steemfire |
| author | diyhometalk |
| permlink | 1970-s-entertainment-makeover-finally |
| weight | 2500 (25.00%) |
| Transaction Info | Block #20949531/Trx cd16d31117c584b460792d4c94c6cfc77fcd879e |
View Raw JSON Data
{
  "trx_id": "cd16d31117c584b460792d4c94c6cfc77fcd879e",
  "block": 20949531,
  "trx_in_block": 48,
  "op_in_trx": 0,
  "virtual_op": 0,
  "timestamp": "2018-03-24T07:54:03",
  "op": [
    "vote",
    {
      "voter": "steemfire",
      "author": "diyhometalk",
      "permlink": "1970-s-entertainment-makeover-finally",
      "weight": 2500
    }
  ]
}herfieupvoted (25.00%) @diyhometalk / 1970-s-entertainment-makeover-finally2018/03/24 07:54:03
herfieupvoted (25.00%) @diyhometalk / 1970-s-entertainment-makeover-finally
2018/03/24 07:54:03
| voter | herfie |
| author | diyhometalk |
| permlink | 1970-s-entertainment-makeover-finally |
| weight | 2500 (25.00%) |
| Transaction Info | Block #20949531/Trx ab694d4c770c7f25597d01e051a677701a23fc81 |
View Raw JSON Data
{
  "trx_id": "ab694d4c770c7f25597d01e051a677701a23fc81",
  "block": 20949531,
  "trx_in_block": 47,
  "op_in_trx": 0,
  "virtual_op": 0,
  "timestamp": "2018-03-24T07:54:03",
  "op": [
    "vote",
    {
      "voter": "herfie",
      "author": "diyhometalk",
      "permlink": "1970-s-entertainment-makeover-finally",
      "weight": 2500
    }
  ]
}matthewthonyitupvoted (25.00%) @diyhometalk / 1970-s-entertainment-makeover-finally2018/03/24 07:54:03
matthewthonyitupvoted (25.00%) @diyhometalk / 1970-s-entertainment-makeover-finally
2018/03/24 07:54:03
| voter | matthewthonyit |
| author | diyhometalk |
| permlink | 1970-s-entertainment-makeover-finally |
| weight | 2500 (25.00%) |
| Transaction Info | Block #20949531/Trx ca51794123ada2583c567eaa8f6ac32056e1720b |
View Raw JSON Data
{
  "trx_id": "ca51794123ada2583c567eaa8f6ac32056e1720b",
  "block": 20949531,
  "trx_in_block": 46,
  "op_in_trx": 0,
  "virtual_op": 0,
  "timestamp": "2018-03-24T07:54:03",
  "op": [
    "vote",
    {
      "voter": "matthewthonyit",
      "author": "diyhometalk",
      "permlink": "1970-s-entertainment-makeover-finally",
      "weight": 2500
    }
  ]
}franklan3386upvoted (50.00%) @diyhometalk / 1970-s-entertainment-makeover-finally2018/03/24 07:54:03
franklan3386upvoted (50.00%) @diyhometalk / 1970-s-entertainment-makeover-finally
2018/03/24 07:54:03
| voter | franklan3386 |
| author | diyhometalk |
| permlink | 1970-s-entertainment-makeover-finally |
| weight | 5000 (50.00%) |
| Transaction Info | Block #20949531/Trx 59969ec9ebce5aa9f11c6876db12dc81e6de0e76 |
View Raw JSON Data
{
  "trx_id": "59969ec9ebce5aa9f11c6876db12dc81e6de0e76",
  "block": 20949531,
  "trx_in_block": 45,
  "op_in_trx": 0,
  "virtual_op": 0,
  "timestamp": "2018-03-24T07:54:03",
  "op": [
    "vote",
    {
      "voter": "franklan3386",
      "author": "diyhometalk",
      "permlink": "1970-s-entertainment-makeover-finally",
      "weight": 5000
    }
  ]
}evilest-fiendupvoted (5.00%) @diyhometalk / 1970-s-entertainment-makeover-finally2018/03/24 07:54:03
evilest-fiendupvoted (5.00%) @diyhometalk / 1970-s-entertainment-makeover-finally
2018/03/24 07:54:03
| voter | evilest-fiend |
| author | diyhometalk |
| permlink | 1970-s-entertainment-makeover-finally |
| weight | 500 (5.00%) |
| Transaction Info | Block #20949531/Trx 10f1bd61c864ed571fe8e9aef6ca691c32249ae7 |
View Raw JSON Data
{
  "trx_id": "10f1bd61c864ed571fe8e9aef6ca691c32249ae7",
  "block": 20949531,
  "trx_in_block": 44,
  "op_in_trx": 0,
  "virtual_op": 0,
  "timestamp": "2018-03-24T07:54:03",
  "op": [
    "vote",
    {
      "voter": "evilest-fiend",
      "author": "diyhometalk",
      "permlink": "1970-s-entertainment-makeover-finally",
      "weight": 500
    }
  ]
}misterakpanupvoted (5.00%) @diyhometalk / 1970-s-entertainment-makeover-finally2018/03/24 07:54:03
misterakpanupvoted (5.00%) @diyhometalk / 1970-s-entertainment-makeover-finally
2018/03/24 07:54:03
| voter | misterakpan |
| author | diyhometalk |
| permlink | 1970-s-entertainment-makeover-finally |
| weight | 500 (5.00%) |
| Transaction Info | Block #20949531/Trx 67f07d929505c6dd512794c21bb30988f0184a09 |
View Raw JSON Data
{
  "trx_id": "67f07d929505c6dd512794c21bb30988f0184a09",
  "block": 20949531,
  "trx_in_block": 43,
  "op_in_trx": 0,
  "virtual_op": 0,
  "timestamp": "2018-03-24T07:54:03",
  "op": [
    "vote",
    {
      "voter": "misterakpan",
      "author": "diyhometalk",
      "permlink": "1970-s-entertainment-makeover-finally",
      "weight": 500
    }
  ]
}nobyeniupvoted (12.50%) @diyhometalk / 1970-s-entertainment-makeover-finally2018/03/24 07:54:03
nobyeniupvoted (12.50%) @diyhometalk / 1970-s-entertainment-makeover-finally
2018/03/24 07:54:03
| voter | nobyeni |
| author | diyhometalk |
| permlink | 1970-s-entertainment-makeover-finally |
| weight | 1250 (12.50%) |
| Transaction Info | Block #20949531/Trx 6ef508f7bae196c37849859b16a5e2fdef424b19 |
View Raw JSON Data
{
  "trx_id": "6ef508f7bae196c37849859b16a5e2fdef424b19",
  "block": 20949531,
  "trx_in_block": 42,
  "op_in_trx": 0,
  "virtual_op": 0,
  "timestamp": "2018-03-24T07:54:03",
  "op": [
    "vote",
    {
      "voter": "nobyeni",
      "author": "diyhometalk",
      "permlink": "1970-s-entertainment-makeover-finally",
      "weight": 1250
    }
  ]
}choogirlupvoted (10.00%) @diyhometalk / 1970-s-entertainment-makeover-finally2018/03/24 07:54:03
choogirlupvoted (10.00%) @diyhometalk / 1970-s-entertainment-makeover-finally
2018/03/24 07:54:03
| voter | choogirl |
| author | diyhometalk |
| permlink | 1970-s-entertainment-makeover-finally |
| weight | 1000 (10.00%) |
| Transaction Info | Block #20949531/Trx 0922d1a40551244511435ebb996888e52ea660bf |
View Raw JSON Data
{
  "trx_id": "0922d1a40551244511435ebb996888e52ea660bf",
  "block": 20949531,
  "trx_in_block": 41,
  "op_in_trx": 0,
  "virtual_op": 0,
  "timestamp": "2018-03-24T07:54:03",
  "op": [
    "vote",
    {
      "voter": "choogirl",
      "author": "diyhometalk",
      "permlink": "1970-s-entertainment-makeover-finally",
      "weight": 1000
    }
  ]
}bustami83upvoted (50.00%) @diyhometalk / 1970-s-entertainment-makeover-finally2018/03/24 07:54:03
bustami83upvoted (50.00%) @diyhometalk / 1970-s-entertainment-makeover-finally
2018/03/24 07:54:03
| voter | bustami83 |
| author | diyhometalk |
| permlink | 1970-s-entertainment-makeover-finally |
| weight | 5000 (50.00%) |
| Transaction Info | Block #20949531/Trx 27834b0f4dce75d97a7ee94ae7b9f9d63bf218c4 |
View Raw JSON Data
{
  "trx_id": "27834b0f4dce75d97a7ee94ae7b9f9d63bf218c4",
  "block": 20949531,
  "trx_in_block": 40,
  "op_in_trx": 0,
  "virtual_op": 0,
  "timestamp": "2018-03-24T07:54:03",
  "op": [
    "vote",
    {
      "voter": "bustami83",
      "author": "diyhometalk",
      "permlink": "1970-s-entertainment-makeover-finally",
      "weight": 5000
    }
  ]
}markangeltruemanupvoted (5.00%) @diyhometalk / 1970-s-entertainment-makeover-finally2018/03/24 07:54:03
markangeltruemanupvoted (5.00%) @diyhometalk / 1970-s-entertainment-makeover-finally
2018/03/24 07:54:03
| voter | markangeltrueman |
| author | diyhometalk |
| permlink | 1970-s-entertainment-makeover-finally |
| weight | 500 (5.00%) |
| Transaction Info | Block #20949531/Trx 8661a33921694f86288f6e27998c93ae02dcacaf |
View Raw JSON Data
{
  "trx_id": "8661a33921694f86288f6e27998c93ae02dcacaf",
  "block": 20949531,
  "trx_in_block": 39,
  "op_in_trx": 0,
  "virtual_op": 0,
  "timestamp": "2018-03-24T07:54:03",
  "op": [
    "vote",
    {
      "voter": "markangeltrueman",
      "author": "diyhometalk",
      "permlink": "1970-s-entertainment-makeover-finally",
      "weight": 500
    }
  ]
}fredkeseupvoted (25.00%) @diyhometalk / 1970-s-entertainment-makeover-finally2018/03/24 07:54:03
fredkeseupvoted (25.00%) @diyhometalk / 1970-s-entertainment-makeover-finally
2018/03/24 07:54:03
| voter | fredkese |
| author | diyhometalk |
| permlink | 1970-s-entertainment-makeover-finally |
| weight | 2500 (25.00%) |
| Transaction Info | Block #20949531/Trx 3d940da90ccf830f22936b12312d0e70b3a54283 |
View Raw JSON Data
{
  "trx_id": "3d940da90ccf830f22936b12312d0e70b3a54283",
  "block": 20949531,
  "trx_in_block": 38,
  "op_in_trx": 0,
  "virtual_op": 0,
  "timestamp": "2018-03-24T07:54:03",
  "op": [
    "vote",
    {
      "voter": "fredkese",
      "author": "diyhometalk",
      "permlink": "1970-s-entertainment-makeover-finally",
      "weight": 2500
    }
  ]
}buckydurddleupvoted (2.50%) @diyhometalk / 1970-s-entertainment-makeover-finally2018/03/24 07:54:03
buckydurddleupvoted (2.50%) @diyhometalk / 1970-s-entertainment-makeover-finally
2018/03/24 07:54:03
| voter | buckydurddle |
| author | diyhometalk |
| permlink | 1970-s-entertainment-makeover-finally |
| weight | 250 (2.50%) |
| Transaction Info | Block #20949531/Trx 3b5f5cb99f9d2b2ecde5f789c1620c1b23cbc0cc |
View Raw JSON Data
{
  "trx_id": "3b5f5cb99f9d2b2ecde5f789c1620c1b23cbc0cc",
  "block": 20949531,
  "trx_in_block": 37,
  "op_in_trx": 0,
  "virtual_op": 0,
  "timestamp": "2018-03-24T07:54:03",
  "op": [
    "vote",
    {
      "voter": "buckydurddle",
      "author": "diyhometalk",
      "permlink": "1970-s-entertainment-makeover-finally",
      "weight": 250
    }
  ]
}ethandsmithupvoted (2.00%) @diyhometalk / 1970-s-entertainment-makeover-finally2018/03/24 07:53:27
ethandsmithupvoted (2.00%) @diyhometalk / 1970-s-entertainment-makeover-finally
2018/03/24 07:53:27
| voter | ethandsmith |
| author | diyhometalk |
| permlink | 1970-s-entertainment-makeover-finally |
| weight | 200 (2.00%) |
| Transaction Info | Block #20949519/Trx 82133c676d6444acf7bdbdfc7cce6e8a8a4a3f09 |
View Raw JSON Data
{
  "trx_id": "82133c676d6444acf7bdbdfc7cce6e8a8a4a3f09",
  "block": 20949519,
  "trx_in_block": 23,
  "op_in_trx": 0,
  "virtual_op": 0,
  "timestamp": "2018-03-24T07:53:27",
  "op": [
    "vote",
    {
      "voter": "ethandsmith",
      "author": "diyhometalk",
      "permlink": "1970-s-entertainment-makeover-finally",
      "weight": 200
    }
  ]
}r-botupvoted (50.00%) @diyhometalk / 1970-s-entertainment-makeover-finally2018/03/24 07:53:21
r-botupvoted (50.00%) @diyhometalk / 1970-s-entertainment-makeover-finally
2018/03/24 07:53:21
| voter | r-bot |
| author | diyhometalk |
| permlink | 1970-s-entertainment-makeover-finally |
| weight | 5000 (50.00%) |
| Transaction Info | Block #20949517/Trx 0fe85170656a85c85a0cd0f3fcb184a3df0fb753 |
View Raw JSON Data
{
  "trx_id": "0fe85170656a85c85a0cd0f3fcb184a3df0fb753",
  "block": 20949517,
  "trx_in_block": 53,
  "op_in_trx": 0,
  "virtual_op": 0,
  "timestamp": "2018-03-24T07:53:21",
  "op": [
    "vote",
    {
      "voter": "r-bot",
      "author": "diyhometalk",
      "permlink": "1970-s-entertainment-makeover-finally",
      "weight": 5000
    }
  ]
}diyhometalkupvoted (100.00%) @diyhometalk / 1970-s-entertainment-makeover-finally2018/03/24 05:22:36
diyhometalkupvoted (100.00%) @diyhometalk / 1970-s-entertainment-makeover-finally
2018/03/24 05:22:36
| voter | diyhometalk |
| author | diyhometalk |
| permlink | 1970-s-entertainment-makeover-finally |
| weight | 10000 (100.00%) |
| Transaction Info | Block #20946503/Trx 28418a24c50a379193bfe90d38ba8ed6c898a1a6 |
View Raw JSON Data
{
  "trx_id": "28418a24c50a379193bfe90d38ba8ed6c898a1a6",
  "block": 20946503,
  "trx_in_block": 4,
  "op_in_trx": 0,
  "virtual_op": 0,
  "timestamp": "2018-03-24T05:22:36",
  "op": [
    "vote",
    {
      "voter": "diyhometalk",
      "author": "diyhometalk",
      "permlink": "1970-s-entertainment-makeover-finally",
      "weight": 10000
    }
  ]
}diyhometalkpublished a new post: 1970-s-entertainment-makeover-finally2018/03/24 05:22:36
diyhometalkpublished a new post: 1970-s-entertainment-makeover-finally
2018/03/24 05:22:36
| parent author | |
| parent permlink | art |
| author | diyhometalk |
| permlink | 1970-s-entertainment-makeover-finally |
| title | 1970's Entertainment Makeover - Finally! |
| body | Saw a lovely entertainment center at costco and my husband wanted to buy it. I said, wait, I think I can make over the one we have ignored for years - skeptical, but willing to see. He and the entire family loves the results. If only I had a project plan, might have gone more smoothly - but, trial and lots of errors got it to the point you are seeing. Happy to answer any questions. Time: 4 Hours Cost: $25 Difficulty: Medium  Very heavy - solid oak! Took it out to the barn/workshop and prepared to sand.  sanded using #80 grit. Moved it around so I could get to the different areas easily, meaning, setting it on it's side, etc.  worked on a color of the stain - son in law had built a gorgeous custom table for a client and he said I could use the remaining stain but it was too dark - used Rustoleum Antique White to soften and blend. Then as a final finish used minwax poly to give it a high gloss at the end. 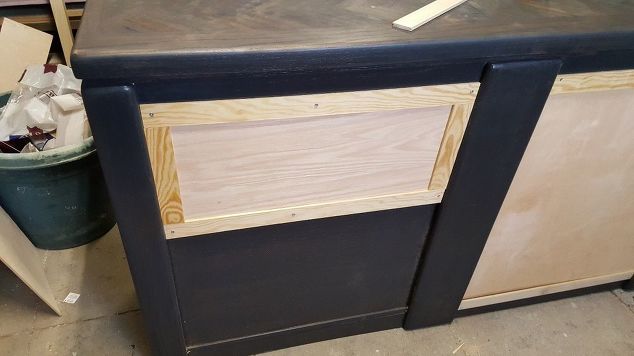 closed out the back and ends with 1/4 x 2 poplar trim - should have used my nailer to finish - one of the "errors" I made, but you can't see it luckily since it is in the back. 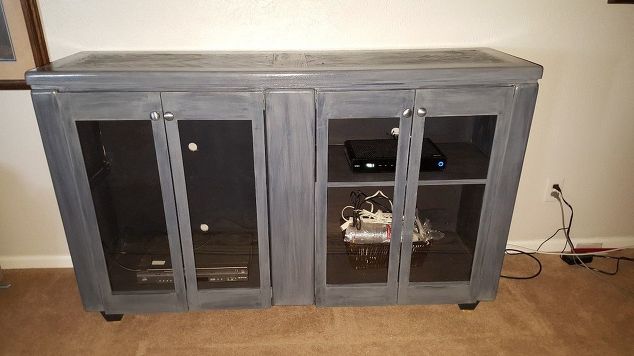 Made doors, trimmed the ends, put cool off color foots on the base, had the guys at lowes cut Plexiglass for the doors which I installed using industrial Velcro so I can take off to clean easily. Top is still a discussion - might do a gray tile or might leave it dark to match the legs. Will keep you updated. Again - no project plan, just some trial and a lot of error, but really happy with the finished product and as much money as I spend at Costco - happy I could produce that my husband loved. Suggested materials for this project: 1/4 poplar trim (Home Depot/Lowes) 1/4 oak plywood (home Depot/Lowes) |
| json metadata | {"tags":["art","makeover","diy","craft","furniture"],"image":["https://steemitimages.com/DQmXJHnwu9g4qoRUzvb4SiNRAKrVgGysX5UGoVxohcHJhUP/1970-s-entertainment-makeover-finally.jpg","https://steemitimages.com/DQmUp2tbWFYNqsznBfakGQPdceN6pXarkz72nCVMVcpvykY/1970-s-entertainment-makeover-finally2.jpg","https://steemitimages.com/DQmXuZL6XpCQ1FPgmZwmozd83WjotjB1shb9oTqbibeAePD/1970-s-entertainment-makeover-finally3.jpg","https://steemitimages.com/DQmTrJqmKm7RjyLLJrAbbF1eZWFMsWMQ7gGcuNKwMiJ6n54/1970-s-entertainment-makeover-finally4.jpg","https://steemitimages.com/DQmWy4MWHwED8ZscCG9yaEDAVBpSRM1aS5FxMGvB7DkdumH/1970-s-entertainment-makeover-finally5.jpg"],"app":"steemit/0.1","format":"markdown"} |
| Transaction Info | Block #20946503/Trx 28418a24c50a379193bfe90d38ba8ed6c898a1a6 |
View Raw JSON Data
{
"trx_id": "28418a24c50a379193bfe90d38ba8ed6c898a1a6",
"block": 20946503,
"trx_in_block": 4,
"op_in_trx": 0,
"virtual_op": 0,
"timestamp": "2018-03-24T05:22:36",
"op": [
"comment",
{
"parent_author": "",
"parent_permlink": "art",
"author": "diyhometalk",
"permlink": "1970-s-entertainment-makeover-finally",
"title": "1970's Entertainment Makeover - Finally!",
"body": "Saw a lovely entertainment center at costco and my husband wanted to buy it. I said, wait, I think I can make over the one we have ignored for years - skeptical, but willing to see. He and the entire family loves the results. If only I had a project plan, might have gone more smoothly - but, trial and lots of errors got it to the point you are seeing. Happy to answer any questions.\nTime: 4 Hours\nCost: $25\nDifficulty: Medium\n\nVery heavy - solid oak! Took it out to the barn/workshop and prepared to sand.\n\nsanded using #80 grit. Moved it around so I could get to the different areas easily, meaning, setting it on it's side, etc.\n\nworked on a color of the stain - son in law had built a gorgeous custom table for a client and he said I could use the remaining stain but it was too dark - used Rustoleum Antique White to soften and blend. Then as a final finish used minwax poly to give it a high gloss at the end.\n\nclosed out the back and ends with 1/4 x 2 poplar trim - should have used my nailer to finish - one of the \"errors\" I made, but you can't see it luckily since it is in the back.\n\nMade doors, trimmed the ends, put cool off color foots on the base, had the guys at lowes cut Plexiglass for the doors which I installed using industrial Velcro so I can take off to clean easily. Top is still a discussion - might do a gray tile or might leave it dark to match the legs. Will keep you updated. Again - no project plan, just some trial and a lot of error, but really happy with the finished product and as much money as I spend at Costco - happy I could produce that my husband loved.\nSuggested materials for this project:\n\n 1/4 poplar trim (Home Depot/Lowes)\n 1/4 oak plywood (home Depot/Lowes)",
"json_metadata": "{\"tags\":[\"art\",\"makeover\",\"diy\",\"craft\",\"furniture\"],\"image\":[\"https://steemitimages.com/DQmXJHnwu9g4qoRUzvb4SiNRAKrVgGysX5UGoVxohcHJhUP/1970-s-entertainment-makeover-finally.jpg\",\"https://steemitimages.com/DQmUp2tbWFYNqsznBfakGQPdceN6pXarkz72nCVMVcpvykY/1970-s-entertainment-makeover-finally2.jpg\",\"https://steemitimages.com/DQmXuZL6XpCQ1FPgmZwmozd83WjotjB1shb9oTqbibeAePD/1970-s-entertainment-makeover-finally3.jpg\",\"https://steemitimages.com/DQmTrJqmKm7RjyLLJrAbbF1eZWFMsWMQ7gGcuNKwMiJ6n54/1970-s-entertainment-makeover-finally4.jpg\",\"https://steemitimages.com/DQmWy4MWHwED8ZscCG9yaEDAVBpSRM1aS5FxMGvB7DkdumH/1970-s-entertainment-makeover-finally5.jpg\"],\"app\":\"steemit/0.1\",\"format\":\"markdown\"}"
}
]
}hendrisusantoupvoted (100.00%) @diyhometalk / create-a-blooming-branch-centerpiece-for-easter2018/03/23 15:21:48
hendrisusantoupvoted (100.00%) @diyhometalk / create-a-blooming-branch-centerpiece-for-easter
2018/03/23 15:21:48
| voter | hendrisusanto |
| author | diyhometalk |
| permlink | create-a-blooming-branch-centerpiece-for-easter |
| weight | 10000 (100.00%) |
| Transaction Info | Block #20929690/Trx 4f343b3b52a3c26c0bba6b10f57f68e925df8e8b |
View Raw JSON Data
{
  "trx_id": "4f343b3b52a3c26c0bba6b10f57f68e925df8e8b",
  "block": 20929690,
  "trx_in_block": 24,
  "op_in_trx": 0,
  "virtual_op": 0,
  "timestamp": "2018-03-23T15:21:48",
  "op": [
    "vote",
    {
      "voter": "hendrisusanto",
      "author": "diyhometalk",
      "permlink": "create-a-blooming-branch-centerpiece-for-easter",
      "weight": 10000
    }
  ]
}diyhometalkupvoted (100.00%) @diyhometalk / create-a-blooming-branch-centerpiece-for-easter2018/03/23 15:20:18
diyhometalkupvoted (100.00%) @diyhometalk / create-a-blooming-branch-centerpiece-for-easter
2018/03/23 15:20:18
| voter | diyhometalk |
| author | diyhometalk |
| permlink | create-a-blooming-branch-centerpiece-for-easter |
| weight | 10000 (100.00%) |
| Transaction Info | Block #20929660/Trx 975752d5d2c5ffb977899ef6522b2c6081b5c6cb |
View Raw JSON Data
{
  "trx_id": "975752d5d2c5ffb977899ef6522b2c6081b5c6cb",
  "block": 20929660,
  "trx_in_block": 69,
  "op_in_trx": 0,
  "virtual_op": 0,
  "timestamp": "2018-03-23T15:20:18",
  "op": [
    "vote",
    {
      "voter": "diyhometalk",
      "author": "diyhometalk",
      "permlink": "create-a-blooming-branch-centerpiece-for-easter",
      "weight": 10000
    }
  ]
}diyhometalkpublished a new post: create-a-blooming-branch-centerpiece-for-easter2018/03/23 15:20:18
diyhometalkpublished a new post: create-a-blooming-branch-centerpiece-for-easter
2018/03/23 15:20:18
| parent author | |
| parent permlink | easter |
| author | diyhometalk |
| permlink | create-a-blooming-branch-centerpiece-for-easter |
| title | Create a Blooming Branch Centerpiece for Easter |
| body | Make an easy centerpiece for your Easter table using blooming branches from your trees or shrubs! Time: 1 Hours Cost: $10 Difficulty: Easy  I love to add a little bit of nature for a spring or Easter table. For an easy centerpiece, I filled a glass vase with jelly beans that look like speckled eggs.  You'll need two vases, one smaller vase to "nest" inside a larger vase and some candy. The candy will conceal your stems.  Center a smaller vase inside a larger vase and place your jelly beans or candy of your choice between the walls of your vases. Easter candy is already on sale or stock up at the dollar store to fill your vase. I saved my candy from last year’s centerpiece with tulips to use again this year.  Fill your inner vase with water and add some blooming branches. I used a combination of Dogwood and plum tree branches that were blooming. Depending on when Easter falls and where your live, use what's available that's in bloom. Forsythia branches or the pink blooms of a Redbud or Cherry tree would be beautiful in a vase as a centerpiece. If you don't have access to blooming branches, use faux floral branches.  I added a few colored faux Easter eggs to tuck in among the branches and around the base of the centerpiece. 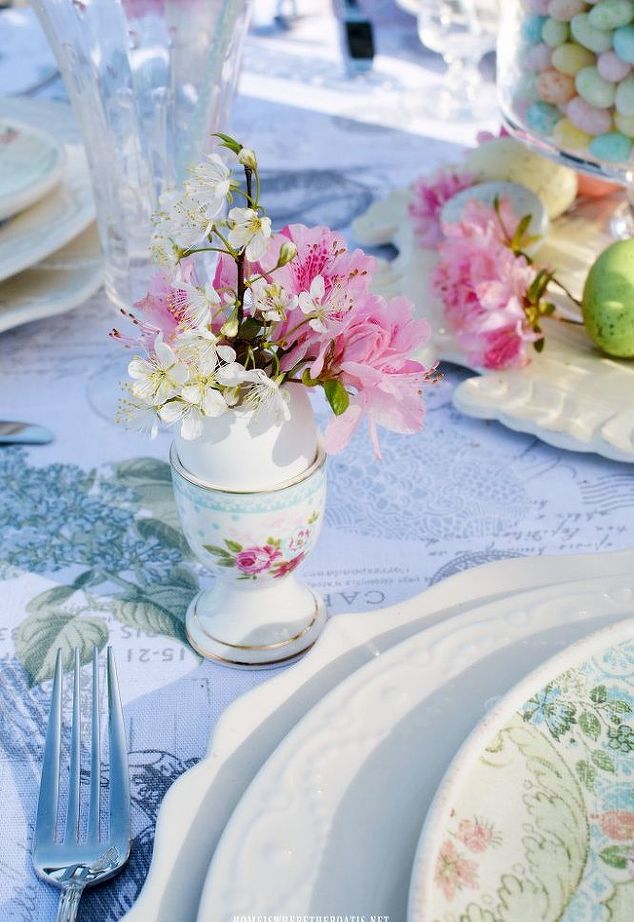 I also like to save my egg shells as mini vases for the table for spring or Easter! Use the edge of a table knife to tap the egg to crack it near the small end of the egg, rotating it as you go until you’ve made a circle all the way around the egg. Carefully remove the circle of shell, including any lose or stray pieces of shell. Pour out your egg (for your recipe or breakfast) and rinse well. Place your egg shell vase in a decorative egg cup, adding water, then your flowers. I cut some azalea blooms from the shrubs and added some plum blossoms. 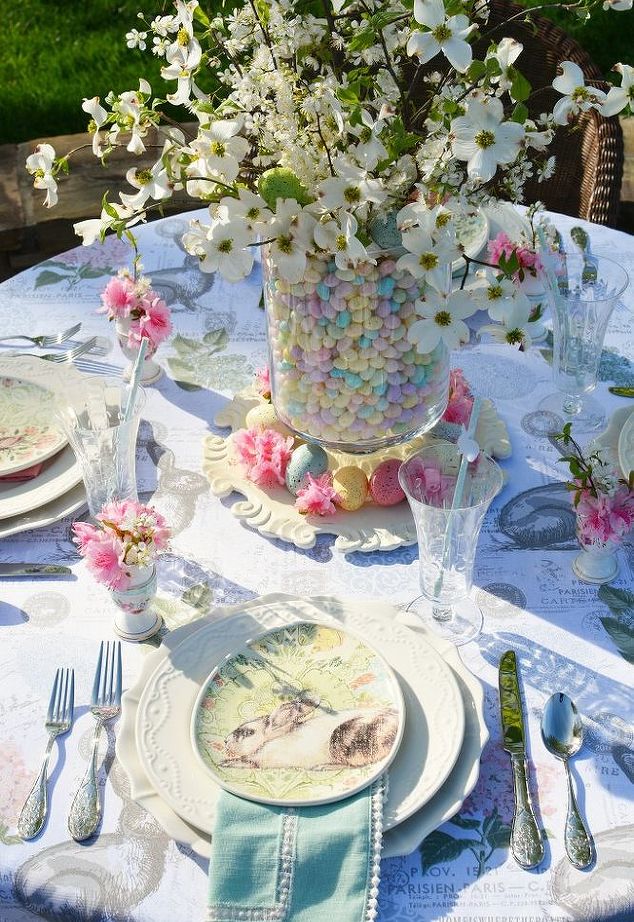 More photos and table details at the blog link below. Wishing you a Happy Easter! Suggested materials for this project: Small glass vase (had, Dollar Tree) Larger glass vase (had, Target) Jelly beans (Walmart) Dogwood and Plum Tree branches (yard) Faux Easter eggs (had, Michaels) https://homeiswheretheboatis.net/2017/04/14/alfresco-easter-table-blooming-branch-centerpiece/ |
| json metadata | {"tags":["easter","centerpiece","flowerarranging","diy","arts"],"image":["https://steemitimages.com/DQmQtGWPPgYF1DHLDnCLbRy9CDiM8Tc8pj4gFjEDZxfKKN2/create-a-blooming-branch-centerpiece-for-easter.jpg","https://steemitimages.com/DQmdfpzJ9e1aFkZgZnwymCxuFrcjygF2Tecu1kcaHjLwdP5/create-a-blooming-branch-centerpiece-for-easter2.jpg","https://steemitimages.com/DQmQDk71ZXjLo9JhXafyhrSendUSn5wQyGCGxRoyFgc1Y2R/create-a-blooming-branch-centerpiece-for-easter3.jpg","https://steemitimages.com/DQmWsAC23D3u7mviskmyiw23m7ZVFHxsGGh7SuNEvai7T68/create-a-blooming-branch-centerpiece-for-easter4.jpg","https://steemitimages.com/DQmTiuBA2qQRfHtdfQ8dXkQ9iypVNrY2HBf5zwGbT6X5NTQ/create-a-blooming-branch-centerpiece-for-easter5.jpg","https://steemitimages.com/DQmTTaEPK4nBhLBHcY8kwJA3mqsHCEYSJ1hFU2wKDprPNRH/create-a-blooming-branch-centerpiece-for-easter6.jpg","https://steemitimages.com/DQmTBHmm7FEuemoQpFEAY2fvYjYPKJwwJSzdSJ9rHk9Cmbo/create-a-blooming-branch-centerpiece-for-easter7.jpg"],"links":["https://homeiswheretheboatis.net/2017/04/14/alfresco-easter-table-blooming-branch-centerpiece/"],"app":"steemit/0.1","format":"markdown"} |
| Transaction Info | Block #20929660/Trx 975752d5d2c5ffb977899ef6522b2c6081b5c6cb |
View Raw JSON Data
{
"trx_id": "975752d5d2c5ffb977899ef6522b2c6081b5c6cb",
"block": 20929660,
"trx_in_block": 69,
"op_in_trx": 0,
"virtual_op": 0,
"timestamp": "2018-03-23T15:20:18",
"op": [
"comment",
{
"parent_author": "",
"parent_permlink": "easter",
"author": "diyhometalk",
"permlink": "create-a-blooming-branch-centerpiece-for-easter",
"title": "Create a Blooming Branch Centerpiece for Easter",
"body": "Make an easy centerpiece for your Easter table using blooming branches from your trees or shrubs!\nTime: 1 Hours\nCost: $10\nDifficulty: Easy\n\nI love to add a little bit of nature for a spring or Easter table. For an easy centerpiece, I filled a glass vase with jelly beans that look like speckled eggs.\n\nYou'll need two vases, one smaller vase to \"nest\" inside a larger vase and some candy. The candy will conceal your stems.\n\nCenter a smaller vase inside a larger vase and place your jelly beans or candy of your choice between the walls of your vases. Easter candy is already on sale or stock up at the dollar store to fill your vase. I saved my candy from last year’s centerpiece with tulips to use again this year.\n\nFill your inner vase with water and add some blooming branches. I used a combination of Dogwood and plum tree branches that were blooming. Depending on when Easter falls and where your live, use what's available that's in bloom. Forsythia branches or the pink blooms of a Redbud or Cherry tree would be beautiful in a vase as a centerpiece. If you don't have access to blooming branches, use faux floral branches.\n\nI added a few colored faux Easter eggs to tuck in among the branches and around the base of the centerpiece.\n\nI also like to save my egg shells as mini vases for the table for spring or Easter! Use the edge of a table knife to tap the egg to crack it near the small end of the egg, rotating it as you go until you’ve made a circle all the way around the egg. Carefully remove the circle of shell, including any lose or stray pieces of shell. Pour out your egg (for your recipe or breakfast) and rinse well. Place your egg shell vase in a decorative egg cup, adding water, then your flowers. I cut some azalea blooms from the shrubs and added some plum blossoms. \n\nMore photos and table details at the blog link below. Wishing you a Happy Easter!\n\nSuggested materials for this project:\n\n Small glass vase (had, Dollar Tree)\n Larger glass vase (had, Target)\n Jelly beans (Walmart)\n Dogwood and Plum Tree branches (yard)\n Faux Easter eggs (had, Michaels)\n\nhttps://homeiswheretheboatis.net/2017/04/14/alfresco-easter-table-blooming-branch-centerpiece/",
"json_metadata": "{\"tags\":[\"easter\",\"centerpiece\",\"flowerarranging\",\"diy\",\"arts\"],\"image\":[\"https://steemitimages.com/DQmQtGWPPgYF1DHLDnCLbRy9CDiM8Tc8pj4gFjEDZxfKKN2/create-a-blooming-branch-centerpiece-for-easter.jpg\",\"https://steemitimages.com/DQmdfpzJ9e1aFkZgZnwymCxuFrcjygF2Tecu1kcaHjLwdP5/create-a-blooming-branch-centerpiece-for-easter2.jpg\",\"https://steemitimages.com/DQmQDk71ZXjLo9JhXafyhrSendUSn5wQyGCGxRoyFgc1Y2R/create-a-blooming-branch-centerpiece-for-easter3.jpg\",\"https://steemitimages.com/DQmWsAC23D3u7mviskmyiw23m7ZVFHxsGGh7SuNEvai7T68/create-a-blooming-branch-centerpiece-for-easter4.jpg\",\"https://steemitimages.com/DQmTiuBA2qQRfHtdfQ8dXkQ9iypVNrY2HBf5zwGbT6X5NTQ/create-a-blooming-branch-centerpiece-for-easter5.jpg\",\"https://steemitimages.com/DQmTTaEPK4nBhLBHcY8kwJA3mqsHCEYSJ1hFU2wKDprPNRH/create-a-blooming-branch-centerpiece-for-easter6.jpg\",\"https://steemitimages.com/DQmTBHmm7FEuemoQpFEAY2fvYjYPKJwwJSzdSJ9rHk9Cmbo/create-a-blooming-branch-centerpiece-for-easter7.jpg\"],\"links\":[\"https://homeiswheretheboatis.net/2017/04/14/alfresco-easter-table-blooming-branch-centerpiece/\"],\"app\":\"steemit/0.1\",\"format\":\"markdown\"}"
}
]
}diyhometalkupvoted (100.00%) @diyhometalk / easter-tablescape2018/03/23 14:59:33
diyhometalkupvoted (100.00%) @diyhometalk / easter-tablescape
2018/03/23 14:59:33
| voter | diyhometalk |
| author | diyhometalk |
| permlink | easter-tablescape |
| weight | 10000 (100.00%) |
| Transaction Info | Block #20929245/Trx d3014c17859994737991fc75f3f84c9850bbafa9 |
View Raw JSON Data
{
  "trx_id": "d3014c17859994737991fc75f3f84c9850bbafa9",
  "block": 20929245,
  "trx_in_block": 34,
  "op_in_trx": 0,
  "virtual_op": 0,
  "timestamp": "2018-03-23T14:59:33",
  "op": [
    "vote",
    {
      "voter": "diyhometalk",
      "author": "diyhometalk",
      "permlink": "easter-tablescape",
      "weight": 10000
    }
  ]
}diyhometalkpublished a new post: easter-tablescape2018/03/23 14:59:33
diyhometalkpublished a new post: easter-tablescape
2018/03/23 14:59:33
| parent author | |
| parent permlink | easter |
| author | diyhometalk |
| permlink | easter-tablescape |
| title | Easter Tablescape |
| body | Hi friends! Some super talented blogger friends and I participated in a fun and inspirational Easter Tablescape Blog Hop recently and I wanted to share my Easter table decor with you! For all of the details head over to the blog at https://statelyhomelane.com! Time: 1 Hours Cost: $30 Difficulty: Easy  I began my tablescape by creating these lovely centerpieces (3 total) from glass vases and faux Easter eggs and flowers. Using glass vases that I had on hand I filled them halfway with these pretty faux Easter eggs and topped each vase off with a bundle of faux geraniums!  I then added my filler decor! Touches of whimsy were brought in with this pretty rabbit ear dish and 2 concrete bunnies that I picked up at target. I also used 3 chunky pillar candle holders topped with an LED candle. The table looks absolutely stunning at night with the candles on!  My favorite part of this fun tablescape was the addition of these beautiful salad plates in varying pastel colors as a base for a pretty egg votive holder and topped with a faux Easter egg!  This was such a fun project for me! I absolutely love the Easter holiday and setting this beautiful tablescape was such a treat! I hope you'll hop over to the blog and check out this post for the full details and sources! Happy Easter friends! Suggested materials for this project: Pastel salad plates Glass centerpieces To see more:https://statelyhomelane.com/spring-into-an-easter-table-blog-hop/ |
| json metadata | {"tags":["easter","eastertable","holidaydecor","homedecor","tablescapes"],"image":["https://steemitimages.com/DQmcVBt3UyHXzopfzSKTc9jvvnRP9MwDit3kjESbDuA9Vyo/easter-tablescape.jpg","https://steemitimages.com/DQmcfoMXMpMEou5M2aor5EA7YKeqiDZXBct8qkka9AVGhdr/easter-tablescape2.jpg","https://steemitimages.com/DQmX2e4V1hUShUwNEMF9L7KrR32Twp7BQAq3CmhiMDaqbp8/easter-tablescape3.jpg","https://steemitimages.com/DQmaGJMCXXSpQEvHAbPfcUbCZztX1GrtkjSbqE7drVhyhtm/easter-tablescape4.jpg"],"links":["https://statelyhomelane.com","https://statelyhomelane.com/spring-into-an-easter-table-blog-hop/"],"app":"steemit/0.1","format":"markdown"} |
| Transaction Info | Block #20929245/Trx d3014c17859994737991fc75f3f84c9850bbafa9 |
View Raw JSON Data
{
"trx_id": "d3014c17859994737991fc75f3f84c9850bbafa9",
"block": 20929245,
"trx_in_block": 34,
"op_in_trx": 0,
"virtual_op": 0,
"timestamp": "2018-03-23T14:59:33",
"op": [
"comment",
{
"parent_author": "",
"parent_permlink": "easter",
"author": "diyhometalk",
"permlink": "easter-tablescape",
"title": "Easter Tablescape",
"body": "Hi friends! Some super talented blogger friends and I participated in a fun and inspirational Easter Tablescape Blog Hop recently and I wanted to share my Easter table decor with you! For all of the details head over to the blog at https://statelyhomelane.com!\n\nTime: 1 Hours\nCost: $30\nDifficulty: Easy\n\nI began my tablescape by creating these lovely centerpieces (3 total) from glass vases and faux Easter eggs and flowers. Using glass vases that I had on hand I filled them halfway with these pretty faux Easter eggs and topped each vase off with a bundle of faux geraniums! \n\nI then added my filler decor! Touches of whimsy were brought in with this pretty rabbit ear dish and 2 concrete bunnies that I picked up at target. I also used 3 chunky pillar candle holders topped with an LED candle. The table looks absolutely stunning at night with the candles on!\n\nMy favorite part of this fun tablescape was the addition of these beautiful salad plates in varying pastel colors as a base for a pretty egg votive holder and topped with a faux Easter egg!\n\nThis was such a fun project for me! I absolutely love the Easter holiday and setting this beautiful tablescape was such a treat! I hope you'll hop over to the blog and check out this post for the full details and sources! Happy Easter friends!\nSuggested materials for this project:\n\n Pastel salad plates\n Glass centerpieces\n\nTo see more:https://statelyhomelane.com/spring-into-an-easter-table-blog-hop/",
"json_metadata": "{\"tags\":[\"easter\",\"eastertable\",\"holidaydecor\",\"homedecor\",\"tablescapes\"],\"image\":[\"https://steemitimages.com/DQmcVBt3UyHXzopfzSKTc9jvvnRP9MwDit3kjESbDuA9Vyo/easter-tablescape.jpg\",\"https://steemitimages.com/DQmcfoMXMpMEou5M2aor5EA7YKeqiDZXBct8qkka9AVGhdr/easter-tablescape2.jpg\",\"https://steemitimages.com/DQmX2e4V1hUShUwNEMF9L7KrR32Twp7BQAq3CmhiMDaqbp8/easter-tablescape3.jpg\",\"https://steemitimages.com/DQmaGJMCXXSpQEvHAbPfcUbCZztX1GrtkjSbqE7drVhyhtm/easter-tablescape4.jpg\"],\"links\":[\"https://statelyhomelane.com\",\"https://statelyhomelane.com/spring-into-an-easter-table-blog-hop/\"],\"app\":\"steemit/0.1\",\"format\":\"markdown\"}"
}
]
}thetroublenotesupvoted (5.00%) @diyhometalk / mini-bathroom-makeover2018/03/22 13:52:18
thetroublenotesupvoted (5.00%) @diyhometalk / mini-bathroom-makeover
2018/03/22 13:52:18
| voter | thetroublenotes |
| author | diyhometalk |
| permlink | mini-bathroom-makeover |
| weight | 500 (5.00%) |
| Transaction Info | Block #20899454/Trx 2a5be5e2f21aa3e43baf9addd820fe18ba0fb57b |
View Raw JSON Data
{
  "trx_id": "2a5be5e2f21aa3e43baf9addd820fe18ba0fb57b",
  "block": 20899454,
  "trx_in_block": 19,
  "op_in_trx": 0,
  "virtual_op": 0,
  "timestamp": "2018-03-22T13:52:18",
  "op": [
    "vote",
    {
      "voter": "thetroublenotes",
      "author": "diyhometalk",
      "permlink": "mini-bathroom-makeover",
      "weight": 500
    }
  ]
}diyhometalkupvoted (100.00%) @diyhometalk / mini-bathroom-makeover2018/03/22 13:31:15
diyhometalkupvoted (100.00%) @diyhometalk / mini-bathroom-makeover
2018/03/22 13:31:15
| voter | diyhometalk |
| author | diyhometalk |
| permlink | mini-bathroom-makeover |
| weight | 10000 (100.00%) |
| Transaction Info | Block #20899033/Trx 97dd7c129ad9b3b56cdf97b8699602c898454194 |
View Raw JSON Data
{
  "trx_id": "97dd7c129ad9b3b56cdf97b8699602c898454194",
  "block": 20899033,
  "trx_in_block": 52,
  "op_in_trx": 0,
  "virtual_op": 0,
  "timestamp": "2018-03-22T13:31:15",
  "op": [
    "vote",
    {
      "voter": "diyhometalk",
      "author": "diyhometalk",
      "permlink": "mini-bathroom-makeover",
      "weight": 10000
    }
  ]
}diyhometalkpublished a new post: mini-bathroom-makeover2018/03/22 13:31:15
diyhometalkpublished a new post: mini-bathroom-makeover
2018/03/22 13:31:15
| parent author | |
| parent permlink | shelves |
| author | diyhometalk |
| permlink | mini-bathroom-makeover |
| title | Mini Bathroom Makeover |
| body | When I moved into my house my guest bathroom had these existing shelves that I never liked. I'm finally taking these things out & replacing them with something more functional. Both of our bathrooms are just tiny & we just needed more clearance & functionality. This redo will finally give us something we can use & it will fit the style of the room. Our bathroom is sugar skulls, so that will give set the stage for you. Time: 2 Days Cost: $25 Difficulty: Medium  Here is how the bathroom looked originally(nothing on the shelves obviously-LOL)! You can see how far the bar sticks out. We & guests constantly ran into that silly thing! I'm also not a fan of glass shelves, just a hazard & shows dust non stop!  So I went to Goodwill & found this awesome raw wood shelf. I found the brackets at Lowe's.  I found a simple towel bar also at Lowe's.  I also found this shelf at Goodwill. Gotta love cheap stuff! 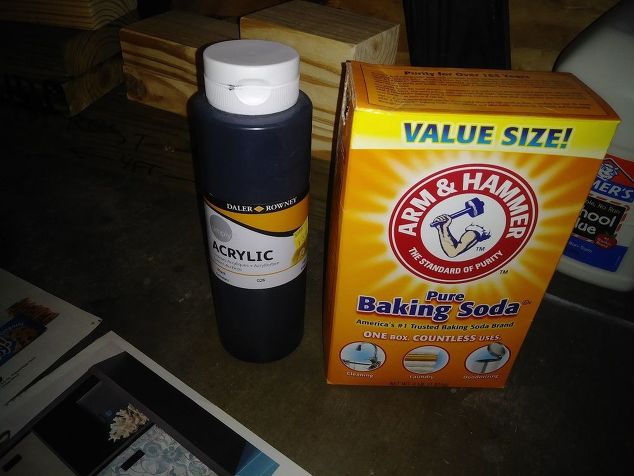 I made my own chalk paint with this acrylic paint I got on clearance at target for less than $2! 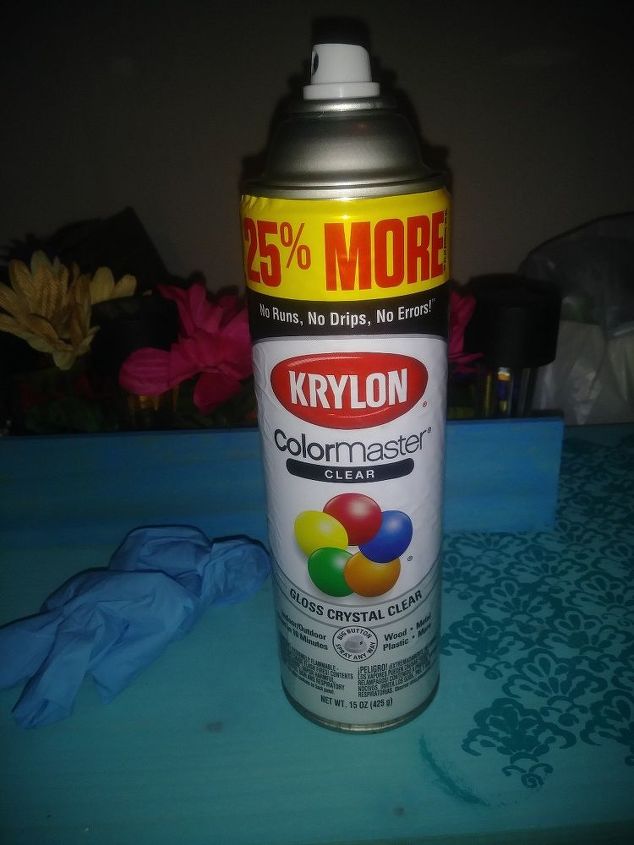 I clear coated everything with Krylon after another fun step. 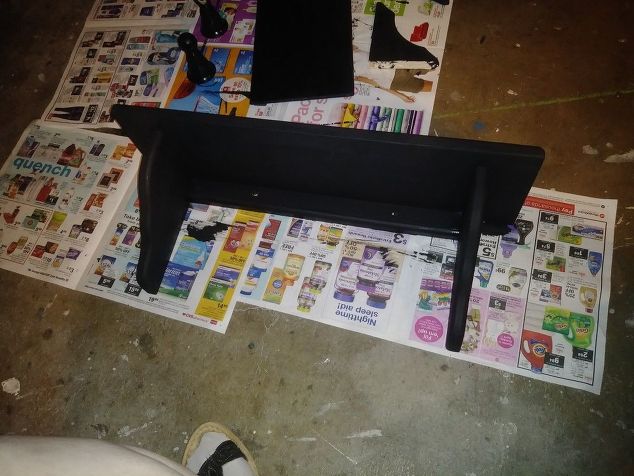 Here is after chalk painting. 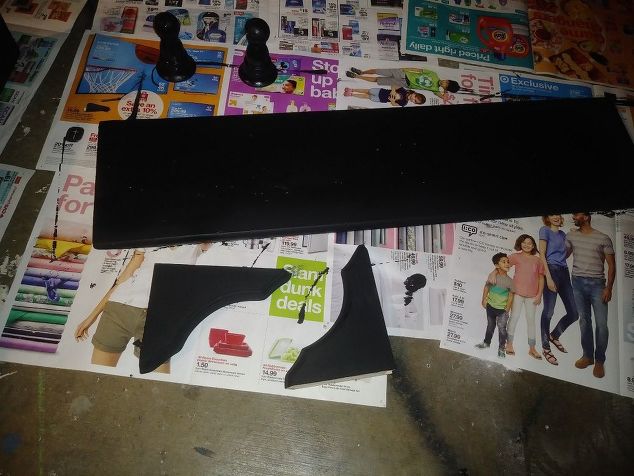 My other pieces.  I bet you were wondering how I successfully painted the bar. I have a drying rack- I just hung that sucker up by one end- since it will be hidden inside anyway!  Since I have limited photos I can't show all my steps. As previously stated- my bathroom is sugar skulls. So i decided to decorate these shelves. I had a sugar skulls coloring book on hand & colored 2 awesome pix(if i do say so myself- lol). I used this longhorn for the underside of the higher shelf- since the top won't be seen, but the bottom would be. I used another you'll see in the later photos on the top of the shelf. I mod podged them into place. I had some sugar skull & other skull stickers that I added to the shelf brackets, inside & outside, so you'll be able to see them, also covered in modge podge. Everything as clear coated after it was all dried for 24 hours.  Here is all is hung up.  Here is the other shelf with the coloring page I chose. 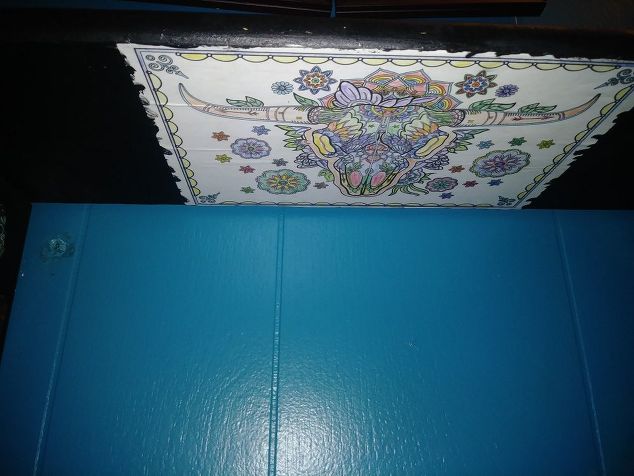 Here is the underneath of the higher shelf. 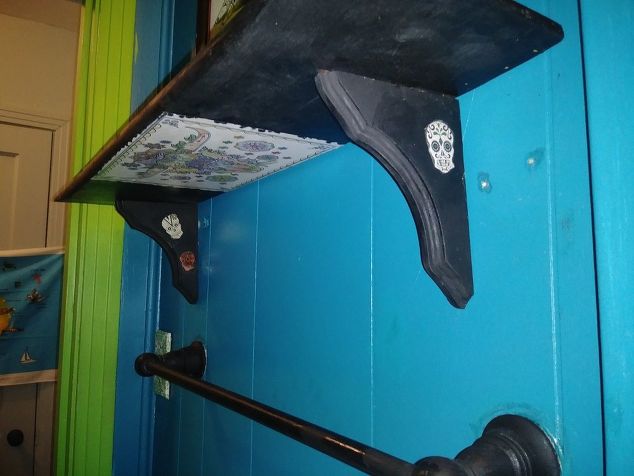 Here you can see the stickers on the brackets. 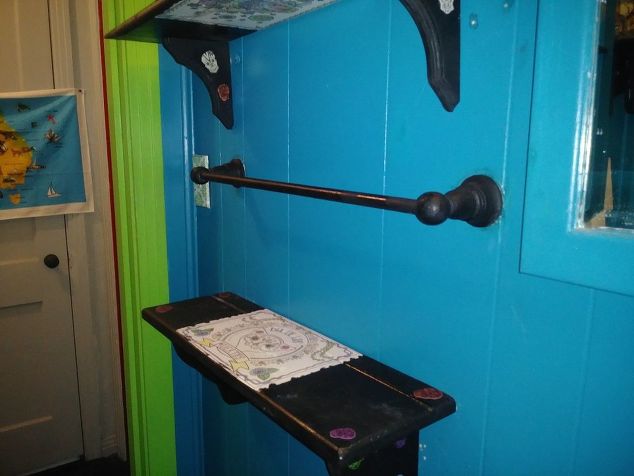 Here is another view of the finished project. I still need to touch up some old holes in the wall & match some paint. But other than that, I think it looks pretty awesome! Suggested materials for this project: Shelves Brackets Acrylic paint Krylon clear spray paint Towel bar Modge Podge Sugar skull coloring book Sugar skull stickers Baking soda |
| json metadata | {"tags":["shelves","bathroom","diy","makeover","artscrafts"],"image":["https://steemitimages.com/DQmdDYv1rn6pFDS2TRumVw17nfbN69fCbRcyFsLfiGb93bp/mini-bathroom-makeover.jpg","https://steemitimages.com/DQmSj7topf9Ga3USLuZg2U7gJbkvndpthpuWNMfgdCPtGvx/mini-bathroom-makeover2.jpg","https://steemitimages.com/DQmaCuyRAYw4RuiZc6HNsLjQkjXjhAmmFYutGnxWgMQVMhf/mini-bathroom-makeover3.jpg","https://steemitimages.com/DQmWN9Sc8dq3NB6MvXTepHcWPASNMQh6Ae2sHZbjXWYxF27/mini-bathroom-makeover4.jpg","https://steemitimages.com/DQmaBZ99CkExorpUvWz4jfu9VPSrpPRG4Qy7WGmsfrAbgTL/mini-bathroom-makeover5.jpg","https://steemitimages.com/DQmZ4f4XTYXi64y8jL6eJb96pF6xu7RUqZpwsmiZLxWZajh/mini-bathroom-makeover6.jpg","https://steemitimages.com/DQmWhVBYc96STvqQDgqh2UV3zaomdm6JHAjFpfczZZztnFx/mini-bathroom-makeover7.jpg","https://steemitimages.com/DQmZKMnymimQLW68yACnxi9qQ4Tw9u6gs9dWDkbWBRWcySi/mini-bathroom-makeover8.jpg","https://steemitimages.com/DQmQx1dabp5C1v3LAEGWuzc6uVoK7AdqJMjcSPeJusFsJyC/mini-bathroom-makeover9.jpg","https://steemitimages.com/DQmZqeVXZu9Si1N7FGEriUzJM4Gr92zukFnG62MPYkNkP6Z/mini-bathroom-makeover10.jpg","https://steemitimages.com/DQmejHe6mmQfP6L4GmuR7vhCqwx8q69UNavH1y62QpW6PTa/mini-bathroom-makeover11.jpg","https://steemitimages.com/DQmQ1J7vaVdihG3f43wAeQEr7DY7wb356hZ1xu16p9pJB7z/mini-bathroom-makeover12.jpg","https://steemitimages.com/DQmakHZEMwr4tD31i32eRotuxPLfy5WW5KN6irLy8WBDbzB/mini-bathroom-makeover13.jpg","https://steemitimages.com/DQmUoJN9U63VTRRqd1bt6DCcma67W8DNNDmqoAkBCNwjpPu/mini-bathroom-makeover14.jpg","https://steemitimages.com/DQmRr61KkaMcJGf1nSV123aY3UfsWLhADs9NB7e7FmSBGAR/mini-bathroom-makeover15.jpg"],"app":"steemit/0.1","format":"markdown"} |
| Transaction Info | Block #20899033/Trx 97dd7c129ad9b3b56cdf97b8699602c898454194 |
View Raw JSON Data
{
"trx_id": "97dd7c129ad9b3b56cdf97b8699602c898454194",
"block": 20899033,
"trx_in_block": 52,
"op_in_trx": 0,
"virtual_op": 0,
"timestamp": "2018-03-22T13:31:15",
"op": [
"comment",
{
"parent_author": "",
"parent_permlink": "shelves",
"author": "diyhometalk",
"permlink": "mini-bathroom-makeover",
"title": "Mini Bathroom Makeover",
"body": "When I moved into my house my guest bathroom had these existing shelves that I never liked. I'm finally taking these things out & replacing them with something more functional. Both of our bathrooms are just tiny & we just needed more clearance & functionality. This redo will finally give us something we can use & it will fit the style of the room. Our bathroom is sugar skulls, so that will give set the stage for you.\nTime: 2 Days\nCost: $25\nDifficulty: Medium\n\nHere is how the bathroom looked originally(nothing on the shelves obviously-LOL)! You can see how far the bar sticks out. We & guests constantly ran into that silly thing! I'm also not a fan of glass shelves, just a hazard & shows dust non stop!\n\nSo I went to Goodwill & found this awesome raw wood shelf. I found the brackets at Lowe's.\n\nI found a simple towel bar also at Lowe's.\n\nI also found this shelf at Goodwill. Gotta love cheap stuff!\n\nI made my own chalk paint with this acrylic paint I got on clearance at target for less than $2!\n\nI clear coated everything with Krylon after another fun step.\n\nHere is after chalk painting.\n\nMy other pieces.\n\nI bet you were wondering how I successfully painted the bar. I have a drying rack- I just hung that sucker up by one end- since it will be hidden inside anyway!\n\nSince I have limited photos I can't show all my steps. As previously stated- my bathroom is sugar skulls. So i decided to decorate these shelves. I had a sugar skulls coloring book on hand & colored 2 awesome pix(if i do say so myself- lol). I used this longhorn for the underside of the higher shelf- since the top won't be seen, but the bottom would be. I used another you'll see in the later photos on the top of the shelf. I mod podged them into place. I had some sugar skull & other skull stickers that I added to the shelf brackets, inside & outside, so you'll be able to see them, also covered in modge podge. Everything as clear coated after it was all dried for 24 hours. \n\nHere is all is hung up.\n\nHere is the other shelf with the coloring page I chose.\n\nHere is the underneath of the higher shelf.\n\nHere you can see the stickers on the brackets.\n\nHere is another view of the finished project. I still need to touch up some old holes in the wall & match some paint. But other than that, I think it looks pretty awesome!\nSuggested materials for this project:\n\nShelves\nBrackets\nAcrylic paint\nKrylon clear spray paint\nTowel bar\nModge Podge\nSugar skull coloring book\nSugar skull stickers\nBaking soda",
"json_metadata": "{\"tags\":[\"shelves\",\"bathroom\",\"diy\",\"makeover\",\"artscrafts\"],\"image\":[\"https://steemitimages.com/DQmdDYv1rn6pFDS2TRumVw17nfbN69fCbRcyFsLfiGb93bp/mini-bathroom-makeover.jpg\",\"https://steemitimages.com/DQmSj7topf9Ga3USLuZg2U7gJbkvndpthpuWNMfgdCPtGvx/mini-bathroom-makeover2.jpg\",\"https://steemitimages.com/DQmaCuyRAYw4RuiZc6HNsLjQkjXjhAmmFYutGnxWgMQVMhf/mini-bathroom-makeover3.jpg\",\"https://steemitimages.com/DQmWN9Sc8dq3NB6MvXTepHcWPASNMQh6Ae2sHZbjXWYxF27/mini-bathroom-makeover4.jpg\",\"https://steemitimages.com/DQmaBZ99CkExorpUvWz4jfu9VPSrpPRG4Qy7WGmsfrAbgTL/mini-bathroom-makeover5.jpg\",\"https://steemitimages.com/DQmZ4f4XTYXi64y8jL6eJb96pF6xu7RUqZpwsmiZLxWZajh/mini-bathroom-makeover6.jpg\",\"https://steemitimages.com/DQmWhVBYc96STvqQDgqh2UV3zaomdm6JHAjFpfczZZztnFx/mini-bathroom-makeover7.jpg\",\"https://steemitimages.com/DQmZKMnymimQLW68yACnxi9qQ4Tw9u6gs9dWDkbWBRWcySi/mini-bathroom-makeover8.jpg\",\"https://steemitimages.com/DQmQx1dabp5C1v3LAEGWuzc6uVoK7AdqJMjcSPeJusFsJyC/mini-bathroom-makeover9.jpg\",\"https://steemitimages.com/DQmZqeVXZu9Si1N7FGEriUzJM4Gr92zukFnG62MPYkNkP6Z/mini-bathroom-makeover10.jpg\",\"https://steemitimages.com/DQmejHe6mmQfP6L4GmuR7vhCqwx8q69UNavH1y62QpW6PTa/mini-bathroom-makeover11.jpg\",\"https://steemitimages.com/DQmQ1J7vaVdihG3f43wAeQEr7DY7wb356hZ1xu16p9pJB7z/mini-bathroom-makeover12.jpg\",\"https://steemitimages.com/DQmakHZEMwr4tD31i32eRotuxPLfy5WW5KN6irLy8WBDbzB/mini-bathroom-makeover13.jpg\",\"https://steemitimages.com/DQmUoJN9U63VTRRqd1bt6DCcma67W8DNNDmqoAkBCNwjpPu/mini-bathroom-makeover14.jpg\",\"https://steemitimages.com/DQmRr61KkaMcJGf1nSV123aY3UfsWLhADs9NB7e7FmSBGAR/mini-bathroom-makeover15.jpg\"],\"app\":\"steemit/0.1\",\"format\":\"markdown\"}"
}
]
}diyhometalkclaimed reward balance: 0.002 STEEM, 0.061 SBD, 0.044 SP2018/03/22 13:14:30
diyhometalkclaimed reward balance: 0.002 STEEM, 0.061 SBD, 0.044 SP
2018/03/22 13:14:30
| account | diyhometalk |
| reward steem | 0.002 STEEM |
| reward sbd | 0.061 SBD |
| reward vests | 71.434843 VESTS |
| Transaction Info | Block #20898698/Trx b0d64fea88a2764bc7f5d2f0bcc91833d1619811 |
View Raw JSON Data
{
  "trx_id": "b0d64fea88a2764bc7f5d2f0bcc91833d1619811",
  "block": 20898698,
  "trx_in_block": 13,
  "op_in_trx": 0,
  "virtual_op": 0,
  "timestamp": "2018-03-22T13:14:30",
  "op": [
    "claim_reward_balance",
    {
      "account": "diyhometalk",
      "reward_steem": "0.002 STEEM",
      "reward_sbd": "0.061 SBD",
      "reward_vests": "71.434843 VESTS"
    }
  ]
}diyhometalkreceived 0.002 STEEM, 0.061 SBD, 0.044 SP author reward for @diyhometalk / easter-bunny-banner2018/03/20 03:11:36
diyhometalkreceived 0.002 STEEM, 0.061 SBD, 0.044 SP author reward for @diyhometalk / easter-bunny-banner
2018/03/20 03:11:36
| author | diyhometalk |
| permlink | easter-bunny-banner |
| sbd payout | 0.061 SBD |
| steem payout | 0.002 STEEM |
| vesting payout | 71.434843 VESTS |
| Transaction Info | Block #20829512/Virtual Operation #13 |
View Raw JSON Data
{
  "trx_id": "0000000000000000000000000000000000000000",
  "block": 20829512,
  "trx_in_block": 4294967295,
  "op_in_trx": 0,
  "virtual_op": 13,
  "timestamp": "2018-03-20T03:11:36",
  "op": [
    "author_reward",
    {
      "author": "diyhometalk",
      "permlink": "easter-bunny-banner",
      "sbd_payout": "0.061 SBD",
      "steem_payout": "0.002 STEEM",
      "vesting_payout": "71.434843 VESTS"
    }
  ]
}steemdelegated 14.475 SP to @diyhometalk2018/03/20 03:01:24
steemdelegated 14.475 SP to @diyhometalk
2018/03/20 03:01:24
| delegator | steem |
| delegatee | diyhometalk |
| vesting shares | 23542.907786 VESTS |
| Transaction Info | Block #20829309/Trx 4716a07aa88dfe3100a526bd687b84e1f5957397 |
View Raw JSON Data
{
  "trx_id": "4716a07aa88dfe3100a526bd687b84e1f5957397",
  "block": 20829309,
  "trx_in_block": 29,
  "op_in_trx": 0,
  "virtual_op": 0,
  "timestamp": "2018-03-20T03:01:24",
  "op": [
    "delegate_vesting_shares",
    {
      "delegator": "steem",
      "delegatee": "diyhometalk",
      "vesting_shares": "23542.907786 VESTS"
    }
  ]
}2018/03/20 02:43:42
2018/03/20 02:43:42
| parent author | diyhometalk |
| parent permlink | easy-diy-stitched-paper-wine-charms |
| author | cheetah |
| permlink | cheetah-re-diyhometalkeasy-diy-stitched-paper-wine-charms |
| title | |
| body | Hi! I am a robot. I just upvoted you! I found similar content that readers might be interested in: http://design-fixation.com/2018/03/diy-stitched-paper-wine-charms.html |
| json metadata | |
| Transaction Info | Block #20828955/Trx c63bf492495576aa42a567b80992b4b93f32beba |
View Raw JSON Data
{
  "trx_id": "c63bf492495576aa42a567b80992b4b93f32beba",
  "block": 20828955,
  "trx_in_block": 38,
  "op_in_trx": 0,
  "virtual_op": 0,
  "timestamp": "2018-03-20T02:43:42",
  "op": [
    "comment",
    {
      "parent_author": "diyhometalk",
      "parent_permlink": "easy-diy-stitched-paper-wine-charms",
      "author": "cheetah",
      "permlink": "cheetah-re-diyhometalkeasy-diy-stitched-paper-wine-charms",
      "title": "",
      "body": "Hi! I am a robot. I just upvoted you! I found similar content that readers might be interested in:\nhttp://design-fixation.com/2018/03/diy-stitched-paper-wine-charms.html",
      "json_metadata": ""
    }
  ]
}cheetahupvoted (0.08%) @diyhometalk / easy-diy-stitched-paper-wine-charms2018/03/20 02:43:33
cheetahupvoted (0.08%) @diyhometalk / easy-diy-stitched-paper-wine-charms
2018/03/20 02:43:33
| voter | cheetah |
| author | diyhometalk |
| permlink | easy-diy-stitched-paper-wine-charms |
| weight | 8 (0.08%) |
| Transaction Info | Block #20828952/Trx 07149313135325d965334b527d8b732e352cf936 |
View Raw JSON Data
{
  "trx_id": "07149313135325d965334b527d8b732e352cf936",
  "block": 20828952,
  "trx_in_block": 22,
  "op_in_trx": 0,
  "virtual_op": 0,
  "timestamp": "2018-03-20T02:43:33",
  "op": [
    "vote",
    {
      "voter": "cheetah",
      "author": "diyhometalk",
      "permlink": "easy-diy-stitched-paper-wine-charms",
      "weight": 8
    }
  ]
}Manabar
Voting Power100.00%
Downvote Power100.00%
Resource Credits100.00%
Reputation Progress20.59%
{
  "voting_manabar": {
    "current_mana": "9400033769",
    "last_update_time": 1695330018
  },
  "downvote_manabar": {
    "current_mana": 2350008442,
    "last_update_time": 1695330018
  },
  "rc_account": {
    "account": "diyhometalk",
    "rc_manabar": {
      "current_mana": "11625368335",
      "last_update_time": 1695330018
    },
    "max_rc_creation_adjustment": {
      "amount": "2020748973",
      "precision": 6,
      "nai": "@@000000037"
    },
    "max_rc": "11420782742"
  }
}
Account Metadata
| POSTING JSON METADATA | |
| profile | {"name":"DIY Hometalk","about":"We are creators and you are, too. Join our community of 8 million DIYers and create the home you love.","location":"USA","website":"http://diyhometalk.com/","profile_image":"https://instagram.fisb5-1.fna.fbcdn.net/t51.2885-19/s150x150/24332125_507675762923335_5738292606303993856_n.jpg","cover_image":"https://www.instagram.com/p/BeUkjizFCl2"} |
| JSON METADATA | |
| profile | {"name":"DIY Hometalk","about":"We are creators and you are, too. Join our community of 8 million DIYers and create the home you love.","location":"USA","website":"http://diyhometalk.com/","profile_image":"https://instagram.fisb5-1.fna.fbcdn.net/t51.2885-19/s150x150/24332125_507675762923335_5738292606303993856_n.jpg","cover_image":"https://www.instagram.com/p/BeUkjizFCl2"} |
{
  "posting_json_metadata": {
    "profile": {
      "name": "DIY Hometalk",
      "about": "We are creators and you are, too. Join our community of 8 million DIYers and create the home you love.",
      "location": "USA",
      "website": "http://diyhometalk.com/",
      "profile_image": "https://instagram.fisb5-1.fna.fbcdn.net/t51.2885-19/s150x150/24332125_507675762923335_5738292606303993856_n.jpg",
      "cover_image": "https://www.instagram.com/p/BeUkjizFCl2"
    }
  },
  "json_metadata": {
    "profile": {
      "name": "DIY Hometalk",
      "about": "We are creators and you are, too. Join our community of 8 million DIYers and create the home you love.",
      "location": "USA",
      "website": "http://diyhometalk.com/",
      "profile_image": "https://instagram.fisb5-1.fna.fbcdn.net/t51.2885-19/s150x150/24332125_507675762923335_5738292606303993856_n.jpg",
      "cover_image": "https://www.instagram.com/p/BeUkjizFCl2"
    }
  }
}
Auth Keys
Owner
Single Signature
Public Keys
STM5o7oHDpND6T7yNYrRaxZ638JdeTQe7udzmDvg3vn84f48U9wPm1/1
Active
Single Signature
Public Keys
STM7cWkRnxLdLAPYKN6e9Wfd4doagsuWRsME9u8A7wiAU3sNRvve61/1
Posting
Single Signature
Public Keys
STM5MTTPuWKqA6xCVZaLdCrs6azT8e8Pb8ecRdbNJQQjxkkj6w8GY1/1
App Permissions
@dtube.app1/1
Memo
STM8EfdzD6e2U52nvDJBDZ96ERt2yF1YADxy9VBQdp5Q75SF1zM1q
{
  "owner": {
    "weight_threshold": 1,
    "account_auths": [],
    "key_auths": [
      [
        "STM5o7oHDpND6T7yNYrRaxZ638JdeTQe7udzmDvg3vn84f48U9wPm",
        1
      ]
    ]
  },
  "active": {
    "weight_threshold": 1,
    "account_auths": [],
    "key_auths": [
      [
        "STM7cWkRnxLdLAPYKN6e9Wfd4doagsuWRsME9u8A7wiAU3sNRvve6",
        1
      ]
    ]
  },
  "posting": {
    "weight_threshold": 1,
    "account_auths": [
      [
        "dtube.app",
        1
      ]
    ],
    "key_auths": [
      [
        "STM5MTTPuWKqA6xCVZaLdCrs6azT8e8Pb8ecRdbNJQQjxkkj6w8GY",
        1
      ]
    ]
  },
  "memo": "STM8EfdzD6e2U52nvDJBDZ96ERt2yF1YADxy9VBQdp5Q75SF1zM1q"
}
Witness Votes
0 / 30
No active witness votes.
[]